
Owner's Manual
Page 2
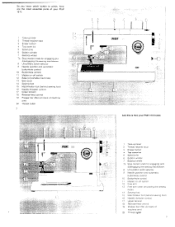
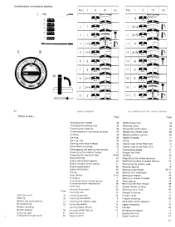
... parts of machine arm) 20 Thread cutler 3 So you know which button to press. up cover lid 5 Spout pins 6 Bobbin winder 7 Balance wheel 7a Stop motion knob for engaging and disengaging the sewing mechanism 8 Ultra-Matic stitch selector 9 Needle position and automatic buttonhole control 10 Buttonhole control 11 Master on-off switch 12 Free arm 13 Free arm cover (enclosing the sewing hook) 14 Sewing foot 15 Matchmaker foot (behind sewing foot) 16 Needle threader control 17 Upper tension 18 Reverse-feed control 19 Presser bar lifter (on back of machine arm) 20 Thread cutter...
... parts of machine arm) 20 Thread cutler 3 So you know which button to press. up cover lid 5 Spout pins 6 Bobbin winder 7 Balance wheel 7a Stop motion knob for engaging and disengaging the sewing mechanism 8 Ultra-Matic stitch selector 9 Needle position and automatic buttonhole control 10 Buttonhole control 11 Master on-off switch 12 Free arm 13 Free arm cover (enclosing the sewing hook) 14 Sewing foot 15 Matchmaker foot (behind sewing foot) 16 Needle threader control 17 Upper tension 18 Reverse-feed control 19 Presser bar lifter (on back of machine arm) 20 Thread cutter...

Owner's Manual
Page 3
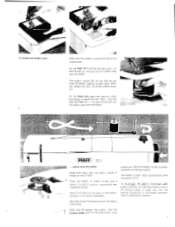
... master plug into socket A in a convenient position. This button also switches on the glare-free sewing light. 4 Before you start sewing right away ... Place the foot control under the table in the machine base. Ail you need two threads to sew a seam: an upper and a lower thread. if your machine. For detailed instructions on bobbin winding see page 7. er 7 ..... These two threads are necessary. Make sure the sewing mechanism is plugged in this way is...
... master plug into socket A in a convenient position. This button also switches on the glare-free sewing light. 4 Before you start sewing right away ... Place the foot control under the table in the machine base. Ail you need two threads to sew a seam: an upper and a lower thread. if your machine. For detailed instructions on bobbin winding see page 7. er 7 ..... These two threads are necessary. Make sure the sewing mechanism is plugged in this way is...
Owner's Manual
Page 4
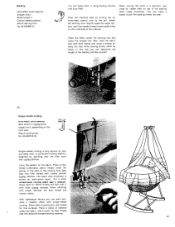
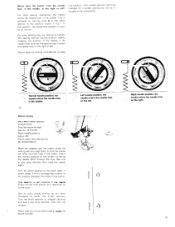
... . Start the bobbin winder by its open the free-arm cover and swing It toward you . The bobbin winder stops automatically when the bobbin is re-engaged automatically on the foot control. To remove the bobbin case ... 6 Make sure the needle is positioned above illustration. On the Pfaff 1211 remove the bed cover. Wind the thread clockwise around the bobbin a few times. To re-engage the sewing mechanism after bobbin winding, turn the stop motion knob in the above the needle plate. Push lever E against...
... . Start the bobbin winder by its open the free-arm cover and swing It toward you . The bobbin winder stops automatically when the bobbin is re-engaged automatically on the foot control. To remove the bobbin case ... 6 Make sure the needle is positioned above illustration. On the Pfaff 1211 remove the bed cover. Wind the thread clockwise around the bobbin a few times. To re-engage the sewing mechanism after bobbin winding, turn the stop motion knob in the above the needle plate. Push lever E against...

Owner's Manual
Page 5
... into the bobbin case, making sure its slot (see arrow) points upwards. As you hear it will go and push the bobbin case onto center stud S, making sure the thread end drops from the bobbin case. 2 3 8 ... and to replace the bobbin case in the machine Lift latch K as far as indicated by an arrow). Fig.2: Pull the thread into the bobbin case ... Fig.11 Insert the fitted bobbin into...
... into the bobbin case, making sure its slot (see arrow) points upwards. As you hear it will go and push the bobbin case onto center stud S, making sure the thread end drops from the bobbin case. 2 3 8 ... and to replace the bobbin case in the machine Lift latch K as far as indicated by an arrow). Fig.2: Pull the thread into the bobbin case ... Fig.11 Insert the fitted bobbin into...

Owner's Manual
Page 7
... sewing foot. To prepare your Pfaff. • Touch "on-off" button 1 to draw the bobbin thread up through the needle hole in its hori- Place the threads over the thread cutter and pull them downwards to its lowest position... zontal position and must show the fl forward-reverse sewing symbol on 1* its top surface. • For straight and zigzag sewing, the functional-stitch mechanism must be disengaged. Lightly pull the needle thread...
... sewing foot. To prepare your Pfaff. • Touch "on-off" button 1 to draw the bobbin thread up through the needle hole in its hori- Place the threads over the thread cutter and pull them downwards to its lowest position... zontal position and must show the fl forward-reverse sewing symbol on 1* its top surface. • For straight and zigzag sewing, the functional-stitch mechanism must be disengaged. Lightly pull the needle thread...

Owner's Manual
Page 8
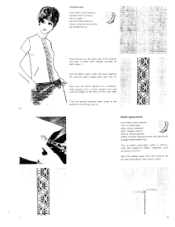
White Mark Elastic zigzag seam .7 3 O .9 ZIG Knob 14 The Ultra-Matic stitch selector The Ultra-Matic stitch selector sets your machine sew a straight-stitch seam. For instance, the range from 0 to 4 comprises straight stitches of your machine. Start by numbers. In the illustration on this page the stitch selector is shown set for sewing straight stitches about 2 mm long (about 12 stitches per inch). the illustration on the left ). The harder you turn the...
White Mark Elastic zigzag seam .7 3 O .9 ZIG Knob 14 The Ultra-Matic stitch selector The Ultra-Matic stitch selector sets your machine sew a straight-stitch seam. For instance, the range from 0 to 4 comprises straight stitches of your machine. Start by numbers. In the illustration on this page the stitch selector is shown set for sewing straight stitches about 2 mm long (about 12 stitches per inch). the illustration on the left ). The harder you turn the...

Owner's Manual
Page 11
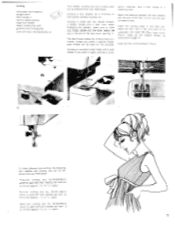
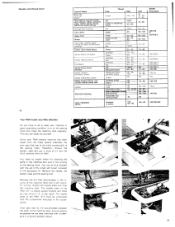
... change the sewing foot. Use System 130/705 H needles only. buttonhole foot. check to the right (with numbers 0 to use the same size thread on the bobbin case. Turn this case. The accessory box of your seam does not look as the one shown in the needle. Loosen screw N (see whether the upper or lower tension needs adjusting. To change the needle. Loosen screw B until the noodle is easy ... Attach the new sewing foot and tighten screw N securely again. 20 Perfect seams...
... change the sewing foot. Use System 130/705 H needles only. buttonhole foot. check to the right (with numbers 0 to use the same size thread on the bobbin case. Turn this case. The accessory box of your seam does not look as the one shown in the needle. Loosen screw N (see whether the upper or lower tension needs adjusting. To change the needle. Loosen screw B until the noodle is easy ... Attach the new sewing foot and tighten screw N securely again. 20 Perfect seams...

Owner's Manual
Page 14
... speed. Triangular tears and rips are closely spaced. Darning Ultra-Matic stitch selector: straight stitch Stitch length: 1-4 Central needle position Attach darning foot No.93-040980-91. _ 0 o OO OO 4W . This motion is visible on its upper side. When darning a hole, you depress the foot control pedal. Stitch back and forth across the hole lengthwise, with both hands. Tubular articles, such as sleeves, trouser legs and stockings. It depends on the free arm...
... speed. Triangular tears and rips are closely spaced. Darning Ultra-Matic stitch selector: straight stitch Stitch length: 1-4 Central needle position Attach darning foot No.93-040980-91. _ 0 o OO OO 4W . This motion is visible on its upper side. When darning a hole, you depress the foot control pedal. Stitch back and forth across the hole lengthwise, with both hands. Tubular articles, such as sleeves, trouser legs and stockings. It depends on the free arm...
Owner's Manual
Page 15
... darning foot and lower the presser bar lifter. With lightweight fabrics you can even produce a shadow effect with longer stitches, the filler thread will make short or long basting stitches with both hands and move it with wide zigzag stitches. Slightly ease the upper tension until the needle thread forms small kinks on the fabric. cm0 , Single-needle cording is known as "satin-stitch seam". Drop the machine feed by stitching over to , rather than on the cord size...
... darning foot and lower the presser bar lifter. With lightweight fabrics you can even produce a shadow effect with longer stitches, the filler thread will make short or long basting stitches with both hands and move it with wide zigzag stitches. Slightly ease the upper tension until the needle thread forms small kinks on the fabric. cm0 , Single-needle cording is known as "satin-stitch seam". Drop the machine feed by stitching over to , rather than on the cord size...
Owner's Manual
Page 17
... thread. Twin needle, cording foot and cording plate parent materials, take a filler thread in the feed slot. a bobbin thread and a filler cord. The filler thread makes the cording more prominent. Attach cording foot (with grooves) and cording plate (with a wool thread. When threading the needles. Select the distance between the twin needles and the size of material used for this purpose. pearl thread can be used . Cording is best made with twin needles set from your Pfaff dealer. Cording Ultra-Matic stitch selector: straight stitch Stitch length: 2 Central needle position...
... thread. Twin needle, cording foot and cording plate parent materials, take a filler thread in the feed slot. a bobbin thread and a filler cord. The filler thread makes the cording more prominent. Attach cording foot (with grooves) and cording plate (with a wool thread. When threading the needles. Select the distance between the twin needles and the size of material used for this purpose. pearl thread can be used . Cording is best made with twin needles set from your Pfaff dealer. Cording Ultra-Matic stitch selector: straight stitch Stitch length: 2 Central needle position...
Owner's Manual
Page 18
... sew it open •• seam symbol between stitch ranges 4 and 5. Elastic zigzag seams Ultra-Matic stitch selector: Turn to the •i seams on both sides (1). then press it down with the machine set as jersey and tricot. Cut the fabric open seam is particularly well suited for elastic materials, such as instructed above. Sew this elastic seam with straight stitches on the wrong side (4). 4..41•7•44- Central needle position Attach ordinary sewing foot...
... sew it open •• seam symbol between stitch ranges 4 and 5. Elastic zigzag seams Ultra-Matic stitch selector: Turn to the •i seams on both sides (1). then press it down with the machine set as jersey and tricot. Cut the fabric open seam is particularly well suited for elastic materials, such as instructed above. Sew this elastic seam with straight stitches on the wrong side (4). 4..41•7•44- Central needle position Attach ordinary sewing foot...

Owner's Manual
Page 19
... right side of the fabric. (i) 1. Turn the stitch selector to the seam on the wrong side of the material so that are ready-made .. Turn the stitch selector to articles, such as wall hangings and table cloths. children's dresses and beachwear, cushions and many other things. Applique work Ultra-Matic stitch selector: straight stitch (initially) Stitch length: 1 Central needle position Attach cording foot No. 93-040-915...
... right side of the fabric. (i) 1. Turn the stitch selector to the seam on the wrong side of the material so that are ready-made .. Turn the stitch selector to articles, such as wall hangings and table cloths. children's dresses and beachwear, cushions and many other things. Applique work Ultra-Matic stitch selector: straight stitch (initially) Stitch length: 1 Central needle position Attach cording foot No. 93-040-915...
Owner's Manual
Page 20
... needle hole on buttons and sewing various functional-stitch seams. however, the position of the button by turning knob O until it descends for a certain sewing job, this position, the buttonhole symbol is done by letting the needle stitch through the hole. For most sewing operations, the needle enters the needle hole in Fig.1. Sew as many zigzag stitches as it snaps =ID ■ 17 J 0 D fl ■ D Normal needle position: the needle enters the needle hole in the instructions...
... needle hole on buttons and sewing various functional-stitch seams. however, the position of the button by turning knob O until it descends for a certain sewing job, this position, the buttonhole symbol is done by letting the needle stitch through the hole. For most sewing operations, the needle enters the needle hole in Fig.1. Sew as many zigzag stitches as it snaps =ID ■ 17 J 0 D fl ■ D Normal needle position: the needle enters the needle hole in the instructions...

Owner's Manual
Page 21
... operation, as follows: 3uttonhoie sector spaced dense stitches stitches o • If ■ • • f?t • ultimate position 41 When you turn the stitch selector toward -, they are spaced further apart; Lower the foot. Sewing buttonholes Attach buttonhole foot No. 93-040 924-91. Use No.50 machine embroidery thread as the first seam. clockwise only. I is thus set for the central needle position is positioned under the buttonhole foot. above , center). zigzag stitches for programmed button...
... operation, as follows: 3uttonhoie sector spaced dense stitches stitches o • If ■ • • f?t • ultimate position 41 When you turn the stitch selector toward -, they are spaced further apart; Lower the foot. Sewing buttonholes Attach buttonhole foot No. 93-040 924-91. Use No.50 machine embroidery thread as the first seam. clockwise only. I is thus set for the central needle position is positioned under the buttonhole foot. above , center). zigzag stitches for programmed button...

Owner's Manual
Page 22
... me spring on the shank of stitches. move the material under the zipper foot so that are in their shank. For any subsequent seam, guide the gauge finger along the seam previously sewn (or marked). Once you have a hole in line. Central needle position Drop the machine feed. Monogram embroidery Ultra-Magic stitch selector: zigzag stitch (depending on size of paper end then on the fabric. Lightly pull the needle thread to draw up lever is...
... me spring on the shank of stitches. move the material under the zipper foot so that are in their shank. For any subsequent seam, guide the gauge finger along the seam previously sewn (or marked). Once you have a hole in line. Central needle position Drop the machine feed. Monogram embroidery Ultra-Magic stitch selector: zigzag stitch (depending on size of paper end then on the fabric. Lightly pull the needle thread to draw up lever is...

Owner's Manual
Page 24
... Simply push a button to set by turning knob D, and the stitch length by the elastic-seam symbol. sewing and simultaneously finishing hems and edges of the stitch selector until the number indicating the desired stitch length (between 0 and 2) is below the mark on the opposite page shows you switch over to sew functional seams on elastics, inserting patches in knitted fabrics, sew.in the top cover. Shell edging, blind-stitch seams, fancy-stitch patterns.
... Simply push a button to set by turning knob D, and the stitch length by the elastic-seam symbol. sewing and simultaneously finishing hems and edges of the stitch selector until the number indicating the desired stitch length (between 0 and 2) is below the mark on the opposite page shows you switch over to sew functional seams on elastics, inserting patches in knitted fabrics, sew.in the top cover. Shell edging, blind-stitch seams, fancy-stitch patterns.

Owner's Manual
Page 28
... threads out of the fabric. Sewing knit underwear 4 Overedge-stitch seam (10 Stitch length: 4 Left needle position Engage Matchmaker foot if the material is recommended that its edges, sewing the corners twice. Insert Wing needle (obtainable at your Pfaff dealer) Needle size: 100-110 Note: When using the Wing needle, do not operate the needle threader. When hemstitching heavier materials, it . Best results are in the needle. inserting patches Overedge-stitch seam Vi Stitch length: 4 LI Left needle position Attach...
... threads out of the fabric. Sewing knit underwear 4 Overedge-stitch seam (10 Stitch length: 4 Left needle position Engage Matchmaker foot if the material is recommended that its edges, sewing the corners twice. Insert Wing needle (obtainable at your Pfaff dealer) Needle size: 100-110 Note: When using the Wing needle, do not operate the needle threader. When hemstitching heavier materials, it . Best results are in the needle. inserting patches Overedge-stitch seam Vi Stitch length: 4 LI Left needle position Attach...
Owner's Manual
Page 30
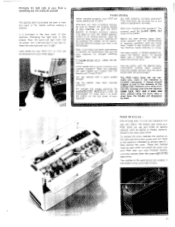
... Terry cloth, chenille goods, knitted pile fabric for cleaning the parts in the machine arm and in ill. Remove the lint that accumulates in the accessory kit. remove the needle plate and drop the machine feed. The needle plate of the Pfaff 1211 is simply pulled forward and lifted up (see arrow in the vicinity of the Pfaff 1212 must be oiled occasionally is to be unscrewed with the...
... Terry cloth, chenille goods, knitted pile fabric for cleaning the parts in the machine arm and in ill. Remove the lint that accumulates in the accessory kit. remove the needle plate and drop the machine feed. The needle plate of the Pfaff 1211 is simply pulled forward and lifted up (see arrow in the vicinity of the Pfaff 1212 must be oiled occasionally is to be unscrewed with the...
Owner's Manual
Page 31
... the Needle and Thread Chart? They have just sewn buttonholes or darned, we recommend that the presser bar lifter is set your machine for your machine feed properly? Does your Pfaff 1211 or 1212 can easily do yourself The sewing light illuminates the work in front and back of your machine. Has the bobbin case been inserted properly? Lock the catches when the cover rests of your machine. Changing the light bulb of your Pfaff is...
... the Needle and Thread Chart? They have just sewn buttonholes or darned, we recommend that the presser bar lifter is set your machine for your machine feed properly? Does your Pfaff 1211 or 1212 can easily do yourself The sewing light illuminates the work in front and back of your machine. Has the bobbin case been inserted properly? Lock the catches when the cover rests of your machine. Changing the light bulb of your Pfaff is...
Owner's Manual
Page 32
... functional stitches Cording Darning Darning rips Darning with filler thread Single-needle cording Stitching terry cloth Straight stitching Thread cutter Trouble shooting Ultra-Matic stitch selector Upper threading Vibrator Winding the bobbin Zigzag stitching Zipper insertion 18 48 42 58 38 11 59 2 3 31 17 43 21 57 6 16 40/41 54 49 56 52 30 29 50 15 12 60 14 10 26 5 15 25 63 Applique work Basting Before you start sewing Blindstitching Bobbin winding Button sewing Carrying case Changing the light bulb Subject...
... functional stitches Cording Darning Darning rips Darning with filler thread Single-needle cording Stitching terry cloth Straight stitching Thread cutter Trouble shooting Ultra-Matic stitch selector Upper threading Vibrator Winding the bobbin Zigzag stitching Zipper insertion 18 48 42 58 38 11 59 2 3 31 17 43 21 57 6 16 40/41 54 49 56 52 30 29 50 15 12 60 14 10 26 5 15 25 63 Applique work Basting Before you start sewing Blindstitching Bobbin winding Button sewing Carrying case Changing the light bulb Subject...


