
Owner's Manual
Page 2
...you unplug the power cord whenever you have to change the needle, sewing foot, bobbin or needle plate, or when you clean or oil the machine or have to avoid injuring your fingers on pin Upper threading Threading he needle Disengaging the sewing mechanism Winding the bobbin Removing bobbin case and bobbin iflsertng the bobbin Inserting the bobbin case Drawing up the bobbin thread Presser bar lifter Thread cutter Thread tension Regulating the stitch length Reverse sewing Finger-tip controls Selecting utility stitches Selecting stretch stitches Utility- c) Only use a 15-watt light bulb in the...
...you unplug the power cord whenever you have to change the needle, sewing foot, bobbin or needle plate, or when you clean or oil the machine or have to avoid injuring your fingers on pin Upper threading Threading he needle Disengaging the sewing mechanism Winding the bobbin Removing bobbin case and bobbin iflsertng the bobbin Inserting the bobbin case Drawing up the bobbin thread Presser bar lifter Thread cutter Thread tension Regulating the stitch length Reverse sewing Finger-tip controls Selecting utility stitches Selecting stretch stitches Utility- c) Only use a 15-watt light bulb in the...
Owner's Manual
Page 3
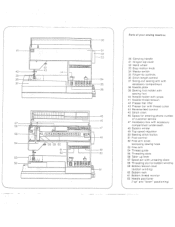
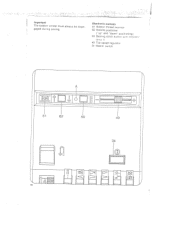
... Spool pin with accessory compartment underneath 48 Bobbin winder 49 Top speed regulator 50 Basting stitch button 51 Foot control 52 Free arm cover, enclosing sewing hook 53 Free arm 54 Thread guide 55 Threading SlOtS 56 Take- Parts of your sewing machine 30 Carrying handle 31 Hinged top cover 32 Hand wheel 33 Stop motion knob 34 Master switch 35 Finger-tip controls 36 Stitch length control 37 Swing-out sewing arm with accessory compartment 38 Needle plate 39 Sewing foot holder with sewing foot 40 Needle holder with screw 41 Needle thread tension 42 Presser bar...
... Spool pin with accessory compartment underneath 48 Bobbin winder 49 Top speed regulator 50 Basting stitch button 51 Foot control 52 Free arm cover, enclosing sewing hook 53 Free arm 54 Thread guide 55 Threading SlOtS 56 Take- Parts of your sewing machine 30 Carrying handle 31 Hinged top cover 32 Hand wheel 33 Stop motion knob 34 Master switch 35 Finger-tip controls 36 Stitch length control 37 Swing-out sewing arm with accessory compartment 38 Needle plate 39 Sewing foot holder with sewing foot 40 Needle holder with screw 41 Needle thread tension 42 Presser bar...
Owner's Manual
Page 9
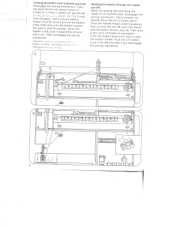
... bobbin is full push it . Insert the spool holder and place a spool of thread on it toward the right to start the bobbin winder. P te tniead from the spool, lead it around bobbin tension stud 59, wind it around bobbin tension stud 59. Disengage the sewing mechanism. Draw the needle thread under the sewing foot, up and into slot 58, and from a second spool (A) Disengage the sewing mechanism. Leu- C . . Then reengage the sewing...
... bobbin is full push it . Insert the spool holder and place a spool of thread on it toward the right to start the bobbin winder. P te tniead from the spool, lead it around bobbin tension stud 59, wind it around bobbin tension stud 59. Disengage the sewing mechanism. Draw the needle thread under the sewing foot, up and into slot 58, and from a second spool (A) Disengage the sewing mechanism. Leu- C . . Then reengage the sewing...

Owner's Manual
Page 11
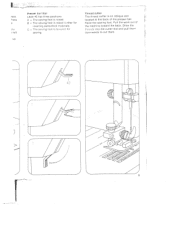
.... Release the latch. Pull the bobbin thread out of the needle hole and lay both threads towards the left and back under the sewing foot. Close the free arm cover. Drawing up latch K and push the bobbin case onto stud B as far as it will go. Inserting the bobbin case Pull up the bobbin thread Hold the needle thread a little tauL Press button 62. The needle moves up by turning the...
.... Release the latch. Pull the bobbin thread out of the needle hole and lay both threads towards the left and back under the sewing foot. Close the free arm cover. Drawing up latch K and push the bobbin case onto stud B as far as it will go. Inserting the bobbin case Pull up the bobbin thread Hold the needle thread a little tauL Press button 62. The needle moves up by turning the...
Owner's Manual
Page 12
Thread cutter The thread cutter is o,;red for inserting extra-thick materials. C = Toe sewing foot is an oblique slot located at the back of the machine toward the back. Draw the thre-ids into the cutter slot and pull znern downwards to cut them. ) 9 ress ress D left up Presser bar lifter Lever 42 has three positions: A = The sewing foot is raised further for sewing. B = The sewng foot is raised. Pull the work out of the presser bar. Raise the sewing foot.
Thread cutter The thread cutter is o,;red for inserting extra-thick materials. C = Toe sewing foot is an oblique slot located at the back of the machine toward the back. Draw the thre-ids into the cutter slot and pull znern downwards to cut them. ) 9 ress ress D left up Presser bar lifter Lever 42 has three positions: A = The sewing foot is raised further for sewing. B = The sewng foot is raised. Pull the work out of the presser bar. Raise the sewing foot.

Owner's Manual
Page 15
... S st'tch Straight stitch 11 Pu lover .oo Blindstitch 12 C.osed cv 'c stl:c" Joining stitch 13 Shell-edge stitch 14 eone: Elastic decorative stitch 15' Elastic stitch 16 Elost'c triple zigzag sttch. 5 mm 5-mm zigzag stitch 17 r n 'm rh 3.5 mm 3.5-mm zigzag stitch 18 triple zrozac; -,:'rr 2 m 2-mm zigzag stitch 19, 20. 21. Button 20 is also used as clearing button for releasing the pushed buttons and the left needle position (see...
... S st'tch Straight stitch 11 Pu lover .oo Blindstitch 12 C.osed cv 'c stl:c" Joining stitch 13 Shell-edge stitch 14 eone: Elastic decorative stitch 15' Elastic stitch 16 Elost'c triple zigzag sttch. 5 mm 5-mm zigzag stitch 17 r n 'm rh 3.5 mm 3.5-mm zigzag stitch 18 triple zrozac; -,:'rr 2 m 2-mm zigzag stitch 19, 20. 21. Button 20 is also used as clearing button for releasing the pushed buttons and the left needle position (see...

Owner's Manual
Page 17
TUhtielitvya-rainodusstsrteittcchh-csotimtcbhincaotmiobnisnaatrieons shown in the chart on the inside of the hinged top cover. For example, if you want to sew an elastic blindstitch, push buttons 15 and 16, select a stitch length between 1 and 4. Selecting the needle position for straight stitching Left needle position: push button 20 Central needle position: push button 10 Right needle position: push buttons 11 and 12. 4 L LZ ) 4 LL 11 12 14 1
TUhtielitvya-rainodusstsrteittcchh-csotimtcbhincaotmiobnisnaatrieons shown in the chart on the inside of the hinged top cover. For example, if you want to sew an elastic blindstitch, push buttons 15 and 16, select a stitch length between 1 and 4. Selecting the needle position for straight stitching Left needle position: push button 20 Central needle position: push button 10 Right needle position: push buttons 11 and 12. 4 L LZ ) 4 LL 11 12 14 1
Owner's Manual
Page 19
Electronic controls 61 Bobbin thread monitor 62 Needle positioner ('up and down" positioning) 50 Basting stitch button wth nd c' lamp A 49 Top speed regulator 34 Master switch 16 Important The bobbin winder must always he disen gaged during sewing.
Electronic controls 61 Bobbin thread monitor 62 Needle positioner ('up and down" positioning) 50 Basting stitch button wth nd c' lamp A 49 Top speed regulator 34 Master switch 16 Important The bobbin winder must always he disen gaged during sewing.
Owner's Manual
Page 20
... length of stitch required is possible to continue sewing with the needle in the fabric when the machine stops. Move the fabric under the sewing foot. Close free arm cover 52. Electronic top speed selector The infinitely variable top speed of the sewing machine can bring the needle to its highest position. If you press and release the foot pedal the machine sews one stitch. Basting Press basting stitch button 50. Each time you press button 62 during sewing the needle...
... length of stitch required is possible to continue sewing with the needle in the fabric when the machine stops. Move the fabric under the sewing foot. Close free arm cover 52. Electronic top speed selector The infinitely variable top speed of the sewing machine can bring the needle to its highest position. If you press and release the foot pedal the machine sews one stitch. Basting Press basting stitch button 50. Each time you press button 62 during sewing the needle...

Owner's Manual
Page 23
... our Sewing hints booklet. Insert the filler cord as foov;s (C: Place c . darning foot in position with The applications of these sewing feet are described in the buttonhole range of the foot, pull it taut and clamp it in front lug D. This serves to determine the buttonhole length. 20 1 Attach the buttonhole foot. me rear lug of the stitch length control (B). adjusted sideways for stitching alonq the rh: left zipper chain. Buttonhole settings Push button 19...
... our Sewing hints booklet. Insert the filler cord as foov;s (C: Place c . darning foot in position with The applications of these sewing feet are described in the buttonhole range of the foot, pull it taut and clamp it in front lug D. This serves to determine the buttonhole length. 20 1 Attach the buttonhole foot. me rear lug of the stitch length control (B). adjusted sideways for stitching alonq the rh: left zipper chain. Buttonhole settings Push button 19...
Owner's Manual
Page 25
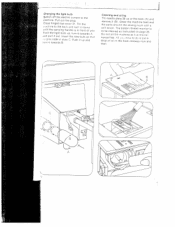
... hae to the back and turn it towards B. '4 Cleaning and oiling Tilt needle plate 38 up , turn it out. Clean the machine feed and the parts around the sewing hook with a soft brush. Pull out the plug. push the light bulb up at the back (A) and remove it is mainte nance-free. Insert the new bulb so that is pins slide in it towards A md pull it round...
... hae to the back and turn it towards B. '4 Cleaning and oiling Tilt needle plate 38 up , turn it out. Clean the machine feed and the parts around the sewing hook with a soft brush. Pull out the plug. push the light bulb up at the back (A) and remove it is mainte nance-free. Insert the new bulb so that is pins slide in it towards A md pull it round...
Owner's Manual
Page 26
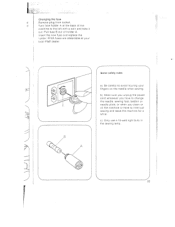
... the machine to interrupt sewing and leave the machine for a while. insert the new fuse and replace the 'older. b) Make sure you unplug the power cord whenever you have to change the needle, sewing foot, bobbin or needie plate, or when you clean cr oil the machine or have to the left with a coin and take it out. c) Only use a 15-watt light bulb in the sewing lamp. 4 ) 23 I. Changing the fuse d Remove plug...
... the machine to interrupt sewing and leave the machine for a while. insert the new fuse and replace the 'older. b) Make sure you unplug the power cord whenever you have to change the needle, sewing foot, bobbin or needie plate, or when you clean cr oil the machine or have to the left with a coin and take it out. c) Only use a 15-watt light bulb in the sewing lamp. 4 ) 23 I. Changing the fuse d Remove plug...

Owner's Manual
Page 27
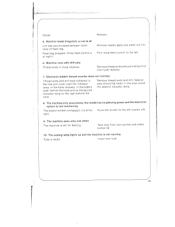
...through the bobbin tension stud. Use first-class thread only. Machine skips stitches Needle not rserted correctly. Needle bent or blunt. Insert new needle. Needle too thin or too thick. Bobbin thread wound unevenly. Regulate thred tensions Used only good-quality thread. 3. Needle bent. Kinks appear on top and bottom of adjustment. Machine threaded improperly. Thread tension too strong. Bobbin case improperly inserted. 4. Only guide the material lightly. Thread machine properly and check both tensions. 24 Insert system 130/705 H needle. During bobbin winding, do...
...through the bobbin tension stud. Use first-class thread only. Machine skips stitches Needle not rserted correctly. Needle bent or blunt. Insert new needle. Needle too thin or too thick. Bobbin thread wound unevenly. Regulate thred tensions Used only good-quality thread. 3. Needle bent. Kinks appear on top and bottom of adjustment. Machine threaded improperly. Thread tension too strong. Bobbin case improperly inserted. 4. Only guide the material lightly. Thread machine properly and check both tensions. 24 Insert system 130/705 H needle. During bobbin winding, do...
Owner's Manual
Page 28
... the free arm cover over the indicator lamp, n the hook raceway, in the area round the second indicator lamp. Special care should be taken in the bobbin Remove thread ends and dirt. Machine feeds irregularly or not at the Move the winder to the left . 6. Flick drop-feed control to the right behind the hook. 8. The machine sews only one stitch The machine is at right.) Remove needle plate and clean out...
... the free arm cover over the indicator lamp, n the hook raceway, in the area round the second indicator lamp. Special care should be taken in the bobbin Remove thread ends and dirt. Machine feeds irregularly or not at the Move the winder to the left . 6. Flick drop-feed control to the right behind the hook. 8. The machine sews only one stitch The machine is at right.) Remove needle plate and clean out...
Owner's Manual
Page 32
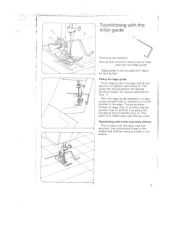
... preceding line of stitches or to stitch parallel to the desired stitching margin for various applications (Fig. 1). Use buttonhole thread in the needle and ordinary sewing thread in position with screw C. bobbin - -- - -- 3 3 The i seam thus made looks neat and accurate. L Topstitching with the edge guide Preparing the machine: Sewing foot: OrdInary sewing foot or clear can be used with nearly /l / / / / // / _t // I/ V Fitting the edge guide: Push edge guide A through hole B and secure it...
... preceding line of stitches or to stitch parallel to the desired stitching margin for various applications (Fig. 1). Use buttonhole thread in the needle and ordinary sewing thread in position with screw C. bobbin - -- - -- 3 3 The i seam thus made looks neat and accurate. L Topstitching with the edge guide Preparing the machine: Sewing foot: OrdInary sewing foot or clear can be used with nearly /l / / / / // / _t // I/ V Fitting the edge guide: Push edge guide A through hole B and secure it...
Owner's Manual
Page 33
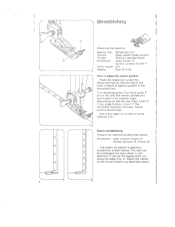
...The elastic blindstitch is against guide E of the blindstitch foot. Adjust guide E accordingly. EJj -J 4 Adjust the needle to the correct position as described above . Turn adjusting screw D to move guide E to adjust the needle position Place the folded hem under the blindstitch foot so that the fold of the outer material is specially -j suitable for stretch fabrics. Blindstitching of Preparing the machine: Sewing foot: Tension: Thread: 8/indstitch: Stitch length: Needle: Blinds fitch foot Ease needle thread tension Ordinary sewing thread wide, button 11 narrow, buttons...
...The elastic blindstitch is against guide E of the blindstitch foot. Adjust guide E accordingly. EJj -J 4 Adjust the needle to the correct position as described above . Turn adjusting screw D to move guide E to adjust the needle position Place the folded hem under the blindstitch foot so that the fold of the outer material is specially -j suitable for stretch fabrics. Blindstitching of Preparing the machine: Sewing foot: Tension: Thread: 8/indstitch: Stitch length: Needle: Blinds fitch foot Ease needle thread tension Ordinary sewing thread wide, button 11 narrow, buttons...

Owner's Manual
Page 34
...Sew the second buttonhole seam in lug D. Place the button against the needle. Please consult the instruction book for information on stretch fabrics the use of a filler thread prevents the buttonhole stretching out of material first. 5 Buttonholes • :, Preparing the machine: Sewing foot: Buttonhole foot Tension: Ease needle thread tension Thread: Fine machine embroidery thread Stitch length: Buttonhole range Stitch type: Button 19 Needle: Size 70-80 We distinguish between buttonholes with and without filler thread. Lower needle and sewing foot. Sew a trial buttonhole...
...Sew the second buttonhole seam in lug D. Place the button against the needle. Please consult the instruction book for information on stretch fabrics the use of a filler thread prevents the buttonhole stretching out of material first. 5 Buttonholes • :, Preparing the machine: Sewing foot: Buttonhole foot Tension: Ease needle thread tension Thread: Fine machine embroidery thread Stitch length: Buttonhole range Stitch type: Button 19 Needle: Size 70-80 We distinguish between buttonholes with and without filler thread. Lower needle and sewing foot. Sew a trial buttonhole...
Owner's Manual
Page 35
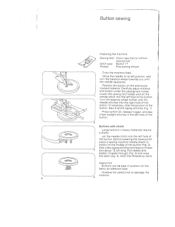
... position of the button (Fig. 2). However be kept in the left hole of the button. Sew a few straight stitches in position on the previously marked material: Carefully place material and button under the sewing foot holder. Buttons with shank Large buttons in heavy materials require a shank. Pull needle and bobbin threads through (Fig. 3) and wrap the stem (Fig. 4). Button sewing Preparing the machine: Sewing foot: Clear-view foot or without sewing foot Stitch type: Button 1 7 Thread: Fine sewing thread Drop the machine feed. Position the button on the fabric...
... position of the button (Fig. 2). However be kept in the left hole of the button. Sew a few straight stitches in position on the previously marked material: Carefully place material and button under the sewing foot holder. Buttons with shank Large buttons in heavy materials require a shank. Pull needle and bobbin threads through (Fig. 3) and wrap the stem (Fig. 4). Button sewing Preparing the machine: Sewing foot: Clear-view foot or without sewing foot Stitch type: Button 1 7 Thread: Fine sewing thread Drop the machine feed. Position the button on the fabric...

Owner's Manual
Page 36
... the machine: Sewing foot: Zipper foot D Stitch length: 2-3 Stitch type: Button 10 Thread: Ordinary sewing thread How to the left as far as it will go. Sew the other side of the seam leave the needle down in the material, raise the zipper foot and open zip under the foot so that less experienced sewers use an edge guide to ensure the seam is straight and neat. 7 Lower the zipper foot again, continue the seam and then sew across...
... the machine: Sewing foot: Zipper foot D Stitch length: 2-3 Stitch type: Button 10 Thread: Ordinary sewing thread How to the left as far as it will go. Sew the other side of the seam leave the needle down in the material, raise the zipper foot and open zip under the foot so that less experienced sewers use an edge guide to ensure the seam is straight and neat. 7 Lower the zipper foot again, continue the seam and then sew across...

Owner's Manual
Page 40
... ) uttWFaShTuhnriertohgtheiniFl.telaedcpinn2trhtrihsh,ebntmteecobrhsoedtaaefdhedurckaaarkindbepnwmtdrahegiaamicarnnnuegftrgadpaetioehgnwddwttrefeshhoosdsseerufwttpaogihsebothsfphcnhoetooshdnibv9ttioesibeOntsoibicrsc,fnehiotngcaaeehvtosinasheentvcdhrrsn(heedeehFiraddanoiedmla.mggwidrn.anaanet2tegn.oe)voderiensivdnaeellwr.y., 2 On stitch back atlnhedinsgfttoyhrpwyeaoroudfr.swelofrkbyyomuodveintegrmthienefatbhreic 11 Darning H- 0 // Preparing the machine: Sewing foot: Stitch type: g1ot Tension: Thread: tFEhianreseeamdnaecehdilneethemrebadrotiednesryion Drop the machine feed.
... ) uttWFaShTuhnriertohgtheiniFl.telaedcpinn2trhtrihsh,ebntmteecobrhsoedtaaefdhedurckaaarkindbepnwmtdrahegiaamicarnnnuegftrgadpaetioehgnwddwttrefeshhoosdsseerufwttpaogihsebothsfphcnhoetooshdnibv9ttioesibeOntsoibicrsc,fnehiotngcaaeehvtosinasheentvcdhrrsn(heedeehFiraddanoiedmla.mggwidrn.anaanet2tegn.oe)voderiensivdnaeellwr.y., 2 On stitch back atlnhedinsgfttoyhrpwyeaoroudfr.swelofrkbyyomuodveintegrmthienefatbhreic 11 Darning H- 0 // Preparing the machine: Sewing foot: Stitch type: g1ot Tension: Thread: tFEhianreseeamdnaecehdilneethemrebadrotiednesryion Drop the machine feed.


