
Owner's Manual
Page 6
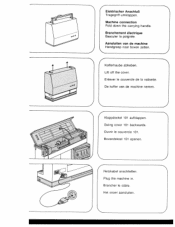
Branchement électrique Basculer Ia poignée. Aansluiten van de machine Handgreep naar boven zetten. Swing cover 101 backwards. Netzkabel anschliel3en. Brancher le cable. Het snoer aansluiten. Enlever le couvercle de Ia valisette. J 4 Kofferhaube abheben. Ouvrir le couvercle 101. Lift off the cover. Plug the machine in. Elektrischer Anschluf3 Tragegriff umklappen. De koffer van de machine nemen. 4Klappdeckel 101 aufklappen. Machine connection Fold down the carrying handle. Bovendeksel 101 openen.
Branchement électrique Basculer Ia poignée. Aansluiten van de machine Handgreep naar boven zetten. Swing cover 101 backwards. Netzkabel anschliel3en. Brancher le cable. Het snoer aansluiten. Enlever le couvercle de Ia valisette. J 4 Kofferhaube abheben. Ouvrir le couvercle 101. Lift off the cover. Plug the machine in. Elektrischer Anschluf3 Tragegriff umklappen. De koffer van de machine nemen. 4Klappdeckel 101 aufklappen. Machine connection Fold down the carrying handle. Bovendeksel 101 openen.
Owner's Manual
Page 7
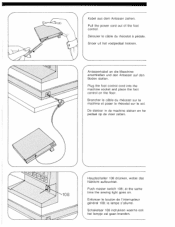
at the same time the sewing light goes on the floor. PuH the power cord out of the foot control. Push master switch 108; Enfoncer le bouton de l'interrupteur général 108; Plug the foot control cord into the machine socket and place the foot control on . Brancher le cable du rheostat sur Ia machine et poser le rheostat sur le sol. Snoer uit...
at the same time the sewing light goes on the floor. PuH the power cord out of the foot control. Push master switch 108; Enfoncer le bouton de l'interrupteur général 108; Plug the foot control cord into the machine socket and place the foot control on . Brancher le cable du rheostat sur Ia machine et poser le rheostat sur le sol. Snoer uit...
Owner's Manual
Page 14
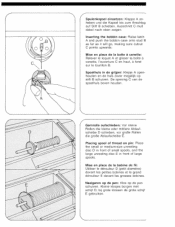
Spoelhuls in front of small spools, and the large unreeling disc F in de grijper: Klepje A open houden en de huls zover mogelijk op stift B schuiven. De opening C van de spoelhuls boven houden. 4 Garnrolle aufschieben: Vor kleine Rollen die kleine oder mittlere Ablauf scheibe ... D; Inserting the bobbin case: Raise latch A and push the bobbin case onto stud B as far as it will go, making sure cutout C points upwards. bij grote klossen de grote schijf F gebruiken. Placing spool of thread on pin: Place the small or medium-size unreeling disc D in front of large spools. Ausschnitt...
Spoelhuls in front of small spools, and the large unreeling disc F in de grijper: Klepje A open houden en de huls zover mogelijk op stift B schuiven. De opening C van de spoelhuls boven houden. 4 Garnrolle aufschieben: Vor kleine Rollen die kleine oder mittlere Ablauf scheibe ... D; Inserting the bobbin case: Raise latch A and push the bobbin case onto stud B as far as it will go, making sure cutout C points upwards. bij grote klossen de grote schijf F gebruiken. Placing spool of thread on pin: Place the small or medium-size unreeling disc D in front of large spools. Ausschnitt...
Owner's Manual
Page 18
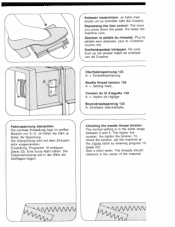
.... Sew a short seam. Anlasser niedertreten. Plus Ia pédale sera abaissée, plus Ia Créative'> coudra vite. De voet druk op het pedaal regelt de sneiheid van de Creative. Die Fadenverknotung soil in der Mitte der Stofflagen liegen. 4 Checking the needle thread tension: The normal setting is in the center of the material. /V Depressing the foot control...
.... Sew a short seam. Anlasser niedertreten. Plus Ia pédale sera abaissée, plus Ia Créative'> coudra vite. De voet druk op het pedaal regelt de sneiheid van de Creative. Die Fadenverknotung soil in der Mitte der Stofflagen liegen. 4 Checking the needle thread tension: The normal setting is in the center of the material. /V Depressing the foot control...
Owner's Manual
Page 36
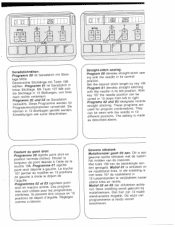
... needle in iL_in 1E 4 Geradstichnähen: Programm 00 ist Geradstich mit Stich lage Mitte. ualtrlisclihspeéesuavprreoinèurtre.êletrCseepscroopugrrsoaugmsramemnes13 positions ...Set the desired stitch length by key 10 Program 01 denotes straight stitching with the needle in 13 Stellungen, von links nach rechts verändern. Programs 02 and 03 designate reverse straight stitching...)L- )u)I 1 1 1 1 1 j 1 I le. Straight-stitch sewing: Program 00 denotes straight-stitch sew ing with the needle in linker Stichlage. Ook hier zijn 13 naald standvariaties mogelijk.
... needle in iL_in 1E 4 Geradstichnähen: Programm 00 ist Geradstich mit Stich lage Mitte. ualtrlisclihspeéesuavprreoinèurtre.êletrCseepscroopugrrsoaugmsramemnes13 positions ...Set the desired stitch length by key 10 Program 01 denotes straight stitching with the needle in 13 Stellungen, von links nach rechts verändern. Programs 02 and 03 designate reverse straight stitching...)L- )u)I 1 1 1 1 1 j 1 I le. Straight-stitch sewing: Program 00 denotes straight-stitch sew ing with the needle in linker Stichlage. Ook hier zijn 13 naald standvariaties mogelijk.
Owner's Manual
Page 37
...Zigzag sewing: Program 10 denotes zigzag sewing with key 106. The sewing jobs which can be carried out on this machine are described in the enclosed Sewing...Set the desired stitch length with the needle in het bijge sloten bock beschreven. Les operations de couture sont dCcrites dans a brochure ci-jointe. Stichbreite zwischen 0.5 und 6,0 mm mit der Taste 107 wählen. Couture au point zigzag Programme 10 signifie point zigzag dé port d'aiguille en position...position deport point zigzag a gauche. Dat is a zigzag seam made with the needle throw starting at the left position....
...Zigzag sewing: Program 10 denotes zigzag sewing with key 106. The sewing jobs which can be carried out on this machine are described in the enclosed Sewing...Set the desired stitch length with the needle in het bijge sloten bock beschreven. Les operations de couture sont dCcrites dans a brochure ci-jointe. Stichbreite zwischen 0.5 und 6,0 mm mit der Taste 107 wählen. Couture au point zigzag Programme 10 signifie point zigzag dé port d'aiguille en position...position deport point zigzag a gauche. Dat is a zigzag seam made with the needle throw starting at the left position....
Owner's Manual
Page 40
..., Zubehörkäst chen C herausnehmen. Op schets D is nog een yak B. O Darning foot 1 Standard sewing foot 2 Clear-view foot 3 Hemming foot 4 Blindstitch foot 5 Zipper foot 6 Buttonhole foot 7 Fancy-stitch foot Bolte de rangement et accessoires: Enlever Ia boIte de rangement A, l'ouvrir et enlever a bolte d'accessoires C. Underneath the box is an accessory compartment B. Sous celle-ci se trouve le casier B. o Stopvoet 1 Normaal naaivoetje 2 Borduurvoet...
..., Zubehörkäst chen C herausnehmen. Op schets D is nog een yak B. O Darning foot 1 Standard sewing foot 2 Clear-view foot 3 Hemming foot 4 Blindstitch foot 5 Zipper foot 6 Buttonhole foot 7 Fancy-stitch foot Bolte de rangement et accessoires: Enlever Ia boIte de rangement A, l'ouvrir et enlever a bolte d'accessoires C. Underneath the box is an accessory compartment B. Sous celle-ci se trouve le casier B. o Stopvoet 1 Normaal naaivoetje 2 Borduurvoet...
Owner's Manual
Page 41
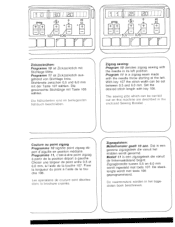
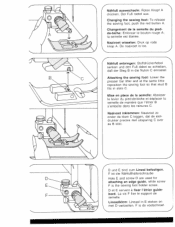
...Iibérée. Attaching the sewing foot: Lower the presser bar lifter and at the same time reposition the sewing foot so that stud B fits in E steken en ) met D vastzetten. Hole E and screw D are used for attaching an edge guide, while screw F is de voetschroef. La vis F fixe le support de semel I 'étrier guide bord. 4 N&#...déplacer Ia semelle de manière que I'étrier B s'emboIte dans les rainures C. Changing the sewing foot: To release the sewing foot, push the red button A. Der FuB rastet aus. Naaivoet inklemmen: Naaivoet zo onder de klem C leggen, dat de stof...
...Iibérée. Attaching the sewing foot: Lower the presser bar lifter and at the same time reposition the sewing foot so that stud B fits in E steken en ) met D vastzetten. Hole E and screw D are used for attaching an edge guide, while screw F is de voetschroef. La vis F fixe le support de semel I 'étrier guide bord. 4 N&#...déplacer Ia semelle de manière que I'étrier B s'emboIte dans les rainures C. Changing the sewing foot: To release the sewing foot, push the red button A. Der FuB rastet aus. Naaivoet inklemmen: Naaivoet zo onder de klem C leggen, dat de stof...
Owner's Manual
Page 42
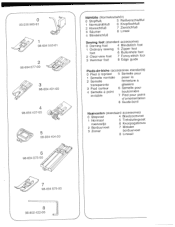
...-00 98-694 Nähtü(e (Normalzubehör) 0 StopffuI3; 5 Rei6verschlul3fuf 1 Normalnãhfuf3 6 Knopflochfu(3 2 KlarsichtfuB 7 Zierstichful3 3 Sãumer 8 Lineal 4 BlindstichfuB Sewing feet (standard accessories) 0 Darning foot 4 Biindstitch foot 1 Ordinary sewing 5 Zipper foot foot 6 Buttonhole foot 2 Clear-view foot 7 Fancy-stitch fool 3 Hemmer foot 8 Ldge guide Pieds-de-biche (accessoires standards) 0 Pied a repriser 5 Semelle pour 1 Semelle normale 2 Semelle poser Ia fermeture a transparente glissiere 3 Pied ourleur 4 Semelle a point...
...-00 98-694 Nähtü(e (Normalzubehör) 0 StopffuI3; 5 Rei6verschlul3fuf 1 Normalnãhfuf3 6 Knopflochfu(3 2 KlarsichtfuB 7 Zierstichful3 3 Sãumer 8 Lineal 4 BlindstichfuB Sewing feet (standard accessories) 0 Darning foot 4 Biindstitch foot 1 Ordinary sewing 5 Zipper foot foot 6 Buttonhole foot 2 Clear-view foot 7 Fancy-stitch fool 3 Hemmer foot 8 Ldge guide Pieds-de-biche (accessoires standards) 0 Pied a repriser 5 Semelle pour 1 Semelle normale 2 Semelle poser Ia fermeture a transparente glissiere 3 Pied ourleur 4 Semelle a point...
Owner's Manual
Page 48
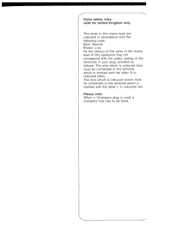
... only The wires in this mains lead are coloured in accordance with the following code: Blue: Neutral Brown: Live As the colours of the wires in the mains lead of this appliance may not correspond with the colour coding of the terminals in your plug, proceed as follows: The wire which is... coloured blue must be fitted. Please note: When a 13-ampere plug is used a 3-ampere fuse has to the terminal which is marked with the letter...
... only The wires in this mains lead are coloured in accordance with the following code: Blue: Neutral Brown: Live As the colours of the wires in the mains lead of this appliance may not correspond with the colour coding of the terminals in your plug, proceed as follows: The wire which is... coloured blue must be fitted. Please note: When a 13-ampere plug is used a 3-ampere fuse has to the terminal which is marked with the letter...
Owner's Manual
Page 51
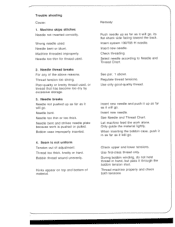
... through the bobbin tension stud. Poor-quality or knotty thread used . Let machine feed the work is not uniform Tension out of material. Check upper and lower tensions. Machine skips stitches Needle not inserted correctly. Needle bent or blunt. Bobbin case improperly inserted. 4. Use only good-quality thread. Use first-class thread only. Thread machine properly and check both tensions. Needle bent and strikes needle plate because work alone. See par. 1 above reasons. Insert new needle. Only guide the material lightly. Thread tension too strong. Thread too thick...
... through the bobbin tension stud. Poor-quality or knotty thread used . Let machine feed the work is not uniform Tension out of material. Check upper and lower tensions. Machine skips stitches Needle not inserted correctly. Needle bent or blunt. Bobbin case improperly inserted. 4. Use only good-quality thread. Use first-class thread only. Thread machine properly and check both tensions. Needle bent and strikes needle plate because work alone. See par. 1 above reasons. Insert new needle. Only guide the material lightly. Thread tension too strong. Thread too thick...
Owner's Manual
Page 52
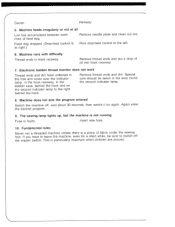
... collected in the free arm cover over the indicator lamp, in the hook raceway, in hook raceway. This is Flick drop-feed control to the right behind the hook and on again. Machine runs with difficulty Thread ends in the bobbin case, behind the hook. Remove thread ends and put a drop of fabric under the sewing foot. Again enter the desired program. 9. The sewing lamp lights up, but the machine is not running...
... collected in the free arm cover over the indicator lamp, in the hook raceway, in hook raceway. This is Flick drop-feed control to the right behind the hook and on again. Machine runs with difficulty Thread ends in the bobbin case, behind the hook. Remove thread ends and put a drop of fabric under the sewing foot. Again enter the desired program. 9. The sewing lamp lights up, but the machine is not running...
Owner's Manual
Page 59
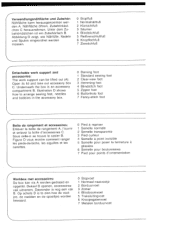
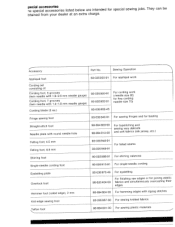
... For appliqué work Cording set consisting of: Cording foot, 5 grooves (twin needle with 1.8-2.5 mm needle gauge) Cording foot, 7 grooves (twin needle with 1.4-1.8 mm needle gauge) Cording blade (2 ea.) Fringe sewing foot 93-035950-91 93-035953-91 93-035952-45 93-035943-91 For cording work (needle size 80, for fine cording needle size 70) For sewing fringes and for basting Straight-stitch foot Needle plate with zigzag stitches 93-035957-00 For sewing knitted fabrics 98-694801-00 For sewing plastic materials Accessory Appliqué foot Part No...
... For appliqué work Cording set consisting of: Cording foot, 5 grooves (twin needle with 1.8-2.5 mm needle gauge) Cording foot, 7 grooves (twin needle with 1.4-1.8 mm needle gauge) Cording blade (2 ea.) Fringe sewing foot 93-035950-91 93-035953-91 93-035952-45 93-035943-91 For cording work (needle size 80, for fine cording needle size 70) For sewing fringes and for basting Straight-stitch foot Needle plate with zigzag stitches 93-035957-00 For sewing knitted fabrics 98-694801-00 For sewing plastic materials Accessory Appliqué foot Part No...
Owner's Manual
Page 60
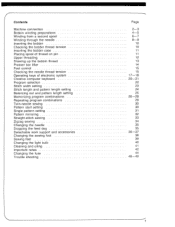
... bobbin thread Presser bar lifter Foot control Checking the needle thread tension Operating keys of electronic system Creative computer keyboard Program selection Stitch width setting Stitch length and pattern length setting Balancing out and pattern length setting Memorizing program combinations Repeating program combinations Twin-needle sewing Pattern start setting Single pattern setting Pattern mirroring Straight-stitch sewing Zigzag sewing Changing the needle Dropping the feed dog Detachable work support and accessories Changing the sewing foot Sewing feet Changing the light bulb Cleaning...
... bobbin thread Presser bar lifter Foot control Checking the needle thread tension Operating keys of electronic system Creative computer keyboard Program selection Stitch width setting Stitch length and pattern length setting Balancing out and pattern length setting Memorizing program combinations Repeating program combinations Twin-needle sewing Pattern start setting Single pattern setting Pattern mirroring Straight-stitch sewing Zigzag sewing Changing the needle Dropping the feed dog Detachable work support and accessories Changing the sewing foot Sewing feet Changing the light bulb Cleaning...


