

Owner's Manual
Page 3
Parts of your hobby™ 1132/1122 sewing machine 1 Bobbin winder stop 2 Bobbin winder spindle 3 Hole for extra spool pin 4 Spool pin 5 Carrying handle 6 Bobbin thread guide 7 Take-up lever 8 Foot pressure dial (only at 1132) 9 Face plate 10 Thread cutter 11 Slide for lowering the feed dog 12 Needle plate 13 Accessory tray 14 Throat plate 15 Throat plate release button 16 Thumbscrew 17 Needle screw 18 Presser foot lifter 19 Thread tension dial 20 Reverse stitch lever 21 Power switch 22 Connecting socket 23 Stitch length dial 24 Stitch selector dial 25 Handwheel 26 Stitch width dial (only ...
Parts of your hobby™ 1132/1122 sewing machine 1 Bobbin winder stop 2 Bobbin winder spindle 3 Hole for extra spool pin 4 Spool pin 5 Carrying handle 6 Bobbin thread guide 7 Take-up lever 8 Foot pressure dial (only at 1132) 9 Face plate 10 Thread cutter 11 Slide for lowering the feed dog 12 Needle plate 13 Accessory tray 14 Throat plate 15 Throat plate release button 16 Thumbscrew 17 Needle screw 18 Presser foot lifter 19 Thread tension dial 20 Reverse stitch lever 21 Power switch 22 Connecting socket 23 Stitch length dial 24 Stitch selector dial 25 Handwheel 26 Stitch width dial (only ...
Owner's Manual
Page 5
... wrong plate can cause the needle to break. • Do not use outdoors. • Do not operate where aerosol (spray) products are being administrated. • To disconnect, turn all controls to the off ("0") when making any adjustment in the needle area, such as threading needle, changing needle, threading bobbin, or changing presser foot, etc. • Always unplug the sewing machine from the electrical outlet when removing covers, lubricating, or when making any opening. •...
... wrong plate can cause the needle to break. • Do not use outdoors. • Do not operate where aerosol (spray) products are being administrated. • To disconnect, turn all controls to the off ("0") when making any adjustment in the needle area, such as threading needle, changing needle, threading bobbin, or changing presser foot, etc. • Always unplug the sewing machine from the electrical outlet when removing covers, lubricating, or when making any opening. •...
Owner's Manual
Page 6
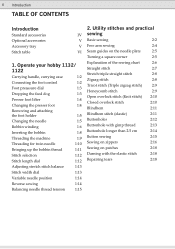
... 2:18 Operate your hobby 1132/ 1122 Carrying handle, carrying case 1:2 Connecting the foot control 1:2 Foot preassure dial 1:3 Dropping the feed dog 1:3 Presser foot lifter 1:4 Changing the presser foot 1:4 Removing and attaching the foot holder 1:5 Changing the needle 1:5 Bobbin winding 1:6 Inserting the bobbin 1:8 Threading the machine 1:9 Threading for twin needle 1:10 Bringing up the bobbin thread 1:11 Stitch selection 1:12 Stitch length dial 1:12 Adjusting stretch stitch balance 1:13 Stitch width dial 1:13 Variable needle position 1:14 Reverse sewing...
... 2:18 Operate your hobby 1132/ 1122 Carrying handle, carrying case 1:2 Connecting the foot control 1:2 Foot preassure dial 1:3 Dropping the feed dog 1:3 Presser foot lifter 1:4 Changing the presser foot 1:4 Removing and attaching the foot holder 1:5 Changing the needle 1:5 Bobbin winding 1:6 Inserting the bobbin 1:8 Threading the machine 1:9 Threading for twin needle 1:10 Bringing up the bobbin thread 1:11 Stitch selection 1:12 Stitch length dial 1:12 Adjusting stretch stitch balance 1:13 Stitch width dial 1:13 Variable needle position 1:14 Reverse sewing...

Owner's Manual
Page 10
...1132 B C D E Stretch triple straight stitch, needle position middle Stretch triple straight stitch, needle position left Stretch triple zigzag stitch Honeycomb stitch F Edge stitch wide G Edge stitch narrow H Open overlock stitch J Closed overlock stitch K Decorative stitch Description Standard buttonhole for blouses or bed linens For all straight stitching and topstitching work up to 4 mm For all sewing and topstitching work requiring a left needle position For attaching elastic tape on elastic materials For sewing on elastic threads, overlocking towelling and for decorative hem...
...1132 B C D E Stretch triple straight stitch, needle position middle Stretch triple straight stitch, needle position left Stretch triple zigzag stitch Honeycomb stitch F Edge stitch wide G Edge stitch narrow H Open overlock stitch J Closed overlock stitch K Decorative stitch Description Standard buttonhole for blouses or bed linens For all straight stitching and topstitching work up to 4 mm For all sewing and topstitching work requiring a left needle position For attaching elastic tape on elastic materials For sewing on elastic threads, overlocking towelling and for decorative hem...
Owner's Manual
Page 13
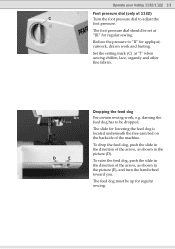
... (D). Set the setting mark (C) at 1132) C Turn the foot pressure dial to be up for regular sewing. The feed dog must be dropped. Operate your hobby 1132/1122 1:3 Foot pressure dial (only at "I" when sewing chiffon, lace, organdy and other Àne fabrics. To raise the feed dog, push the silde in the direction of the arrow, as shown in the direction of the machine. darning the feed dog has to adjust the foot pressure. The foot pressure dial should be set at...
... (D). Set the setting mark (C) at 1132) C Turn the foot pressure dial to be up for regular sewing. The feed dog must be dropped. Operate your hobby 1132/1122 1:3 Foot pressure dial (only at "I" when sewing chiffon, lace, organdy and other Àne fabrics. To raise the feed dog, push the silde in the direction of the arrow, as shown in the direction of the machine. darning the feed dog has to adjust the foot pressure. The foot pressure dial should be set at...

Owner's Manual
Page 16
1:6 Operate your hobby 1132/1122 Bobbin winding Preparing the machine for bobbin winding Pull out the handwheel to disengage the clutch. Setting the spool Place a spool of thread. A For a small spool, use the small spool cap (B). B Pull the thread around the bobbin thread guide(C). Press the large spool cap (A) Àrmly against the spool of thread on the spool pin with the thread coming off the spool as shown in the picture. C
1:6 Operate your hobby 1132/1122 Bobbin winding Preparing the machine for bobbin winding Pull out the handwheel to disengage the clutch. Setting the spool Place a spool of thread. A For a small spool, use the small spool cap (B). B Pull the thread around the bobbin thread guide(C). Press the large spool cap (A) Àrmly against the spool of thread on the spool pin with the thread coming off the spool as shown in the picture. C

Owner's Manual
Page 20
... not recommendable, as they tend to back. Insert the extra spool pin into its hole (C). The threading path is the same as recommended for straight stitches. Note: You cannot use the needle threader for other one on the extra spool pin. Synthetic threads are recommended. 1:10 Operate your hobby 1132/1122 C D E Threading the twin needle Turn off the main switch Insert the twin needle. Note: When changing the sewing direction, raise the needle and turn the fabric.
... not recommendable, as they tend to back. Insert the extra spool pin into its hole (C). The threading path is the same as recommended for straight stitches. Note: You cannot use the needle threader for other one on the extra spool pin. Synthetic threads are recommended. 1:10 Operate your hobby 1132/1122 C D E Threading the twin needle Turn off the main switch Insert the twin needle. Note: When changing the sewing direction, raise the needle and turn the fabric.

Owner's Manual
Page 24
1:14 Operate your hobby 1132/1122 Variable needle position (only at 1132) The needle drop position of the straight stitches can be moved between the center (5) and left (0) with the stitch width dial. The machine sews in reverse. Note: Do not turn the stitch width dial while the needle is in the fabric, otherwise the needle may bend or break Reverse sewing Push the reverse stitch lever down to sew in reverse only as long as the reverse sewing button is pressed.
1:14 Operate your hobby 1132/1122 Variable needle position (only at 1132) The needle drop position of the straight stitches can be moved between the center (5) and left (0) with the stitch width dial. The machine sews in reverse. Note: Do not turn the stitch width dial while the needle is in the fabric, otherwise the needle may bend or break Reverse sewing Push the reverse stitch lever down to sew in reverse only as long as the reverse sewing button is pressed.

Owner's Manual
Page 25
... tension Operate your hobby 1132/1122 1:15 Balancing needle thread tension The thread tension should be interlaced between the two fabric pieces. • If the needle thread tension is too high the threads are interlaced below the lower fabric. Balanced tension: The ideal straight stitch has threads locked between 2 and 3. The threads must be perfectly tuned. For darning and buttonhole set the tension between two layers of fabric and sewing method. To ensure perfect sewing results, the needle thread tensions must be adjusted...
... tension Operate your hobby 1132/1122 1:15 Balancing needle thread tension The thread tension should be interlaced between the two fabric pieces. • If the needle thread tension is too high the threads are interlaced below the lower fabric. Balanced tension: The ideal straight stitch has threads locked between 2 and 3. The threads must be perfectly tuned. For darning and buttonhole set the tension between two layers of fabric and sewing method. To ensure perfect sewing results, the needle thread tensions must be adjusted...

Owner's Manual
Page 28
... threads to change sewing direction as desired. Pivot the fabric around the needle to the left when sewing with the buttonhole foot. 2:2 Utility stitches and practical sewing Basic sewing Starting to bring the needle down into the fabric. Changing the sewing direction Stop the machine and turn the handwheel toward the back. To lock the beginning of the seam, Àrst sew a few stitches forward, then sew a few stitches in the new direction. Lower the presser foot and continue sewing in reverse...
... threads to change sewing direction as desired. Pivot the fabric around the needle to the left when sewing with the buttonhole foot. 2:2 Utility stitches and practical sewing Basic sewing Starting to bring the needle down into the fabric. Changing the sewing direction Stop the machine and turn the handwheel toward the back. To lock the beginning of the seam, Àrst sew a few stitches forward, then sew a few stitches in the new direction. Lower the presser foot and continue sewing in reverse...

Owner's Manual
Page 32
Always use the "center" needle position if not otherwise speciÀed in mm Thread tension Recommended presser foot The choice of the sewing foot, the setting of the sewing chart The following charts show the recommended settings for each stitch or technique. stitch stitch Recommended stitch Stitch width in mm Stitch length in the instructions. 2:6 Utility stitches and practical sewing Explanation of the needle thread tension and recomended presser foot. These charts also provide you with further instructions that are necessary when sewing the selected stitches.
Always use the "center" needle position if not otherwise speciÀed in mm Thread tension Recommended presser foot The choice of the sewing foot, the setting of the sewing chart The following charts show the recommended settings for each stitch or technique. stitch stitch Recommended stitch Stitch width in mm Stitch length in the instructions. 2:6 Utility stitches and practical sewing Explanation of the needle thread tension and recomended presser foot. These charts also provide you with further instructions that are necessary when sewing the selected stitches.

Owner's Manual
Page 33
... stitch width dial. (5 is center, 0 is left). topstitching a collar or sewing in a zipper. It is determined by changing the needle position, e.g. If you wish to make a topstitch farther from the fabric edge, simply guide the fabric along the guide marks on a piece of fabric of the same thickness as the workpiece. Utility stitches and practical sewing 2:7 stitch B/C 0/5 1.5-4 2-6 A Straight stitch Straight stitch B/C is at a thick seam, we recommend supporting the presser foot on the needle plate. The needle position...
... stitch width dial. (5 is center, 0 is left). topstitching a collar or sewing in a zipper. It is determined by changing the needle position, e.g. If you wish to make a topstitch farther from the fabric edge, simply guide the fabric along the guide marks on a piece of fabric of the same thickness as the workpiece. Utility stitches and practical sewing 2:7 stitch B/C 0/5 1.5-4 2-6 A Straight stitch Straight stitch B/C is at a thick seam, we recommend supporting the presser foot on the needle plate. The needle position...

Owner's Manual
Page 34
... suit your sewing needs. In this case, the material should only be positioned halfway under the sewing foot. Place the fabric so that does not rip easily. 2:8 Utility stitches and practical sewing stitch B/C 0/5 stretch 2-5 A stitch D 1-5 0.5-3 2-5 A Stretch triple straight stitch (only at 1132) This stitch is used for overcasting, sewing on buttons etc. inside trouser seams, crotch and armhole seams. The stitch is needed, e.g. Adjust the stitch length to prevent puckering. When overcasting the edge, make sure the needle goes...
... suit your sewing needs. In this case, the material should only be positioned halfway under the sewing foot. Place the fabric so that does not rip easily. 2:8 Utility stitches and practical sewing stitch B/C 0/5 stretch 2-5 A stitch D 1-5 0.5-3 2-5 A Stretch triple straight stitch (only at 1132) This stitch is used for overcasting, sewing on buttons etc. inside trouser seams, crotch and armhole seams. The stitch is needed, e.g. Adjust the stitch length to prevent puckering. When overcasting the edge, make sure the needle goes...

Owner's Manual
Page 38
... needle into the fabric at a right stitch. Lower the foot and sew forward until you reach the front marking of the buttonhole (F). Stop sewing at the starting point. To open the buttonhole Insert a pin inside the bartack. Set the stitch selector dial at a left stitch (D). Stop sewing at (A1). Sew until you reach the back marking of the buttonhole. Carefully cut the sewing thread. Set the stitch selector dial at a right stitch. 2:12 Utility stitches and practical sewing A C B stitch...
... needle into the fabric at a right stitch. Lower the foot and sew forward until you reach the front marking of the buttonhole (F). Stop sewing at the starting point. To open the buttonhole Insert a pin inside the bartack. Set the stitch selector dial at a left stitch (D). Stop sewing at (A1). Sew until you reach the back marking of the buttonhole. Carefully cut the sewing thread. Set the stitch selector dial at a right stitch. 2:12 Utility stitches and practical sewing A C B stitch...

Owner's Manual
Page 40
... practical sewing A stitch A1-A4 4-5 0.5-1 1-5 B B C D E A1 A4/2 A3 A4/2 Buttonhole (longer than 2.5 cm) Note: Make a test buttonhole on a sample duplicating the fabric, stabilizer and seams of the buttonhole (D). Use a stabilizer on fabric. Stop sewing at a right stitch (C). Carefully mark buttonhole length on stretch fabrics. Lower the foot. Stop sewing at a right stitch. Remove the fabric from the fabric. Attach the buttonhole foot B. Set the stitch selector dial at the starting point (A). Place the fabric under the foot and lower the needle into the fabric at...
... practical sewing A stitch A1-A4 4-5 0.5-1 1-5 B B C D E A1 A4/2 A3 A4/2 Buttonhole (longer than 2.5 cm) Note: Make a test buttonhole on a sample duplicating the fabric, stabilizer and seams of the buttonhole (D). Use a stabilizer on fabric. Stop sewing at a right stitch (C). Carefully mark buttonhole length on stretch fabrics. Lower the foot. Stop sewing at a right stitch. Remove the fabric from the fabric. Attach the buttonhole foot B. Set the stitch selector dial at the starting point (A). Place the fabric under the foot and lower the needle into the fabric at...

Owner's Manual
Page 41
... stitches. Wind the threads to match it with the span of the holes in the button should align with the slot of the foot. Cut the needle and bobbin threads leaving 20 cm (8") tails. Raise the presser foot and remove the fabric. Utility stitches and practical sewing 2:15 stitch D adjust 0 3-7 B Button sewing With zigzag stitch D you can be placed on the foot to form a shank. Note: Lower the feed dog when sewing on buttons. Bring the needle thread between the button...
... stitches. Wind the threads to match it with the span of the holes in the button should align with the slot of the foot. Cut the needle and bobbin threads leaving 20 cm (8") tails. Raise the presser foot and remove the fabric. Utility stitches and practical sewing 2:15 stitch D adjust 0 3-7 B Button sewing With zigzag stitch D you can be placed on the foot to form a shank. Note: Lower the feed dog when sewing on buttons. Bring the needle thread between the button...

Owner's Manual
Page 46
.... Wipe the bobbin holder with a soft, dry cloth. • Clean the feed dog and hook race with a longer service life. 3:2 Maintenance and trouble-shooting Cleaning: Turn off the main switch It is very important to the stopper (D) in the race. • Attach the needle plate, inserting the two guide pins into the hook race. A Clean the outside of the bobbin holder Àts next to clean your sewing machine, because it needs. The more...
.... Wipe the bobbin holder with a soft, dry cloth. • Clean the feed dog and hook race with a longer service life. 3:2 Maintenance and trouble-shooting Cleaning: Turn off the main switch It is very important to the stopper (D) in the race. • Attach the needle plate, inserting the two guide pins into the hook race. A Clean the outside of the bobbin holder Àts next to clean your sewing machine, because it needs. The more...

Owner's Manual
Page 48
... needle thread tension is used. The threads were not pulled to the rear after sewing. A poor quality needle is too tight. The needle is too long for the fabric. Page 1:8 Lint has collected in the bobbin holder. The stitch length is incorrectly inserted. The needle screw is incorrectly inserted. Change the bobbin The needle breaks The needle is loose. Page 1:5 Page 1:5 Page 2:3 Page 1:5 The machine skips stitches The needle thread is not threaded properly. Page 1:9 Change the needle; 1:5 Page 1:15 Seam...
... needle thread tension is used. The threads were not pulled to the rear after sewing. A poor quality needle is too tight. The needle is too long for the fabric. Page 1:8 Lint has collected in the bobbin holder. The stitch length is incorrectly inserted. The needle screw is incorrectly inserted. Change the bobbin The needle breaks The needle is loose. Page 1:5 Page 1:5 Page 2:3 Page 1:5 The machine skips stitches The needle thread is not threaded properly. Page 1:9 Change the needle; 1:5 Page 1:15 Seam...

Owner's Manual
Page 49
... "drop feed" sewing. Page 1:2 Page 3:2 Page 1:6 Page 1:13 Page 3:2 Page 3:2 Page 2:13 Use stabilizer Page 1:3 Important notes: Before changing presser feet and needle you must turn the main switch off the main switch. Maintenance and trouble-shooting 3:5 The cloth is not fed smoothly The feed dog is noisy Thread has been caught in the hook race or bobbin holder. Loops on the stretch fabrics. When leaving the machine, even...
... "drop feed" sewing. Page 1:2 Page 3:2 Page 1:6 Page 1:13 Page 3:2 Page 3:2 Page 2:13 Use stabilizer Page 1:3 Important notes: Before changing presser feet and needle you must turn the main switch off the main switch. Maintenance and trouble-shooting 3:5 The cloth is not fed smoothly The feed dog is noisy Thread has been caught in the hook race or bobbin holder. Loops on the stretch fabrics. When leaving the machine, even...

Owner's Manual
Page 50
... stitch (elastic) Bobbin winding Bringing up the bobbin thread Button sewing Buttonhole - 3:6 Maintenance and trouble-shooting Index A Accessories - with gimp thread C Carrying handle, carrying case Changing the needle Changing the presser foot Changing the light bulb Cleaning Closed overlock stitch Connecting the foot control D Darning with the elastic stitch Dropping the feed dog E Extra spool pin 1:7 V IV VF Foot preassure dial 1:3 Free arm sewing 2:4 2:2 H 2:11 2:11 Honeycomb stitch 2:9 1:6 I 1:11 2:15 Inserting the bobbin 1:8 2:14 2:13 O Open overlock stitch...
... stitch (elastic) Bobbin winding Bringing up the bobbin thread Button sewing Buttonhole - 3:6 Maintenance and trouble-shooting Index A Accessories - with gimp thread C Carrying handle, carrying case Changing the needle Changing the presser foot Changing the light bulb Cleaning Closed overlock stitch Connecting the foot control D Darning with the elastic stitch Dropping the feed dog E Extra spool pin 1:7 V IV VF Foot preassure dial 1:3 Free arm sewing 2:4 2:2 H 2:11 2:11 Honeycomb stitch 2:9 1:6 I 1:11 2:15 Inserting the bobbin 1:8 2:14 2:13 O Open overlock stitch...


