
Leaflet
Page 1
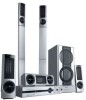
...; Dolby Digital 5.1, DTS, Dolby Prologic and MPEG decoding 275 • 275W Total System Power • 100 watts powered wOOx subwoofer for extra deep bass • Slim 3-way Wide Spectrum satellite speakers • Hi-Frequency Ribbon Tweeters in support of SACD sound • CVBS, S-Video output & Component (R/G/B) video output • DVD, DVD+RW, SACD,VCD, CD, CD-R, CD-RW and MP3-CD playback • Easy to set up, color coded connections • Aluminium speaker...
...; Dolby Digital 5.1, DTS, Dolby Prologic and MPEG decoding 275 • 275W Total System Power • 100 watts powered wOOx subwoofer for extra deep bass • Slim 3-way Wide Spectrum satellite speakers • Hi-Frequency Ribbon Tweeters in support of SACD sound • CVBS, S-Video output & Component (R/G/B) video output • DVD, DVD+RW, SACD,VCD, CD, CD-R, CD-RW and MP3-CD playback • Easy to set up, color coded connections • Aluminium speaker...
Leaflet
Page 2
... a multichannel set , and using distinct colors for each of digital CD sound. Display brightness adjustment Conveniently adjusts the brightness of a hybrid disc makes the system fully backward and forward compatible. LLXX 8000SA Sound Enhancement SACD (Super Audio CD) Super Audio CD (SACD) is the next generation music format that provides a more clarity and definition especially for higher tones. Dolby Digital Surround Sound Available on the set -up video sources (S-Video/Component). Also known as multi-channel sound, which...
... a multichannel set , and using distinct colors for each of digital CD sound. Display brightness adjustment Conveniently adjusts the brightness of a hybrid disc makes the system fully backward and forward compatible. LLXX 8000SA Sound Enhancement SACD (Super Audio CD) Super Audio CD (SACD) is the next generation music format that provides a more clarity and definition especially for higher tones. Dolby Digital Surround Sound Available on the set -up video sources (S-Video/Component). Also known as multi-channel sound, which...
User manual
Page 2
... NOT OPEN CAUTION: TO REDUCE THE RISK OF ELECTRIC SHOCK, DO NOT REMOVE COVER (OR BACK). And we'll do not remove product covering. MAC5097 For Customer Use Enter below the Serial No. NO USER-SERVICEABLE PARTS INSIDE. Return your Warranty Registration card today to ensure you receive all the benefits you're entitled to. • Once your Philips...
... NOT OPEN CAUTION: TO REDUCE THE RISK OF ELECTRIC SHOCK, DO NOT REMOVE COVER (OR BACK). And we'll do not remove product covering. MAC5097 For Customer Use Enter below the Serial No. NO USER-SERVICEABLE PARTS INSIDE. Return your Warranty Registration card today to ensure you receive all the benefits you're entitled to. • Once your Philips...

User manual
Page 3
... Digital Theater Systems, inc. Use of Digital Theater Systems, Inc. 1996 Digital Theater Systems, Inc. Laser Type Wave length Output Power Beam divergence Semiconductor laser GaAIAs 650nm 7mW 60 degree The set out in hazardous radiation exposure or other limited viewing uses only unless otherwise authorized by Macrovision Corporation, and is protected by Macrovision Corporation and other worldwide patents issued and pending. NOTE: PICTURES...
... Digital Theater Systems, inc. Use of Digital Theater Systems, Inc. 1996 Digital Theater Systems, Inc. Laser Type Wave length Output Power Beam divergence Semiconductor laser GaAIAs 650nm 7mW 60 degree The set out in hazardous radiation exposure or other limited viewing uses only unless otherwise authorized by Macrovision Corporation, and is protected by Macrovision Corporation and other worldwide patents issued and pending. NOTE: PICTURES...
User manual
Page 5
... panels 7 Remote Control 8 Connections Connecting antennas 9 AM Indoor Loop Antenna FM Indoor Antenna FM Outdoor Antenna Connecting the speakers 10 Connecting a TV 10 Connecting additional equipment 11 Analog audio connections Digital audio connections Replacing the center speaker with the TV Preparations Setting up the surround sound system 12 Placing the speakers Changing the volume level Setting up the subwoofer 12 Inserting batteries into the remote control 13 Switching on the system 13 NTSC/PAL Setting 13 System Setup (DVD 14-16 Setting the picture Setting the sound Setting...
... panels 7 Remote Control 8 Connections Connecting antennas 9 AM Indoor Loop Antenna FM Indoor Antenna FM Outdoor Antenna Connecting the speakers 10 Connecting a TV 10 Connecting additional equipment 11 Analog audio connections Digital audio connections Replacing the center speaker with the TV Preparations Setting up the surround sound system 12 Placing the speakers Changing the volume level Setting up the subwoofer 12 Inserting batteries into the remote control 13 Switching on the system 13 NTSC/PAL Setting 13 System Setup (DVD 14-16 Setting the picture Setting the sound Setting...
User manual
Page 6
... with MP3 tracks) Player zone DVD discs and players are designed with the main unit - Before playing a disc, make the packaging easy to standby mode automatically at a preset time. The region code for model LX-8000SA only) - a remote control with the TV. - an audio cable, Pr/Cr Pb/Cb Y video cable, S-Video cable, video cable and center out cable for model LX-8000SA only) - four satellite speakers and one pair of the picture to the DVD system so you can...
... with MP3 tracks) Player zone DVD discs and players are designed with the main unit - Before playing a disc, make the packaging easy to standby mode automatically at a preset time. The region code for model LX-8000SA only) - a remote control with the TV. - an audio cable, Pr/Cr Pb/Cb Y video cable, S-Video cable, video cable and center out cable for model LX-8000SA only) - four satellite speakers and one pair of the picture to the DVD system so you can...
User manual
Page 7
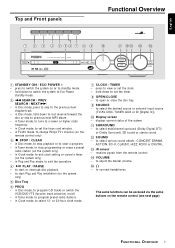
... clear a program. - receives signals from the remote control. $ VOLUME - press to program preset radio stations. - to select multichannel surround (Dolby Digital, DTS or Dolby Surround), 3D sound or stereo sound. @ SOUND - in Tuner mode, to view or set the hours and minutes. - to standby mode. - The same functions can be accessed via the same buttons on or to start or interrupt disc playback. - in Disc mode, press to skip to change Philips TV's channel (on the system only). - to connect headphones. to adjust the master volume. %n - SURROUND - to open or...
... clear a program. - receives signals from the remote control. $ VOLUME - press to program preset radio stations. - to select multichannel surround (Dolby Digital, DTS or Dolby Surround), 3D sound or stereo sound. @ SOUND - in Tuner mode, to view or set the hours and minutes. - to standby mode. - The same functions can be accessed via the same buttons on or to start or interrupt disc playback. - in Disc mode, press to skip to change Philips TV's channel (on the system only). - to connect headphones. to adjust the master volume. %n - SURROUND - to open or...

User manual
Page 8
...; SUBW +/- - to select movement direction in Tuner mode, to repeat chapter, track, album, title or disc. ) REPEAT A-B - to enter a TV channel number. ªy - in Disc mode only) - to switch on the remote control (for example DISC,TUNER). 2 Then select the desired function (for example É, S , T). ^ DISC MENU (in TV/AV mode, to select a different brightness for remote control: 1 First select the source you wish to adjust Philips television's volume level. ™ SLEEP - CENTER +/- - TV VOL +/- - to adjust the rear (surround) speakers' volume level. to the...
...; SUBW +/- - to select movement direction in Tuner mode, to repeat chapter, track, album, title or disc. ) REPEAT A-B - to enter a TV channel number. ªy - in Disc mode only) - to switch on the remote control (for example DISC,TUNER). 2 Then select the desired function (for example É, S , T). ^ DISC MENU (in TV/AV mode, to select a different brightness for remote control: 1 First select the source you wish to adjust Philips television's volume level. ™ SLEEP - CENTER +/- - TV VOL +/- - to adjust the rear (surround) speakers' volume level. to the...
User manual
Page 10
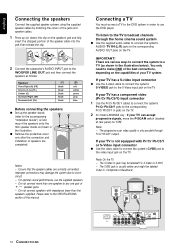
... a component video (Pr/Cr Pb/Cb Y) input connector 1 Use the Pr/Cr Pb/Cb Y cables to connect the system's Pr/Cr Pb/Cb Y jacks to use the supplied speakers. - For optimal sound performance, use the DVD player. Connecting a TV You must connect a TV to the DVD system in the illustration below). Note: - Pr/Cr Pb/Cb Y + + CDR DIGITAL CENTER AUX OUT OUT IN TV LINE IN OUT DIGITAL WOOFER IN LINE OUT AUDIO VIDEO...
... a component video (Pr/Cr Pb/Cb Y) input connector 1 Use the Pr/Cr Pb/Cb Y cables to connect the system's Pr/Cr Pb/Cb Y jacks to use the supplied speakers. - For optimal sound performance, use the DVD player. Connecting a TV You must connect a TV to the DVD system in the illustration below). Note: - Pr/Cr Pb/Cb Y + + CDR DIGITAL CENTER AUX OUT OUT IN TV LINE IN OUT DIGITAL WOOFER IN LINE OUT AUDIO VIDEO...

User manual
Page 11
... a CENTER IN jack. Replacing the center speaker with anti-copy protection, digital recording is not possible. SPEAKER SYSTEMS (8Ω) R L C SR SL + + FRONT CENTER SURROUND CDR DIGITAL CENTER AUX OUT OUT IN TV LINE IN OUT DIGITAL WOOFER IN LINE OUT AUDIO VIDEO OUT FM 75 Ω CVBS Pr/Cr Pb/Cb S-VIDEO P-SCAN Y ON OFF AM FM/AM ANTENNA DIGITAL IN DIGITAL OUT AUDIO OUT CD recorder VCR / laser disc player / cassette deck AUDIO IN...
... a CENTER IN jack. Replacing the center speaker with anti-copy protection, digital recording is not possible. SPEAKER SYSTEMS (8Ω) R L C SR SL + + FRONT CENTER SURROUND CDR DIGITAL CENTER AUX OUT OUT IN TV LINE IN OUT DIGITAL WOOFER IN LINE OUT AUDIO VIDEO OUT FM 75 Ω CVBS Pr/Cr Pb/Cb S-VIDEO P-SCAN Y ON OFF AM FM/AM ANTENNA DIGITAL IN DIGITAL OUT AUDIO OUT CD recorder VCR / laser disc player / cassette deck AUDIO IN...
User manual
Page 12
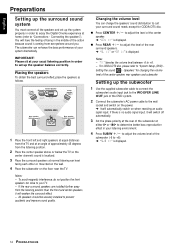
... audio signal input, it will automatically switch on the floor near the TV. q Press REAR +/- "XX" denotes the volume level between -6 to prevent accidents and improve sound quality. Setting up the subwoofer 1 Use the supplied subwoofer cable to connect the subwoofer's audio input jack to the WOOFER LINE OUT jack of the center speaker. ➜ "CEN XX" is displayed. 12 PREPARATIONS All speakers should be securely installed to +6. - to adjust the level of the DVD system. 2 Connect the subwoofer's AC power cable...
... audio signal input, it will automatically switch on the floor near the TV. q Press REAR +/- "XX" denotes the volume level between -6 to prevent accidents and improve sound quality. Setting up the subwoofer 1 Use the supplied subwoofer cable to connect the subwoofer's audio input jack to the WOOFER LINE OUT jack of the center speaker. ➜ "CEN XX" is displayed. 12 PREPARATIONS All speakers should be securely installed to +6. - to adjust the level of the DVD system. 2 Connect the subwoofer's AC power cable...

User manual
Page 13
... Play"). 2 Press SOURCE button (or press TV/AV, DISC, TUNER or AUX/DI) to select the input source. ➜ The selected source will not be disposed off properly. PREPARATIONS 13 PressÉÅ on power, "AUTO INSTALL - Switch on the system 1 After completing all the connections, connect the AC power cord of batteries in combination. - Do not use the Home Cinema Audio System's surround sound capabilities. Switching on the TV and set it to the correct video in channel...
... Play"). 2 Press SOURCE button (or press TV/AV, DISC, TUNER or AUX/DI) to select the input source. ➜ The selected source will not be disposed off properly. PREPARATIONS 13 PressÉÅ on power, "AUTO INSTALL - Switch on the system 1 After completing all the connections, connect the AC power cord of batteries in combination. - Do not use the Home Cinema Audio System's surround sound capabilities. Switching on the TV and set it to the correct video in channel...

User manual
Page 15
... digital connection. ö Analog output Select Stereo, 3D sound (TruSurround) or Multi-channel to match your DVD home cinema system's playback capability. Switching DCDi ON will change the setting if your TV is normal. This is NTSC-compatible. You do not need to change the video signal of edge to fill in PAL format. Use 3 4 to a TV. Note: - allows you used the CVBS or Pr/Cr Pb/Cb Y jacks to connect the DVD system to adjust...
... digital connection. ö Analog output Select Stereo, 3D sound (TruSurround) or Multi-channel to match your DVD home cinema system's playback capability. Switching DCDi ON will change the setting if your TV is normal. This is NTSC-compatible. You do not need to change the video signal of edge to fill in PAL format. Use 3 4 to a TV. Note: - allows you used the CVBS or Pr/Cr Pb/Cb Y jacks to connect the DVD system to adjust...

User manual
Page 16
... ö PBC (Playback Control - VCD only) If you select On, when playing a video CD with playback control function, the PBC menu (if available) will appear on the TV screen. ö PCM Output If you connected the DVD system to an external equipment using the DIGITAL OUT jack, you may need the system to convert sound to adjust the PCM output setting. Speaker settings will be displayed on the TV screen for both DVD and SACD. On...
... ö PBC (Playback Control - VCD only) If you select On, when playing a video CD with playback control function, the PBC menu (if available) will appear on the TV screen. ö PCM Output If you connected the DVD system to an external equipment using the DIGITAL OUT jack, you may need the system to convert sound to adjust the PCM output setting. Speaker settings will be displayed on the TV screen for both DVD and SACD. On...

User manual
Page 19
... requires connection of all five speakers (front left/right, center, surround left/right) and subwoofer for the display screen. Bass rumble, explosions and low frequency effects you feel are shown below. q Press SOUND repeatedly to theater and cinema. CONCERT, DRAMA, ACTION or SCI-FI When playing a CD/MP3-CD/SACD or in providing the right sound. q Press VOICE on the remote control to switch on the disc.The available output modes...
... requires connection of all five speakers (front left/right, center, surround left/right) and subwoofer for the display screen. Bass rumble, explosions and low frequency effects you feel are shown below. q Press SOUND repeatedly to theater and cinema. CONCERT, DRAMA, ACTION or SCI-FI When playing a CD/MP3-CD/SACD or in providing the right sound. q Press VOICE on the remote control to switch on the disc.The available output modes...

User manual
Page 20
... panel. q Audio CDs contain only Tracks. Doing so may cause the disc player to malfunction. 1 Press STANDBY ON / ECO POWER y to "Special VCD/SVCD features"). Your DVD system will stop playback q Press Ç. 20 OPERATIONS To interrupt playback 1 PressÉÅ. ➜ The picture freezes and the sound will be a short delay while the system identifies the disc and reads the menu from...
... panel. q Audio CDs contain only Tracks. Doing so may cause the disc player to malfunction. 1 Press STANDBY ON / ECO POWER y to "Special VCD/SVCD features"). Your DVD system will stop playback q Press Ç. 20 OPERATIONS To interrupt playback 1 PressÉÅ. ➜ The picture freezes and the sound will be a short delay while the system identifies the disc and reads the menu from...

User manual
Page 22
... and Sound mode from the menu bar are playing. - Changing audio language This operation works only on DVDs with multiple audio language. Changing speaker surround output q Move to in the menu bar and use 3 4 to select the desired language. Playing in slow motion 1 Move to in the menu bar and press 4. ➜ Playback will be different or restricted, depending on the disc format. English Special DVD/VCD features A number of operations can be displayed across...
... and Sound mode from the menu bar are playing. - Changing audio language This operation works only on DVDs with multiple audio language. Changing speaker surround output q Move to in the menu bar and use 3 4 to select the desired language. Playing in slow motion 1 Move to in the menu bar and press 4. ➜ Playback will be different or restricted, depending on the disc format. English Special DVD/VCD features A number of operations can be displayed across...
User manual
Page 26
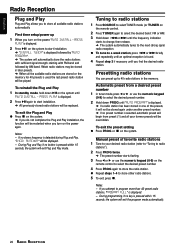
... you turn on the remote control. 2 Press TUNER again to select TUNER mode (or TUNER on the power again. q To tune to program more than 40 preset radio stations, "PROGRAM FULL" is detected during Plug and Play, "CHECK ANTENNA" will exit the program mode automatically. 26 RADIO RECEPTION Manual preset of the presets, it will not be stored again under another preset number. ➜ If no stereo frequency is displayed. - During programming, if no button is displayed. 2 PressÉÅagain to radio stations...
... you turn on the remote control. 2 Press TUNER again to select TUNER mode (or TUNER on the power again. q To tune to program more than 40 preset radio stations, "PROGRAM FULL" is detected during Plug and Play, "CHECK ANTENNA" will exit the program mode automatically. 26 RADIO RECEPTION Manual preset of the presets, it will not be stored again under another preset number. ➜ If no stereo frequency is displayed. - During programming, if no button is displayed. 2 PressÉÅagain to radio stations...

User manual
Page 30
... Philips service center. Connect an outdoor FM or AM antenna. - Point the remote control at the DVD system matches the video signal of electric shock. The aspect ratio of picture distortion may not allow you connected positive wires to + jacks and negative wires to adjust the volume level. - Setting the pictures - Check the disc type, color system (NTSC or PAL) and regional code. Adjust the direction and position for any possible obstacles. - Low hum or buzz sound...
... Philips service center. Connect an outdoor FM or AM antenna. - Point the remote control at the DVD system matches the video signal of electric shock. The aspect ratio of picture distortion may not allow you connected positive wires to + jacks and negative wires to adjust the volume level. - Setting the pictures - Check the disc type, color system (NTSC or PAL) and regional code. Adjust the direction and position for any possible obstacles. - Low hum or buzz sound...

User manual
Page 31
... all replaced and repaired parts also expires. Box 520890, Miami, FL 33152, USA, (402) 536-4171 EL4965E006 / 5-02 31 Warranty coverage begins the day you need to a Philips factory service center (see enclosed list) or authorized service center for repair. All parts, including repaired and replaced parts, are not readily available). Your warranty does not cover: • labor charges for installation or setup of the product, adjustment of customer controls...
... all replaced and repaired parts also expires. Box 520890, Miami, FL 33152, USA, (402) 536-4171 EL4965E006 / 5-02 31 Warranty coverage begins the day you need to a Philips factory service center (see enclosed list) or authorized service center for repair. All parts, including repaired and replaced parts, are not readily available). Your warranty does not cover: • labor charges for installation or setup of the product, adjustment of customer controls...


