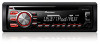

Owner's Manual
Page 2
Table of Contents Before You Start 3 Getting Started 4 Radio...7 CD/USB/iPod/AUX 7 App Mode 9 Pandora 10 Settings 10 FUNCTION settings 11 AUDIO settings 11 SYSTEM settings 12 ILLUMINATION settings 12 MIXTRAX settings 13 Connections/Installation 14 Additional Information 16 2 En About this manual: • In the following instructions, a USB memory or USB audio player are referred to as "USB device". • In this manual, iPod and iPhone are referred to as "iPod".
Table of Contents Before You Start 3 Getting Started 4 Radio...7 CD/USB/iPod/AUX 7 App Mode 9 Pandora 10 Settings 10 FUNCTION settings 11 AUDIO settings 11 SYSTEM settings 12 ILLUMINATION settings 12 MIXTRAX settings 13 Connections/Installation 14 Additional Information 16 2 En About this manual: • In the following instructions, a USB memory or USB audio player are referred to as "USB device". • In this manual, iPod and iPhone are referred to as "iPod".

Owner's Manual
Page 3
... sound level, set the dial and leave it there. Please keep the volume low enough to install or service this device may be deceiving. However, there is in Your Hands Get the most importantly, without contacting them in a particular installation. Over time, your hearing "comfort level" adapts to higher volumes of your vehicle in a safe location before using this unit or the authorized PIONEER Service Station for Pioneer products...
... sound level, set the dial and leave it there. Please keep the volume low enough to install or service this device may be deceiving. However, there is in Your Hands Get the most importantly, without contacting them in a particular installation. Over time, your hearing "comfort level" adapts to higher volumes of your vehicle in a safe location before using this unit or the authorized PIONEER Service Station for Pioneer products...
Owner's Manual
Page 4
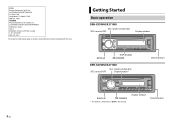
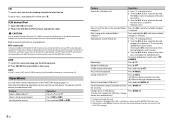
... SUPPORT DIVISION P.O. CUSTOMER SATISFACTION DEPARTMENT 340 Ferrier Street Unit 2 Markham, Ontario L3R 2Z5, Canada 1-877-283-5901 905-479-4411 For warranty information please see the Limited Warranty sheet included with this unit. Getting Started Basic operation DEH-X3700UI/X3710UI M.C. (multi-control) dial SRC (source)/OFF Display window BAND/ DISP (display) /DIMMER DEH-X2700UI/X2710UI M.C. (multi-control) dial SRC (source)/OFF Display button* Detach button 4 En BAND/ /DIMMER...
... SUPPORT DIVISION P.O. CUSTOMER SATISFACTION DEPARTMENT 340 Ferrier Street Unit 2 Markham, Ontario L3R 2Z5, Canada 1-877-283-5901 905-479-4411 For warranty information please see the Limited Warranty sheet included with this unit. Getting Started Basic operation DEH-X3700UI/X3710UI M.C. (multi-control) dial SRC (source)/OFF Display window BAND/ DISP (display) /DIMMER DEH-X2700UI/X2710UI M.C. (multi-control) dial SRC (source)/OFF Display button* Detach button 4 En BAND/ /DIMMER...
Owner's Manual
Page 5
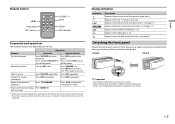
... Remote Control / FUNCTION SRC (source) VOLUME +/- dial. Select a source Press SRC/OFF repeatedly. Change the display information Press DISP repeatedly. To retract the antenna, turn off . Appears when the button is set (page 11). Adjust the volume Turn the M.C. Press again to prevent theft. Detaching the front panel Detach the front panel to unmute. Remove any cables and devices attached to turn off the power. Return to mute the unit. Appears when random/shuffle play is set...
... Remote Control / FUNCTION SRC (source) VOLUME +/- dial. Select a source Press SRC/OFF repeatedly. Change the display information Press DISP repeatedly. To retract the antenna, turn off . Appears when the button is set (page 11). Adjust the volume Turn the M.C. Press again to prevent theft. Detaching the front panel Detach the front panel to unmute. Remove any cables and devices attached to turn off the power. Return to mute the unit. Appears when random/shuffle play is set...

Owner's Manual
Page 6
... time. Then install a new battery. • When disposing of no operation. dial to adjust the minute, then press to replace the battery Insert the CR2025 (3 V) battery with metallic tools or objects. • If the battery leaks, remove the battery and wipe the remote control completely clean. How to confirm. [QUIT] appears. 4 Turn the M.C. See page 12 for disposal. • "Perchlorate Material - Canceling the demonstration display (DEMO...
... time. Then install a new battery. • When disposing of no operation. dial to adjust the minute, then press to replace the battery Insert the CR2025 (3 V) battery with metallic tools or objects. • If the battery leaks, remove the battery and wipe the remote control completely clean. How to confirm. [QUIT] appears. 4 Turn the M.C. See page 12 for disposal. • "Perchlorate Material - Canceling the demonstration display (DEMO...
Owner's Manual
Page 7
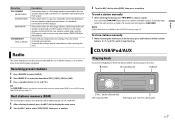
... select [RADIO]. 2 Press BAND/ to select the band from the device before connecting it stops flashing. TIP The / buttons can be set to display the main menu. 2 Turn the M.C. To store stations manually 1 While receiving the station you may result in the FUNCTION settings (page 11). Select when there is a passive subwoofer connected directly to the rear speaker output leads and there is set to the unit. (eject) Disc loading slot USB port M.C. (multi-control) dial SRC (source)/OFF AUX input jack (3.5 mm stereo...
... select [RADIO]. 2 Press BAND/ to select the band from the device before connecting it stops flashing. TIP The / buttons can be set to display the main menu. 2 Turn the M.C. To store stations manually 1 While receiving the station you may result in the FUNCTION settings (page 11). Select when there is a passive subwoofer connected directly to the rear speaker output leads and there is set to the unit. (eject) Disc loading slot USB port M.C. (multi-control) dial SRC (source)/OFF AUX input jack (3.5 mm stereo...
Owner's Manual
Page 8
... audio files only *2 This function is disabled when USB is set by the FUNCTION settings. 8 En dial when a folder/ category is selected. dial to select a letter, then press to display the list. 2 Turn the M.C. button on the unit, the sound retriever function can make various adjustments in the selected folder/ Press the M.C. MTP connection A device installed with the device. Press or . dial twice also enters the alphabetical search mode.) 3 Turn the M.C. To eject a disc, stop...
... audio files only *2 This function is disabled when USB is set by the FUNCTION settings. 8 En dial when a folder/ category is selected. dial to select a letter, then press to display the list. 2 Turn the M.C. button on the unit, the sound retriever function can make various adjustments in the selected folder/ Press the M.C. MTP connection A device installed with the device. Press or . dial twice also enters the alphabetical search mode.) 3 Turn the M.C. To eject a disc, stop...
Owner's Manual
Page 9
... for DEH-X2700UI/X2710UI). • Switching the control mode to [CONTROL iPod/CTRL iPod] pauses song playback. Use the connected iPod to resume playback. • The following iPod models are still accessible from the link play mode. 2 Turn the M.C. For details on compatible devices, visit our website. Important Use of third party apps may be operated from the unit. For iPhone users This function is compatible with iPhones and iPod touches installed with this mode, the connected iPod cannot be played after...
... for DEH-X2700UI/X2710UI). • Switching the control mode to [CONTROL iPod/CTRL iPod] pauses song playback. Use the connected iPod to resume playback. • The following iPod models are still accessible from the link play mode. 2 Turn the M.C. For details on compatible devices, visit our website. Important Use of third party apps may be operated from the unit. For iPhone users This function is compatible with iPhones and iPod touches installed with this mode, the connected iPod cannot be played after...

Owner's Manual
Page 10
... the latest version before use. 1 Connect this unit with Pioneer. dial. Press and hold the M.C. NOTE Some functions of the Pandora application to Pandora Update the firmware of Pandora may not be set by the FUNCTION settings. dial to select the options, then press to display the main menu. 2 Turn the M.C. Press and hold 5/ . Basic operations You can make various adjustments in the FUNCTION settings (page 11). Press (list...
... the latest version before use. 1 Connect this unit with Pioneer. dial. Press and hold the M.C. NOTE Some functions of the Pandora application to Pandora Update the firmware of Pandora may not be set by the FUNCTION settings. dial to select the options, then press to display the main menu. 2 Turn the M.C. Press and hold 5/ . Basic operations You can make various adjustments in the FUNCTION settings (page 11). Press (list...

Owner's Manual
Page 11
...), [OFF] Enhance compressed audio and restore rich sound. (Not available when USB is selected as a source and the MIXTRAX function is set to on.) AUDIO BOOK iPod [FASTER], [NORMAL], [SLOWER] Change the playback speed. (Not available when [CONTROL iPod/CTRL iPod] is a shared setting used for each of the below combinations are output from the subwoofer. AUDIO settings Menu Item Description FADER*1 Adjust the front and rear speaker balance. SUB.W CTRL*2*3 Cut-off frequency: [OFF], [50HZ], [63HZ...
...), [OFF] Enhance compressed audio and restore rich sound. (Not available when USB is selected as a source and the MIXTRAX function is set to on.) AUDIO BOOK iPod [FASTER], [NORMAL], [SLOWER] Change the playback speed. (Not available when [CONTROL iPod/CTRL iPod] is a shared setting used for each of the below combinations are output from the subwoofer. AUDIO settings Menu Item Description FADER*1 Adjust the front and rear speaker balance. SUB.W CTRL*2*3 Cut-off frequency: [OFF], [50HZ], [63HZ...
Owner's Manual
Page 12
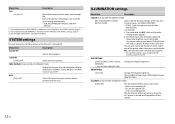
... unit is selected in [SUB.W]. SYSTEM settings You can also customize the preset colors. INFO DISPLAY (Only for the keys/display of this setting. 12 En Menu Item SLA [+4] to [10] Change the display brightness. AUX [ON], [OFF] Set to [ON] when using an auxiliary device connected to the same setting automatically. • USB, iPod, PANDORA (iPhone), and APP (iPhone) *1 Not available when [SUB.W/SUB.W] is selected in [SP-P/O MODE] in the INITIAL settings (page 7). *2 Not available when [REAR/REAR...
... unit is selected in [SUB.W]. SYSTEM settings You can also customize the preset colors. INFO DISPLAY (Only for the keys/display of this setting. 12 En Menu Item SLA [+4] to [10] Change the display brightness. AUX [ON], [OFF] Set to [ON] when using an auxiliary device connected to the same setting automatically. • USB, iPod, PANDORA (iPhone), and APP (iPhone) *1 Not available when [SUB.W/SUB.W] is selected in [SP-P/O MODE] in the INITIAL settings (page 7). *2 Not available when [REAR/REAR...

Owner's Manual
Page 13
... changes randomly according to the low pass mode. FLASH AREA (Only for DEH-X3700UI/X3710UI) [KEY/DISPLAY], [KEY], [OFF] Select the area for DEH-X3700UI/X3710UI) [SOUND LEVEL 1] to [SOUND LEVEL 6] Change the illumination effect according to the audio level. DISPLAY FX/DISP FX [ON], [OFF] Set the MIXTRAX special effects on /off . MIX PATTERN (Only for DEH-X2700UI/X2710UI) [SOUND LEVEL] Change the MIXTRAX special effects according to the sound and bass level...
... changes randomly according to the low pass mode. FLASH AREA (Only for DEH-X3700UI/X3710UI) [KEY/DISPLAY], [KEY], [OFF] Select the area for DEH-X3700UI/X3710UI) [SOUND LEVEL 1] to [SOUND LEVEL 6] Change the illumination effect according to the audio level. DISPLAY FX/DISP FX [ON], [OFF] Set the MIXTRAX special effects on /off . MIX PATTERN (Only for DEH-X2700UI/X2710UI) [SOUND LEVEL] Change the MIXTRAX special effects according to the sound and bass level...
Owner's Manual
Page 14
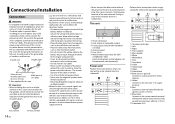
... with other device must be connected (sold separately), make sure to metal parts of the ignition key may result in fire, generation of the battery before installation. - When installing this unit is equipped with a glass antenna, connect it to follow the directions below. - Never wire the negative speaker cable directly to the system control terminal of an external power amp. Power cord input Rear output or subwoofer output Front output (Only for DEH-X3700UI/ X3710UI) Antenna input Fuse (10 A) Wired remote input (Only...
... with other device must be connected (sold separately), make sure to metal parts of the ignition key may result in fire, generation of the battery before installation. - When installing this unit is equipped with a glass antenna, connect it to follow the directions below. - Never wire the negative speaker cable directly to the system control terminal of an external power amp. Power cord input Rear output or subwoofer output Front output (Only for DEH-X3700UI/ X3710UI) Antenna input Fuse (10 A) Wired remote input (Only...

Owner's Manual
Page 15
.... DEH-X2700UI/X2710UI Leave ample 5 cm space System remote control Connect to the green and green/black leads. Subwoofer (4 Ω) × 2 Orange/white (Only for DEH-X3700UI/ X3710UI) Connect to [SP-P/O MODE] (page 7). Power amp (sold separately) To front output Front speaker To rear output or subwoofer output Rear speaker or subwoofer 5 cm DIN front/rear mount This unit can be sure to connect the subwoofer to the vehicle. • Do not install this unit. English When using a subwoofer...
.... DEH-X2700UI/X2710UI Leave ample 5 cm space System remote control Connect to the green and green/black leads. Subwoofer (4 Ω) × 2 Orange/white (Only for DEH-X3700UI/ X3710UI) Connect to [SP-P/O MODE] (page 7). Power amp (sold separately) To front output Front speaker To rear output or subwoofer output Rear speaker or subwoofer 5 cm DIN front/rear mount This unit can be sure to connect the subwoofer to the vehicle. • Do not install this unit. English When using a subwoofer...

Owner's Manual
Page 16
... inserted disc contains DRM protected files. - Replace the USB device. Make sure the connection cable for the iPod has not shorted out (e.g., not caught in something or damaged. The connected USB device consumes more than maximum allowable current. - ERROR-19 Communication failed. - Once the iPod's main menu is activated. - Format the USB device with a compatible USB device. Disconnect the cable from the iPod. Error messages Common AMP ERROR This unit fails to operate or the speaker connection...
... inserted disc contains DRM protected files. - Replace the USB device. Make sure the connection cable for the iPod has not shorted out (e.g., not caught in something or damaged. The connected USB device consumes more than maximum allowable current. - ERROR-19 Communication failed. - Once the iPod's main menu is activated. - Format the USB device with a compatible USB device. Disconnect the cable from the iPod. Error messages Common AMP ERROR This unit fails to operate or the speaker connection...

Owner's Manual
Page 17
... prevent ejection of discs cannot be displayed as the equalizer and repeat play are cracked, chipped or warped - The discs may vary. - Operations may warp making the disc unplayable. - NOT FOUND No related songs. - Try again later. Wait until Pandora allows you are not supported. • Firmly secure the USB storage device before driving. CHECK APP This version of area. - Select a station. Apps...
... prevent ejection of discs cannot be displayed as the equalizer and repeat play are cracked, chipped or warped - The discs may vary. - Operations may warp making the disc unplayable. - NOT FOUND No related songs. - Try again later. Wait until Pandora allows you are not supported. • Firmly secure the USB storage device before driving. CHECK APP This version of area. - Select a station. Apps...

Owner's Manual
Page 18
... playback of audio files on media players, smartphones, or other devices while using this product. • Do not leave discs or a USB storage device in the United States and/or other countries. Not compatible protected files 18 En Partitioned USB device Only the first partition can be supported. Older versions may not be played. iPod touch (1st through 7th generation) - iPhone 3GS - Sequence of audio file depends...
... playback of audio files on media players, smartphones, or other devices while using this product. • Do not leave discs or a USB storage device in the United States and/or other countries. Not compatible protected files 18 En Partitioned USB device Only the first partition can be supported. Older versions may not be played. iPod touch (1st through 7th generation) - iPhone 3GS - Sequence of audio file depends...
Owner's Manual
Page 19
...) Audio Maximum power output: 50 W × 4 70 W × 1/2 Ω (for the operation of this accessory with iPod or iPhone may affect wireless performance. Used with safety and regulatory standards. Lightning is not responsible for subwoofer) Continuous power output: 22 W × 4 (50 Hz to 15 000 Hz, 5 % THD, 4 Ω load, both channels driven) Load impedance: 4 Ω (4 Ω to 8 Ω allowable) Preout maximum output level...
...) Audio Maximum power output: 50 W × 4 70 W × 1/2 Ω (for the operation of this accessory with iPod or iPhone may affect wireless performance. Used with safety and regulatory standards. Lightning is not responsible for subwoofer) Continuous power output: 22 W × 4 (50 Hz to 15 000 Hz, 5 % THD, 4 Ω load, both channels driven) Load impedance: 4 Ω (4 Ω to 8 Ω allowable) Preout maximum output level...


