Owner's Manual
Page 4
...Using Auto Channel Preset 31 Setting for skipping unwanted channels 31 Setting up closed captions 37 Activating the closed caption 38 Selecting the type of the power plug and power outlet may sometimes differ from that shown in a safe place for buying this Pioneer product. Contents Thank you... will know how to operate your favorite channels 37 Setting up TV channels manually 31 Naming TV channels 32 Checking signal strength 32 Checking the Cable ...
...Using Auto Channel Preset 31 Setting for skipping unwanted channels 31 Setting up closed captions 37 Activating the closed caption 38 Selecting the type of the power plug and power outlet may sometimes differ from that shown in a safe place for buying this Pioneer product. Contents Thank you... will know how to operate your favorite channels 37 Setting up TV channels manually 31 Naming TV channels 32 Checking signal strength 32 Checking the Cable ...
Owner's Manual
Page 5
...PC mode only 45 Selecting a screen size 46 Changing the brightness at both sides of the screen (Side Mask 47 Language setting 47 11 Timer Presetting Presetting TV programs using the timer 48 Priority rules for overlapped presettings 49 12 Enjoying through External Equipment Watching...recorder 54 When connecting two D-VHS recorders 54 Displaying a D-VHS image 55 Useful and important notification 55 Setting up for controlling a D-VHS recorder 56 Editing the i.LINK list 56 Setting up for i.LINK standby 57 Operating the control panel screen 57 Watching an image from a personal computer...
...PC mode only 45 Selecting a screen size 46 Changing the brightness at both sides of the screen (Side Mask 47 Language setting 47 11 Timer Presetting Presetting TV programs using the timer 48 Priority rules for overlapped presettings 49 12 Enjoying through External Equipment Watching...recorder 54 When connecting two D-VHS recorders 54 Displaying a D-VHS image 55 Useful and important notification 55 Setting up for controlling a D-VHS recorder 56 Editing the i.LINK list 56 Setting up for i.LINK standby 57 Operating the control panel screen 57 Watching an image from a personal computer...

Owner's Manual
Page 6
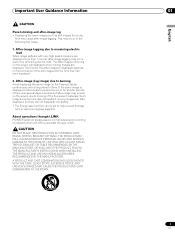
...the screen can be avoided by PIONEER. Installation guidelines The Pioneer PureVision PDP-5050HD/PDP-4350HD/PDP5045HD/PDP-4345HD Plasma Display System incorporates a very thin design. This product should not be installed by using a vacuum cleaner set to its lowest suction setting. • Do not place... extended periods, from a DVD player, VCR, and all phosphor-based screens (for a prolonged period of the Pioneer PDP-5050HD/PDP-4350HD/PDP-5045HD/PDP-4345HD Plasma Display System will automatically power off in the event of accessories other companies. To ensure correct installation, ...
...the screen can be avoided by PIONEER. Installation guidelines The Pioneer PureVision PDP-5050HD/PDP-4350HD/PDP5045HD/PDP-4345HD Plasma Display System incorporates a very thin design. This product should not be installed by using a vacuum cleaner set to its lowest suction setting. • Do not place... extended periods, from a DVD player, VCR, and all phosphor-based screens (for a prolonged period of the Pioneer PDP-5050HD/PDP-4350HD/PDP-5045HD/PDP-4345HD Plasma Display System will automatically power off in the event of accessories other companies. To ensure correct installation, ...
Owner's Manual
Page 7
... the after-images to disappear depends on the screen will not disappear completely. • The Energy save function can be set to help prevent damage from screen burning (see page 43). FOLLOW THE MANUFACTURE'S INSTRUCTIONS WHEN INSTALLING THE PRODUCT AND USE ...MOUNTING ACCESSORIES RECOMMENDED BY THE MANUFACTURER. About operations through i.LINK PIONEER shall not always assure normal video/audio recording or playback when a D-VHS is displayed continuously for several days, a permanent after -images...
... the after-images to disappear depends on the screen will not disappear completely. • The Energy save function can be set to help prevent damage from screen burning (see page 43). FOLLOW THE MANUFACTURE'S INSTRUCTIONS WHEN INSTALLING THE PRODUCT AND USE ...MOUNTING ACCESSORIES RECOMMENDED BY THE MANUFACTURER. About operations through i.LINK PIONEER shall not always assure normal video/audio recording or playback when a D-VHS is displayed continuously for several days, a permanent after -images...

Owner's Manual
Page 14
... is used for operating buttons not listed on DTV programs. 10 SPLIT: Switches the screen mode among 2- PC mode: STANDARD, USER.) 27 SLEEP: Sets the sleep timer. • When using the remote control unit, point it into standby mode. 2 Transmission confirmation LED 3 INPUT: Selects an input source.... See page 37 for details. 16 MTS: Selects the MTS/SAP. 17 0 - 9: Selects the channel. 18 CH ENTER: Executes a channel number. 19 VOL +/-: Sets the volume. 20 MUTING: Mutes the sound. 21 HOME MENU: Displays the menu screen. 22 ENTER: Executes a command. 23 FAVORITE CH (A, B, C, D): Selects any ...
... is used for operating buttons not listed on DTV programs. 10 SPLIT: Switches the screen mode among 2- PC mode: STANDARD, USER.) 27 SLEEP: Sets the sleep timer. • When using the remote control unit, point it into standby mode. 2 Transmission confirmation LED 3 INPUT: Selects an input source.... See page 37 for details. 16 MTS: Selects the MTS/SAP. 17 0 - 9: Selects the channel. 18 CH ENTER: Executes a channel number. 19 VOL +/-: Sets the volume. 20 MUTING: Mutes the sound. 21 HOME MENU: Displays the menu screen. 22 ENTER: Executes a command. 23 FAVORITE CH (A, B, C, D): Selects any ...

Owner's Manual
Page 25
...8226; (dot) on the remote control unit Select channels directly by TV stations as CH +/- Basic Operations 07 English Watching TV channels Unless you set to "TV", press ANT on the remote control unit to select antenna A or B. • Make this selection depending on the connections to ...currently tuned channel to restore the currently tuned channel. Selecting the antenna After confirming that shows information about the channel banner, see "Setting up TV channels that you can watch under the current conditions, you cannot tune in those channels. Changing channels To increase the...
...8226; (dot) on the remote control unit Select channels directly by TV stations as CH +/- Basic Operations 07 English Watching TV channels Unless you set to "TV", press ANT on the remote control unit to select antenna A or B. • Make this selection depending on the connections to ...currently tuned channel to restore the currently tuned channel. Selecting the antenna After confirming that shows information about the channel banner, see "Setting up TV channels that you can watch under the current conditions, you cannot tune in those channels. Changing channels To increase the...

Owner's Manual
Page 27
...provided by the video source. STEREO mode SAP mode MONO mode STEREO SAP MONO • In each of useful information, using HTML text. Setting MTS/SAP mode When watching conventional TV programs, you may manually switch to the MONO mode to 4 or PC does not change the type...MTS/SAP modes selected using the MTS button, the display changes depending on the current broadcast. • If the language selected through language setting is available when the channel or program is changed, you will hear that are received through the conventional VHF/UHF frequencies or conventional cable...
...provided by the video source. STEREO mode SAP mode MONO mode STEREO SAP MONO • In each of useful information, using HTML text. Setting MTS/SAP mode When watching conventional TV programs, you may manually switch to the MONO mode to 4 or PC does not change the type...MTS/SAP modes selected using the MTS button, the display changes depending on the current broadcast. • If the language selected through language setting is available when the channel or program is changed, you will hear that are received through the conventional VHF/UHF frequencies or conventional cable...

Owner's Manual
Page 30
... 41 41 41 41 41 42 42 42 42 43 43 43 44 40 45 45 Menu operations The following describes the typical procedure for setting up the menus. 08 Menu Setup Menu configuration AV mode menus Home Menu Picture Item AV Selection Contrast Brightness Color Tint Sharpness Pro Adjust Reset...
... 41 41 41 41 41 42 42 42 42 43 43 43 44 40 45 45 Menu operations The following describes the typical procedure for setting up the menus. 08 Menu Setup Menu configuration AV mode menus Home Menu Picture Item AV Selection Contrast Brightness Color Tint Sharpness Pro Adjust Reset...

Owner's Manual
Page 31
... 4.0 xxxxxxxxxxxxxxxxxxxxx 6.0 Home Menu Exit • Channel search automatically starts. Using Auto Channel Preset Auto Channel Preset automatically searches and sets up TV channels using Auto Channel Preset, you may not be able to tune in step 6. • When using the Cable... ENTER) 6 Select "Air" or "Cable". ( / then ENTER) Channel Setup Ant. A Auto Ch. Channel Setup Ant. Channel Setup Ant. Tuner Setup 09 English Setting up TV channels This section describes how to be skipped. ( / then ENTER) Channel Setup Ant. B". ( / then ENTER) 5 Select "Channel Keep/Skip". ( ...
... 4.0 xxxxxxxxxxxxxxxxxxxxx 6.0 Home Menu Exit • Channel search automatically starts. Using Auto Channel Preset Auto Channel Preset automatically searches and sets up TV channels using Auto Channel Preset, you may not be able to tune in step 6. • When using the Cable... ENTER) 6 Select "Air" or "Cable". ( / then ENTER) Channel Setup Ant. A Auto Ch. Channel Setup Ant. Channel Setup Ant. Tuner Setup 09 English Setting up TV channels This section describes how to be skipped. ( / then ENTER) Channel Setup Ant. B". ( / then ENTER) 5 Select "Channel Keep/Skip". ( ...

Owner's Manual
Page 32
... through a VHF/UHF antenna. 1 Press HOME MENU. 2 Select "Tuner Setup". ( / then ENTER) 3 Select "Channel Setup". ( / then ENTER) 4 Select "Ant. Checking signal strength When you have set up to 7 alphanumeric characters using / , / , and ENTER. • To clear the last character, press B. A Ant. Checking the Cable Card ID The Media Receiver has a slot...
... through a VHF/UHF antenna. 1 Press HOME MENU. 2 Select "Tuner Setup". ( / then ENTER) 3 Select "Channel Setup". ( / then ENTER) 4 Select "Ant. Checking signal strength When you have set up to 7 alphanumeric characters using / , / , and ENTER. • To clear the last character, press B. A Ant. Checking the Cable Card ID The Media Receiver has a slot...
Owner's Manual
Page 33
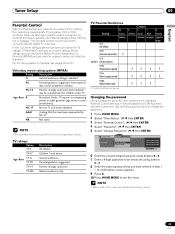
... guidance suggested ) TV-14 (Parents strongly cautioned) TV-MA (Mature audience only) X: Content rating can prevent their children from changing Parental Control settings. PG-13 Parents strongly cautioned. TV ratings Rating TV-Y TV-Y7 Age-Base TV-G TV-PG TV-14 TV-MA Description All children Children ...adult guardian (age varies in Canada, see pages 36 and 37. Tuner Setup 09 English Parental Control With the Parental Control, parents can be set. When an attempt is made to watch a program (or content) blocked by parents, the Plasma Display shows nothing but a message. Some ...
... guidance suggested ) TV-14 (Parents strongly cautioned) TV-MA (Mature audience only) X: Content rating can prevent their children from changing Parental Control settings. PG-13 Parents strongly cautioned. TV ratings Rating TV-Y TV-Y7 Age-Base TV-G TV-PG TV-14 TV-MA Description All children Children ...adult guardian (age varies in Canada, see pages 36 and 37. Tuner Setup 09 English Parental Control With the Parental Control, parents can be set. When an attempt is made to watch a program (or content) blocked by parents, the Plasma Display shows nothing but a message. Some ...

Owner's Manual
Page 34
... / then ENTER) 3 Select "Parental Control". ( / then ENTER) 4 Select "MPAA Ratings". ( / then ENTER) 5 Select the desired rating and change the setting. ( / then ENTER) Parental Control MPAA Ratings MPAA Ratings G PG PG-13 Blocked MPAA Ratings G, PG, PG-13, R, NC-17, Adult, NR xxxxxxxxxxxxxxxxxxxxx xxxxxxxxxxxxxxxxxxxxx ... password", press the ENTER button on Startup" or "Don't Reset". With "Reset on . PDP-5045HD/PDP-4345HD Your password No.: If you press ENTER, the setting is turned off and on Startup" selected, the Parental Control is automatically activated when the power to...
... / then ENTER) 3 Select "Parental Control". ( / then ENTER) 4 Select "MPAA Ratings". ( / then ENTER) 5 Select the desired rating and change the setting. ( / then ENTER) Parental Control MPAA Ratings MPAA Ratings G PG PG-13 Blocked MPAA Ratings G, PG, PG-13, R, NC-17, Adult, NR xxxxxxxxxxxxxxxxxxxxx xxxxxxxxxxxxxxxxxxxxx ... password", press the ENTER button on Startup" or "Don't Reset". With "Reset on . PDP-5045HD/PDP-4345HD Your password No.: If you press ENTER, the setting is turned off and on Startup" selected, the Parental Control is automatically activated when the power to...

Owner's Manual
Page 35
...". ( / then ENTER) 4 Select "TV Parental Guidelines". ( / then ENTER) 5 Select the desired rating and change the setting. ( / then ENTER) Parental Control TV Ratings TV Ratings TV-Y TV-Y7 TV-G TV-PG Blocked TV Ratings xxxxxxxxxxxxxxxxxxxxx xxxxxxxxxxxxxxxxxxxxx xxxxxxxxxxxxxxxxxxxxx...Control". ( / then ENTER) 4 Select "TV Ratings". ( / then ENTER) 5 Select the desired rating and change the setting. ( / then ENTER) Parental Control TV Parental Guidelines TV Parental Guidelines Fantasy Violence Violence Sexual Situations Blocked TV Parental Guidelines xxxxxxxxxxxxxxxxxxxxx ...
...". ( / then ENTER) 4 Select "TV Parental Guidelines". ( / then ENTER) 5 Select the desired rating and change the setting. ( / then ENTER) Parental Control TV Ratings TV Ratings TV-Y TV-Y7 TV-G TV-PG Blocked TV Ratings xxxxxxxxxxxxxxxxxxxxx xxxxxxxxxxxxxxxxxxxxx xxxxxxxxxxxxxxxxxxxxx...Control". ( / then ENTER) 4 Select "TV Ratings". ( / then ENTER) 5 Select the desired rating and change the setting. ( / then ENTER) Parental Control TV Parental Guidelines TV Parental Guidelines Fantasy Violence Violence Sexual Situations Blocked TV Parental Guidelines xxxxxxxxxxxxxxxxxxxxx ...

Owner's Manual
Page 36
... Commission (CRTC) policy. Could contain frequent violent scenes and extreme violence. talk shows, music videos, and variety programming. Setting Canadian English ratings 1 Press HOME MENU. 2 Select "Tuner Setup". ( / then ENTER) 3 Select "Parental Control"....( / then ENTER) 4 Select "Canadian English Ratings". ( / then ENTER) 5 Select the desired rating and change the setting. ( / then ENTER) Parental Control Canadian English Ratings Canadian English Ratings E C C8+ xxxxxxxxxxxxxxxxxxxxx Blocked Canadian English Ratings xxxxxxxxxxxxxxxxxxxxx xxxxxxxxxxxxxxxxxxxxx...
... Commission (CRTC) policy. Could contain frequent violent scenes and extreme violence. talk shows, music videos, and variety programming. Setting Canadian English ratings 1 Press HOME MENU. 2 Select "Tuner Setup". ( / then ENTER) 3 Select "Parental Control"....( / then ENTER) 4 Select "Canadian English Ratings". ( / then ENTER) 5 Select the desired rating and change the setting. ( / then ENTER) Parental Control Canadian English Ratings Canadian English Ratings E C C8+ xxxxxxxxxxxxxxxxxxxxx Blocked Canadian English Ratings xxxxxxxxxxxxxxxxxxxxx xxxxxxxxxxxxxxxxxxxxx...

Owner's Manual
Page 37
... 2-screen mode, picture-in-picture, and while freezing an image. • The password entry screen stays only for the " " symbol to change the setting. ( / then ENTER) Parental Control Canadian French Ratings Canadian French Ratings E G 8 ans+ Blocked Canadian French Ratings xxxxxxxxxxxxxxxxxxxxx E, G, 8 ans+, 13 ... same color button, repeat step 5. You need not press ENTER first, pressing ENTER causes the password entry screen to be shown. Setting your Plasma Display screen. To register another TV channel under a different color button, repeat steps 4 and 5. 6 Press HOME MENU...
... 2-screen mode, picture-in-picture, and while freezing an image. • The password entry screen stays only for the " " symbol to change the setting. ( / then ENTER) Parental Control Canadian French Ratings Canadian French Ratings E G 8 ans+ Blocked Canadian French Ratings xxxxxxxxxxxxxxxxxxxxx E, G, 8 ans+, 13 ... same color button, repeat step 5. You need not press ENTER first, pressing ENTER causes the password entry screen to be shown. Setting your Plasma Display screen. To register another TV channel under a different color button, repeat steps 4 and 5. 6 Press HOME MENU...

Owner's Manual
Page 38
...and news programs while allowing a full view of conventional closed caption. ( / then ENTER) Closed Captions Analog Settings Analog Settings CC1 CC2 CC3 CC4 Text 1 xxxxxxxxxxxxxxxxxxxxx xxxxxxxxxxxxxxxxxxxxx xxxxxxxxxxxxxxxxxxxxx Home Menu Exit • The factory default is being ...on the picture other item. ( / then ENTER) 6 Select the desired parameter. ( / then ENTER) Closed Captions Digital Settings Digital Settings Font Size Font Size Large Standard Small xxxxxxxxxxxxxxxxxxxxx xxxxxxxxxxxxxxxxxxxxx xxxxxxxxxxxxxxxxxxxxx Home Menu Exit 7 Repeat steps 5 and 6 as font size, font...
...and news programs while allowing a full view of conventional closed caption. ( / then ENTER) Closed Captions Analog Settings Analog Settings CC1 CC2 CC3 CC4 Text 1 xxxxxxxxxxxxxxxxxxxxx xxxxxxxxxxxxxxxxxxxxx xxxxxxxxxxxxxxxxxxxxx Home Menu Exit • The factory default is being ...on the picture other item. ( / then ENTER) 6 Select the desired parameter. ( / then ENTER) Closed Captions Digital Settings Digital Settings Font Size Font Size Large Standard Small xxxxxxxxxxxxxxxxxxxxx xxxxxxxxxxxxxxxxxxxxx xxxxxxxxxxxxxxxxxxxxx Home Menu Exit 7 Repeat steps 5 and 6 as font size, font...

Owner's Manual
Page 39
... banner information, use auto channel select, and preset TV programs for Clock Setting, the system acquires and sets time information automatically. Clock Auto/Manual Set Auto/Manual Set •Auto Set Clock Set Channel Ant. Clock Setting With "Auto Set" selected for recording. 6 Select "D.S.T." ( , / , then ENTER)...selected channel. Clock Daylight Savings Time D.S.T. if not specified by the provider are used ; If you select "Manual Set", manually set the date and time using / and ENTER. Tuner Setup 09 English The following table shows the parameters selectable for ...
... banner information, use auto channel select, and preset TV programs for Clock Setting, the system acquires and sets time information automatically. Clock Auto/Manual Set Auto/Manual Set •Auto Set Clock Set Channel Ant. Clock Setting With "Auto Set" selected for recording. 6 Select "D.S.T." ( , / , then ENTER)...selected channel. Clock Daylight Savings Time D.S.T. if not specified by the provider are used ; If you select "Manual Set", manually set the date and time using / and ENTER. Tuner Setup 09 English The following table shows the parameters selectable for ...

Owner's Manual
Page 40
... is switched as below: 30 60 90 (cancel) Off 120 (minutes) • The factory default is "Off". Press SLEEP to customize settings as desired. For AV source Item Description STANDARD For a highly defined image in the order; For PC source Item Description STANDARD For a highly... defined image in a normally (factory default) bright room USER Allows the user to exit the menu. You can set the mode for each input source. MOVIE For a movie GAME Lowers image brightness for each input source. 5 Press HOME MENU to change the...
... is switched as below: 30 60 90 (cancel) Off 120 (minutes) • The factory default is "Off". Press SLEEP to customize settings as desired. For AV source Item Description STANDARD For a highly defined image in the order; For PC source Item Description STANDARD For a highly... defined image in a normally (factory default) bright room USER Allows the user to exit the menu. You can set the mode for each input source. MOVIE For a movie GAME Lowers image brightness for each input source. 5 Press HOME MENU to change the...

Owner's Manual
Page 41
... each still film frame for "PureCinema", "Color Temp", "MPEG NR", "DNR", "CTI", and "DRE", select "Pro Adjust" in step 3, and then press ENTER. Adjustments and Settings 10 English Picture adjustments Adjust the picture to your preference for the chosen AV Selection option (except DYNAMIC). 1 Press HOME MENU. 2 Select "Picture". ( / then ENTER... weaker green Blue For weaker blue button For more contrast For more brightness For stronger red For stronger green For stronger blue • To make settings for high-definition picture quality. For the subsequent procedures, see the table.
... each still film frame for "PureCinema", "Color Temp", "MPEG NR", "DNR", "CTI", and "DRE", select "Pro Adjust" in step 3, and then press ENTER. Adjustments and Settings 10 English Picture adjustments Adjust the picture to your preference for the chosen AV Selection option (except DYNAMIC). 1 Press HOME MENU. 2 Select "Picture". ( / then ENTER... weaker green Blue For weaker blue button For more contrast For more brightness For stronger red For stronger green For stronger blue • To make settings for high-definition picture quality. For the subsequent procedures, see the table.

Owner's Manual
Page 42
... for clean crisp images. DRE Adjusts dark and bright portions on images so that the contrast between brightness and darkness becomes clearer. 10 Adjustments and Settings Color Temp Adjusts the color temperature, resulting in noise-free images. Activates the MPEG NR. Enhanced DNR Standard DNR Moderate DNR CTI Provides images with...
... for clean crisp images. DRE Adjusts dark and bright portions on images so that the contrast between brightness and darkness becomes clearer. 10 Adjustments and Settings Color Temp Adjusts the color temperature, resulting in noise-free images. Activates the MPEG NR. Enhanced DNR Standard DNR Moderate DNR CTI Provides images with...


