
Owner's Manual
Page 3
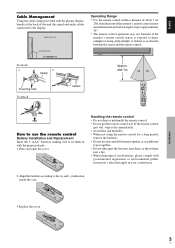
... be used in a closed cabinet or shelves. These limits are designed to service or repair the unit. Please see the section "Plasma monitor cleaning procedure" on a circuit different from that important literature concerning the operation and maintenance of this happens, turn off the power to the monitor and unplug the power cord. If the problem persists, contact your plasma monitor and keep the manual handy...
... be used in a closed cabinet or shelves. These limits are designed to service or repair the unit. Please see the section "Plasma monitor cleaning procedure" on a circuit different from that important literature concerning the operation and maintenance of this happens, turn off the power to the monitor and unplug the power cord. If the problem persists, contact your plasma monitor and keep the manual handy...
Owner's Manual
Page 4
...-based display devices and all other gas plasma displays, plasma monitors can result in a moving image whenever possible. * Change the position of the menu display from time to time. * Always power down , to clean the front panel and bezel area. As is the case with minimal contrast between colors. * Note: Burn-in which the plasma monitor is strongly recommended to use solvents such as this causes flaws on black backgrounds. Plasma monitor...
...-based display devices and all other gas plasma displays, plasma monitors can result in a moving image whenever possible. * Change the position of the menu display from time to time. * Always power down , to clean the front panel and bezel area. As is the case with minimal contrast between colors. * Note: Burn-in which the plasma monitor is strongly recommended to use solvents such as this causes flaws on black backgrounds. Plasma monitor...
Owner's Manual
Page 6
... manufacturers instructions. 8. Refer all instructions. 5. The power supply cord or the plug has been damaged; Heed all warnings. 4. Only use this apparatus near any of time. 14. Wall Mounting - Objects have fallen into the enclosure through openings. WARNING To reduce the risk of fire or electric shock, do not expose this apparatus during lightning storms or when unused for replacement of...
... manufacturers instructions. 8. Refer all instructions. 5. The power supply cord or the plug has been damaged; Heed all warnings. 4. Only use this apparatus near any of time. 14. Wall Mounting - Objects have fallen into the enclosure through openings. WARNING To reduce the risk of fire or electric shock, do not expose this apparatus during lightning storms or when unused for replacement of...
Owner's Manual
Page 8
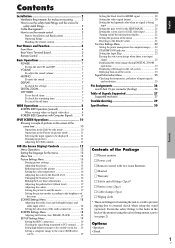
... View 4 Rear View/ Terminal Board 5 Remote Control 6 Basic Operations 7 POWER 7 To turn the unit ON and OFF 7 VOLUME 7 To adjust the sound volume 7 MUTING 7 To mute the sound 7 DISPLAY 7 To check the settings 7 DIGITAL ZOOM 7 OFF TIMER 7 To set the off timer 7 To check the remaining time 7 To cancel the off timer 7 WIDE Operations 8 SCREEN SIZE Operation (manual 8 When viewing videos or digital video discs 8 SCREEN SIZE Operation with Computer Signals .......... 9 Setting the black level for HDMI signal 20 Setting the video signal format 20 Setting the background color...
... View 4 Rear View/ Terminal Board 5 Remote Control 6 Basic Operations 7 POWER 7 To turn the unit ON and OFF 7 VOLUME 7 To adjust the sound volume 7 MUTING 7 To mute the sound 7 DISPLAY 7 To check the settings 7 DIGITAL ZOOM 7 OFF TIMER 7 To set the off timer 7 To check the remaining time 7 To cancel the off timer 7 WIDE Operations 8 SCREEN SIZE Operation (manual 8 When viewing videos or digital video discs 8 SCREEN SIZE Operation with Computer Signals .......... 9 Setting the black level for HDMI signal 20 Setting the video signal format 20 Setting the background color...
Owner's Manual
Page 10
... and old batteries together, or use the remote control Battery Installation and Replacement Insert the 2 "AAA" batteries, making sure to direct sunlight or strong artificial light, or if there is an obstacle between the sensor and the remote control. Back of the unit mounting holes Operating Range * Use the remote control within a distance of the unit the signal and audio cables connected to the (+) and (-) indication...
... and old batteries together, or use the remote control Battery Installation and Replacement Insert the 2 "AAA" batteries, making sure to direct sunlight or strong artificial light, or if there is an obstacle between the sensor and the remote control. Back of the unit mounting holes Operating Range * Use the remote control within a distance of the unit the signal and audio cables connected to the (+) and (-) indication...
Owner's Manual
Page 11
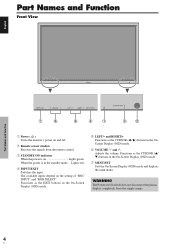
... Adjusts the volume. WARNING The Power on/off . Lights red. w Remote sensor window Receives the signals from the supply mains. 4 En Functions as the EXIT buttons in the standby mode ... When the power is on Lights green. r INPUT/EXIT Switches the input. t LEFT/- u MENU/SET Sets the On-Screen Display (OSD) mode and displays the main menu. Part Names and Function Front View English Part Names and Function q Power ( ) Turns the monitor's power on and off switch does not disconnect the plasma display completely from the remote control. e STANDBY...
... Adjusts the volume. WARNING The Power on/off . Lights red. w Remote sensor window Receives the signals from the supply mains. 4 En Functions as the EXIT buttons in the standby mode ... When the power is on Lights green. r INPUT/EXIT Switches the input. t LEFT/- u MENU/SET Sets the On-Screen Display (OSD) mode and displays the main menu. Part Names and Function Front View English Part Names and Function q Power ( ) Turns the monitor's power on and off switch does not disconnect the plasma display completely from the remote control. e STANDBY...
Owner's Manual
Page 12
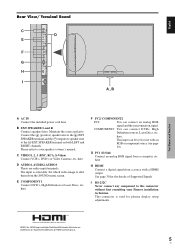
... or registered trademarks of Supported Signals. here. This input can be set for use with a HDMI output. See page 30 for plasma display setup adjustments. This connector is selectable. Please refer to this connector without first consulting your speaker's owner's manual. HDMI, the HDMI logo and High-Definition Multimedia Interface are audio input terminals. Connect the (positive) speaker wire to the EXT SPEAKER terminal and the (negative) speaker wire to allot them...
... or registered trademarks of Supported Signals. here. This input can be set for use with a HDMI output. See page 30 for plasma display setup adjustments. This connector is selectable. Please refer to this connector without first consulting your speaker's owner's manual. HDMI, the HDMI logo and High-Definition Multimedia Interface are audio input terminals. Connect the (positive) speaker wire to the EXT SPEAKER terminal and the (negative) speaker wire to allot them...
Owner's Manual
Page 13
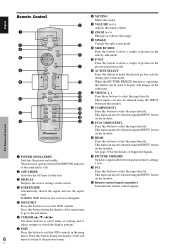
... display still images on the monitor. !8 HDMI Press this button to access the OSD controls. Part Names and Function !7 PC2/COMPONENT2 Press this button to select the input directly. q POWER ON/STANDBY Switches the power on the screen. Press this button to adjust settings or switch the display patterns. This input can also be selected using the INPUT button on the monitor. r SCREEN SIZE Automatically detects the signal and sets the aspect ratio. See page 30 for all signals. !9 PICTURE MEMORY Switches...
... display still images on the monitor. !8 HDMI Press this button to access the OSD controls. Part Names and Function !7 PC2/COMPONENT2 Press this button to select the input directly. q POWER ON/STANDBY Switches the power on the screen. Press this button to adjust settings or switch the display patterns. This input can also be selected using the INPUT button on the monitor. r SCREEN SIZE Automatically detects the signal and sets the aspect ratio. See page 30 for all signals. !9 PICTURE MEMORY Switches...

Owner's Manual
Page 14
... time is turned off the unit with the remote control). OFF TIMER 0 Note: After the power is displayed, then turns off . The monitor's STANDBY/ON indicator will reduce the picture and return it reaches zero. The screen changes each time the DISPLAY button is not pressed for a long period of time, turn off the power of the ZOOM- button will light up (green) when the unit is set to turn the power off timer is still supplied...
... time is turned off the unit with the remote control). OFF TIMER 0 Note: After the power is displayed, then turns off . The monitor's STANDBY/ON indicator will reduce the picture and return it reaches zero. The screen changes each time the DISPLAY button is not pressed for a long period of time, turn off the power of the ZOOM- button will light up (green) when the unit is set to turn the power off timer is still supplied...

Owner's Manual
Page 16
Press the SCREEN SIZE button on the display output of the various VESA signal standards supported by the monitor. FULL size screen Information Ⅵ Supported resolution See page 27 for details on the remote control. 2. of displaying pixels in . FULL size screen WIDE Operations 9 En English SCREEN SIZE Operation with a vertical frequency of 60 Hz and horizontal frequency of 31.7 (31.0) kHz are input Select an appropriate setting for RGB SELECT mode referring to fill...
Press the SCREEN SIZE button on the display output of the various VESA signal standards supported by the monitor. FULL size screen Information Ⅵ Supported resolution See page 27 for details on the remote control. 2. of displaying pixels in . FULL size screen WIDE Operations 9 En English SCREEN SIZE Operation with a vertical frequency of 60 Hz and horizontal frequency of 31.7 (31.0) kHz are input Select an appropriate setting for RGB SELECT mode referring to fill...

Owner's Manual
Page 18
... HDMI button to change the size of the input signal. VIDEO1 PC1DSUB B A ACTIVE SELECT button VIDEO1 PC1DSUB B A Selecting the input signals to be used to change the selection of the sub screen, press the ᮢ button. Use the ZOOM ( or )button to make the desired picture active, press the ACTIVE SELECT button. Adjusting the OSD controls 1. VAIDEO1 PC2-BNC B Top Left ᮣ button ᮤ button...
... HDMI button to change the size of the input signal. VIDEO1 PC1DSUB B A ACTIVE SELECT button VIDEO1 PC1DSUB B A Selecting the input signals to be used to change the selection of the sub screen, press the ᮢ button. Use the ZOOM ( or )button to make the desired picture active, press the ACTIVE SELECT button. Adjusting the OSD controls 1. VAIDEO1 PC2-BNC B Top Left ᮣ button ᮤ button...

Owner's Manual
Page 20
... DEFAULT/MOVIE1/MOVIE2/STANDARD/DYNAMIC Sub menu BASS TREBLE BALANCE AUDIO INPUT1 AUDIO INPUT2 AUDIO INPUT3 HDMI INPUT Sub menu 2 Sub menu 3 Sub menu 4 0←13→26 0←13→26 L←→R -22←0→+22 VIDEO 1-3 / COMPNT 1-2 / PC1DSUB / PC2-BNC VIDEO 1-3 / COMPNT 1-2 / PC1DSUB / PC2-BNC VIDEO 1-3 / COMPNT 1-2 / PC1DSUB / PC2-BNC ON←→OFF Sub menu SCREEN SIZE V.POSITION H.POSITION V.SIZE H.SIZE AUTO PICTURE PHASE*1 CLOCK*1 Sub menu...
... DEFAULT/MOVIE1/MOVIE2/STANDARD/DYNAMIC Sub menu BASS TREBLE BALANCE AUDIO INPUT1 AUDIO INPUT2 AUDIO INPUT3 HDMI INPUT Sub menu 2 Sub menu 3 Sub menu 4 0←13→26 0←13→26 L←→R -22←0→+22 VIDEO 1-3 / COMPNT 1-2 / PC1DSUB / PC2-BNC VIDEO 1-3 / COMPNT 1-2 / PC1DSUB / PC2-BNC VIDEO 1-3 / COMPNT 1-2 / PC1DSUB / PC2-BNC ON←→OFF Sub menu SCREEN SIZE V.POSITION H.POSITION V.SIZE H.SIZE AUTO PICTURE PHASE*1 CLOCK*1 Sub menu...

Owner's Manual
Page 22
... MENU/SET button. Example: Storing picture settings at the cursor position. • When you to store in the order of VIDEO display. NOTE : - 1/2 RESET NEXT PAGE SEL. NOTE : - Use the v and w button to DEFAULT. Information Ⅵ Picture adjustment screen CONTRAST: Changes the picture's white level. PICTURE PICTURE MEMORY : OFF CONTRAST BRIGHTNESS SHARPNESS COLOR TINT R G DNR : LOW COLOR TEMP. : MIDDLE GAMMA : 2.1 LOW TONE : AUTO SET UP LEVEL : 0 COLOR MGT PURECINEMA : ON AV SELECTION : DYNAMIC SEL. MEMORY3 INPUT : - ADJ. SIGNAL...
... MENU/SET button. Example: Storing picture settings at the cursor position. • When you to store in the order of VIDEO display. NOTE : - 1/2 RESET NEXT PAGE SEL. NOTE : - Use the v and w button to DEFAULT. Information Ⅵ Picture adjustment screen CONTRAST: Changes the picture's white level. PICTURE PICTURE MEMORY : OFF CONTRAST BRIGHTNESS SHARPNESS COLOR TINT R G DNR : LOW COLOR TEMP. : MIDDLE GAMMA : 2.1 LOW TONE : AUTO SET UP LEVEL : 0 COLOR MGT PURECINEMA : ON AV SELECTION : DYNAMIC SEL. MEMORY3 INPUT : - ADJ. SIGNAL...

Owner's Manual
Page 23
.... OSD (On Screen Display) Controls 16 En PICTURE PICTURE MEMORY : OFF CONTRAST BRIGHTNESS SHARPNESS COLOR TINT R G DNR : LOW COLOR TEMP. : HIGH GAMMA : 2.1 LOW TONE : AUTO SET UP LEVEL : 0 COLOR MGT PURECINEMA : ON AV SELECTION : DYNAMIC SEL. On "R.HIGH", adjust the white balance. Example: Setting "2" On "LOW TONE" of "PICTURE" menu, select "2". English Setting the color temperature Use this procedure to adjust the white balance for black level RESET: Resets settings to the factory default values. HIGH...
.... OSD (On Screen Display) Controls 16 En PICTURE PICTURE MEMORY : OFF CONTRAST BRIGHTNESS SHARPNESS COLOR TINT R G DNR : LOW COLOR TEMP. : HIGH GAMMA : 2.1 LOW TONE : AUTO SET UP LEVEL : 0 COLOR MGT PURECINEMA : ON AV SELECTION : DYNAMIC SEL. On "R.HIGH", adjust the white balance. Example: Setting "2" On "LOW TONE" of "PICTURE" menu, select "2". English Setting the color temperature Use this procedure to adjust the white balance for black level RESET: Resets settings to the factory default values. HIGH...

Owner's Manual
Page 27
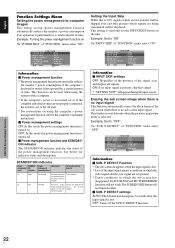
... MASK : 3 S1/S2 : OFF DISPLAY OSD : ON OSD ADJUST : TOP LEFT ALL RESET : OFF SEL. EXIT RETURN Information Ⅵ BACK GROUND Settings BLACK: Sets the background color to gray. GRAY: Sets the background color to black. To prevent this , set RGB SELECT to WIDE4. EXIT RETURN Information Ⅵ HDMI SET UP settings COLOR1: When connected to the SET TOP BOX, DVD etc. Setting the video signal format Use these 8 modes must be compressed horizontally...
... MASK : 3 S1/S2 : OFF DISPLAY OSD : ON OSD ADJUST : TOP LEFT ALL RESET : OFF SEL. EXIT RETURN Information Ⅵ BACK GROUND Settings BLACK: Sets the background color to gray. GRAY: Sets the background color to black. To prevent this , set RGB SELECT to WIDE4. EXIT RETURN Information Ⅵ HDMI SET UP settings COLOR1: When connected to the SET TOP BOX, DVD etc. Setting the video signal format Use these 8 modes must be compressed horizontally...

Owner's Manual
Page 28
... screen size, volume control, etc. SET UP LANGUAGE : ENGLISH BNC INPUT : COMPONENT D-SUB INPUT : RGB HD SELECT : 1080I RGB SELECT : AUTO HDMI SET UP : COLOR1 COLOR SYSTEM : AUTO BACK GROUND : GRAY SIDE MASK : 3 S1/S2 : OFF DISPLAY OSD : ON OSD ADJUST : TOP CENTER ALL RESET : OFF SEL. ADJ. Refer to page 13 for items to be adjusted from 0 to 15. Setting the screen size for S1/S2 video input If the S-video signal...
... screen size, volume control, etc. SET UP LANGUAGE : ENGLISH BNC INPUT : COMPONENT D-SUB INPUT : RGB HD SELECT : 1080I RGB SELECT : AUTO HDMI SET UP : COLOR1 COLOR SYSTEM : AUTO BACK GROUND : GRAY SIDE MASK : 3 S1/S2 : OFF DISPLAY OSD : ON OSD ADJUST : TOP CENTER ALL RESET : OFF SEL. ADJ. Refer to page 13 for items to be adjusted from 0 to 15. Setting the screen size for S1/S2 video input If the S-video signal...
Owner's Manual
Page 29
... -picuture mode is ON, signals which the sub screen has disappeared, the ZOOM NAV and PICTURE FREEZE functions will appear during the input search. P DETECT : AUTO ZOOM NAV : BTM LEFT PICTURE FREEZE : S BY S1 LONG LIFE : MANUAL SEL. The SCREEN SIZE button will be used when using the monitor with a computer. * If the computer's power is not turned on or if the computer and selector tuner are...
... -picuture mode is ON, signals which the sub screen has disappeared, the ZOOM NAV and PICTURE FREEZE functions will appear during the input search. P DETECT : AUTO ZOOM NAV : BTM LEFT PICTURE FREEZE : S BY S1 LONG LIFE : MANUAL SEL. The SCREEN SIZE button will be used when using the monitor with a computer. * If the computer's power is not turned on or if the computer and selector tuner are...

Owner's Manual
Page 35
... a 1024 dots ן640 lines signal. *3 The picture is displayed in the table above , you are connecting a composite sync signal, use the monitor adapter (D-Sub 15-pin) to your computer's video port. *7 Other screen modes (ZOOM and WIDE) are not accepted. • The sync may have to adjust the position and size of the picture or the fine picture because of errors in synchronization of your computer. • When...
... a 1024 dots ן640 lines signal. *3 The picture is displayed in the table above , you are connecting a composite sync signal, use the monitor adapter (D-Sub 15-pin) to your computer's video port. *7 Other screen modes (ZOOM and WIDE) are not accepted. • The sync may have to adjust the position and size of the picture or the fine picture because of errors in synchronization of your computer. • When...
Owner's Manual
Page 36
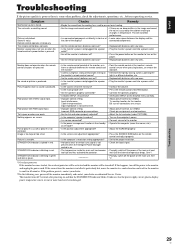
...; Plug the monitor's power cord into a power outlet. • Increase the volume. • Press the remote control's MUTING button. • Connect the speakers properly. • Set AUDIO INPUT on ? • Is a source connected? • Is the power management function in temperature. Troubleshooting 29 En The unit emits a crackling sound. This will be turned off 5 seconds after powering on screen. Cable interconnections. The monitor turns off . STANDBY/ON indicator is blinking in red. See*1. • Prompty switch off the power of...
...; Plug the monitor's power cord into a power outlet. • Increase the volume. • Press the remote control's MUTING button. • Connect the speakers properly. • Set AUDIO INPUT on ? • Is a source connected? • Is the power management function in temperature. Troubleshooting 29 En The unit emits a crackling sound. This will be turned off 5 seconds after powering on screen. Cable interconnections. The monitor turns off . STANDBY/ON indicator is blinking in red. See*1. • Prompty switch off the power of...
Owner's Manual
Page 37
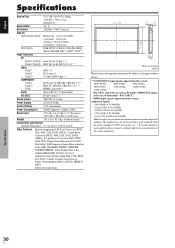
..., 1035I, 1080I (60Hz)), 2-2 pull down Converter (PAL, NTSC, 480I, 525I), Digital Zoom Function (100-900% Selectable), Self Diagnosis, Image Burn reduction tools (ABL, INVERSE, WHITE, ORBITER, SCREEN WIPER), Color Temperature select (high/middle/middle low/low, user has 4 memories), Auto Picture, Input Skip, Color MGT, Low Tone (3 mode), Gamma Correction (4 mode), Plug and play (DDC1, DDC2b, HDMI:EDDC), Split screen operations The features and specifications may be displayed properly.
..., 1035I, 1080I (60Hz)), 2-2 pull down Converter (PAL, NTSC, 480I, 525I), Digital Zoom Function (100-900% Selectable), Self Diagnosis, Image Burn reduction tools (ABL, INVERSE, WHITE, ORBITER, SCREEN WIPER), Color Temperature select (high/middle/middle low/low, user has 4 memories), Auto Picture, Input Skip, Color MGT, Low Tone (3 mode), Gamma Correction (4 mode), Plug and play (DDC1, DDC2b, HDMI:EDDC), Split screen operations The features and specifications may be displayed properly.


