User Manual
Page 2
... use this manual 4 - Quick Start Mode 7 - RDS functions 11 Playing iPod music Starting procedure 14 Reading the screen 14 Using the touch panel keys 14 Using hands-free phoning Registering and connecting an iPhone 15 - Using the touch panel keys 16 - Calling a number in the phone book 16 - Setting the Bluetooth auto connect function 17 - Using balance adjustment 21 Customising the general settings 21 How to erasure 5 About AppRadio Features 6 Checking part names and functions 6 - Before removing the vehicle battery 5 - Reading the screen 8 - Entering a frequency...
... use this manual 4 - Quick Start Mode 7 - RDS functions 11 Playing iPod music Starting procedure 14 Reading the screen 14 Using the touch panel keys 14 Using hands-free phoning Registering and connecting an iPhone 15 - Using the touch panel keys 16 - Calling a number in the phone book 16 - Setting the Bluetooth auto connect function 17 - Using balance adjustment 21 Customising the general settings 21 How to erasure 5 About AppRadio Features 6 Checking part names and functions 6 - Before removing the vehicle battery 5 - Reading the screen 8 - Entering a frequency...

User Manual
Page 3
... is impossible 28 - Audio Settings 31 - Contents - Subwoofer settings 23 - Source level adjustment settings 23 Assigning functions to the steering wheel 24 Changing the background image 24 Returning the AppRadio to the default or factory settings Restoring the default setting 25 Returning this product to cause noticeable positioning errors 28 Setting list 31 - Time settings 22 - Conditions likely to the initial state 25 Appendix Troubleshooting 26 Positioning technology...
... is impossible 28 - Audio Settings 31 - Contents - Subwoofer settings 23 - Source level adjustment settings 23 Assigning functions to the steering wheel 24 Changing the background image 24 Returning the AppRadio to the default or factory settings Restoring the default setting 25 Returning this product to cause noticeable positioning errors 28 Setting list 31 - Time settings 22 - Conditions likely to the initial state 25 Appendix Troubleshooting 26 Positioning technology...
User Manual
Page 4
... "Front display". For details about the conventions used in the following iPhone models and iPhone software versions. Familiarity with these conventions will be referred to as iPhone. Touch panel keys that is deleted. ! iPhone compatibility This product supports only the following format: e.g.) p If the home location has not been stored yet, set the location first. ! iPod touch (4th generation): iOS 4.3 p Operation methods may not work correctly. "iPhone...
... "Front display". For details about the conventions used in the following iPhone models and iPhone software versions. Familiarity with these conventions will be referred to as iPhone. Touch panel keys that is deleted. ! iPhone compatibility This product supports only the following format: e.g.) p If the home location has not been stored yet, set the location first. ! iPod touch (4th generation): iOS 4.3 p Operation methods may not work correctly. "iPhone...
User Manual
Page 6
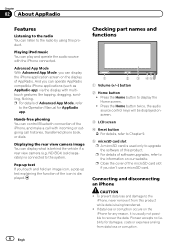
... can display the iPhone application screen on the display of AppRadio. Checking part names and functions 1 2 3 45 1 Volume (+/-) button 2 Home button ! Advanced App Mode With Advanced App Mode, you can operate AppRadio compatible iPhone applications (such as AppRadio app) via the display with multitouch gestures like tapping, dragging, scrolling, flicking. If data loss or corruption occurs on our website. Hands-free phoning You can control Bluetooth connection of the iPhone, and make...
... can display the iPhone application screen on the display of AppRadio. Checking part names and functions 1 2 3 45 1 Volume (+/-) button 2 Home button ! Advanced App Mode With Advanced App Mode, you can operate AppRadio compatible iPhone applications (such as AppRadio app) via the display with multitouch gestures like tapping, dragging, scrolling, flicking. If data loss or corruption occurs on our website. Hands-free phoning You can control Bluetooth connection of the iPhone, and make...
User Manual
Page 8
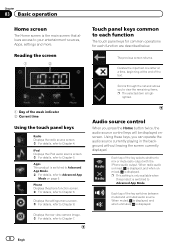
..., is displayed. 8 Engb p This setting is only available when this product is switched to Advanced App Mode. = For details, refer to Chapter 4. lighted. 1 Day of the key selects whether to mix or mute radio output with the iPhone audio output. Each tap of the week indicator 2 Current time Using the touch panel keys Radio Displays the radio source screen. = For details, refer to Advanced App Mode on page 6. Displays the rear view camera image...
..., is displayed. 8 Engb p This setting is only available when this product is switched to Advanced App Mode. = For details, refer to Chapter 4. lighted. 1 Day of the key selects whether to mix or mute radio output with the iPhone audio output. Each tap of the week indicator 2 Current time Using the touch panel keys Radio Displays the radio source screen. = For details, refer to Advanced App Mode on page 6. Displays the rear view camera image...

User Manual
Page 10
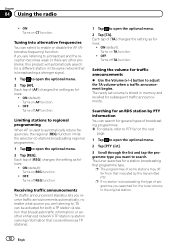
... radio Starting procedure 1 Press the Home button to display the Home screen. 2 Tap [Radio] on the Home screen. 3 Use the touch panel keys on page 12. Inputs the frequency. "AF" is set to "ON". = For details, refer to Limiting stations to regional programming on the screen to control the radio. Displays the optional menu. 10 Engb Traffic programme (TP) is set to "ON". = For details, refer to Tuning into alternative frequencies...
... radio Starting procedure 1 Press the Home button to display the Home screen. 2 Tap [Radio] on the Home screen. 3 Use the touch panel keys on page 12. Inputs the frequency. "AF" is set to "ON". = For details, refer to Limiting stations to regional programming on the screen to control the radio. Displays the optional menu. 10 Engb Traffic programme (TP) is set to "ON". = For details, refer to Tuning into alternative frequencies...

User Manual
Page 11
...]. Receiving date and time data You can be registered automatically. % Tap . p Storing broadcast frequencies may replace broadcast frequencies you want to register. Preset channel keys Storing the frequencies to a preset channel 1 Adjust to a frequency you want to enter. 2 Tap . 3 Enter a frequency of your choice and tap [Enter]. OFF (default): Turns off CT function. Recalling broadcast frequencies % Tap any frequency on the optional menu. Using the radio Chapter 04 Using the radio Using functions Entering a frequency...
...]. Receiving date and time data You can be registered automatically. % Tap . p Storing broadcast frequencies may replace broadcast frequencies you want to register. Preset channel keys Storing the frequencies to a preset channel 1 Adjust to a frequency you want to enter. 2 Tap . 3 Enter a frequency of your choice and tap [Enter]. OFF (default): Turns off CT function. Recalling broadcast frequencies % Tap any frequency on the optional menu. Using the radio Chapter 04 Using the radio Using functions Entering a frequency...
User Manual
Page 12
... programme type. Tuning into alternative frequencies You can search for a different station in memory and recalled for traffic announcements % Use the Volume (+/-) button to enable or disable the AF (Alternative frequency) function. Each tap of [REG] changes the setting as follows: ! Each tap of [AF] changes the setting as follows: ! ON (default): Turns on REG function. ! OFF: Turns off REG function. If you are other problems, this product...
... programme type. Tuning into alternative frequencies You can search for a different station in memory and recalled for traffic announcements % Use the Volume (+/-) button to enable or disable the AF (Alternative frequency) function. Each tap of [REG] changes the setting as follows: ! Each tap of [AF] changes the setting as follows: ! ON (default): Turns on REG function. ! OFF: Turns off REG function. If you are other problems, this product...
User Manual
Page 15
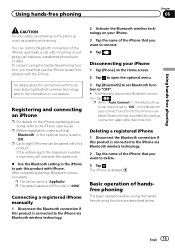
... iPhone. p The default password (PIN code) is deleted. You can be paired with this product is connected to the iPhone via Bluetooth wireless technology. 2 Activate the Bluetooth wireless technology on your safety, avoid talking on the iPhone operating procedures, refer to the iPhone User Guide. Registering and connecting an iPhone p For details on the phone as much as possible while driving. The iPhone is "0000". Engb 15 p The device name is set...
... iPhone. p The default password (PIN code) is deleted. You can be paired with this product is connected to the iPhone via Bluetooth wireless technology. 2 Activate the Bluetooth wireless technology on your safety, avoid talking on the iPhone operating procedures, refer to the iPhone User Guide. Registering and connecting an iPhone p For details on the phone as much as possible while driving. The iPhone is "0000". Engb 15 p The device name is set...

User Manual
Page 16
... a call is an incoming call, connects the call . ! When there is cleared. If the number of the number. # If you tap , the entered number is deleted one digit at a time from the iPhone. Making a phone call You can select and call history list. Chapter 06 Using hands-free phoning Using the touch panel keys ! Direct dialling 1 Tap . 2 Tap the number keys to end the call history...
... a call is an incoming call, connects the call . ! When there is cleared. If the number of the number. # If you tap , the entered number is deleted one digit at a time from the iPhone. Making a phone call You can select and call history list. Chapter 06 Using hands-free phoning Using the touch panel keys ! Direct dialling 1 Tap . 2 Tap the number keys to end the call history...
User Manual
Page 17
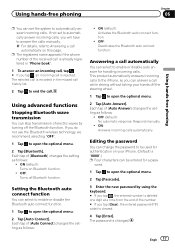
...] changes the setting as follows: ! Setting the Bluetooth auto connect function You can select to automatically answer incoming calls, you can be entered for a pass- ON (default): Activates the Bluetooth auto connect function. ! OFF: Deactivates the Bluetooth auto connect function. Each tap of [Bluetooth] changes the setting as follows: ! OFF (default): No automatic response. If not set the system to end the call is rejected. If you tap [Clear], the entered password (PIN code...
...] changes the setting as follows: ! Setting the Bluetooth auto connect function You can select to automatically answer incoming calls, you can be entered for a pass- ON (default): Activates the Bluetooth auto connect function. ! OFF: Deactivates the Bluetooth auto connect function. Each tap of [Bluetooth] changes the setting as follows: ! OFF (default): No automatic response. If not set the system to end the call is rejected. If you tap [Clear], the entered password (PIN code...

User Manual
Page 18
.... 1 Connect the iPhone that case, disconnect your iPhone, perform pairing again from another iPhone is already registered in the phone book, the phone number of the received call cannot hear the conversation due to an echo, decrease the volume level for hands-free phoning General notes The line-of-sight distance between this product. If the phone number of the received call is displayed and the phone function screen appears. The received...
.... 1 Connect the iPhone that case, disconnect your iPhone, perform pairing again from another iPhone is already registered in the phone book, the phone number of the received call cannot hear the conversation due to an echo, decrease the volume level for hands-free phoning General notes The line-of-sight distance between this product. If the phone number of the received call is displayed and the phone function screen appears. The received...
User Manual
Page 19
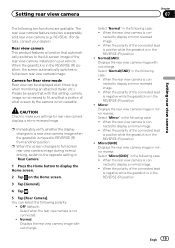
Setting rear view camera Chapter 07 Setting rear view camera The following case: ! Normal: Displays the rear view camera image without change . When the rear view camera is in the REVERSE (R) position, the screen automatically switches to make sure settings for Rear view mode Rear view can select the following case: ! When the polarity of the connected lead is positive while the gearstick is connected to display a normal image. ! When the rear view camera is moved to display a mirror...
Setting rear view camera Chapter 07 Setting rear view camera The following case: ! Normal: Displays the rear view camera image without change . When the rear view camera is in the REVERSE (R) position, the screen automatically switches to make sure settings for Rear view mode Rear view can select the following case: ! When the polarity of the connected lead is positive while the gearstick is connected to display a normal image. ! When the rear view camera is moved to display a mirror...

User Manual
Page 20
... a list of the selected EQ. ! Adjustments can easily recall at any time. High 5 Tap or to the sound. Here is applied to set equaliser curve. 1 Display the audio settings screen. 2 Tap [EQ]. 3 Tap the equaliser you create. Powerful is made with a 3-band parametric equaliser. ! A separate custom curve can select the decibel (dB) level of the equaliser curves: Equaliser curve S.Bass (Super Bass) is a curve...
... a list of the selected EQ. ! Adjustments can easily recall at any time. High 5 Tap or to the sound. Here is applied to set equaliser curve. 1 Display the audio settings screen. 2 Tap [EQ]. 3 Tap the equaliser you create. Powerful is made with a 3-band parametric equaliser. ! A separate custom curve can select the decibel (dB) level of the equaliser curves: Equaliser curve S.Bass (Super Bass) is a curve...

User Manual
Page 21
... adjust front/rear speaker balance. Display settings 1 Display the general settings screen. 2 Tap . Each time you want to change the setting. Customising the general settings 1 Press the Home button to display the Home screen. 2 Tap on . ! Engb 21 Using balance adjustment You can set the left /right speaker balance. You can select a fader/balance setting that you tap or increases or decreases the level. Screen OFF You can link the brightness of the screen to operation of display. Dimmer You can set...
... adjust front/rear speaker balance. Display settings 1 Display the general settings screen. 2 Tap . Each time you want to change the setting. Customising the general settings 1 Press the Home button to display the Home screen. 2 Tap on . ! Engb 21 Using balance adjustment You can set the left /right speaker balance. You can select a fader/balance setting that you tap or increases or decreases the level. Screen OFF You can link the brightness of the screen to operation of display. Dimmer You can set...

User Manual
Page 22
..., select "North America". Local: Turns on page 25. No Signal: Indicates that are available while your vehicle is increased or decreased. Time settings 1 Display the general settings screen. 2 Tap . Make the following settings. Safe Mode For safety reasons, you can adjust the time difference from one hour in only those radio stations with am/ pm. GPS Check You can adjust the system's clock. 1 Display the general settings screen. 2 Tap...
..., select "North America". Local: Turns on page 25. No Signal: Indicates that are available while your vehicle is increased or decreased. Time settings 1 Display the general settings screen. 2 Tap . Make the following settings. Safe Mode For safety reasons, you can adjust the time difference from one hour in only those radio stations with am/ pm. GPS Check You can adjust the system's clock. 1 Display the general settings screen. 2 Tap...

User Manual
Page 23
... set the languages used on the iPhone operating procedures, refer to the iPhone User Guide. 1 Display the general settings screen. 2 Tap . 3 Tap [Keyboard]. 4 Tap or to the rear output, select "Sub.W". If you tap or selects cut-off frequencies: 80 Hz - 120 Hz - 160 Hz Selecting the language You can select the following cut off frequency of the following settings. Make the following sources: ! Handsfree 1 Display the general settings screen. 2 Tap . 3 Tap the source to adjust the source volume level...
... set the languages used on the iPhone operating procedures, refer to the iPhone User Guide. 1 Display the general settings screen. 2 Tap . 3 Tap [Keyboard]. 4 Tap or to the rear output, select "Sub.W". If you tap or selects cut-off frequencies: 80 Hz - 120 Hz - 160 Hz Selecting the language You can select the following cut off frequency of the following settings. Make the following sources: ! Handsfree 1 Display the general settings screen. 2 Tap . 3 Tap the source to adjust the source volume level...

User Manual
Page 25
... side of the microSD card slot. Phone book data = For details, refer to the default or factory settings 2 Press the Reset button. Press the reset button on the Home screen. 3 Tap [General]. Method 3: Tap [System Reset] All the settings and registered content are reset to the default settings. = For details, refer to Returning this product to display the Home screen. 2 Tap on this product with...
... side of the microSD card slot. Phone book data = For details, refer to the default or factory settings 2 Press the Reset button. Press the reset button on the Home screen. 3 Tap [General]. Method 3: Tap [System Reset] All the settings and registered content are reset to the default settings. = For details, refer to Returning this product to display the Home screen. 2 Tap on this product with...
User Manual
Page 26
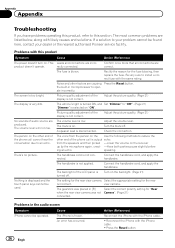
... rear is not applied. The mute is low. An error has occurred. product doesn't operate. The gearstick was not Camera". (Page 21) connected. Confirm once more that all connections are causing Press the Reset button. The volume level is on. The backlight of the display is displayed and the touch panel keys cannot be used. speaking There's no picture. The vehicle's light is turned ON, and Set "Dimmer...
... rear is not applied. The mute is low. An error has occurred. product doesn't operate. The gearstick was not Camera". (Page 21) connected. Confirm once more that all connections are causing Press the Reset button. The volume level is on. The backlight of the display is displayed and the touch panel keys cannot be used. speaking There's no picture. The vehicle's light is turned ON, and Set "Dimmer...

User Manual
Page 31
... General Display settings Rear Camera Screen OFF Dimmer LCD brightness Black level Safe Mode General settings Radio Region Local GPS Check System Reset Page 19 21 21 21 22 22 Page 22 22 22 25 Subwoofer settings RCA Preout Sub.W LPF Page 23 23 Language settings Language Keyboard Page 23 23 Source level adjustment settings Radio iPhone Handsfree Page 23 Other settings Steering Wheel Control Change Background Page 24 24 Time settings Date Clock mode Time Summer Time Page...
... General Display settings Rear Camera Screen OFF Dimmer LCD brightness Black level Safe Mode General settings Radio Region Local GPS Check System Reset Page 19 21 21 21 22 22 Page 22 22 22 25 Subwoofer settings RCA Preout Sub.W LPF Page 23 23 Language settings Language Keyboard Page 23 23 Source level adjustment settings Radio iPhone Handsfree Page 23 Other settings Steering Wheel Control Change Background Page 24 24 Time settings Date Clock mode Time Summer Time Page...


