
Instruction Manual English
Page 3
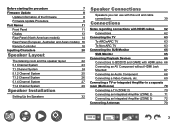
... Speaker Installation Setting Up the Speakers 32 Speaker Connections Speakers you can use with this unit and cable connections 39 Connections Notes regarding connections with HDMI cables 62 Connections 62 Connecting the TV 63 To ARC/eARC TV 63 To Non-ARC TV 63 Connecting the SUB Monitor 65 SUB Monitor 65 Connecting Playback Devices 66 Connections to BD/DVD and GAME with HDMI jacks 66 Connecting an AV Component without HDMI Jack...
... Speaker Installation Setting Up the Speakers 32 Speaker Connections Speakers you can use with this unit and cable connections 39 Connections Notes regarding connections with HDMI cables 62 Connections 62 Connecting the TV 63 To ARC/eARC TV 63 To Non-ARC TV 63 Connecting the SUB Monitor 65 SUB Monitor 65 Connecting Playback Devices 66 Connections to BD/DVD and GAME with HDMI jacks 66 Connecting an AV Component without HDMI Jack...

Instruction Manual English
Page 4
... OUT jack 76 Connecting the Power Cord 77 Playback Playing audio from an externally connected device 79 Basic Operations 79 BLUETOOTH® Playback 80 Playing audio from BLUETOOTH wireless technology enabled devices with this unit 80 Transmitting audio from this unit to BLUETOOTH wireless technology enabled devices 81 Listening To the Radio 83 Listening To the AM/FM Radio 83 Listening To DAB Digital Radio (European models only) 86 Presetting a Radio Station 88 Listening Mode 89...
... OUT jack 76 Connecting the Power Cord 77 Playback Playing audio from an externally connected device 79 Basic Operations 79 BLUETOOTH® Playback 80 Playing audio from BLUETOOTH wireless technology enabled devices with this unit 80 Transmitting audio from this unit to BLUETOOTH wireless technology enabled devices 81 Listening To the Radio 83 Listening To the AM/FM Radio 83 Listening To DAB Digital Radio (European models only) 86 Presetting a Radio Station 88 Listening Mode 89...
Instruction Manual English
Page 8
... standby mode after purchase. Disconnecting and reconnecting cables, USB storage device, speaker setup microphone or headphones, or performing operations on the unit such as turning the power off . • If "HDMI CEC" is announced after "Completed!" Next, select "System Setup" "Hardware" - Select "System Setup" - "Firmware Update" - The process is completed, and your firmware is updated to update the firmware via network or USB port when the firmware update is set to "On", set it...
... standby mode after purchase. Disconnecting and reconnecting cables, USB storage device, speaker setup microphone or headphones, or performing operations on the unit such as turning the power off . • If "HDMI CEC" is announced after "Completed!" Next, select "System Setup" "Hardware" - Select "System Setup" - "Firmware Update" - The process is completed, and your firmware is updated to update the firmware via network or USB port when the firmware update is set to "On", set it...
Instruction Manual English
Page 11
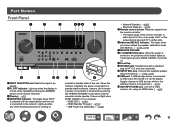
...;p145) -- K SETUP MIC jack: Connect the supplied speaker setup microphone. ( →p153, p170) L USB port: A USB storage device is turned on , however. -- Lights up . USB Power Out at an angle of the following functions is working or LM I JK A INPUT SELECTOR dial: Switch the input to USB devices while in it can be played. using an HDMI cable. ( →p69) 11 B FL OFF indicator: Lights up when ZONE 2/ZONE 3 is not supported. ( →...
...;p145) -- K SETUP MIC jack: Connect the supplied speaker setup microphone. ( →p153, p170) L USB port: A USB storage device is turned on , however. -- Lights up . USB Power Out at an angle of the following functions is working or LM I JK A INPUT SELECTOR dial: Switch the input to USB devices while in it can be played. using an HDMI cable. ( →p69) 11 B FL OFF indicator: Lights up when ZONE 2/ZONE 3 is not supported. ( →...
Instruction Manual English
Page 19
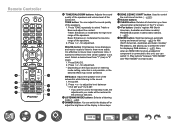
... restored to register AM (North American, Australian and Asian models)/ FM/DAB (European models) radio stations. ( →p88) U MODE button: Switches between "CEC MODE" and "RCV MODE" (normal mode). 19 Press + or - T +Fav button: Used to the previous statuses. SW button: Adjust the speaker level of the speakers. 2. for AM (North American, Australian and Asian models)/ FM stations, and allows you made will be achieved...
... restored to register AM (North American, Australian and Asian models)/ FM/DAB (European models) radio stations. ( →p88) U MODE button: Switches between "CEC MODE" and "RCV MODE" (normal mode). 19 Press + or - T +Fav button: Used to the previous statuses. SW button: Adjust the speaker level of the speakers. 2. for AM (North American, Australian and Asian models)/ FM stations, and allows you made will be achieved...

Instruction Manual English
Page 76
... use a monaural mini plug cable (ø1/8″ / 3.5 mm) without resistance. When the desired input is selected on the unit, power link operation will be activated with a TRIGGER IN jack such as a BD/ DVD player to this unit. 12V TRIGGER OUT jack a BD/DVD a Monaural mini plug cable (ø1/8″ / 3.5 mm) Connections When connecting a device equipped with a control signal of the inputs. • For connection, use a stereo mini plug cable...
... use a monaural mini plug cable (ø1/8″ / 3.5 mm) without resistance. When the desired input is selected on the unit, power link operation will be activated with a TRIGGER IN jack such as a BD/ DVD player to this unit. 12V TRIGGER OUT jack a BD/DVD a Monaural mini plug cable (ø1/8″ / 3.5 mm) Connections When connecting a device equipped with a control signal of the inputs. • For connection, use a stereo mini plug cable...

Instruction Manual English
Page 96
... a music file. 96 "Network Standby" is set to play from the displayed devices. • AirPlay2-supported devices are connected to play from the displayed devices, and start play the music files on the AirPlay-enabled device. Then, press NET on the remote controller. "Hardware" - You can be selected. • The volume can also play of AirPlay wireless technology, the sound produced on this unit may slightly...
... a music file. 96 "Network Standby" is set to play from the displayed devices. • AirPlay2-supported devices are connected to play from the displayed devices, and start play the music files on the AirPlay-enabled device. Then, press NET on the remote controller. "Hardware" - You can be selected. • The volume can also play of AirPlay wireless technology, the sound produced on this unit may slightly...
Instruction Manual English
Page 97
... Android™). This function also supports a playlist on the same network will automatically display compatible devices. 4. "Hardware" - "Power Management" - Spotify -- Then, a list of the settings in the Home, manually turn the unit on and then press NET on the remote controller. Playing Back 1. https://intl.pioneer-audiovisual.com/playfi/info_p.html • To use a music streaming distribution service, user registration may be played. Download Pioneer Music Control App using your mobile device...
... Android™). This function also supports a playlist on the same network will automatically display compatible devices. 4. "Hardware" - "Power Management" - Spotify -- Then, a list of the settings in the Home, manually turn the unit on and then press NET on the remote controller. Playing Back 1. https://intl.pioneer-audiovisual.com/playfi/info_p.html • To use a music streaming distribution service, user registration may be played. Download Pioneer Music Control App using your mobile device...
Instruction Manual English
Page 133
...-amp connected Yes When front speakers are bi-amp connected • This setting will be set to both ZONE 2 speaker terminal and ZONE 3 speaker terminals. • This setting cannot be selected when surround speakers are being used No When speakers are as follows. -- If "Height 1 Speaker" is set to neither ZONE 2 nor ZONE 3 speaker terminals Setup ‰‰Zone 2 Preout (Default Value: Zone 2) Set an output destination of wireless headphones...
...-amp connected Yes When front speakers are bi-amp connected • This setting will be set to both ZONE 2 speaker terminal and ZONE 3 speaker terminals. • This setting cannot be selected when surround speakers are being used No When speakers are as follows. -- If "Height 1 Speaker" is set to neither ZONE 2 nor ZONE 3 speaker terminals Setup ‰‰Zone 2 Preout (Default Value: Zone 2) Set an output destination of wireless headphones...
Instruction Manual English
Page 135
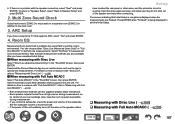
... the use of the ZONE speakers, it may not be possible to select this setting. When using the unit "meter", the setting is available in increments of 0.03 m from 0.03 m to 9.00 m. • When measurements are made using the unit "feet", the setting is available in 0.5 dB increments). A test tone will be changed by pressing the MODE button on the remote controller.
... the use of the ZONE speakers, it may not be possible to select this setting. When using the unit "meter", the setting is available in increments of 0.03 m from 0.03 m to 9.00 m. • When measurements are made using the unit "feet", the setting is available in 0.5 dB increments). A test tone will be changed by pressing the MODE button on the remote controller.

Instruction Manual English
Page 138
... you can set the volume for content other than DTS:X. • Depending on the content, this function ‰‰IMAX User Setting (Default Value: Auto) When playing IMAX content with the IMAX sound mode, select whether to automatically apply the speaker setting recommended by IMAX or to set "IMAX Bass Feeding" and "IMAX LFE Mute Level". In cases when this setting "On". Setup ‰‰...
... you can set the volume for content other than DTS:X. • Depending on the content, this function ‰‰IMAX User Setting (Default Value: Auto) When playing IMAX content with the IMAX sound mode, select whether to automatically apply the speaker setting recommended by IMAX or to set "IMAX Bass Feeding" and "IMAX LFE Mute Level". In cases when this setting "On". Setup ‰‰...

Instruction Manual English
Page 141
... multiple audio sources are some default values you select "HDMI", "COAXIAL", or "OPTICAL" in the "Audio Select" setting. Set this item to the OPTICAL jack in the "Input/Output Assign" "Digital Audio Input" setting. Select "Off" normally. • Each time the "Audio Select" setting is changed when "TUNER", "NET", "USB", or "BLUETOOTH" input is produced or truncation occurs at the beginning of a track when playing PCM...
... multiple audio sources are some default values you select "HDMI", "COAXIAL", or "OPTICAL" in the "Audio Select" setting. Set this item to the OPTICAL jack in the "Input/Output Assign" "Digital Audio Input" setting. Select "Off" normally. • Each time the "Audio Select" setting is changed when "TUNER", "NET", "USB", or "BLUETOOTH" input is produced or truncation occurs at the beginning of a track when playing PCM...

Instruction Manual English
Page 154
... Hz" can adjust the output volume of the range of each connected speaker how you can only be selected even though connection is set to test noises. "Crossover". "Configuration" - If the overall volume balance changes by adjusting the volume of each frequency, you like while listening to "Large" in "System Setup" - To readjust the overall volume balance with / . "Speaker" - "Crossover". • If an item...
... Hz" can adjust the output volume of the range of each connected speaker how you can only be selected even though connection is set to test noises. "Crossover". "Configuration" - If the overall volume balance changes by adjusting the volume of each frequency, you like while listening to "Large" in "System Setup" - To readjust the overall volume balance with / . "Speaker" - "Crossover". • If an item...

Instruction Manual English
Page 164
... unit. Firmware Update: Select the firmware file you have downloaded to connect. Web Setup Menu operations You can make the settings for entering the user name and password is displayed. Select "Network/Bluetooth" - Start the internet browser on the remote controller to save the settings. 164 The screen for the network function of this unit using a Control4 system. User name: admin (fixed) Password: admin (default value) • You can change the...
... unit. Firmware Update: Select the firmware file you have downloaded to connect. Web Setup Menu operations You can make the settings for entering the user name and password is displayed. Select "Network/Bluetooth" - Start the internet browser on the remote controller to save the settings. 164 The screen for the network function of this unit using a Control4 system. User name: admin (fixed) Password: admin (default value) • You can change the...
Instruction Manual English
Page 166
... point to connect. Check the following operating systems. (As of the connected speakers. 2. "Enter Password": Enter the password (or key) of the access point beforehand. Speaker Setup 1. Note that the image on the SSID list screen, press ENTER, and then follow the onscreen instructions. Select "Next" and press ENTER. "Wired": Use a wired LAN to connect to mask the password with iPhone®, iPad®, and iPod touch®...
... point to connect. Check the following operating systems. (As of the connected speakers. 2. "Enter Password": Enter the password (or key) of the access point beforehand. Speaker Setup 1. Note that the image on the SSID list screen, press ENTER, and then follow the onscreen instructions. Select "Next" and press ENTER. "Wired": Use a wired LAN to connect to mask the password with iPhone®, iPad®, and iPod touch®...
Instruction Manual English
Page 167
... careful of the speaker terminals when connecting. The screen indicating that Initial Setup is complete is being displayed to your mobile device and use the supplied speaker setup microphone. • Each speaker outputs the test tone at high volume during measurement. • If you have touched the rear panel or other wires, and the protection circuit is working. Download the Pioneer Remote App to exit...
... careful of the speaker terminals when connecting. The screen indicating that Initial Setup is complete is being displayed to your mobile device and use the supplied speaker setup microphone. • Each speaker outputs the test tone at high volume during measurement. • If you have touched the rear panel or other wires, and the protection circuit is working. Download the Pioneer Remote App to exit...

Instruction Manual English
Page 177
..., unplug and plug the power cords or HDMI cable of this unit and connected devices. 5" Troubleshooting ‰‰Resetting the unit (this unit may solve the problem. When the unit is displayed on the display, and the unit returns to exit Initial Setup. 1. "Clear" is operating erratically ‰‰Try restarting the unit Restarting this resets the unit settings to the default) If the...
..., unplug and plug the power cords or HDMI cable of this unit and connected devices. 5" Troubleshooting ‰‰Resetting the unit (this unit may solve the problem. When the unit is displayed on the display, and the unit returns to exit Initial Setup. 1. "Clear" is operating erratically ‰‰Try restarting the unit Restarting this resets the unit settings to the default) If the...
Instruction Manual English
Page 178
... may have operated. "Power Management" - "Source" - Troubleshooting Troubleshooting „„Power ‰‰When the power is turned on each time. "Fixed PCM" in the Home screen functions. • The protection circuit function may be malfunctioning. CH SP WIRE NG If the unit returns to standby state immediately and remove the power plug from the tip of the speaker cable so that none of the connecting cables are input...
... may have operated. "Power Management" - "Source" - Troubleshooting Troubleshooting „„Power ‰‰When the power is turned on each time. "Fixed PCM" in the Home screen functions. • The protection circuit function may be malfunctioning. CH SP WIRE NG If the unit returns to standby state immediately and remove the power plug from the tip of the speaker cable so that none of the connecting cables are input...
Instruction Manual English
Page 182
...". ( →p91) „„Linked operation ‰‰HDMI linked operation does not work with CEC-compliant devices, such as a microwave oven or cordless phone which use the radio wave in the 2.4 GHz range. • A metallic object near the unit can cause interference. • If radio waves are blocked by changing the screen mode on the TV. ‰‰Video and audio are out of synch...
...". ( →p91) „„Linked operation ‰‰HDMI linked operation does not work with CEC-compliant devices, such as a microwave oven or cordless phone which use the radio wave in the 2.4 GHz range. • A metallic object near the unit can cause interference. • If radio waves are blocked by changing the screen mode on the TV. ‰‰Video and audio are out of synch...
Firmware Update VSX LX305 505 09 05 2023
Page 5
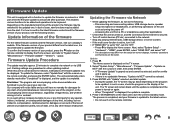
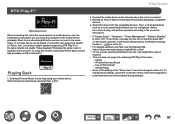
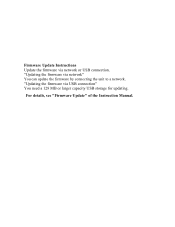
"Updating the firmware via network or USB connection. Firmware Update Instructions Update the firmware via network" You can update the firmware by connecting the unit to a network. For details, see "Firmware Update" of the Instruction Manual. "Updating the firmware via USB connection" You need a 128 MB or larger capacity USB storage for updating.
"Updating the firmware via network or USB connection. Firmware Update Instructions Update the firmware via network" You can update the firmware by connecting the unit to a network. For details, see "Firmware Update" of the Instruction Manual. "Updating the firmware via USB connection" You need a 128 MB or larger capacity USB storage for updating.


