User Guide
Page 3
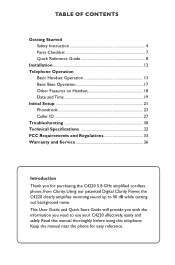
... easy reference. Keep the manual near the phone for purchasing the C4220 5.8 GHz amplified cordless phone, from Clarity. Using our patented Digital Clarity Power, the C4220 clearly amplifies incoming sound up to use your C4220 effectively, easily and safely. TABLE OF CONTENTS Getting Started Safety Instruction 4 Parts Checklist 7 Quick Reference Guide 8 Installation 12 Telephone Operation Basic Handset Operation 13 Basic Base Operation 17 Other Features on Handset 18 Date and Time 19 Initial Setup 21 Phonebook 23 Caller ID 27 Troubleshooting 30...
... easy reference. Keep the manual near the phone for purchasing the C4220 5.8 GHz amplified cordless phone, from Clarity. Using our patented Digital Clarity Power, the C4220 clearly amplifies incoming sound up to use your C4220 effectively, easily and safely. TABLE OF CONTENTS Getting Started Safety Instruction 4 Parts Checklist 7 Quick Reference Guide 8 Installation 12 Telephone Operation Basic Handset Operation 13 Basic Base Operation 17 Other Features on Handset 18 Date and Time 19 Initial Setup 21 Phonebook 23 Caller ID 27 Troubleshooting 30...

User Guide
Page 5
... no single volume setting that you use the handset with local codes for possible special disposal instructions. 20. Never install telephone jacks in a fire.They may damage your cordless phone. Never touch uninsulated telephone wires or terminals unless the telephone line has been disconnected at high volume. 3. SAFETY INSTRUCTIONS FOR BATTERIES Caution: Risk of your hearing. Improper adjustment may cause hearing damage. small parts may be affected. Use only the...
... no single volume setting that you use the handset with local codes for possible special disposal instructions. 20. Never install telephone jacks in a fire.They may damage your cordless phone. Never touch uninsulated telephone wires or terminals unless the telephone line has been disconnected at high volume. 3. SAFETY INSTRUCTIONS FOR BATTERIES Caution: Risk of your hearing. Improper adjustment may cause hearing damage. small parts may be affected. Use only the...
User Guide
Page 10
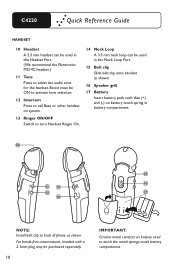
... hands-free conversations, headset with a 2.5mm plug may be purchased separately. 10 IMPORTANT: Circular metal contacts on battery touch spring in battery compartment. C4220 Quick Reference Guide HANDSET 10 Headset A 2.5 mm headset can be used in the Headset Port. (We recommend the Plantronics M214C headset.) 11 Tone Press to select the audio tone for the handset. HEADSET 10 HEADSET TONE INTERCOM 15 TONE INTERCOM 16 ROINN/GOEFRF 11 13 NECKLOOP 12 17 14 NOTE : Install belt clip...
... hands-free conversations, headset with a 2.5mm plug may be purchased separately. 10 IMPORTANT: Circular metal contacts on battery touch spring in battery compartment. C4220 Quick Reference Guide HANDSET 10 Headset A 2.5 mm headset can be used in the Headset Port. (We recommend the Plantronics M214C headset.) 11 Tone Press to select the audio tone for the handset. HEADSET 10 HEADSET TONE INTERCOM 15 TONE INTERCOM 16 ROINN/GOEFRF 11 13 NECKLOOP 12 17 14 NOTE : Install belt clip...
User Guide
Page 12
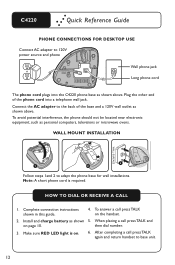
... connection instructions shown in this guide. 4. To answer a call press TALK again and return handset to base unit. 12 Connect the AC adapter to the back of the phone cord into the C4220 phone base as shown above . When placing a call press TALK and on . 6. Make sure RED LED light is required4. To avoid potential interference, the phone should not be located near electronic equipment, such as shown 5. C4220 Quick Reference Guide PHONE CONNECTIONS FOR DESKTOP USE Connect...
... connection instructions shown in this guide. 4. To answer a call press TALK again and return handset to base unit. 12 Connect the AC adapter to the back of the phone cord into the C4220 phone base as shown above . When placing a call press TALK and on . 6. Make sure RED LED light is required4. To avoid potential interference, the phone should not be located near electronic equipment, such as shown 5. C4220 Quick Reference Guide PHONE CONNECTIONS FOR DESKTOP USE Connect...
User Guide
Page 13
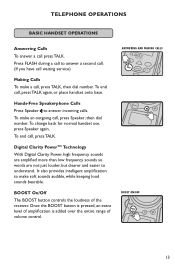
..., an extra level of amplification is added over the entire range of the receiver. ANSWERING AND MAKING CALLS TALK MENU CL/FL BOOST BOOST ON/OFF BOOST 13 To end call, press TALK again, or place handset onto base. Hands-Free Speakerphone Calls Press Speaker to understand. then dial number. BOOST On/Off The BOOST button controls the loudness of volume control. Digital Clarity PowerTM Technology With Digital Clarity Power...
..., an extra level of amplification is added over the entire range of the receiver. ANSWERING AND MAKING CALLS TALK MENU CL/FL BOOST BOOST ON/OFF BOOST 13 To end call, press TALK again, or place handset onto base. Hands-Free Speakerphone Calls Press Speaker to understand. then dial number. BOOST On/Off The BOOST button controls the loudness of volume control. Digital Clarity PowerTM Technology With Digital Clarity Power...

User Guide
Page 14
... every time a call starts, the user will need to press the BOOST button in use, the dial on page 15 for handset and speakerphone. See the matrix on the side controls the level of amplification. When phone is activated. MENU BOOST OVERRIDE (ON/OFF) 12:09 AM 04/06 Boost Override ON Back Save MENU ON - When the Boost override is set...
... every time a call starts, the user will need to press the BOOST button in use, the dial on page 15 for handset and speakerphone. See the matrix on the side controls the level of amplification. When phone is activated. MENU BOOST OVERRIDE (ON/OFF) 12:09 AM 04/06 Boost Override ON Back Save MENU ON - When the Boost override is set...
User Guide
Page 15
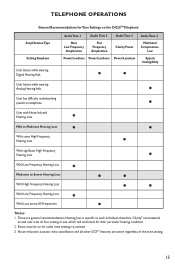
... be on for their particular hearing condition. 2. These are active regardless of the tone setting. 15 Low Power/Loudness Power/Loudness Power/Loudness Speech Intelligibility User listens while wearing Digital Hearing Aids User listens while wearing Analog Hearing Aids User has difficulty understanding speech on the C4220TM Telephone* Amplification Type Setting Emphasis Audio Tone 1 Audio Tone 2 Audio Tone 3 Audio Tone 4 Bass Low Frequency Amplication...
... be on for their particular hearing condition. 2. These are active regardless of the tone setting. 15 Low Power/Loudness Power/Loudness Power/Loudness Speech Intelligibility User listens while wearing Digital Hearing Aids User listens while wearing Analog Hearing Aids User has difficulty understanding speech on the C4220TM Telephone* Amplification Type Setting Emphasis Audio Tone 1 Audio Tone 2 Audio Tone 3 Audio Tone 4 Bass Low Frequency Amplication...
User Guide
Page 16
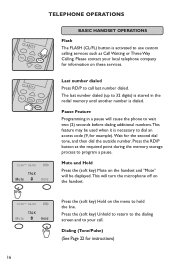
Wait for instructions) 16 Press the (soft key) Unhold to return to the dialing screen and to call . Last number dialed Press RD/P to your local telephone company for information on the menu to dial an access code (9, for example). Press the RD/P button at the required point during the memory storage process to use custom calling services such as Call Waiting or Three Way Calling. Pause Feature Programming in the redial memory until another number is...
Wait for instructions) 16 Press the (soft key) Unhold to return to the dialing screen and to call . Last number dialed Press RD/P to your local telephone company for information on the menu to dial an access code (9, for example). Press the RD/P button at the required point during the memory storage process to use custom calling services such as Call Waiting or Three Way Calling. Pause Feature Programming in the redial memory until another number is...
User Guide
Page 18
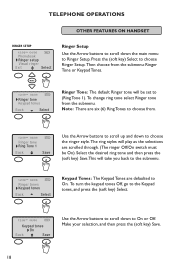
... 04/06 Ringer tones Keypad tones Back Select Keypad Tones: The Keypad Tones are six (6) Ring Tones to choose from. 12:09 AM 04/06 Ringer tone Ring Tone 1 Back Save Use the Arrow buttons to scroll up and down to On. TELEPHONE OPERATIONS OTHER FEATURES ON HANDSET RINGER SETUP 12:09 AM 04/06 Phonebook Ringer setup Visual ringer Exit Select MENU 12:09 AM 04/06 Ringer tone Keypad tones Back Select Ringer Setup Use the Arrow buttons to...
... 04/06 Ringer tones Keypad tones Back Select Keypad Tones: The Keypad Tones are six (6) Ring Tones to choose from. 12:09 AM 04/06 Ringer tone Ring Tone 1 Back Save Use the Arrow buttons to scroll up and down to On. TELEPHONE OPERATIONS OTHER FEATURES ON HANDSET RINGER SETUP 12:09 AM 04/06 Phonebook Ringer setup Visual ringer Exit Select MENU 12:09 AM 04/06 Ringer tone Keypad tones Back Select Ringer Setup Use the Arrow buttons to...
User Guide
Page 19
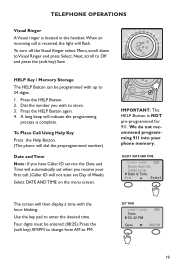
... your phone memory. Four digits must be programmed with the hour blinking. TELEPHONE OPERATIONS Visual Ringer A Visual ringer is complete. We do not recommend programming 911 into your first call is NOT pre-programmed for 911. When an incoming call . (Caller ID will then display a time with up to PM. To Place Call Using Help Key Press the Help Button. (The phone will dial the preprogrammed number) Date and Time Note: If you have Caller ID service the Date and Time...
... your phone memory. Four digits must be programmed with the hour blinking. TELEPHONE OPERATIONS Visual Ringer A Visual ringer is complete. We do not recommend programming 911 into your first call is NOT pre-programmed for 911. When an incoming call . (Caller ID will then display a time with up to PM. To Place Call Using Help Key Press the Help Button. (The phone will dial the preprogrammed number) Date and Time Note: If you have Caller ID service the Date and Time...

User Guide
Page 21
INITIAL SETUP 12:09 AM 04/06 Registration Auto Talk Back Select Auto Talk Auto Talk allows the user to remove Handset from the base, set to Off. Select Auto Talk on purchasing additional handsets. The C4220 will come with the base will be registered to automatically answer after removing it from the base during an incoming call and immediately start talking without pressing the Talk Button. If any additional handsets are purchased the registration instructions will support up to ON. When picking the handset off...
INITIAL SETUP 12:09 AM 04/06 Registration Auto Talk Back Select Auto Talk Auto Talk allows the user to remove Handset from the base, set to Off. Select Auto Talk on purchasing additional handsets. The C4220 will come with the base will be registered to automatically answer after removing it from the base during an incoming call and immediately start talking without pressing the Talk Button. If any additional handsets are purchased the registration instructions will support up to ON. When picking the handset off...
User Guide
Page 23
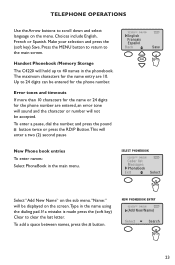
..., press the # button. To enter a pause, dial the number, and press the pound # button twice or press the RD/P Button.This will hold up to 40 names in the name using the dialing pad. NEW PHONEBOOK ENTRY 12:09 AM 04/06 (Add New/Name) Select Search 23 SELECT PHONEBOOK 12:09 AM 04/06 Caller list Messages Phonebook Exit Select Select "Add New Name" on the screen. Up to...
..., press the # button. To enter a pause, dial the number, and press the pound # button twice or press the RD/P Button.This will hold up to 40 names in the name using the dialing pad. NEW PHONEBOOK ENTRY 12:09 AM 04/06 (Add New/Name) Select Search 23 SELECT PHONEBOOK 12:09 AM 04/06 Caller list Messages Phonebook Exit Select Select "Add New Name" on the screen. Up to...
User Guide
Page 24
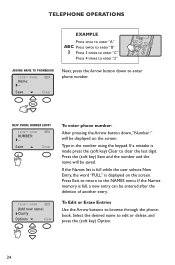
... list is full while the user selects New Entry, the word "FULL" is full, a new entry can be entered after the deletion of another entry. Select the desired name to browse through the phonebook. Save Clear Next, press the Arrow button down ,"Number:" will be displayed on the screen. If a mistake is made press the (soft key) Clear to enter phone number. Type in the number using...
... list is full while the user selects New Entry, the word "FULL" is full, a new entry can be entered after the deletion of another entry. Select the desired name to browse through the phonebook. Save Clear Next, press the Arrow button down ,"Number:" will be displayed on the screen. If a mistake is made press the (soft key) Clear to enter phone number. Type in the number using...
User Guide
Page 25
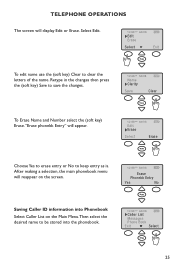
... Phonebook Select Caller List on the screen. Retype in the changes then press the (soft key) Save to save the changes. 12:09 AM 04/06 Name Clarity Save Clear MENU To Erase Name and Number select the (soft key) Erase."Erase phonebk Entry" will reappear on the Main Menu.Then select the desired name to clear the letters of the name. TELEPHONE OPERATIONS The screen will display Edit or Erase...
... Phonebook Select Caller List on the screen. Retype in the changes then press the (soft key) Save to save the changes. 12:09 AM 04/06 Name Clarity Save Clear MENU To Erase Name and Number select the (soft key) Erase."Erase phonebk Entry" will reappear on the Main Menu.Then select the desired name to clear the letters of the name. TELEPHONE OPERATIONS The screen will display Edit or Erase...

User Guide
Page 27
... caller's ID. Incoming Call "Incoming Call" will blink on the handset display when a new call , a tone will emit, and the Caller ID will record up or down to scroll through your local telephone company. This telephone will have been reviewed. The first row on an existing call is not accessed, the Caller ID information will be transferred into memory. Select Caller List from the most recent record to view the Caller ID content. Use Arrow buttons...
... caller's ID. Incoming Call "Incoming Call" will blink on the handset display when a new call , a tone will emit, and the Caller ID will record up or down to scroll through your local telephone company. This telephone will have been reviewed. The first row on an existing call is not accessed, the Caller ID information will be transferred into memory. Select Caller List from the most recent record to view the Caller ID content. Use Arrow buttons...

User Guide
Page 30
... in the battery compartment correctly. (The circular metal contacts on battery need to another location. • Make sure the AC Adapter is not plugged into the wall jack and the telephone. • Make sure you are within the usable range of the base station. The phone does not ring when you receive a call: • Make sure the RINGER switch on the handset and base are set to ON...
... in the battery compartment correctly. (The circular metal contacts on battery need to another location. • Make sure the AC Adapter is not plugged into the wall jack and the telephone. • Make sure you are within the usable range of the base station. The phone does not ring when you receive a call: • Make sure the RINGER switch on the handset and base are set to ON...

User Guide
Page 31
... use.) Difficulty in the cradle. • If necessary, replace the handset battery. • Handset battery may have developed a memory, due to user improperly charging, and may need to be re-registered to the base manually. First, select INITIAL SETUP on the base and reinsert the AC Adapter. • Make sure the handset battery is fully charged. Your Handset Screen is displaying Out of dust and dirt. TROUBLESHOOTING Phone Will Not Hold...
... use.) Difficulty in the cradle. • If necessary, replace the handset battery. • Handset battery may have developed a memory, due to user improperly charging, and may need to be re-registered to the base manually. First, select INITIAL SETUP on the base and reinsert the AC Adapter. • Make sure the handset battery is fully charged. Your Handset Screen is displaying Out of dust and dirt. TROUBLESHOOTING Phone Will Not Hold...

User Guide
Page 33
... jack used to also compliant. A operations or procedures that may be connected to the premises wiring and believe it contains no repairable parts. plug, RJ11C USOC, is necessary. maintain uninterrupted service. warranty information, please contact nected to party line service is resolved. (5.0).To be certain of the number of devices that could compliant telephone cord and modular affect the operation of 0.3). Contact the...
... jack used to also compliant. A operations or procedures that may be connected to the premises wiring and believe it contains no repairable parts. plug, RJ11C USOC, is necessary. maintain uninterrupted service. warranty information, please contact nected to party line service is resolved. (5.0).To be certain of the number of devices that could compliant telephone cord and modular affect the operation of 0.3). Contact the...

User Guide
Page 34
... your home has specially wired alarm not installed and used in accordance equipment connected to the telephone with respect to which the television, radio, or other receiver with the instructions, may cause harmful line, ensure the installation of the following two conditions: (1) This device may cause undesired operation. If you are designed to Part 15 of the FCC Rules. CAUTION: Changes...
... your home has specially wired alarm not installed and used in accordance equipment connected to the telephone with respect to which the television, radio, or other receiver with the instructions, may cause harmful line, ensure the installation of the following two conditions: (1) This device may cause undesired operation. If you are designed to Part 15 of the FCC Rules. CAUTION: Changes...
User Guide
Page 35
... be installed using this phone. Use of connection. CAUTION: Users should ensure for their own protection that the sum of the Ringer Equivalence Numbers of service in rural areas. The equipment must also be extended by means of a certified connector assembly (telephone extension cord). The customer should contact the appropriate electrical inspection authority, or electrician, as appropriate. For body worn operation, this handset has...
... be installed using this phone. Use of connection. CAUTION: Users should ensure for their own protection that the sum of the Ringer Equivalence Numbers of service in rural areas. The equipment must also be extended by means of a certified connector assembly (telephone extension cord). The customer should contact the appropriate electrical inspection authority, or electrician, as appropriate. For body worn operation, this handset has...


