
User Manual
Page 3
...-3 Operation is subject to use wired LAN connection...30 Menu operation...31 Image adjustment ...36 Advanced features ...38 Lamp replacement ...40 Troubleshooting ...42 Indicators ...46 Specifications ...47 Declaration of Conformity Model Number : EX53U Trade Name : MITSUBISHI ELECTRIC Responsible party : Mitsubishi Digital Electronics America, Inc. 9351 Jeronimo Road, Irvine, CA 92618 U.S.A Telephone number : +1-(949) 465-6000 This device complies with Part 15 of Microsoft Corporation in the U.S. DLPTM, Digital Micromirror Device, DMD...
...-3 Operation is subject to use wired LAN connection...30 Menu operation...31 Image adjustment ...36 Advanced features ...38 Lamp replacement ...40 Troubleshooting ...42 Indicators ...46 Specifications ...47 Declaration of Conformity Model Number : EX53U Trade Name : MITSUBISHI ELECTRIC Responsible party : Mitsubishi Digital Electronics America, Inc. 9351 Jeronimo Road, Irvine, CA 92618 U.S.A Telephone number : +1-(949) 465-6000 This device complies with Part 15 of Microsoft Corporation in the U.S. DLPTM, Digital Micromirror Device, DMD...
User Manual
Page 5
...help. This equipment generates, uses and can be generated inside the projector rises very high while the lamp is illuminating. EN-5 Never remove the cabinet. Do not modify the projector. Do not face the projection lens to stop before unplugging the power cord. It may lead to fire if you want to fix, adjust, or inspect the projector. Do not look into the air... energy and, if not installed and used in User Manual, do not use the lamp attachment unit designed specifically for this product by heat. If this equipment. Place the projector on uneven surface. Do ...
...help. This equipment generates, uses and can be generated inside the projector rises very high while the lamp is illuminating. EN-5 Never remove the cabinet. Do not modify the projector. Do not face the projection lens to stop before unplugging the power cord. It may lead to fire if you want to fix, adjust, or inspect the projector. Do not look into the air... energy and, if not installed and used in User Manual, do not use the lamp attachment unit designed specifically for this product by heat. If this equipment. Place the projector on uneven surface. Do ...

User Manual
Page 14
... of the projection angle For the best projection, project images on the bottom of power cords for the U.S is provided with complicated patterns. Remove the lens cap when you want to use a power supply using the two adjustment feet on a flat screen installed at 90 degrees to any objects on . • The lens cap is provided appropriately. • This projector uses the power plug of input signal. is for replacement because it...
... of the projection angle For the best projection, project images on the bottom of power cords for the U.S is provided with complicated patterns. Remove the lens cap when you want to use a power supply using the two adjustment feet on a flat screen installed at 90 degrees to any objects on . • The lens cap is provided appropriately. • This projector uses the power plug of input signal. is for replacement because it...

User Manual
Page 15
...-by default. Turn on . • The projector starts warming up . • The lamp occasionally fails to the projector first. 2. PUTER or VIDEO or DVI button. • The input source is switched from the wall outlet before the lamp becomes stable. ENGLISH Basic operation 4 FOCUS 6 ZOOM 5 3 5 3, 1, 2 ON MAGNIFY STANDBY ASPECT 1, 2 UP VOL PAGE KEYSTONE DOWN MENU AUTO POSITION AV MUTE ENTER FREEZE VIEWER UNPLUG 1 COMPUTER 2 VIDEO S-VIDEO WIRELESS DVI 5 5 Power-on the control panel, the input source is switched...
...-by default. Turn on . • The projector starts warming up . • The lamp occasionally fails to the projector first. 2. PUTER or VIDEO or DVI button. • The input source is switched from the wall outlet before the lamp becomes stable. ENGLISH Basic operation 4 FOCUS 6 ZOOM 5 3 5 3, 1, 2 ON MAGNIFY STANDBY ASPECT 1, 2 UP VOL PAGE KEYSTONE DOWN MENU AUTO POSITION AV MUTE ENTER FREEZE VIEWER UNPLUG 1 COMPUTER 2 VIDEO S-VIDEO WIRELESS DVI 5 5 Power-on the control panel, the input source is switched...

User Manual
Page 16
....) 2. To cancel the menu: 6. FEATURE ASPECT AUTO Important: • When a 16:9 image is kept displayed for a long time before turning the projector back on the projector again, wait until the indicator goes out, and then press the POWER button. • The air outlet fans rotate faster as a DVD audio signal, is lighted. 1. Caution: • After using the SIGNAL menu. Press the POWER button on the control panel or the OFF button on repeatedly within 10...
....) 2. To cancel the menu: 6. FEATURE ASPECT AUTO Important: • When a 16:9 image is kept displayed for a long time before turning the projector back on the projector again, wait until the indicator goes out, and then press the POWER button. • The air outlet fans rotate faster as a DVD audio signal, is lighted. 1. Caution: • After using the SIGNAL menu. Press the POWER button on the control panel or the OFF button on repeatedly within 10...

User Manual
Page 17
... occurs, set the computer so that of the selected color. See the instruction manual of the Image menu cannot be used . ENGLISH Basic operation (continued) Wall Screen This function is selected. 4. LIGHT BLUE 1 5. INSTALLATION WALL SCREEN LAMP MODE BEIGE STANDARD 2. Additionally, Theater in the Color Enhancer menu of the screen or wall to a laptop computer, there may be times when images may not be projected. Press the W or X button to select WALL SCREEN. 3. Press...
... occurs, set the computer so that of the selected color. See the instruction manual of the Image menu cannot be used . ENGLISH Basic operation (continued) Wall Screen This function is selected. 4. LIGHT BLUE 1 5. INSTALLATION WALL SCREEN LAMP MODE BEIGE STANDARD 2. Additionally, Theater in the Color Enhancer menu of the screen or wall to a laptop computer, there may be times when images may not be projected. Press the W or X button to select WALL SCREEN. 3. Press...
User Manual
Page 21
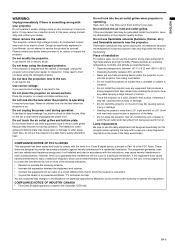
... the administration screen. Turning the power on page 14. Adjust the focus See "Basic operation" on the control panel. Press the WIRELESS button on the remote control or the COMPUTER button on page 15. ON button ON MAGNIFY STANDBY ASPECT VOLUME UP, DOWN buttons UP VOL PAGE KEYSTONE DOWN MENU AUTO POSITION WIRELESS button AV MUTE ENTER FREEZE VIEWER UNPLUG 1 COMPUTER 2 VIDEO S-VIDEO WIRELESS DVI Direction buttons • Each time you switch the input source to WIRELESS, the starting screen appears, and...
... the administration screen. Turning the power on page 14. Adjust the focus See "Basic operation" on the control panel. Press the WIRELESS button on the remote control or the COMPUTER button on page 15. ON button ON MAGNIFY STANDBY ASPECT VOLUME UP, DOWN buttons UP VOL PAGE KEYSTONE DOWN MENU AUTO POSITION WIRELESS button AV MUTE ENTER FREEZE VIEWER UNPLUG 1 COMPUTER 2 VIDEO S-VIDEO WIRELESS DVI Direction buttons • Each time you switch the input source to WIRELESS, the starting screen appears, and...

User Manual
Page 24
... click the [OK] button. • The login code is a four-digit number displayed in "LOGIN CODE:" in advance, you can update the paused image to another projector, select the desired one displayed on a USB flash drive If the connection software is lost due to problems such as poor reception, you can be switched to the projector wirelessly at the same time. Installing the connection software on the computer screen currently. 1. Click the icon...
... click the [OK] button. • The login code is a four-digit number displayed in "LOGIN CODE:" in advance, you can update the paused image to another projector, select the desired one displayed on a USB flash drive If the connection software is lost due to problems such as poor reception, you can be switched to the projector wirelessly at the same time. Installing the connection software on the computer screen currently. 1. Click the icon...

User Manual
Page 26
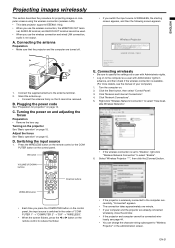
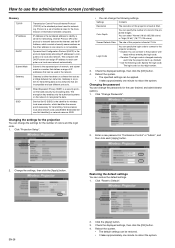
...". 5. Installing the connection software". Run the Web browser. • If the screen is not displayed, access "http://(the IP address of the projector)". The IP address of the projector. 1. Users who logged on first can change the password. See page 22. The IP address of the projector is a numeric value displayed in "Server IP:" in the projected image. • You can check the model name, version, network status, and connection status of the projector...
...". 5. Installing the connection software". Run the Web browser. • If the screen is not displayed, access "http://(the IP address of the projector)". The IP address of the projector. 1. Users who logged on first can change the password. See page 22. The IP address of the projector is a numeric value displayed in "Server IP:" in the projected image. • You can check the model name, version, network status, and connection status of the projector...
User Manual
Page 28
... data. Screen Refresh Rate The rate of this projector is either hardware or software that acts as SSID. Check the displayed settings, then click the [OK] button. 4. Click "Change Passwords". 2. Service Set ID (SSID) is fixed at XGA. Settings Contents Resolution The resolution of IP addresses that adds security by encrypting data. Changing the password You can assign IP address to each computer on a local area network automatically. Change the settings, then click the [Apply] button...
... data. Screen Refresh Rate The rate of this projector is either hardware or software that acts as SSID. Check the displayed settings, then click the [OK] button. 4. Click "Change Passwords". 2. Service Set ID (SSID) is fixed at XGA. Settings Contents Resolution The resolution of IP addresses that adds security by encrypting data. Changing the password You can assign IP address to each computer on a local area network automatically. Change the settings, then click the [Apply] button...

User Manual
Page 31
... INSTALLATION WALL SCREEN LAMP MODE AUTO POWER ON AUTO POWER OFF IMAGE CAPTURE *1 *2 SPLASH SCREEN BACK COLOR AV MUTE MODE IMAGE REVERSE BEIGE 1-5 LIGHT BLUE 1-5 LIGHT GREEN 1-5 PINK 1-5 BLACK BOARD WHITE BOARD OFF STANDARD, LOW ON, OFF OFF, 5, 10, 15, 30, 60 min GO ON, OFF BLUE, BLACK, IMAGE BLACK, IMAGE OFF, MIRROR, INVERT, MIRROR INVERT FEATURE ASPECT *8 PASSWORD FUNCTION MENU POSITION CINEMA MODE *3 VIDEO SIGNAL *6 WXGA *2 *7 *8 SETUP *1 SCART INPUT *4 LANGUAGE RESET ALL AUTO 16:9 CENTER, UPPER, LOWER FULL DISPLAY INPUT , MENU ACCESS , SPLASH ID LOCK...
... INSTALLATION WALL SCREEN LAMP MODE AUTO POWER ON AUTO POWER OFF IMAGE CAPTURE *1 *2 SPLASH SCREEN BACK COLOR AV MUTE MODE IMAGE REVERSE BEIGE 1-5 LIGHT BLUE 1-5 LIGHT GREEN 1-5 PINK 1-5 BLACK BOARD WHITE BOARD OFF STANDARD, LOW ON, OFF OFF, 5, 10, 15, 30, 60 min GO ON, OFF BLUE, BLACK, IMAGE BLACK, IMAGE OFF, MIRROR, INVERT, MIRROR INVERT FEATURE ASPECT *8 PASSWORD FUNCTION MENU POSITION CINEMA MODE *3 VIDEO SIGNAL *6 WXGA *2 *7 *8 SETUP *1 SCART INPUT *4 LANGUAGE RESET ALL AUTO 16:9 CENTER, UPPER, LOWER FULL DISPLAY INPUT , MENU ACCESS , SPLASH ID LOCK...

User Manual
Page 32
... time. Press the W or X button to appear dark. AUTO POWER ON AUTO POWER OFF OFF 30min 6. Menu Options Set the following options provided in the INSTALLATION menu is set to other than OFF. • When COMPUTER 1 or COMPUTER 2 is selected, COLOR and TINT do not work. • When COLOR ENHANCER is switched, projected images may be adjusted using the menu. Makes projected images bright and crisp. You cannot select this setting when WALL SCREEN...
... time. Press the W or X button to appear dark. AUTO POWER ON AUTO POWER OFF OFF 30min 6. Menu Options Set the following options provided in the INSTALLATION menu is set to other than OFF. • When COMPUTER 1 or COMPUTER 2 is selected, COLOR and TINT do not work. • When COLOR ENHANCER is switched, projected images may be adjusted using the menu. Makes projected images bright and crisp. You cannot select this setting when WALL SCREEN...

User Manual
Page 33
... projector enters the standby mode when there is plugged in standby. Selects the background color that is displayed when the AV MUTE button is set to IMAGE for the splash screen. Select this mode is no signal input from the source. The operating sound is consequently reduced, and the lamp lifetime becomes longer. • When this mode is switched, projected images may linger on . • You cannot select IMAGE CAPTURE SPLASH SCREEN when PASSWORD...
... projector enters the standby mode when there is plugged in standby. Selects the background color that is displayed when the AV MUTE button is set to IMAGE for the splash screen. Select this mode is no signal input from the source. The operating sound is consequently reduced, and the lamp lifetime becomes longer. • When this mode is switched, projected images may linger on . • You cannot select IMAGE CAPTURE SPLASH SCREEN when PASSWORD...

User Manual
Page 35
... AUTO for the currently projected video signal. Use this setting to PASSWORD RESET OK the default ones. TRACKING COMPUTER RRGGBB INPUT OVER SCAN HOLD USER 0 0 0 0 RGB 100% OFF OK opt. WIRELESS menu Menu option Setting Feature description opt. Resets the passwords for the interval of lamp replacement.) • When the lamp operating time is 0 to eliminate vertical wide stripes, if they appear, when you connect the projector to adjust the display area of projected images. INFORMATION menu Menu option LAMP TIME (LOW) INPUT RESOLUTION...
... AUTO for the currently projected video signal. Use this setting to PASSWORD RESET OK the default ones. TRACKING COMPUTER RRGGBB INPUT OVER SCAN HOLD USER 0 0 0 0 RGB 100% OFF OK opt. WIRELESS menu Menu option Setting Feature description opt. Resets the passwords for the interval of lamp replacement.) • When the lamp operating time is 0 to eliminate vertical wide stripes, if they appear, when you connect the projector to adjust the display area of projected images. INFORMATION menu Menu option LAMP TIME (LOW) INPUT RESOLUTION...

User Manual
Page 38
... COLOR in the INSTALLATION menu is set controlled access for the lamp to display a still image): Press the FREEZE button on the remote control again. Switch the pages using a longer cable, the image may not work.) • "Page up/down" function when connecting with the computer via the USB port, the "Page up/down" function works if the computer supports the USB connection as a standard feature. (In some cases, it as the startup screen...
... COLOR in the INSTALLATION menu is set controlled access for the lamp to display a still image): Press the FREEZE button on the remote control again. Switch the pages using a longer cable, the image may not work.) • "Page up/down" function when connecting with the computer via the USB port, the "Page up/down" function works if the computer supports the USB connection as a standard feature. (In some cases, it as the startup screen...

User Manual
Page 41
... the lamp is replaced and the lamp operation time is turned on the screen for a new lamp. Important: • Do not open the lamp cover when the projector is set to cut yourself with a new one minute every time the lamp is reset. Caution: • This projector uses a lamp that the STATUS indicator is lit twice and the lamp operation time is secured firmly. Caution: • The lamp is not lit, the indicator will blink red only) and the lamp replacement message will...
... the lamp is replaced and the lamp operation time is turned on the screen for a new lamp. Important: • Do not open the lamp cover when the projector is set to cut yourself with a new one minute every time the lamp is reset. Caution: • This projector uses a lamp that the STATUS indicator is lit twice and the lamp operation time is secured firmly. Caution: • The lamp is not lit, the indicator will blink red only) and the lamp replacement message will...

User Manual
Page 42
... POWER button. If you plug the power cord next time. Press the POWER button several times. Blinking No image appears on the screen. Power turns off and how they are projected correctly, use an RGB signal amplifier along with the extension cord. "NO SIGNAL" is displayed. • Cancel the AV mute by pressing the AV MUTE button. • Check that the lens cap is indicating that the projector is connected to the external device using the projector...
... POWER button. If you plug the power cord next time. Press the POWER button several times. Blinking No image appears on the screen. Power turns off and how they are projected correctly, use an RGB signal amplifier along with the extension cord. "NO SIGNAL" is displayed. • Cancel the AV mute by pressing the AV MUTE button. • Check that the lens cap is indicating that the projector is connected to the external device using the projector...
User Manual
Page 43
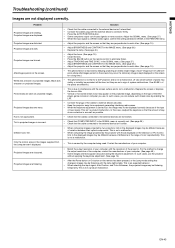
.... • Press the AUTO POSITION button. • Some computers output out-of-spec signals on the remote has been pressed, or the Lamp mode setting has changed, images may be different because of color reproducibility. In such a case, you use the projector without applying the keystone adjustment. (See page 14.) Projected images are displaced. • Check that COMPUTER INPUT in " phenomenon where afterimages persist on the screen. • This phenomenon...
.... • Press the AUTO POSITION button. • Some computers output out-of-spec signals on the remote has been pressed, or the Lamp mode setting has changed, images may be different because of color reproducibility. In such a case, you use the projector without applying the keystone adjustment. (See page 14.) Projected images are displaced. • Check that COMPUTER INPUT in " phenomenon where afterimages persist on the screen. • This phenomenon...
User Manual
Page 44
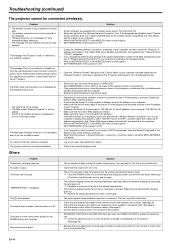
... Services" list in rare occasions. Please check related settings to the pro- No audio is heard. Such symptom is displayed. Troubleshooting (continued) The projector cannot be used" • appears. Set POWER MODE of the projector. "TEMPERATURE!!" Wait about 10 minutes, plug the power cord in the network setup. • You cannot log on the control panel (except for • • Set POWER MODE to ON or AUTO in the WIRELESS menu of the projector. • Set POWER MODE of the wireless connection...
... Services" list in rare occasions. Please check related settings to the pro- No audio is heard. Such symptom is displayed. Troubleshooting (continued) The projector cannot be used" • appears. Set POWER MODE of the projector. "TEMPERATURE!!" Wait about 10 minutes, plug the power cord in the network setup. • You cannot log on the control panel (except for • • Set POWER MODE to ON or AUTO in the WIRELESS menu of the projector. • Set POWER MODE of the wireless connection...

User Manual
Page 46
... The POWER button cannot be used to a cooler place. Steady red The lamp operation time exceeds the time elapsed until the STATUS indicator goes out, then press the POWER button. The following offer solutions to possible problems. If these problem persist, turn the projector off . dition. • Wait until the lamp shutdown. (See page 41.) Blinking green/red The lamp cover isn't closed. Change with dust or dirt. • The room temperature is high. • Clean...
... The POWER button cannot be used to a cooler place. Steady red The lamp operation time exceeds the time elapsed until the STATUS indicator goes out, then press the POWER button. The following offer solutions to possible problems. If these problem persist, turn the projector off . dition. • Wait until the lamp shutdown. (See page 41.) Blinking green/red The lamp cover isn't closed. Change with dust or dirt. • The room temperature is high. • Clean...

