
User Manual
Page 3
...of Conformity Model number: Trade name: Responsible party: Telephone number: WL2650U MITSUBISHI ELECTRIC Mitsubishi Digital Electronics America, Inc. 9351 Jeronimo Road, ..., and (2) this chemical symbol means that the battery or accumulator contains a heavy metal at your projector...10 Viewing computer images ...13 Viewing video images...17 Menu operation ...22 Adjusting projected images...28 Advanced features ......-3 Contents Important safeguards ...4 Preparing your projector...6 Using the remote control...9 Setting up your local community waste collection/ recycling centre.
...of Conformity Model number: Trade name: Responsible party: Telephone number: WL2650U MITSUBISHI ELECTRIC Mitsubishi Digital Electronics America, Inc. 9351 Jeronimo Road, ..., and (2) this chemical symbol means that the battery or accumulator contains a heavy metal at your projector...10 Viewing computer images ...13 Viewing video images...17 Menu operation ...22 Adjusting projected images...28 Advanced features ......-3 Contents Important safeguards ...4 Preparing your projector...6 Using the remote control...9 Setting up your local community waste collection/ recycling centre.

User Manual
Page 6
...Audio/Video cable (246C381-10) Power supply parts USB 4-pin (type A) USB cable (246C509-10) Mini D-SUB 15-pin RGB cable for PC (246C521-10) D-SUB 9-pin RS-232C cable (246C548-10) • Used for other products. 1 3 2 Inserting the batteries into the remote control 1. Attach the rear... cap (Attached to the projector) • Lamp replacement tray (857C106-10) • CD-ROM (919C167-10) • Safety Manual/ Quick Start up (871D534-10) Power cord (two) (246C483-10, 246C383-20) Remote control R6 (size-AA) (290P136-10) battery (two) Important: • The attached power cords are to...
...Audio/Video cable (246C381-10) Power supply parts USB 4-pin (type A) USB cable (246C509-10) Mini D-SUB 15-pin RGB cable for PC (246C521-10) D-SUB 9-pin RS-232C cable (246C548-10) • Used for other products. 1 3 2 Inserting the batteries into the remote control 1. Attach the rear... cap (Attached to the projector) • Lamp replacement tray (857C106-10) • CD-ROM (919C167-10) • Safety Manual/ Quick Start up (871D534-10) Power cord (two) (246C483-10, 246C383-20) Remote control R6 (size-AA) (290P136-10) battery (two) Important: • The attached power cords are to...

User Manual
Page 7
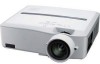
... audio input terminals EN-7 ing is on the screen, the KEYSTONE button functions as the ENTER button. Terminal board 12 3 13 12 11 10 8 9 1 COMPUTER/COMPONENT VIDEO IN-1 terminal (Mini D-SUB 15-pin) 2 COMPUTER/COMPONENT VIDEO IN-2 terminal (Mini D-SUB 15-pin)...Preparating your projector (continued) Overview 6 13 12 11 10 1 Speaker 2 Air inlet grille/Filter cover 1 3 Control area 2 4 ZOOM ring 3 5 FOCUS ring 4 6 Remote control sensor (Front) 5 7 Air outlet grille 8 Lamp cover 9 Air outlet grille 10 Remote control sensor (Rear) 11 Kensington Security Lock Standard ...
... audio input terminals EN-7 ing is on the screen, the KEYSTONE button functions as the ENTER button. Terminal board 12 3 13 12 11 10 8 9 1 COMPUTER/COMPONENT VIDEO IN-1 terminal (Mini D-SUB 15-pin) 2 COMPUTER/COMPONENT VIDEO IN-2 terminal (Mini D-SUB 15-pin)...Preparating your projector (continued) Overview 6 13 12 11 10 1 Speaker 2 Air inlet grille/Filter cover 1 3 Control area 2 4 ZOOM ring 3 5 FOCUS ring 4 6 Remote control sensor (Front) 5 7 Air outlet grille 8 Lamp cover 9 Air outlet grille 10 Remote control sensor (Rear) 11 Kensington Security Lock Standard ...
User Manual
Page 8
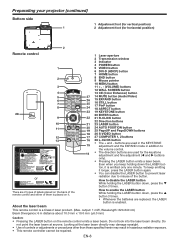
...27 COMPUTER 1, 2 buttons 13 CE MUTE STILL 16 28 L-CLICK button • The + and - About the laser beam This remote control is placed on the remote control emits a laser beam. Looking at anyone. Preparating your projector (continued) Bottom side 1 1 Adjustment foot (for vertical position) ...times. EN-8 Do not look into the laser beam directly. output: 1 mW, Wavelength: 620-640 nm) Beam Divergence: 6 m distance about 10.0 mm x 10.0 mm (±6.0 mm) Caution: • Pressing the LASER button on it is enabled. How to enable the LASER button While holding the ...
...27 COMPUTER 1, 2 buttons 13 CE MUTE STILL 16 28 L-CLICK button • The + and - About the laser beam This remote control is placed on the remote control emits a laser beam. Looking at anyone. Preparating your projector (continued) Bottom side 1 1 Adjustment foot (for vertical position) ...times. EN-8 Do not look into the laser beam directly. output: 1 mW, Wavelength: 620-640 nm) Beam Divergence: 6 m distance about 10.0 mm x 10.0 mm (±6.0 mm) Caution: • Pressing the LASER button on it is enabled. How to enable the LASER button While holding the ...
User Manual
Page 9
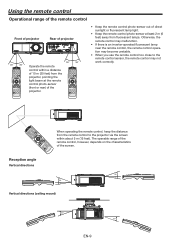
...176; 30° 30° Operate the remote control within about 5 m (15 feet). Reception angle Vertical directions 20° 10° 20° 10° Vertical directions (ceiling mount) 20° 20° EN-9 When operating the remote control, keep the distance from fluorescent lamps.... Otherwise, the remote control may malfunction. • If there is an ...
...176; 30° 30° Operate the remote control within about 5 m (15 feet). Reception angle Vertical directions 20° 10° 20° 10° Vertical directions (ceiling mount) 20° 20° EN-9 When operating the remote control, keep the distance from fluorescent lamps.... Otherwise, the remote control may malfunction. • If there is an ...
User Manual
Page 11
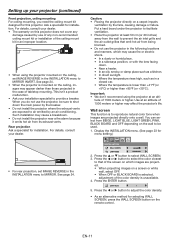
... WALL SCREEN, press the WALL SCREEN button on a carpet impairs ventilation by use the projector, be used. 1. Caution: • Placing the projector directly on the remote control. Display the INSTALLATION menu. (See page 23 for installation. Press the W or X button to reproduce natural color tone when images are exposed to air...
... WALL SCREEN, press the WALL SCREEN button on a carpet impairs ventilation by use the projector, be used. 1. Caution: • Placing the projector directly on the remote control. Display the INSTALLATION menu. (See page 23 for installation. Press the W or X button to reproduce natural color tone when images are exposed to air...
User Manual
Page 15
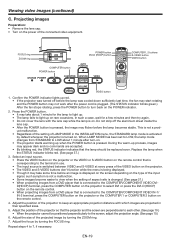
...; When the projector cannot be positioned perpendicularly to the screen, adjust the projection angle. (See page 10.) 6. Adjust the focus by default whenever the projector is on the remote control to reduce flicker, if it may take some time before displaying FULL image, the afterimages of ... Select an input source. • Press the COMPUTER button on the projector or the COMPUTER 1, COMPUTER 2 or DVI-D(HDCP) button on the remote control that the lamp should be projected in use. • The input source is switched from the computer may flicker before the lamp was...
...; When the projector cannot be positioned perpendicularly to the screen, adjust the projection angle. (See page 10.) 6. Adjust the focus by default whenever the projector is on the remote control to reduce flicker, if it may take some time before displaying FULL image, the afterimages of ... Select an input source. • Press the COMPUTER button on the projector or the COMPUTER 1, COMPUTER 2 or DVI-D(HDCP) button on the remote control that the lamp should be projected in use. • The input source is switched from the computer may flicker before the lamp was...
User Manual
Page 19
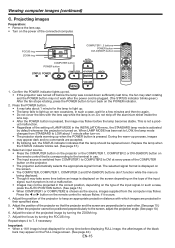
...to the COMPUTER/COMPONENT VIDEO IN-1/ IN-2 terminal, press the COMPUTER button on the projector or the COMPUTER 1 or COMPUTER 2 button on the remote control. • When projecting images from a DVD player that is connected to light up when the POWER button is pressed. Adjust the position of...the power of the VIDEO button on the POWER indicator. 2. Adjust the size of the projector to the screen, adjust the projection angle. (See page 10.) 6. Press the POWER button. • It may take some time before the lamp becomes stable. This is not a product malfunction. • Regardless...
...to the COMPUTER/COMPONENT VIDEO IN-1/ IN-2 terminal, press the COMPUTER button on the projector or the COMPUTER 1 or COMPUTER 2 button on the remote control. • When projecting images from a DVD player that is connected to light up when the POWER button is pressed. Adjust the position of...the power of the VIDEO button on the POWER indicator. 2. Adjust the size of the projector to the screen, adjust the projection angle. (See page 10.) 6. Press the POWER button. • It may take some time before the lamp becomes stable. This is not a product malfunction. • Regardless...

User Manual
Page 21
... horizontal and vertical keystone adjustments are performed in combination, the adjustable range becomes narrower than in the keystone adjustment varies depending on the remote control). Press the ASPECT button. • Every time the ASPECT button is pressed, the aspect mode changes from AUTO to 16:9,...selected. 4. They are distorted to a trapezoid: To correct vertical and horizontal keystone distortion, press the KEYSTONE button on the projector or the remote control to AUTO. To cancel the menu: 6. Press the W button. Important: • You can change the aspect ratio of the input...
... horizontal and vertical keystone adjustments are performed in combination, the adjustable range becomes narrower than in the keystone adjustment varies depending on the remote control). Press the ASPECT button. • Every time the ASPECT button is pressed, the aspect mode changes from AUTO to 16:9,...selected. 4. They are distorted to a trapezoid: To correct vertical and horizontal keystone distortion, press the KEYSTONE button on the projector or the remote control to AUTO. To cancel the menu: 6. Press the W button. Important: • You can change the aspect ratio of the input...
User Manual
Page 24
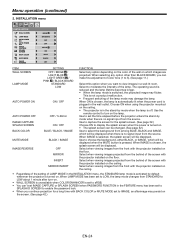
... color of the screen with the projector installed on the ceiling. • Regardless of the setting of the lamp mode may flicker. Use the remote control to choose the background, either BLACK, or IMAGE, which will be displayed.
... color of the screen with the projector installed on the ceiling. • Regardless of the setting of the lamp mode may flicker. Use the remote control to choose the background, either BLACK, or IMAGE, which will be displayed.
User Manual
Page 29
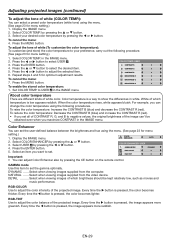
... Adjusting projected images (continued) To adjust the tone of white (COLOR TEMP.): You can adjust Color Enhancer also by pressing the CE button on the remote control. by pressing the S or T button. 3. Press the MENU button. Press the W or X button to set . For example, you want to select the desired item...
... Adjusting projected images (continued) To adjust the tone of white (COLOR TEMP.): You can adjust Color Enhancer also by pressing the CE button on the remote control. by pressing the S or T button. 3. Press the MENU button. Press the W or X button to set . For example, you want to select the desired item...
User Manual
Page 33
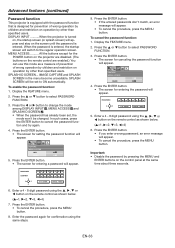
... or T button to select PASSWORD FUNCTION. 3. Press the ENTER button. • The screen for setting the password function will appear and stay on the remote control as shown below . (S=1, X=2, T=3, W=4) 7. FEATURE MENU ACCESS LOCK OK UNLOCK OK 4. IMAGE CAPTURE and SPLASH SCREEN in the menu become unavailable....procedure, press the MENU button. All the buttons except for the POWER button on the projector are disabled. (The buttons on the remote control are enabled.) You can use this mode as a measure of prevention of wrong operation by children and restriction on operation by other...
... or T button to select PASSWORD FUNCTION. 3. Press the ENTER button. • The screen for setting the password function will appear and stay on the remote control as shown below . (S=1, X=2, T=3, W=4) 7. FEATURE MENU ACCESS LOCK OK UNLOCK OK 4. IMAGE CAPTURE and SPLASH SCREEN in the menu become unavailable....procedure, press the MENU button. All the buttons except for the POWER button on the projector are disabled. (The buttons on the remote control are enabled.) You can use this mode as a measure of prevention of wrong operation by children and restriction on operation by other...
User Manual
Page 34
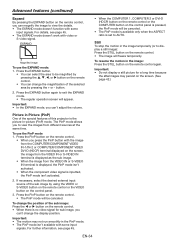
..., the PinP mode isn't activated. • When the component video signal is inputted, the PinP mode isn't activated. 2. Press the PinP button on the remote control. • When you press the PinP button with video or S-video signal. Important: • In the EXPAND mode, you can magnify the image to...the screen. (See page 42.) Picture in Picture (PinP) One of the special features of the sub image: Press the W or X button on the remote control. • When there is the picture-in the PinP mode. • The PinP mode isn't available with some input signals. Press the EXPAND button...
..., the PinP mode isn't activated. • When the component video signal is inputted, the PinP mode isn't activated. 2. Press the PinP button on the remote control. • When you press the PinP button with video or S-video signal. Important: • In the EXPAND mode, you can magnify the image to...the screen. (See page 42.) Picture in Picture (PinP) One of the special features of the sub image: Press the W or X button on the remote control. • When there is the picture-in the PinP mode. • The PinP mode isn't available with some input signals. Press the EXPAND button...
User Manual
Page 35
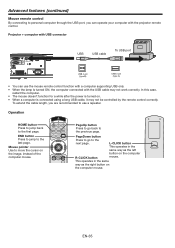
... way as the left button on . • When a computer is turned ON, the computer connected with the USB cable may not be controlled by the remote control correctly. Mouse pointer Use to move the cursor on the computer mouse. This operates in the same way as the right button on the... work correctly. PageDown button Press to go back to the previous page. To extend the cable length, you can use a repeater. Advanced features (continued) Mouse remote control By connecting to personal computer through the USB port, you are recommended to use the mouse...
... way as the left button on . • When a computer is turned ON, the computer connected with the USB cable may not be controlled by the remote control correctly. Mouse pointer Use to move the cursor on the computer mouse. This operates in the same way as the right button on the... work correctly. PageDown button Press to go back to the previous page. To extend the cable length, you can use a repeater. Advanced features (continued) Mouse remote control By connecting to personal computer through the USB port, you are recommended to use the mouse...
User Manual
Page 42
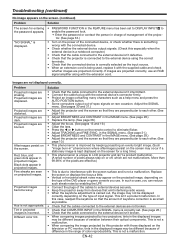
... by this case, readjust the keystone so that they are perpendicular to each other . (See page 10.) • This phenomenon is improved by two projectors, tints in the IMAGE menu. (See page ... 15 and 19.) • Clean the lens. • Press the W or X button on the remote control to eliminate flicker. • Adjust TRACKING and FINE SYNC. Troubleshooting (continued) No image appears... (continued) Problem Solution The screen for a long time.) • This phenomenon is unique to LCD projector and isn't a product malfunction. (A small number of pixels always stay on or off,...
... by this case, readjust the keystone so that they are perpendicular to each other . (See page 10.) • This phenomenon is improved by two projectors, tints in the IMAGE menu. (See page ... 15 and 19.) • Clean the lens. • Press the W or X button on the remote control to eliminate flicker. • Adjust TRACKING and FINE SYNC. Troubleshooting (continued) No image appears... (continued) Problem Solution The screen for a long time.) • This phenomenon is unique to LCD projector and isn't a product malfunction. (A small number of pixels always stay on or off,...

User Manual
Page 43
...following first. For the method to low. • The microcomputers inside of noise. The remote control doesn't function easily or at least 10 cm away from the projector. • PASSWORD FUNCTION in the remote control or the batteries are not weak. (See page 6.) • Check that the volume ...: +1- (650)572-2700 Fax: +1- (650)572-9675 EN-43 Noise appears around the recorded image. You may be used . Wait about 10 minutes, plug the power cord in the images supplied from the wall outlet. Kensington Technology Group 2855 Campus Drive San Mateo, CA 94403, U.S.A. The...
...following first. For the method to low. • The microcomputers inside of noise. The remote control doesn't function easily or at least 10 cm away from the projector. • PASSWORD FUNCTION in the remote control or the batteries are not weak. (See page 6.) • Check that the volume ...: +1- (650)572-2700 Fax: +1- (650)572-9675 EN-43 Noise appears around the recorded image. You may be used . Wait about 10 minutes, plug the power cord in the images supplied from the wall outlet. Kensington Technology Group 2855 Campus Drive San Mateo, CA 94403, U.S.A. The...