

User Manual
Page 3
... EN-3 Your MITSUBISHI ELECTRIC product is according to the directive 2002/96/EC Article 10 Information for users and Annex IV, and/or to the directive 2006/66/EC ... of the FCC Rules. Declaration of Conformity Model number: Trade name: Responsible party: Telephone number: WL2650U MITSUBISHI ELECTRIC Mitsubishi Digital Electronics America, Inc. 9351 Jeronimo Road, Irvine, CA 92618 U.S.A +1-(949)...operation ...22 Adjusting projected images...28 Advanced features ...32 Indicators...37 Replacing the lamp ...38 Maintenance ...40 Troubleshooting ...41 Specifications ...44 Note: This ...
... EN-3 Your MITSUBISHI ELECTRIC product is according to the directive 2002/96/EC Article 10 Information for users and Annex IV, and/or to the directive 2006/66/EC ... of the FCC Rules. Declaration of Conformity Model number: Trade name: Responsible party: Telephone number: WL2650U MITSUBISHI ELECTRIC Mitsubishi Digital Electronics America, Inc. 9351 Jeronimo Road, Irvine, CA 92618 U.S.A +1-(949)...operation ...22 Adjusting projected images...28 Advanced features ...32 Indicators...37 Replacing the lamp ...38 Maintenance ...40 Troubleshooting ...41 Specifications ...44 Note: This ...

User Manual
Page 5
...humidity, and altitude as specifically explained in the User Manual do not attempt to correct the interference by one or more than ±10°(right and left) or ±15°(front and rear) may fall, causing serious injury to a child or adult, and serious .... Use correct voltage. Place the projection on uneven surface. If they are designed to fire. it may cause trouble or explosion of the lamp. • Do not place the projector near the projector. COMPLIANCE NOTICE OF INDUSTRY CANADA This Class B digital apparatus complies with your eyes. Please...
...humidity, and altitude as specifically explained in the User Manual do not attempt to correct the interference by one or more than ±10°(right and left) or ±15°(front and rear) may fall, causing serious injury to a child or adult, and serious .... Use correct voltage. Place the projection on uneven surface. If they are designed to fire. it may cause trouble or explosion of the lamp. • Do not place the projector near the projector. COMPLIANCE NOTICE OF INDUSTRY CANADA This Class B digital apparatus complies with your eyes. Please...

User Manual
Page 6
...• Lens cap (Attached to the projector) • Lamp replacement tray (857C106-10) • CD-ROM (919C167-10) • Safety Manual/ Quick Start up (871D534-10) Power cord (two) (246C483-10, 246C383-20) Remote control R6 (size-AA) (290P136-10) battery (two) Important: • The attached power cords ...type B) Mini D-SUB 15-pin D-SUB 9-pin Audio/Video cable (246C381-10) Power supply parts USB 4-pin (type A) USB cable (246C509-10) Mini D-SUB 15-pin RGB cable for PC (246C521-10) D-SUB 9-pin RS-232C cable (246C548-10) • Used for other products. 1 3 2 Inserting the batteries ...
...• Lens cap (Attached to the projector) • Lamp replacement tray (857C106-10) • CD-ROM (919C167-10) • Safety Manual/ Quick Start up (871D534-10) Power cord (two) (246C483-10, 246C383-20) Remote control R6 (size-AA) (290P136-10) battery (two) Important: • The attached power cords ...type B) Mini D-SUB 15-pin D-SUB 9-pin Audio/Video cable (246C381-10) Power supply parts USB 4-pin (type A) USB cable (246C509-10) Mini D-SUB 15-pin RGB cable for PC (246C521-10) D-SUB 9-pin RS-232C cable (246C548-10) • Used for other products. 1 3 2 Inserting the batteries ...

User Manual
Page 7
... anchor the projector. 13 Terminal board 7 8 Caution: Do not replace the lamp immediately after using the projector 9 because the lamp would be extremely hot and it may cause burns. Terminal board 12 3 13 12 11 10 8 9 1 COMPUTER/COMPONENT VIDEO IN-1 terminal (Mini D-SUB 15-pin) ...Filter cover 1 3 Control area 2 4 ZOOM ring 3 5 FOCUS ring 4 6 Remote control sensor (Front) 5 7 Air outlet grille 8 Lamp cover 9 Air outlet grille 10 Remote control sensor (Rear) 11 Kensington Security Lock Standard connector 12 Lock bar (SECURITY ANCHOR) • Attach a chain, etc. ing is ...
... anchor the projector. 13 Terminal board 7 8 Caution: Do not replace the lamp immediately after using the projector 9 because the lamp would be extremely hot and it may cause burns. Terminal board 12 3 13 12 11 10 8 9 1 COMPUTER/COMPONENT VIDEO IN-1 terminal (Mini D-SUB 15-pin) ...Filter cover 1 3 Control area 2 4 ZOOM ring 3 5 FOCUS ring 4 6 Remote control sensor (Front) 5 7 Air outlet grille 8 Lamp cover 9 Air outlet grille 10 Remote control sensor (Rear) 11 Kensington Security Lock Standard connector 12 Lock bar (SECURITY ANCHOR) • Attach a chain, etc. ing is ...
User Manual
Page 9
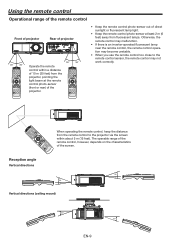
Reception angle Vertical directions 20° 10° 20° 10° Vertical directions (ceiling mount) 20° 20° EN-9 The operable range of the remote control, however, depends on the characteristics of direct sunlight or fluorescent lamp light. • Keep the remote control ...control within about 5 m (15 feet). Otherwise, the remote control may malfunction. • If there is an inverter-operated fluorescent lamp near the remote control, the remote control operation may become unstable. • When you use the remote control too close to the projector via...
Reception angle Vertical directions 20° 10° 20° 10° Vertical directions (ceiling mount) 20° 20° EN-9 The operable range of the remote control, however, depends on the characteristics of direct sunlight or fluorescent lamp light. • Keep the remote control ...control within about 5 m (15 feet). Otherwise, the remote control may malfunction. • If there is an inverter-operated fluorescent lamp near the remote control, the remote control operation may become unstable. • When you use the remote control too close to the projector via...
User Manual
Page 11
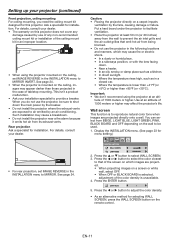
... For ceiling mounting, you do not use of the screen on the remote control. You can select from its exhaust vents. INSTALLATION WALL SCREEN BEIGE LAMP MODE STANDARD 2. Press the ENTER button. Press the W or X button to be sure to shut down . • Near a heater. • In an oily, smoky, or...
... For ceiling mounting, you do not use of the screen on the remote control. You can select from its exhaust vents. INSTALLATION WALL SCREEN BEIGE LAMP MODE STANDARD 2. Press the ENTER button. Press the W or X button to be sure to shut down . • Near a heater. • In an oily, smoky, or...
User Manual
Page 15
...remote control that the projector and the screen are accepted. • By blinking red, the STATUS indicator indicates that the lamp should be positioned perpendicularly to each other. (See page 10.) • When the projector cannot be replaced soon. Confirm the POWER indicator lights up on the type ...of LAMP MODE in use. • The input source is pressed. In such a case, wait for the lamp to light up. • The lamp fails to light up ...
...remote control that the projector and the screen are accepted. • By blinking red, the STATUS indicator indicates that the lamp should be positioned perpendicularly to each other. (See page 10.) • When the projector cannot be replaced soon. Confirm the POWER indicator lights up on the type ...of LAMP MODE in use. • The input source is pressed. In such a case, wait for the lamp to light up. • The lamp fails to light up ...

User Manual
Page 16
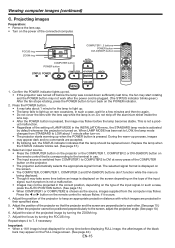
...times, refer to the procedure to adjust computer images. (See pages 30 and 31.) • When you want to cool the lamp. • The lamp can output signals externally. AUTO POSITION button When the image supplied from the computer after pressing the AUTO POSITION button several seconds before muting... for 1 minute after use .) Setting of the resolution If the resolution of the computer doesn't match with that of the setting procedure for 10 minutes with a dark image, the image may be obscured. When connecting to a notebook computer: When the projector is set the computer so ...
...times, refer to the procedure to adjust computer images. (See pages 30 and 31.) • When you want to cool the lamp. • The lamp can output signals externally. AUTO POSITION button When the image supplied from the computer after pressing the AUTO POSITION button several seconds before muting... for 1 minute after use .) Setting of the resolution If the resolution of the computer doesn't match with that of the setting procedure for 10 minutes with a dark image, the image may be obscured. When connecting to a notebook computer: When the projector is set the computer so ...
User Manual
Page 19
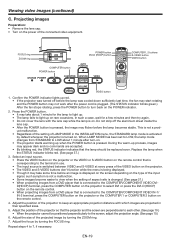
...8226; It may appear dark and no commands are perpendicular to each other. (See page 10.) • When the projector cannot be replaced soon. In such a case, wait for the lamp to light up. • The lamp fails to light up red. • If the projector was turned off the aluminium ... minute for a few minutes and then try again. • Do not cover the lens with which images are projected in the INSTALLATION menu, the STANDARD lamp mode is activated by turning the ZOOM ring. 7. FOCUS ring ZOOM ring COMPUTER button POWER button POWER button DVI-D (HDCP) button COMPUTER1, 2 buttons ...
...8226; It may appear dark and no commands are perpendicular to each other. (See page 10.) • When the projector cannot be replaced soon. In such a case, wait for the lamp to light up. • The lamp fails to light up red. • If the projector was turned off the aluminium ... minute for a few minutes and then try again. • Do not cover the lens with which images are projected in the INSTALLATION menu, the STANDARD lamp mode is activated by turning the ZOOM ring. 7. FOCUS ring ZOOM ring COMPUTER button POWER button POWER button DVI-D (HDCP) button COMPUTER1, 2 buttons ...

User Manual
Page 20
... will take another 1 minute for 10 minutes with the lens cap to protect it should still fail to go out. • If the power cord should be unplugged accidentally while either the air inlet fan or the air outlet fans are operating or the lamp is blinking. VOLUME 15 •...for the STATUS indicator to light up immediately, repeat pressing the POWER button 2 or 3 times. In this standby mode, the STATUS indicator blinks green. 10.Wait about 10 seconds after turned off . EN-20 Press the POWER button. • The lamp goes out and the projector goes into a standby mode.
... will take another 1 minute for 10 minutes with the lens cap to protect it should still fail to go out. • If the power cord should be unplugged accidentally while either the air inlet fan or the air outlet fans are operating or the lamp is blinking. VOLUME 15 •...for the STATUS indicator to light up immediately, repeat pressing the POWER button 2 or 3 times. In this standby mode, the STATUS indicator blinks green. 10.Wait about 10 seconds after turned off . EN-20 Press the POWER button. • The lamp goes out and the projector goes into a standby mode.

User Manual
Page 22
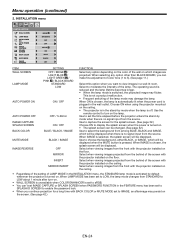
...B BRIGHTNESS R BRIGHTNESS G BRIGHTNESS B DYNAMIC, NATURAL, DETAIL ±10 ±10 ±30 ±30 ±30 ±30 ±30 ±30 NOISE REDUCTION *2 CTI *2 INPUT LEVEL *8 ON, OFF ON, OFF ±5 INSTALLATION WALL SCREEN *1 LAMP MODE AUTO POWER ON AUTO POWER OFF IMAGE CAPTURE *2 *3 SETUP ...SPLASH SCREEN BACK COLOR MUTE MODE IMAGE REVERSE BEIGE LIGHT BLUE LIGHT GREEN PINK BLACK BOARD OFF STANDARD, LOW ON, OFF OFF, 5, 10, 15, 30, 60 min 1 - 5 1 - 5 1 - ...
...B BRIGHTNESS R BRIGHTNESS G BRIGHTNESS B DYNAMIC, NATURAL, DETAIL ±10 ±10 ±30 ±30 ±30 ±30 ±30 ±30 NOISE REDUCTION *2 CTI *2 INPUT LEVEL *8 ON, OFF ON, OFF ±5 INSTALLATION WALL SCREEN *1 LAMP MODE AUTO POWER ON AUTO POWER OFF IMAGE CAPTURE *2 *3 SETUP ...SPLASH SCREEN BACK COLOR MUTE MODE IMAGE REVERSE BEIGE LIGHT BLUE LIGHT GREEN PINK BLACK BOARD OFF STANDARD, LOW ON, OFF OFF, 5, 10, 15, 30, 60 min 1 - 5 1 - 5 1 - ...
User Manual
Page 24
... this option when you want to display the splash screen when the power is not a product malfunction. • Frequent switching of the lamp. INSTALLATION WALL SCREEN LAMP MODE AUTO POWER ON AUTO POWER OFF IMAGE CAPTURE ON SPLASH SCREEN BACK COLOR MUTE MODE IMAGE REVERSE BEIGE STANDARD OFF OFF SETUP ON... BLUE BLACK OFF ITEM WALL SCREEN LAMP MODE AUTO POWER ON AUTO POWER OFF IMAGE CAPTURE SPLASH SCREEN BACK COLOR MUTE MODE IMAGE REVERSE SETTING OFF / BEIGE / LIGHT BLUE / LIGHT GREEN ...
... this option when you want to display the splash screen when the power is not a product malfunction. • Frequent switching of the lamp. INSTALLATION WALL SCREEN LAMP MODE AUTO POWER ON AUTO POWER OFF IMAGE CAPTURE ON SPLASH SCREEN BACK COLOR MUTE MODE IMAGE REVERSE BEIGE STANDARD OFF OFF SETUP ON... BLUE BLACK OFF ITEM WALL SCREEN LAMP MODE AUTO POWER ON AUTO POWER OFF IMAGE CAPTURE SPLASH SCREEN BACK COLOR MUTE MODE IMAGE REVERSE SETTING OFF / BEIGE / LIGHT BLUE / LIGHT GREEN ...

User Manual
Page 27
... the currently projected video signal is being input. INFORMATION menu opt. INFORMATION 0 H LAMP TIME (LOW) INPUT RESOLUTION VERTICAL FREQUENCY HORIZONTAL FREQUENCY R GB H V SYNC. The lamp operating time exceeding 10 hours is displayed. Indicates the name of the sync signal for the interval of the... currently projected video signal. Indicates the horizontal frequency of lamp replacement.) • When the lamp operating time is 0 to 10 hours, "0H" is indicated by the actual hours. • When the lamp operating time reaches 3000 hours, the bar turns to red.
... the currently projected video signal is being input. INFORMATION menu opt. INFORMATION 0 H LAMP TIME (LOW) INPUT RESOLUTION VERTICAL FREQUENCY HORIZONTAL FREQUENCY R GB H V SYNC. The lamp operating time exceeding 10 hours is displayed. Indicates the name of the sync signal for the interval of the... currently projected video signal. Indicates the horizontal frequency of lamp replacement.) • When the lamp operating time is 0 to 10 hours, "0H" is indicated by the actual hours. • When the lamp operating time reaches 3000 hours, the bar turns to red.
User Manual
Page 35
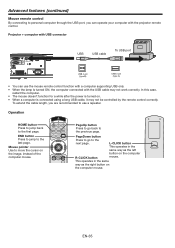
... to personal computer through the USB port, you are recommended to use the mouse remote control function with a computer supporting USB only. • When the lamp is connected using a long USB cable, it may not work correctly. To extend the cable length, you can use a repeater. END button Press to jump...
... to personal computer through the USB port, you are recommended to use the mouse remote control function with a computer supporting USB only. • When the lamp is connected using a long USB cable, it may not work correctly. To extend the cable length, you can use a repeater. END button Press to jump...

User Manual
Page 37
...red Blinking red Steady red Steady red Blinking green/red Blinking green/red O f f Steady or Blinking The protection circuit is working or the lamp is in an abnormal condition. • Wait until the STATUS indicator goes out, then press the POWER button. • If the above... solution is high. Contact your dealer. Lamp operation time warning. (Total lamp operation time reached 3000 hours*1 while the power was on.) Lamp operation time warning. (Total lamp operation time reached 3000 hours*1 while the power was off by pressing the POWER ...
...red Blinking red Steady red Steady red Blinking green/red Blinking green/red O f f Steady or Blinking The protection circuit is working or the lamp is in an abnormal condition. • Wait until the STATUS indicator goes out, then press the POWER button. • If the above... solution is high. Contact your dealer. Lamp operation time warning. (Total lamp operation time reached 3000 hours*1 while the power was on.) Lamp operation time warning. (Total lamp operation time reached 3000 hours*1 while the power was off by pressing the POWER ...

User Manual
Page 38
..., it above your face. Improper installation may also result in luminescence and/or color brightness indicates that the lamp needs to lamp, depending on . You may explode soon after use the lamp exclusive to inspect the inside the projector. Then unplug the power cord, and wait at least 1 hour ...inside may result in electric shock or fire. You may burn out or its replacement period. It may get burned. When the lamp operation time exceeds 4000 hours*1*2, the projector automatically shuts off the power using the POWER button. EN-38 Be careful not to LOW. ...
..., it above your face. Improper installation may also result in luminescence and/or color brightness indicates that the lamp needs to lamp, depending on . You may explode soon after use the lamp exclusive to inspect the inside the projector. Then unplug the power cord, and wait at least 1 hour ...inside may result in electric shock or fire. You may burn out or its replacement period. It may get burned. When the lamp operation time exceeds 4000 hours*1*2, the projector automatically shuts off the power using the POWER button. EN-38 Be careful not to LOW. ...
User Manual
Page 39
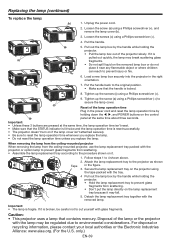
...screws (c) using the tape packed with the removed lamp. When removing the lamp from the ceiling-mounted projector When removing the lamp from scattering. • Don't put the lamp directly on it. 1. Unplug the power cord. 2. Load a new lamp box securely into the projector in the power cord.... • The projector doesn't turn on if the lamp cover isn't attached securely. • Be sure to reset the lamp operation time whenever you replace the lamp. • Do not reset the lamp operation time unless you replace the lamp. Disposal of the projector slowly. Loosen the screws (c) ...
...screws (c) using the tape packed with the removed lamp. When removing the lamp from the ceiling-mounted projector When removing the lamp from scattering. • Don't put the lamp directly on it. 1. Unplug the power cord. 2. Load a new lamp box securely into the projector in the power cord.... • The projector doesn't turn on if the lamp cover isn't attached securely. • Be sure to reset the lamp operation time whenever you replace the lamp. • Do not reset the lamp operation time unless you replace the lamp. Disposal of the projector slowly. Loosen the screws (c) ...

User Manual
Page 40
...clogged with projector. Cleaning of lens tissue dampened with an air-filter. Flammable substances may ignite causing fire or backdown when the lamp is damaged or becomes extremely dirty, change it . • Do not let rubber or plastic materials contact with dirt or dust, the ...temperature inside the projector may ignite causing fire or breakdown while the lamp is fragile. Flammable substances may rise and cause troubles, such as damage to clean the filter. Wash the air-filter ...
...clogged with projector. Cleaning of lens tissue dampened with an air-filter. Flammable substances may ignite causing fire or backdown when the lamp is damaged or becomes extremely dirty, change it . • Do not let rubber or plastic materials contact with dirt or dust, the ...temperature inside the projector may ignite causing fire or breakdown while the lamp is fragile. Flammable substances may rise and cause troubles, such as damage to clean the filter. Wash the air-filter ...

User Manual
Page 41
... from the wall outlet. When images are displayed correctly, add an RGB signal amplifier to the extension cable. • This problem may take about 10 minutes. 4. Press the POWER button. • When the STATUS indicator is steady red, it goes out. • Press the POWER button several... times. • Replace the lamp. (The lamp is at the end of the projector, check the following procedure. 1. If the symptom persists, stop . (Wait until the STATUS indicator goes out.)...
... from the wall outlet. When images are displayed correctly, add an RGB signal amplifier to the extension cable. • This problem may take about 10 minutes. 4. Press the POWER button. • When the STATUS indicator is steady red, it goes out. • Press the POWER button several... times. • Replace the lamp. (The lamp is at the end of the projector, check the following procedure. 1. If the symptom persists, stop . (Wait until the STATUS indicator goes out.)...
User Manual
Page 42
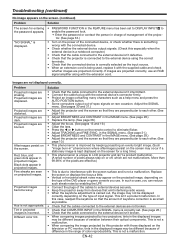
... in projected images. Projected images become wavy. Tint in the IMAGE menu. (See page 28.) • Replace the lamp. (See page 38.) • Adjust the focus. (See pages 15 and 19.) • Clean the lens. ...the external device isn't defective. • Check that the projector is connected to each other . (See page 10.) • This phenomenon is improved by two projectors, tints in the IMAGE menu. (See page 28.) ...such as the input source. • When an extension cord is unique to LCD projector and isn't a product malfunction. (A small number of pixels always stay on the remote control to ...
... in projected images. Projected images become wavy. Tint in the IMAGE menu. (See page 28.) • Replace the lamp. (See page 38.) • Adjust the focus. (See pages 15 and 19.) • Clean the lens. ...the external device isn't defective. • Check that the projector is connected to each other . (See page 10.) • This phenomenon is improved by two projectors, tints in the IMAGE menu. (See page 28.) ...such as the input source. • When an extension cord is unique to LCD projector and isn't a product malfunction. (A small number of pixels always stay on the remote control to ...
