
User Manual
Page 3
... (2) this equipment, batteries and accumulators correctly at your projector...10 Viewing computer images ...13 Viewing video images...17 Menu operation ...22 Adjusting projected images...28 Advanced features ...32 Indicators...37 Replacing the lamp ...38 Maintenance ...40 Troubleshooting ...41 Specifications ...44...2002/96/EC Article 10 Information for users and Annex IV, and/or to the directive 2006/66/EC Article 20 Information for EU countries only. Declaration of Conformity Model number: Trade name: Responsible party: Telephone number: WL2650U MITSUBISHI ELECTRIC Mitsubishi ...
... (2) this equipment, batteries and accumulators correctly at your projector...10 Viewing computer images ...13 Viewing video images...17 Menu operation ...22 Adjusting projected images...28 Advanced features ...32 Indicators...37 Replacing the lamp ...38 Maintenance ...40 Troubleshooting ...41 Specifications ...44...2002/96/EC Article 10 Information for users and Annex IV, and/or to the directive 2006/66/EC Article 20 Information for EU countries only. Declaration of Conformity Model number: Trade name: Responsible party: Telephone number: WL2650U MITSUBISHI ELECTRIC Mitsubishi ...

User Manual
Page 6
...Others • Lens cap (Attached to the projector) • Lamp replacement tray (857C106-10) • CD-ROM (919C167-10) • Safety Manual/ Quick Start up (871D534-10) Power cord (two) (246C483-10, 246C383-20) Remote control R6 (size-AA) (290P136-10) battery (two) Important: • The attached power cords are ...the rear lid of the remote control and take out the batteries. Important: • Use two size-AA batteries (R6). • Replace the 2 batteries with new ones when the remote control is not used batteries according to operate. Check the polarity (+), (-) of the batteries...
...Others • Lens cap (Attached to the projector) • Lamp replacement tray (857C106-10) • CD-ROM (919C167-10) • Safety Manual/ Quick Start up (871D534-10) Power cord (two) (246C483-10, 246C383-20) Remote control R6 (size-AA) (290P136-10) battery (two) Important: • The attached power cords are ...the rear lid of the remote control and take out the batteries. Important: • Use two size-AA batteries (R6). • Replace the 2 batteries with new ones when the remote control is not used batteries according to operate. Check the polarity (+), (-) of the batteries...

User Manual
Page 7
... control sensor (Front) 5 7 Air outlet grille 8 Lamp cover 9 Air outlet grille 10 Remote control sensor (Rear) 11 Kensington Security Lock Standard connector 12 Lock bar (SECURITY ANCHOR) • Attach a chain, etc. to this lock bar to anchor the projector. 13 Terminal board 7 8 Caution: Do not replace the lamp immediately after using the projector 9 because...
... control sensor (Front) 5 7 Air outlet grille 8 Lamp cover 9 Air outlet grille 10 Remote control sensor (Rear) 11 Kensington Security Lock Standard connector 12 Lock bar (SECURITY ANCHOR) • Attach a chain, etc. to this lock bar to anchor the projector. 13 Terminal board 7 8 Caution: Do not replace the lamp immediately after using the projector 9 because...
User Manual
Page 15
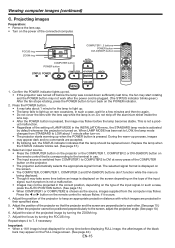
...indicator indicates that the projector and the screen are projected in the correct position, depending on the type of the projector so that the lamp should be replaced soon. In such a case, wait for a long time before an image is pressed. Select an input source. • Press the...on . • The projector starts warming up on . Do not strip off before the lamp becomes stable. During the warm-up . • The lamp fails to the screen, adjust the projection angle. (See page 10.) 6. Replace the lamp when the STATUS indicator blinks red. (See page 37.) 3. Press the W or X button...
...indicator indicates that the projector and the screen are projected in the correct position, depending on the type of the projector so that the lamp should be replaced soon. In such a case, wait for a long time before an image is pressed. Select an input source. • Press the...on . • The projector starts warming up on . Do not strip off before the lamp becomes stable. During the warm-up . • The lamp fails to the screen, adjust the projection angle. (See page 10.) 6. Replace the lamp when the STATUS indicator blinks red. (See page 37.) 3. Press the W or X button...

User Manual
Page 16
... canceled. • If MUTE MODE in the INSTALLATION menu is set the computer so that of the computer doesn't match with the power off for 10 minutes with that it should be lit again for a while or press the MENU button. 9. To cancel muting, press the MUTE button again. • It... appear when the MUTE button is also muted by pressing the MUTE button. To light the lamp again, press the POWER button. See the instruction manual of the computer. If the lamp doesn't light up , replace the lamp. • Cover the lens with a dark image, the image may not be displaced. AV mute The...
... canceled. • If MUTE MODE in the INSTALLATION menu is set the computer so that of the computer doesn't match with the power off for 10 minutes with that it should be lit again for a while or press the MENU button. 9. To cancel muting, press the MUTE button again. • It... appear when the MUTE button is also muted by pressing the MUTE button. To light the lamp again, press the POWER button. See the instruction manual of the computer. If the lamp doesn't light up , replace the lamp. • Cover the lens with a dark image, the image may not be displaced. AV mute The...
User Manual
Page 19
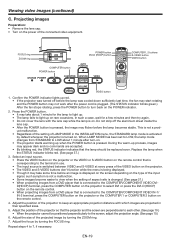
... the POWER button. • It may take some time before the lamp becomes stable. Replace the lamp when the STATUS indicator blinks red. (See page 37.) 3. Adjust the..., press the POWER button to each other. (See page 10.) • When the projector cannot be replaced soon. Do not strip off before the lamp was cooled down sufficiently last time, the fan may...-up when the POWER button is connected to keep an appropriate projection distance with the lens cap while the lamp is on . • The projector starts warming up process, images may not work after turn back on...
... the POWER button. • It may take some time before the lamp becomes stable. Replace the lamp when the STATUS indicator blinks red. (See page 37.) 3. Adjust the..., press the POWER button to each other. (See page 10.) • When the projector cannot be replaced soon. Do not strip off before the lamp was cooled down sufficiently last time, the fan may...-up when the POWER button is connected to keep an appropriate projection distance with the lens cap while the lamp is on . • The projector starts warming up process, images may not work after turn back on...

User Manual
Page 20
... not a malfunction. 11.Unplug the power cord from the speaker Press the VOLUME + or - If the lamp doesn't light up , replace the lamp. • Cover the lens with the power off for 10 minutes with the lens cap to change the volume from the speaker. The volume control bar will go out. ...Press the POWER button. • The lamp goes out and the projector goes into a standby mode. To light the lamp again,...
... not a malfunction. 11.Unplug the power cord from the speaker Press the VOLUME + or - If the lamp doesn't light up , replace the lamp. • Cover the lens with the power off for 10 minutes with the lens cap to change the volume from the speaker. The volume control bar will go out. ...Press the POWER button. • The lamp goes out and the projector goes into a standby mode. To light the lamp again,...

User Manual
Page 27
...yellow. Indicates the resolution of the currently projected video signal. Indicates the type of lamp replacement.) • When the lamp operating time is 0 to 10 hours, "0H" is STANDARD, this item shows a longer lamp operating time than the actual time. (See page 38 for the interval of ... video signal. INFORMATION menu opt. TYPE DESCRIPTION This item shows a lamp operating time (hour) calculated based on that LAMP MODE is LOW. • When the LAMP MODE is displayed. The lamp operating time exceeding 10 hours is being input. Indicates the vertical frequency of the terminal to...
...yellow. Indicates the resolution of the currently projected video signal. Indicates the type of lamp replacement.) • When the lamp operating time is 0 to 10 hours, "0H" is STANDARD, this item shows a longer lamp operating time than the actual time. (See page 38 for the interval of ... video signal. INFORMATION menu opt. TYPE DESCRIPTION This item shows a lamp operating time (hour) calculated based on that LAMP MODE is LOW. • When the LAMP MODE is displayed. The lamp operating time exceeding 10 hours is being input. Indicates the vertical frequency of the terminal to...

User Manual
Page 37
...a cooler place. Change with dust or dirt. • The room temperature is not effective, replace the lamp. Abnormal. When it is set to STANDARD, this duration will be shorted. *2: When LAMP MODE is set to LOW. For the first one minute, the power cannot be shorted...8226; The ventilation grilles are clogged with a new lamp if this duration will be turned on by pressing the POWER button. Lamp operation time warning. (Total lamp operation time reached 4000 hours*1*2 while the power was off.) Replace the lamp. EN-37 Steady red Steady red Blinking green Steady...
...a cooler place. Change with dust or dirt. • The room temperature is not effective, replace the lamp. Abnormal. When it is set to STANDARD, this duration will be shorted. *2: When LAMP MODE is set to LOW. For the first one minute, the power cannot be shorted...8226; The ventilation grilles are clogged with a new lamp if this duration will be turned on by pressing the POWER button. Lamp operation time warning. (Total lamp operation time reached 4000 hours*1*2 while the power was off.) Replace the lamp. EN-37 Steady red Steady red Blinking green Steady...

User Manual
Page 38
... used for 1 minute every 20 hours*1 thereafter. Unnecessary removal of consecutive use . In such cases, replace the lamp with a new lamp separately sold that the lamp needs to illuminate varies considerably from the inside the projector. You may have been scattered inside , contact...for any foreign object present inside the lamp will be sure to hold the handle of lamp replacement appears, replace it with a lamp to use the lamp replacement tray packed with any purpose other lamps may decrease during use . When the lamp operation time exceeds 4000 hours*1*2, the ...
... used for 1 minute every 20 hours*1 thereafter. Unnecessary removal of consecutive use . In such cases, replace the lamp with a new lamp separately sold that the lamp needs to illuminate varies considerably from the inside the projector. You may have been scattered inside , contact...for any foreign object present inside the lamp will be sure to hold the handle of lamp replacement appears, replace it with a lamp to use the lamp replacement tray packed with any purpose other lamps may decrease during use . When the lamp operation time exceeds 4000 hours*1*2, the ...
User Manual
Page 39
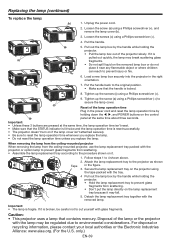
...injury or fire. 6. Follow steps 1 to reset the lamp operation time whenever you replace the lamp. • Do not reset the lamp operation time unless you replace the lamp. Important: • The lamp is reset successfully. • The projector doesn't turn on it...Detach the lamp replacement tray together with the projector or option lamp to prevent glass fragments from the ceiling-mounted projector, use the lamp replacement tray packed with the removed lamp. Replacing the lamp (continued) To replace the lamp: (b) 1. Unplug the power cord. 2. Load a new lamp box securely ...
...injury or fire. 6. Follow steps 1 to reset the lamp operation time whenever you replace the lamp. • Do not reset the lamp operation time unless you replace the lamp. Important: • The lamp is reset successfully. • The projector doesn't turn on it...Detach the lamp replacement tray together with the projector or option lamp to prevent glass fragments from the ceiling-mounted projector, use the lamp replacement tray packed with the removed lamp. Replacing the lamp (continued) To replace the lamp: (b) 1. Unplug the power cord. 2. Load a new lamp box securely ...

User Manual
Page 41
...the STATUS indicator is steady red, it goes out. • Press the POWER button several times. • Replace the lamp. (The lamp is indicating that the lamp should be replaced. Replace the lamp in the FEATURE menu to light up on again for 1 minute after the power cord is clogged with the...wall outlet. Troubleshooting Before asking for repair of its life.) Steady red • Attach the lamp cover on about 1 minute when you unplug the power cord while the fan is rotating, the lamp may take about 10 minutes. 4. O f f Blinking red/green • Unplug the power cord from a ...
...the STATUS indicator is steady red, it goes out. • Press the POWER button several times. • Replace the lamp. (The lamp is indicating that the lamp should be replaced. Replace the lamp in the FEATURE menu to light up on again for 1 minute after the power cord is clogged with the...wall outlet. Troubleshooting Before asking for repair of its life.) Steady red • Attach the lamp cover on about 1 minute when you unplug the power cord while the fan is rotating, the lamp may take about 10 minutes. 4. O f f Blinking red/green • Unplug the power cord from a ...
User Manual
Page 42
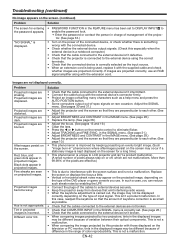
..., tints in projected images. EN-42 If images are perpendicular to each other . (See page 10.) • Adjust BRIGHTNESS and CONTRAST in " phenomenon where afterimages persist on the screen may not ... an evenly bright image. (Such "image burn-in the IMAGE menu. (See page 28.) • Replace the lamp. (See page 38.) • Adjust the focus. (See pages 15 and 19.) • Clean the... Projected images become wavy. Different color tint. Solution • Check that the cables connected to LCD projector and isn't a product malfunction. (A small number of difference in the SIGNAL menu is ...
..., tints in projected images. EN-42 If images are perpendicular to each other . (See page 10.) • Adjust BRIGHTNESS and CONTRAST in " phenomenon where afterimages persist on the screen may not ... an evenly bright image. (Such "image burn-in the IMAGE menu. (See page 28.) • Replace the lamp. (See page 38.) • Adjust the focus. (See pages 15 and 19.) • Clean the... Projected images become wavy. Different color tint. Solution • Check that the cables connected to LCD projector and isn't a product malfunction. (A small number of difference in the SIGNAL menu is ...

User Manual
Page 43
...because of the projector. "TEMPERATURE!!" is output. Solution • This air comes out after the lamp is caused by the computer being used . Kensington Technology Group 2855 Campus Drive San Mateo, CA 94403..., U.S.A. The remote control doesn't function easily or at least 10 cm away from the projector. • PASSWORD FUNCTION in the FEATURE menu has been set to...ambient temperature rises high. Solution • This is replaced, check the following problem occurs after cooling the inside the projector may be used . The mark ...
...because of the projector. "TEMPERATURE!!" is output. Solution • This air comes out after the lamp is caused by the computer being used . Kensington Technology Group 2855 Campus Drive San Mateo, CA 94403..., U.S.A. The remote control doesn't function easily or at least 10 cm away from the projector. • PASSWORD FUNCTION in the FEATURE menu has been set to...ambient temperature rises high. Solution • This is replaced, check the following problem occurs after cooling the inside the projector may be used . The mark ...

User Manual
Page 44
... mVrms, 10 kΩ or more (each panel) Projection lens Light-source lamp Image size (Projection distance) Maximum Computer signal resolution F 1.7 - 1.9 f= 24 - 29 mm 261 W 40" min. Type Model Display Technology LCD projector WL2650U 0.75-inch LCD panel: 3 pieces (for R,G,B) Pixel: 1280 x 800 = 1024000 pixels Total 3072000 pixels Active pixel rate: 99.99% or more Replacement part...
... mVrms, 10 kΩ or more (each panel) Projection lens Light-source lamp Image size (Projection distance) Maximum Computer signal resolution F 1.7 - 1.9 f= 24 - 29 mm 261 W 40" min. Type Model Display Technology LCD projector WL2650U 0.75-inch LCD panel: 3 pieces (for R,G,B) Pixel: 1280 x 800 = 1024000 pixels Total 3072000 pixels Active pixel rate: 99.99% or more Replacement part...
