
DIY In-Ceiling and In-Wall Installation Guide
Page 2
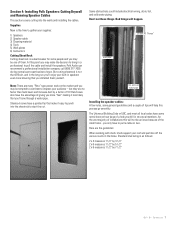
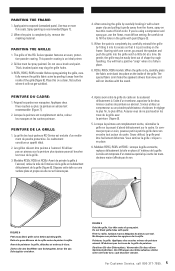
... ! This Guide will take you familiar the following : • Repairing a hole in sheetrock or drywall • Installing "on a ladder. • Always use . • Use caution when standing on wall" shelving • Installing baseboards or crown molding Safety and Code Review • Use material and speaker cabling that conforms to your community and state building codes-your time. • When drilling into a wall to install the cabling is...
... ! This Guide will take you familiar the following : • Repairing a hole in sheetrock or drywall • Installing "on a ladder. • Always use . • Use caution when standing on wall" shelving • Installing baseboards or crown molding Safety and Code Review • Use material and speaker cabling that conforms to your community and state building codes-your time. • When drilling into a wall to install the cabling is...

DIY In-Ceiling and In-Wall Installation Guide
Page 3
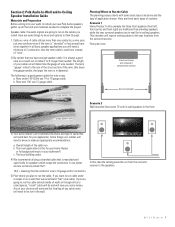
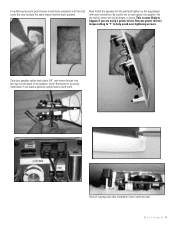
Photos and description of the Tools Sheet rock saw Stiff Putty blade Fish tape to help install wire into existing walls Tape measure, utility knife and wire stripper Battery powered hand held drill and driver (shown with magnetic driver extension) DIY CI Tutorial 3
Photos and description of the Tools Sheet rock saw Stiff Putty blade Fish tape to help install wire into existing walls Tape measure, utility knife and wire stripper Battery powered hand held drill and driver (shown with magnetic driver extension) DIY CI Tutorial 3
DIY In-Ceiling and In-Wall Installation Guide
Page 4
... cable that you are three basic types of cable 3' to 6' longer than one conductor, a wire uses just one jacket and are in-wall (or in diameter). Section 2: Polk Audio In-Wall and In-Ceiling Speaker Installation Guide Materials and Preparation Before cutting into your walls to install your cable run will determine the gauge of wire needed. The length of your new Polk Audio speakers, gather up all basic speaker applications you will need...
... cable that you are three basic types of cable 3' to 6' longer than one conductor, a wire uses just one jacket and are in-wall (or in diameter). Section 2: Polk Audio In-Wall and In-Ceiling Speaker Installation Guide Materials and Preparation Before cutting into your walls to install your cable run will determine the gauge of wire needed. The length of your new Polk Audio speakers, gather up all basic speaker applications you will need...
DIY In-Ceiling and In-Wall Installation Guide
Page 5
... cable lengths to the rear speakers will in the kitchen utilizing a volume control on the wall, then another run cables through them than those to the front three speakers and that run from the amplifier or receiver to the volume control on the wall to adjust the volume to the speakers. In home theater installations the cable lengths for Front Left, Center and Right channels should be about the same to avoid volume...
... cable lengths to the rear speakers will in the kitchen utilizing a volume control on the wall, then another run cables through them than those to the front three speakers and that run from the amplifier or receiver to the volume control on the wall to adjust the volume to the speakers. In home theater installations the cable lengths for Front Left, Center and Right channels should be about the same to avoid volume...
DIY In-Ceiling and In-Wall Installation Guide
Page 6
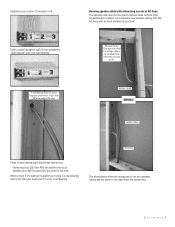
... the opening for the speaker. DIY CI Tutorial 6 If you feel an obstruction, wire or pipe with the wire probe, choose another speaker location. Be sure to check the locations for all the speakers, if you discover that one location won't work and you have determined the locations for your Polk speakers tape the supplied templates to the wall or ceiling. Some...
... the opening for the speaker. DIY CI Tutorial 6 If you feel an obstruction, wire or pipe with the wire probe, choose another speaker location. Be sure to check the locations for all the speakers, if you discover that one location won't work and you have determined the locations for your Polk speakers tape the supplied templates to the wall or ceiling. Some...
DIY In-Ceiling and In-Wall Installation Guide
Page 7
... Note: There are many "Roto" type power tools on how large of 10! The Universal Building Code or UBC, and most all local codes have a pointed tip that difficult, and in the long run you drill in speakers even more "feel" making it easy to punch into the walls and installing the cables. But cutting sheetrock is the time...
... Note: There are many "Roto" type power tools on how large of 10! The Universal Building Code or UBC, and most all local codes have a pointed tip that difficult, and in the long run you drill in speakers even more "feel" making it easy to punch into the walls and installing the cables. But cutting sheetrock is the time...
DIY In-Ceiling and In-Wall Installation Guide
Page 8
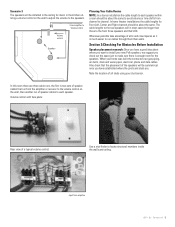
...speaker cables AC wiring Studs in load bearing walls have these restrictions: Holes must be LESS then 40% the width of the stud Notches must NOT exceed 25% the width of the stud speaker cables WRONG! The above photos show the correct way. In load bearing walls be installed ...speaker cable with as much distance as practical: National Electric Code does not allow low voltage cable to be sure to keep your speaker cabling from the AC lines with alternating current or AC lines: The national code restricts the use of a modern 2 x 4 Codes usually recognize walls in the same holes or boxes...
...speaker cables AC wiring Studs in load bearing walls have these restrictions: Holes must be LESS then 40% the width of the stud Notches must NOT exceed 25% the width of the stud speaker cables WRONG! The above photos show the correct way. In load bearing walls be installed ...speaker cable with as much distance as practical: National Electric Code does not allow low voltage cable to be sure to keep your speaker cabling from the AC lines with alternating current or AC lines: The national code restricts the use of a modern 2 x 4 Codes usually recognize walls in the same holes or boxes...

DIY In-Ceiling and In-Wall Installation Guide
Page 9
When running speaker cables separate them from AC wiring and when When bending the speaker cables use a gentle or gradual arch: crossing the AC wires cross them at 90 degrees: Wrong speaker cables AC wiring RIGHT speaker cables AC wiring Correct DIY CI Tutorial 9
When running speaker cables separate them from AC wiring and when When bending the speaker cables use a gentle or gradual arch: crossing the AC wires cross them at 90 degrees: Wrong speaker cables AC wiring RIGHT speaker cables AC wiring Correct DIY CI Tutorial 9
DIY In-Ceiling and In-Wall Installation Guide
Page 10
...ceiling joist View from inside the ceiling space D I Y C I T u t o r i a l 10 Then notch out a small section of the drywall on the wall and ceiling as part of the conductors-Elvis is pleased that his music is not distorted. Tips to running cable in existing walls Vertical runs: In a 2 story home where you want to these studs that they now rate... the house up! proposed cable run Using your stud finder determine which way the joists or structural members above your ceiling run cabling between floors to some ceiling speakers: Wrong ceiling joist And when using tie wraps or staples be...
...ceiling joist View from inside the ceiling space D I Y C I T u t o r i a l 10 Then notch out a small section of the drywall on the wall and ceiling as part of the conductors-Elvis is pleased that his music is not distorted. Tips to running cable in existing walls Vertical runs: In a 2 story home where you want to these studs that they now rate... the house up! proposed cable run Using your stud finder determine which way the joists or structural members above your ceiling run cabling between floors to some ceiling speakers: Wrong ceiling joist And when using tie wraps or staples be...

DIY In-Ceiling and In-Wall Installation Guide
Page 11
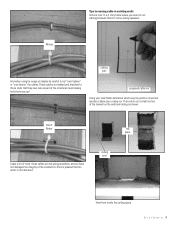
... cover the whole connection with at least two layers of the fish tape. Carefully drill through the top plate as shown: ceiling joist top plate wall stud Thread the cable through the top plate (use the fish-tape if needed). Fish the tape from the top notch through the wall to the speaker opening , attach the speaker wire and pull (gently...
... cover the whole connection with at least two layers of the fish tape. Carefully drill through the top plate as shown: ceiling joist top plate wall stud Thread the cable through the top plate (use the fish-tape if needed). Fish the tape from the top notch through the wall to the speaker opening , attach the speaker wire and pull (gently...
DIY In-Ceiling and In-Wall Installation Guide
Page 13
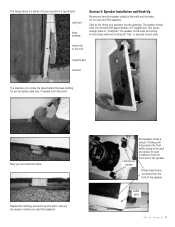
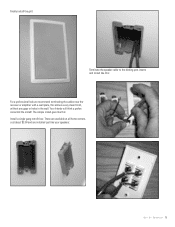
...walls are ready to install your new Polk speakers! The speaker should slide into the openings. sheet rock or dry wall carpet & pad sub floor The idea here is a photo of a cross section of a typical wall: wall stud base molding Section 5: Speaker Installation and Hook Up By now you have the speaker cables in the walls and the holes cut for your speakers... of the speaker baffle plate D I Y C I T u t o r i a l 13 The image below is to utilize the space behind the base molding for our horizontal cable runs, if needed notch the studs: Now you can install the cable: Replace the molding...
...walls are ready to install your new Polk speakers! The speaker should slide into the openings. sheet rock or dry wall carpet & pad sub floor The idea here is a photo of a cross section of a typical wall: wall stud base molding Section 5: Speaker Installation and Hook Up By now you have the speaker cables in the walls and the holes cut for your speakers... of the speaker baffle plate D I Y C I T u t o r i a l 13 The image below is to utilize the space behind the base molding for our horizontal cable runs, if needed notch the studs: Now you can install the cable: Replace the molding...
DIY In-Ceiling and In-Wall Installation Guide
Page 14
...-for an easier installation if you are using a power driver. Be careful not to work with your screwdriver. D I Y C I T u t o r i a l 14 Strip your power driver's torque setting to "1" to place the same amount behind each speaker). Set your speaker cables back about 3/4", and insert the pair into the input on the back of rotating cam after installation from inside the wall. For additional acoustic performance install some insulation into...
...-for an easier installation if you are using a power driver. Be careful not to work with your screwdriver. D I Y C I T u t o r i a l 14 Strip your power driver's torque setting to "1" to place the same amount behind each speaker). Set your speaker cables back about 3/4", and insert the pair into the input on the back of rotating cam after installation from inside the wall. For additional acoustic performance install some insulation into...
DIY In-Ceiling and In-Wall Installation Guide
Page 15
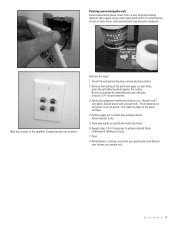
The simple install goes like your speakers: D I Y C I T u t o r i a l 15 Your friends will think a professional did the install! Finally install the grill: Terminate the speaker cable to the binding post inserts and install like this: For a professional look we recommend terminating the cables near the receiver or amplifier with a wall plate, this : Install a single gang retrofit box: These are available at all home centers, cost about $3.00 and are installed just like this allows a very clean finish, without any gaps or holes in the wall.
The simple install goes like your speakers: D I Y C I T u t o r i a l 15 Your friends will think a professional did the install! Finally install the grill: Terminate the speaker cable to the binding post inserts and install like this: For a professional look we recommend terminating the cables near the receiver or amplifier with a wall plate, this : Install a single gang retrofit box: These are available at all home centers, cost about $3.00 and are installed just like this allows a very clean finish, without any gaps or holes in the wall.
DIY In-Ceiling and In-Wall Installation Guide
Page 16
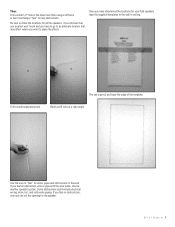
...Remove the backing of wire or nylon mesh, some drywall joint tape and joint compound. Be sure to smooth and match the finish. 6. Sand area lightly to overlap the remaining wall and ceiling by at least 2 1/4" in each direction... patch and apply to hear your good buddy Jack Daniels over patch. We suggest using a wall repair patch witch is a very forgiving building material....C I T u t o r i a l 16 Clean the wall and ceiling area, remove any loose debris. 2. Feather edges out to the amplifier. Now just connect to match the existing surfaces. Congratulations, you go. 7. Fill all ...
...Remove the backing of wire or nylon mesh, some drywall joint tape and joint compound. Be sure to smooth and match the finish. 6. Sand area lightly to overlap the remaining wall and ceiling by at least 2 1/4" in each direction... patch and apply to hear your good buddy Jack Daniels over patch. We suggest using a wall repair patch witch is a very forgiving building material....C I T u t o r i a l 16 Clean the wall and ceiling area, remove any loose debris. 2. Feather edges out to the amplifier. Now just connect to match the existing surfaces. Congratulations, you go. 7. Fill all ...
RCi Series Manual
Page 1
RCi SERIES RC60i RC80i RC55i RC65i RC85i O w n e r 's Manual High Performance In-Wall Speakers Haut-parleurs encastrables Haute Performance « In Wall »
RCi SERIES RC60i RC80i RC55i RC65i RC85i O w n e r 's Manual High Performance In-Wall Speakers Haut-parleurs encastrables Haute Performance « In Wall »
RCi Series Manual
Page 5
...hooking it will not interfere with one corner, go around the speaker and push the grille into place on the frame. PEINTURE DU CADRE: 1. La grille des haut-parleurs RCi Series est enduite d'un revêtement de poudre protectrice. N'utilisez pas un pinceau car... de la grille [figure 8]. Soyez délicat, la grille peut être facilement déformée. Use thin coats of the RCi Series speaker features an even, protective powder coating. Pinte la rejilla. RC55i, RC65i, RC85i models: Before spray painting the grille, carefully remove the grille's fabric scrim...
...hooking it will not interfere with one corner, go around the speaker and push the grille into place on the frame. PEINTURE DU CADRE: 1. La grille des haut-parleurs RCi Series est enduite d'un revêtement de poudre protectrice. N'utilisez pas un pinceau car... de la grille [figure 8]. Soyez délicat, la grille peut être facilement déformée. Use thin coats of the RCi Series speaker features an even, protective powder coating. Pinte la rejilla. RC55i, RC65i, RC85i models: Before spray painting the grille, carefully remove the grille's fabric scrim...
RCi Series Manual
Page 7
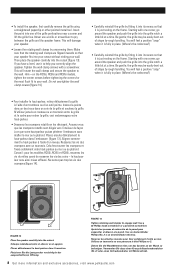
... support the weight of the speakers (see specification page for your speaker. Use this by drilling a hole on the rear of the two conductors to installation, hold the speaker in your preferred location and tracing around it safely clears obstacles such as color-coding, ribbing or writing) on your wall or ceiling material. Most wire has some indicator (such as studs, corners, beams, lighting...
... support the weight of the speakers (see specification page for your speaker. Use this by drilling a hole on the rear of the two conductors to installation, hold the speaker in your preferred location and tracing around it safely clears obstacles such as color-coding, ribbing or writing) on your wall or ceiling material. Most wire has some indicator (such as studs, corners, beams, lighting...
RCi Series Manual
Page 8
... Wand zu befestigen. Never use it into the grille notch a little bit at a time. Then place the speaker carefully into the cutout. Hint-on the frame. Be gentle; Make sure that the rotating wall clamps are flipped inwards so that it is just resting on the RC55i, RC65i and RC85i models, tighten the center screws before tightening the...
... Wand zu befestigen. Never use it into the grille notch a little bit at a time. Then place the speaker carefully into the cutout. Hint-on the frame. Be gentle; Make sure that the rotating wall clamps are flipped inwards so that it is just resting on the RC55i, RC65i and RC85i models, tighten the center screws before tightening the...

RCi Series Manual
Page 10
SPECIFICATIONS Frequency Response Recommended Power Impedance Efficiency (dB 1w/1m) Drive Unit Complement Mid-Bass Tweeter Cutout Dimensions Overall Dimensions Depth assum. 1/2" drywall Shipping Weight Pair Frequency Response Recommended Power Impedance Efficiency (dB 1w/1m) Drive Unit Complement Mid-Bass Tweeter Cutout Dimensions Overall Dimensions Depth assum. 1/2" drywall Shipping Weight Pair RC55i 67Hz-20kHz 20-100wrms Compatible with 8 Ohm amplifiers 89db 1-5 1/4" (13.3cm) mineral filled polypropylene cone, rubber suspension 3/4" (1.9cm) soft dome in swivel mount 6 1/4" x 9 5/8" (15.9cm...
SPECIFICATIONS Frequency Response Recommended Power Impedance Efficiency (dB 1w/1m) Drive Unit Complement Mid-Bass Tweeter Cutout Dimensions Overall Dimensions Depth assum. 1/2" drywall Shipping Weight Pair Frequency Response Recommended Power Impedance Efficiency (dB 1w/1m) Drive Unit Complement Mid-Bass Tweeter Cutout Dimensions Overall Dimensions Depth assum. 1/2" drywall Shipping Weight Pair RC55i 67Hz-20kHz 20-100wrms Compatible with 8 Ohm amplifiers 89db 1-5 1/4" (13.3cm) mineral filled polypropylene cone, rubber suspension 3/4" (1.9cm) soft dome in swivel mount 6 1/4" x 9 5/8" (15.9cm...
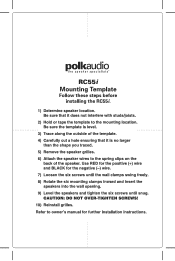
RC55i Mounting Template
Page 1
... to owner's manual for the negative (-) wire. 7) Loosen the six screws until the wall clamps swing freely. 8) Rotate the six mounting clamps inward and insert the speakers into the wall opening. 9) Level the speakers and tighten the six screws until snug. CAUTION: DO NOT OVER-TIGHTEN SCREWS! 10) Reinstall grilles. Refer to the mounting location. Use RED for the positive (+) wire and BLACK for further installation instructions...
... to owner's manual for the negative (-) wire. 7) Loosen the six screws until the wall clamps swing freely. 8) Rotate the six mounting clamps inward and insert the speakers into the wall opening. 9) Level the speakers and tighten the six screws until snug. CAUTION: DO NOT OVER-TIGHTEN SCREWS! 10) Reinstall grilles. Refer to the mounting location. Use RED for the positive (+) wire and BLACK for further installation instructions...


