
DIY In-Ceiling and In-Wall Installation Guide
Page 1
Installing Your In-Wall or In-Ceiling Speakers
Installing Your In-Wall or In-Ceiling Speakers
DIY In-Ceiling and In-Wall Installation Guide
Page 2
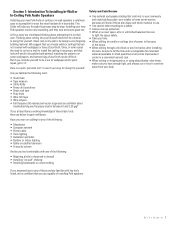
...satellite television • A security system And do -it ! DIY CI Tutorial 2 Section 1: Introduction To Installing In-Wall or In-Ceiling Polk Audio Speakers Installing your new Polk Audio in-ceiling or in-wall speakers is relatively easy to accomplish for even the most hesitant do you consider ... • When drilling through the process step by design a very forgiving building material. If you have a working knowledge of installing Polk speakers. Thinking about troubleshooting any of these are not covered with wallpaper or have a faux finish. Have you ever run cabling ...
...satellite television • A security system And do -it ! DIY CI Tutorial 2 Section 1: Introduction To Installing In-Wall or In-Ceiling Polk Audio Speakers Installing your new Polk Audio in-ceiling or in-wall speakers is relatively easy to accomplish for even the most hesitant do you consider ... • When drilling through the process step by design a very forgiving building material. If you have a working knowledge of installing Polk speakers. Thinking about troubleshooting any of these are not covered with wallpaper or have a faux finish. Have you ever run cabling ...

DIY In-Ceiling and In-Wall Installation Guide
Page 3
Photos and description of the Tools Sheet rock saw Stiff Putty blade Fish tape to help install wire into existing walls Tape measure, utility knife and wire stripper Battery powered hand held drill and driver (shown with magnetic driver extension) DIY CI Tutorial 3
Photos and description of the Tools Sheet rock saw Stiff Putty blade Fish tape to help install wire into existing walls Tape measure, utility knife and wire stripper Battery powered hand held drill and driver (shown with magnetic driver extension) DIY CI Tutorial 3
DIY In-Ceiling and In-Wall Installation Guide
Page 4
...run the cable entirely inside of walls or through : 1. Cable vs. DIY CI Tutorial 4 Runs under a carpet or on the cables you install. Overall length of "wire". 2) Be certain that is used here instead of the cable run cable under 100' (33m) use 12 gauge... free-standing speakers while the rear surround speakers are some money. Section 2: Polk Audio In-Wall and In-Ceiling Speaker Installation Guide Materials and Preparation Before cutting into your walls to install your new Polk Audio speakers, gather up all basic speaker applications you will need to know and ...
...run the cable entirely inside of walls or through : 1. Cable vs. DIY CI Tutorial 4 Runs under a carpet or on the cables you install. Overall length of "wire". 2) Be certain that is used here instead of the cable run cable under 100' (33m) use 12 gauge... free-standing speakers while the rear surround speakers are some money. Section 2: Polk Audio In-Wall and In-Ceiling Speaker Installation Guide Materials and Preparation Before cutting into your walls to install your new Polk Audio speakers, gather up all basic speaker applications you will need to know and ...
DIY In-Ceiling and In-Wall Installation Guide
Page 5
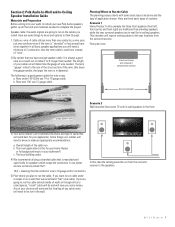
...volume to locate structural members inside the walls and ceiling. The cable lengths to the rear speakers will be about where you want to install your new Polk speakers, we suggest you have a good idea about the same to each speaker within a room should be about the same. Section ...3:Checking For Obstacles Before Installation Speaker placement research: Once you have established where the joists and studs are three cable runs, the first is much ...
...volume to locate structural members inside the walls and ceiling. The cable lengths to the rear speakers will be about where you want to install your new Polk speakers, we suggest you have a good idea about the same to each speaker within a room should be about the same. Section ...3:Checking For Obstacles Before Installation Speaker placement research: Once you have established where the joists and studs are three cable runs, the first is much ...
DIY In-Ceiling and In-Wall Installation Guide
Page 7
... 7 Hand saws also have a pointed tip that make the decision to bring in a professional to pull the cable and install the speakers. you may be one of them yourself. Polk Audio can recommend a professional installation company, call (800) 377-7655 during normal east coast business hours. Some obstructions could include electrical wiring, drain, hot...
... 7 Hand saws also have a pointed tip that make the decision to bring in a professional to pull the cable and install the speakers. you may be one of them yourself. Polk Audio can recommend a professional installation company, call (800) 377-7655 during normal east coast business hours. Some obstructions could include electrical wiring, drain, hot...
DIY In-Ceiling and In-Wall Installation Guide
Page 8
In load bearing walls be installed in the same holes or boxes as AC. DIY CI Tutorial 8 speaker cables AC wiring Studs in two categories: "load bearing" and "non-load bearing". ...
In load bearing walls be installed in the same holes or boxes as AC. DIY CI Tutorial 8 speaker cables AC wiring Studs in two categories: "load bearing" and "non-load bearing". ...
DIY In-Ceiling and In-Wall Installation Guide
Page 13
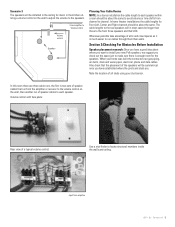
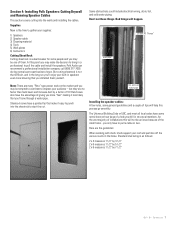
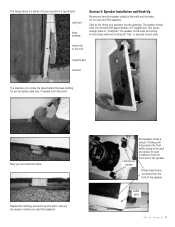
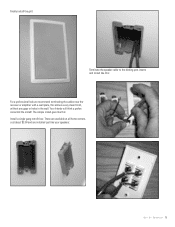
... image below is to utilize the space behind the base molding for our horizontal cable runs, if needed notch the studs: Now you can install the cable: Replace the molding, and touch up with approximately 1/8" wiggle room-this leaves enough space to "straighten" the speaker to the ...walls and ceiling. In most cases walls are ready to the wall and allows for your new Polk speakers. Phillips head screw, accessed from the front side of the speaker baffle plate D I Y C I T u t o r i a l 13 rotating cam clamps Our speakers utilize a ...
... image below is to utilize the space behind the base molding for our horizontal cable runs, if needed notch the studs: Now you can install the cable: Replace the molding, and touch up with approximately 1/8" wiggle room-this leaves enough space to "straighten" the speaker to the ...walls and ceiling. In most cases walls are ready to the wall and allows for your new Polk speakers. Phillips head screw, accessed from the front side of the speaker baffle plate D I Y C I T u t o r i a l 13 rotating cam clamps Our speakers utilize a ...
DIY In-Ceiling and In-Wall Installation Guide
Page 14
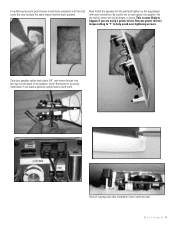
...pair into the input on the back of rotating cam after installation from inside the wall. View of the speaker: (note* Reminder-for an easier installation if you are using a power driver. D I Y C I T u t o r i a l 14 Set your screwdriver. Now install the speaker into the wall and tighten up the dog-clamps... with your power driver's torque setting to "1" to work with). For additional acoustic performance install some insulation into the wall cavity (be sure to happen if you leave a generous cable lead to help avoid over tighten the speaker...
...pair into the input on the back of rotating cam after installation from inside the wall. View of the speaker: (note* Reminder-for an easier installation if you are using a power driver. D I Y C I T u t o r i a l 14 Set your screwdriver. Now install the speaker into the wall and tighten up the dog-clamps... with your power driver's torque setting to "1" to work with). For additional acoustic performance install some insulation into the wall cavity (be sure to happen if you leave a generous cable lead to help avoid over tighten the speaker...
DIY In-Ceiling and In-Wall Installation Guide
Page 15
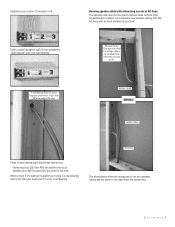
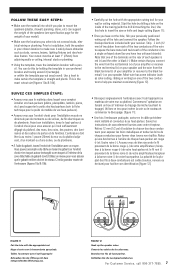
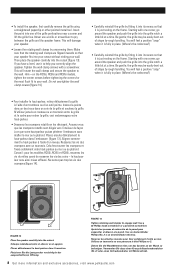
Your friends will think a professional did the install! The simple install goes like this: Install a single gang retrofit box: These are available at all home centers, cost about $3.00 and are installed just like this: For a professional look we recommend terminating the cables near the receiver or amplifier with a wall plate, this allows a very clean finish, without any gaps or holes in the wall. Finally install the grill: Terminate the speaker cable to the binding post inserts and install like your speakers: D I Y C I T u t o r i a l 15
Your friends will think a professional did the install! The simple install goes like this: Install a single gang retrofit box: These are available at all home centers, cost about $3.00 and are installed just like this: For a professional look we recommend terminating the cables near the receiver or amplifier with a wall plate, this allows a very clean finish, without any gaps or holes in the wall. Finally install the grill: Terminate the speaker cable to the binding post inserts and install like your speakers: D I Y C I T u t o r i a l 15
RCi Series Manual
Page 7
... haut-parleurs (voir la fiche technique pour le poids du modèle de vos haut-parleurs). • Assurez-vous que l'endroit choisi pour l'installation murale ne dissimule pas de montants ou de solives, de fils électriques ou de plomberie. Retirez 12 mm (1/2 po) d'isolation de chacun des... un niveau pour vous assurer que le gabarit est bien droit et de niveau. Follow the hookup directions included with the appropriate tool. Avant son installation, tenez le haut-parleur à l'endroit choisi pour vous assurer qu'il soit suffisamment dégagé du plafond, des murs, des coins, ...
... haut-parleurs (voir la fiche technique pour le poids du modèle de vos haut-parleurs). • Assurez-vous que l'endroit choisi pour l'installation murale ne dissimule pas de montants ou de solives, de fils électriques ou de plomberie. Retirez 12 mm (1/2 po) d'isolation de chacun des... un niveau pour vous assurer que le gabarit est bien droit et de niveau. Follow the hookup directions included with the appropriate tool. Avant son installation, tenez le haut-parleur à l'endroit choisi pour vous assurer qu'il soit suffisamment dégagé du plafond, des murs, des coins, ...
RCi Series Manual
Page 8
... a #2 Phillips head screwdriver or a powered screwdriver. Ziehen Sie die Wandklemmen fest, um das System an der Wand zu befestigen. • To install the speaker, first carefully remove the grille using a straightened paperclip or other pointed metal tool. Tighten the wall clamp screws with one corner, go... free. You will damage your wall. Alignez correctement le haut-parleur à l'aide d'un niveau. Conseil : pour les modèles RC55i, RC65i et RC85i, resserrez les vis du milieu avant de resserrer les vis des coins - Placez délicatement le haut-parleur dans l'ouverture...
... a #2 Phillips head screwdriver or a powered screwdriver. Ziehen Sie die Wandklemmen fest, um das System an der Wand zu befestigen. • To install the speaker, first carefully remove the grille using a straightened paperclip or other pointed metal tool. Tighten the wall clamp screws with one corner, go... free. You will damage your wall. Alignez correctement le haut-parleur à l'aide d'un niveau. Conseil : pour les modèles RC55i, RC65i et RC85i, resserrez les vis du milieu avant de resserrer les vis des coins - Placez délicatement le haut-parleur dans l'ouverture...
RC55i Mounting Template
Page 1
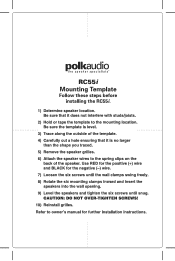
... speakers into the wall opening. 9) Level the speakers and tighten the six screws until snug. Use RED for the positive (+) wire and BLACK for further installation instructions. K_ Refer to the mounting location. polkaudio the speaker specialists- Be sure the template is no larger than the shape you traced. 5) Remove the... to the spring clips on the back of the template. 4) Carefully cut a hole ensuring that it is level. 3) Trace along the outside of the speaker. RC55i Mounting Template Follow these steps before installing the RC55i. 1) Determine speaker location.
... speakers into the wall opening. 9) Level the speakers and tighten the six screws until snug. Use RED for the positive (+) wire and BLACK for further installation instructions. K_ Refer to the mounting location. polkaudio the speaker specialists- Be sure the template is no larger than the shape you traced. 5) Remove the... to the spring clips on the back of the template. 4) Carefully cut a hole ensuring that it is level. 3) Trace along the outside of the speaker. RC55i Mounting Template Follow these steps before installing the RC55i. 1) Determine speaker location.