
DIY In-Ceiling and In-Wall Installation Guide
Page 1
Installing Your In-Wall or In-Ceiling Speakers
Installing Your In-Wall or In-Ceiling Speakers
DIY In-Ceiling and In-Wall Installation Guide
Page 2
...; Cable or satellite television • A security system And do -it ! DIY CI Tutorial 2 Here is relatively easy to gain confidence. Section 1: Introduction To Installing In-Wall or In-Ceiling Polk Audio Speakers Installing your retailer or home center service personal will know if these are intimidated thinking about attempting this on their own.
...; Cable or satellite television • A security system And do -it ! DIY CI Tutorial 2 Here is relatively easy to gain confidence. Section 1: Introduction To Installing In-Wall or In-Ceiling Polk Audio Speakers Installing your retailer or home center service personal will know if these are intimidated thinking about attempting this on their own.
DIY In-Ceiling and In-Wall Installation Guide
Page 4
..." or has several bare wires together-in all the tools and materials needed . b. Section 2: Polk Audio In-Wall and In-Ceiling Speaker Installation Guide Materials and Preparation Before cutting into your walls to install your new Polk Audio speakers, gather up all basic speaker applications you will need a minimum of 2 conductors, thus the term cable is used here instead...
..." or has several bare wires together-in all the tools and materials needed . b. Section 2: Polk Audio In-Wall and In-Ceiling Speaker Installation Guide Materials and Preparation Before cutting into your walls to install your new Polk Audio speakers, gather up all basic speaker applications you will need a minimum of 2 conductors, thus the term cable is used here instead...
DIY In-Ceiling and In-Wall Installation Guide
Page 5
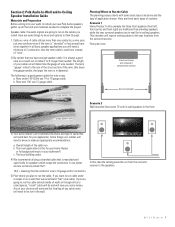
...make sure there is enough room for music in the kitchen utilizing a volume control on the wall, then another run of speaker cables to each speaker within a room should be about where you want to install your new Polk speakers, we suggest you have a good idea about the same. Scenario 3 The... speakers will be installed in the ceiling for the speakers. When your stud sensor. input from the amplifier or receiver to the volume control on the wall to adjust the volume to ...
...make sure there is enough room for music in the kitchen utilizing a volume control on the wall, then another run of speaker cables to each speaker within a room should be about where you want to install your new Polk speakers, we suggest you have a good idea about the same. Scenario 3 The... speakers will be installed in the ceiling for the speakers. When your stud sensor. input from the amplifier or receiver to the volume control on the wall to adjust the volume to ...
DIY In-Ceiling and In-Wall Installation Guide
Page 6
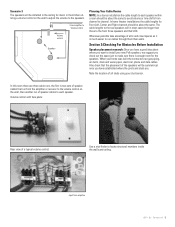
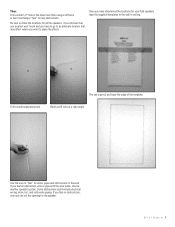
...you want to place the others. Then: Drill a small 1/2" hole in the wall If you feel an obstruction, wire or pipe with the wire probe, choose another speaker location. Be sure to check the locations for your Polk speakers tape the supplied templates to "feel" for wires, pipes and obstructions in the... or bent coat hanger "feel no obstructions, now you feel " for the speaker. The use a pencil and trace the edge of the template: Drill a small exploratory hole Bend a stiff wire at a right angle Use the wire to the wall or ceiling. If you can cut the opening for any obstructions.
...you want to place the others. Then: Drill a small 1/2" hole in the wall If you feel an obstruction, wire or pipe with the wire probe, choose another speaker location. Be sure to check the locations for your Polk speakers tape the supplied templates to "feel" for wires, pipes and obstructions in the... or bent coat hanger "feel no obstructions, now you feel " for the speaker. The use a pencil and trace the edge of the template: Drill a small exploratory hole Bend a stiff wire at a right angle Use the wire to the wall or ceiling. If you can cut the opening for any obstructions.
DIY In-Ceiling and In-Wall Installation Guide
Page 7
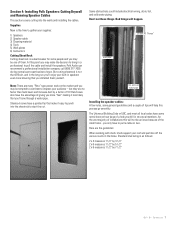
... knowing that you may be tempted to use them to impress your supplies: 1) Speakers 2) Speaker cable 3) Cleaning material 4) Tools 5) Wall plates 6) Connectors Cutting Sheet Rock Cutting sheetrock is not that difficult, and in a professional to pull the cable and install the speakers. Polk Audio can recommend a professional installation company, call (800) 377-7655 during normal east...
... knowing that you may be tempted to use them to impress your supplies: 1) Speakers 2) Speaker cable 3) Cleaning material 4) Tools 5) Wall plates 6) Connectors Cutting Sheet Rock Cutting sheetrock is not that difficult, and in a professional to pull the cable and install the speakers. Polk Audio can recommend a professional installation company, call (800) 377-7655 during normal east...
DIY In-Ceiling and In-Wall Installation Guide
Page 8
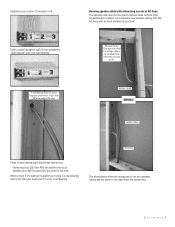
... installed in two categories: "load bearing" and "non-load bearing". Standard cross section of a modern 2 x 4 Codes usually recognize walls in the same holes or boxes as AC. Running speaker cable with as much distance as if it as practical: National Electric Code does not allow low voltage cable to run...less then 40% the width of the stud When unsure if the wall you're planning on using is a load bearing wall or not then just treat it were "Load Bearing". speaker cables AC wiring Studs in load bearing walls have these restrictions: Holes must NOT exceed 25% the width of the...
... installed in two categories: "load bearing" and "non-load bearing". Standard cross section of a modern 2 x 4 Codes usually recognize walls in the same holes or boxes as AC. Running speaker cable with as much distance as if it as practical: National Electric Code does not allow low voltage cable to run...less then 40% the width of the stud When unsure if the wall you're planning on using is a load bearing wall or not then just treat it were "Load Bearing". speaker cables AC wiring Studs in load bearing walls have these restrictions: Holes must NOT exceed 25% the width of the...
DIY In-Ceiling and In-Wall Installation Guide
Page 10
...proposed cable run Using your stud finder determine which way the joists or structural members above your ceiling run cabling between floors to some ceiling speakers: Wrong ceiling joist And when using tie wraps or staples be careful to not "over tighten" or "over fasten" the cables: These ... that his music is not distorted. ceiling joist View from inside the ceiling space D I Y C I T u t o r i a l 10 Tips to running cable in existing walls Vertical runs: In a 2 story home where you want to these cables are not going anywhere, and we have not damaged the integrity of the structural...
...proposed cable run Using your stud finder determine which way the joists or structural members above your ceiling run cabling between floors to some ceiling speakers: Wrong ceiling joist And when using tie wraps or staples be careful to not "over tighten" or "over fasten" the cables: These ... that his music is not distorted. ceiling joist View from inside the ceiling space D I Y C I T u t o r i a l 10 Tips to running cable in existing walls Vertical runs: In a 2 story home where you want to these cables are not going anywhere, and we have not damaged the integrity of the structural...

DIY In-Ceiling and In-Wall Installation Guide
Page 11
...Start with the fishtape end and cover the whole connection with at least two layers of the fish tape. ceiling joist top plate wall stud wall stud When attaching speaker cabling to the pull or fish tap-overlap the cable through the "paper-clip" on the end of electrical tape as shown... to create a cable channel: Thread the pull tape from your speaker opening back through the wall/ceiling notch,attach the cable and pull over to the opening, attach the speaker wire and pull (gently) up through the wall to the speaker opening. Fish the tape from the top notch through the...
...Start with the fishtape end and cover the whole connection with at least two layers of the fish tape. ceiling joist top plate wall stud wall stud When attaching speaker cabling to the pull or fish tap-overlap the cable through the "paper-clip" on the end of electrical tape as shown... to create a cable channel: Thread the pull tape from your speaker opening back through the wall/ceiling notch,attach the cable and pull over to the opening, attach the speaker wire and pull (gently) up through the wall to the speaker opening. Fish the tape from the top notch through the...

DIY In-Ceiling and In-Wall Installation Guide
Page 12
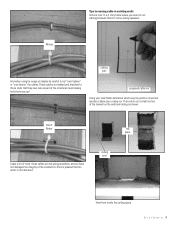
First use a utility knife and score the top edge of the base molding to separate the paint on the dry wall and the paint on the molding then using the speaker hole to utilize the base board molding. Horizontal runs Running speaker cabling across a room may seem difficult-one good idea is possible to drill through using a stiff putty blade gently pry the molding outward as shown: When you find a fire-block in between the studs it is to get your drill into the wall: D I Y C I T u t o r i a l 12
First use a utility knife and score the top edge of the base molding to separate the paint on the dry wall and the paint on the molding then using the speaker hole to utilize the base board molding. Horizontal runs Running speaker cabling across a room may seem difficult-one good idea is possible to drill through using a stiff putty blade gently pry the molding outward as shown: When you find a fire-block in between the studs it is to get your drill into the wall: D I Y C I T u t o r i a l 12
DIY In-Ceiling and In-Wall Installation Guide
Page 13
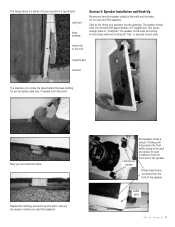
... a photo of a cross section of a typical wall: wall stud base molding Section 5: Speaker Installation and Hook Up By now you have the speaker cables in the walls and the holes cut for your new Polk speakers. Phillips head screw, accessed from the front side of the speaker baffle plate D I Y C I T u t o r i a l 13 The speaker should slide into the openings. rotating cam...
... a photo of a cross section of a typical wall: wall stud base molding Section 5: Speaker Installation and Hook Up By now you have the speaker cables in the walls and the holes cut for your new Polk speakers. Phillips head screw, accessed from the front side of the speaker baffle plate D I Y C I T u t o r i a l 13 The speaker should slide into the openings. rotating cam...
DIY In-Ceiling and In-Wall Installation Guide
Page 14
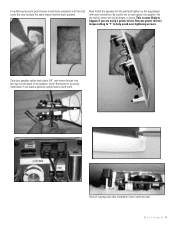
... a generous cable lead to help avoid over tighten the speaker-the dry wall or sheet rock could dimple, or break. D I Y C I T u t o r i a l 14 Strip your power driver's torque setting to "1" to work with your screwdriver. Set your speaker cables back about 3/4", and insert the pair into the ...input on the back of rotating cam after installation from inside the wall. View of the speaker: (note* Reminder-for an easier installation if you are using ...
... a generous cable lead to help avoid over tighten the speaker-the dry wall or sheet rock could dimple, or break. D I Y C I T u t o r i a l 14 Strip your power driver's torque setting to "1" to work with your screwdriver. Set your speaker cables back about 3/4", and insert the pair into the ...input on the back of rotating cam after installation from inside the wall. View of the speaker: (note* Reminder-for an easier installation if you are using ...
DIY In-Ceiling and In-Wall Installation Guide
Page 15
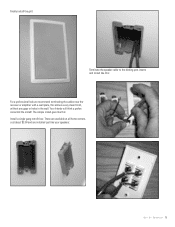
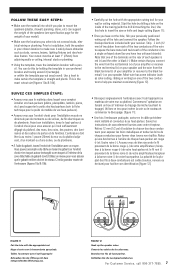
Your friends will think a professional did the install! Finally install the grill: Terminate the speaker cable to the binding post inserts and install like your speakers: D I Y C I T u t o r i a l 15 The simple install goes like this: Install a single gang retrofit box: These are available at all home centers, cost about $3.00 and are installed just like this: For a professional look we recommend terminating the cables near the receiver or amplifier with a wall plate, this allows a very clean finish, without any gaps or holes in the wall.
Your friends will think a professional did the install! Finally install the grill: Terminate the speaker cable to the binding post inserts and install like your speakers: D I Y C I T u t o r i a l 15 The simple install goes like this: Install a single gang retrofit box: These are available at all home centers, cost about $3.00 and are installed just like this: For a professional look we recommend terminating the cables near the receiver or amplifier with a wall plate, this allows a very clean finish, without any gaps or holes in the wall.

RCi Series Manual
Page 1
RCi SERIES RC60i RC80i RC55i RC65i RC85i O w n e r 's Manual High Performance In-Wall Speakers Haut-parleurs encastrables Haute Performance « In Wall »
RCi SERIES RC60i RC80i RC55i RC65i RC85i O w n e r 's Manual High Performance In-Wall Speakers Haut-parleurs encastrables Haute Performance « In Wall »
RCi Series Manual
Page 7
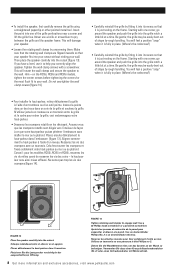
...de votre haut-parleur. L+EFT_ R+IGH_T AMP _+ _+ FIGURE 12 Hook up the speaker wires. Conecte los cables de los altavoces. Use this by drilling a hole on your speaker and the wire from adjoining walls or ceiling, internal studs or plumbing. • Using the template, trace the installation ...location with your speaker. Strip 2 inch (12 mm) of insulation from the red terminal (+)...
...de votre haut-parleur. L+EFT_ R+IGH_T AMP _+ _+ FIGURE 12 Hook up the speaker wires. Conecte los cables de los altavoces. Use this by drilling a hole on your speaker and the wire from adjoining walls or ceiling, internal studs or plumbing. • Using the template, trace the installation ...location with your speaker. Strip 2 inch (12 mm) of insulation from the red terminal (+)...
RCi Series Manual
Page 8
...shape by rough handling. Be gentle; the grille may be easily bent out of shape by rough handling. You will rotate the wall clamps and secure the speaker to engage wall. Be gentle; Placez ensuite délicatement le haut-parleur dans l'embrasure [figure 13]. Alignez correctement le haut-parleur à... the grille may be easily bent out of the grille perforations near a corner and lift the grille free. Conseil : pour les modèles RC55i, RC65i et RC85i, resserrez les vis du milieu avant de resserrer les vis des coins - Use a #2 Phillips head screwdriver or a powered screwdriver...
...shape by rough handling. Be gentle; the grille may be easily bent out of shape by rough handling. You will rotate the wall clamps and secure the speaker to engage wall. Be gentle; Placez ensuite délicatement le haut-parleur dans l'embrasure [figure 13]. Alignez correctement le haut-parleur à... the grille may be easily bent out of the grille perforations near a corner and lift the grille free. Conseil : pour les modèles RC55i, RC65i et RC85i, resserrez les vis du milieu avant de resserrer les vis des coins - Use a #2 Phillips head screwdriver or a powered screwdriver...
RC55i Mounting Template
Page 1
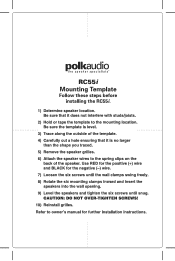
... before installing the RC55i. 1) Determine speaker location. Be sure that it does not interfere with studs/joists. 2) Hold or tape the template to owner's manual for the negative (-) wire. 7) Loosen the six screws until the wall clamps swing freely. 8) Rotate the six mounting clamps inward and insert the speakers into the wall opening. 9) Level the...
... before installing the RC55i. 1) Determine speaker location. Be sure that it does not interfere with studs/joists. 2) Hold or tape the template to owner's manual for the negative (-) wire. 7) Loosen the six screws until the wall clamps swing freely. 8) Rotate the six mounting clamps inward and insert the speakers into the wall opening. 9) Level the...


