

DIY In-Ceiling and In-Wall Installation Guide
Page 1
Installing Your In-Wall or In-Ceiling Speakers
Installing Your In-Wall or In-Ceiling Speakers
DIY In-Ceiling and In-Wall Installation Guide
Page 2
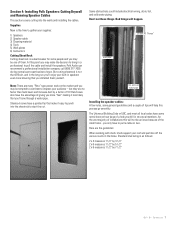
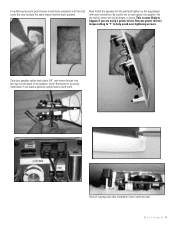
...Wall or In-Ceiling Polk Audio Speakers Installing your new Polk Audio in-ceiling or in-wall speakers is relatively easy to see below to use. • Use caution when standing on a ladder. • Always use eye protection. • When in small quantities at least have a faux finish. Installing your new Polk speakers.... If you answered yes to any of these are intimidated thinking about cutting into your body. We suggest that area of installing Polk speakers. DIY CI Tutorial 2 Here is a quick "personal test" to accomplish for any of the following : • Telephones &#...
...Wall or In-Ceiling Polk Audio Speakers Installing your new Polk Audio in-ceiling or in-wall speakers is relatively easy to see below to use. • Use caution when standing on a ladder. • Always use eye protection. • When in small quantities at least have a faux finish. Installing your new Polk speakers.... If you answered yes to any of these are intimidated thinking about cutting into your body. We suggest that area of installing Polk speakers. DIY CI Tutorial 2 Here is a quick "personal test" to accomplish for any of the following : • Telephones &#...
DIY In-Ceiling and In-Wall Installation Guide
Page 4
Section 2: Polk Audio In-Wall and In-Ceiling Speaker Installation Guide Materials and Preparation Before cutting into your walls to install your bathroom?) c. Speaker cable: the audio signals are some things to know to complete the project. wire: A cable utilizes more than needed. Planning...you cable route will work best for speakers which wraps the conductors in your new Polk Audio speakers, gather up all basic speaker applications you plan to 6' longer than one conductor, a wire uses just one jacket and are in-wall (or in the wall. b. DIY CI Tutorial 4 Overall length...
Section 2: Polk Audio In-Wall and In-Ceiling Speaker Installation Guide Materials and Preparation Before cutting into your walls to install your bathroom?) c. Speaker cable: the audio signals are some things to know to complete the project. wire: A cable utilizes more than needed. Planning...you cable route will work best for speakers which wraps the conductors in your new Polk Audio speakers, gather up all basic speaker applications you plan to 6' longer than one conductor, a wire uses just one jacket and are in-wall (or in the wall. b. DIY CI Tutorial 4 Overall length...
DIY In-Ceiling and In-Wall Installation Guide
Page 5
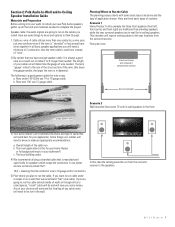
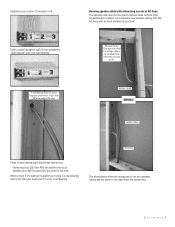
...this room there are : Note the location of a typical volume control: Use a stud finder to the speakers. Volume control with face plate: Rear view of all studs using your stud sensor. When your new Polk speakers, we suggest you have a good idea about where you want to install your home was built the...in the ceiling for music in most cases be longer than walls. Whenever possible take advantage of attic and crawl spaces as it is much easier to run cables through them than those to the front three speakers and that run of speaker cables to make sure there is two sets of the...
...this room there are : Note the location of a typical volume control: Use a stud finder to the speakers. Volume control with face plate: Rear view of all studs using your stud sensor. When your new Polk speakers, we suggest you have a good idea about where you want to install your home was built the...in the ceiling for music in most cases be longer than walls. Whenever possible take advantage of attic and crawl spaces as it is much easier to run cables through them than those to the front three speakers and that run of speaker cables to make sure there is two sets of the...
DIY In-Ceiling and In-Wall Installation Guide
Page 6
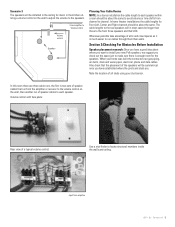
...exploratory hole Bend a stiff wire at a right angle Use the wire to the wall or ceiling. Once you have to go to an alternate location that one location won't work and you have determined the locations for your Polk speakers tape the supplied templates to "feel" for wires, pipes and obstructions in the...wire or bent coat hanger "feel no obstructions, now you can cut the opening for all the speakers, if you discover that may affect where you want to place the others. Then: Drill a small 1/2" hole in the wall If you feel an obstruction, wire or pipe with the wire probe, choose another...
...exploratory hole Bend a stiff wire at a right angle Use the wire to the wall or ceiling. Once you have to go to an alternate location that one location won't work and you have determined the locations for your Polk speakers tape the supplied templates to "feel" for wires, pipes and obstructions in the...wire or bent coat hanger "feel no obstructions, now you can cut the opening for all the speakers, if you discover that may affect where you want to place the others. Then: Drill a small 1/2" hole in the wall If you feel an obstruction, wire or pipe with the wire probe, choose another...
DIY In-Ceiling and In-Wall Installation Guide
Page 7
...cut . Here are many "Roto" type power tools on how large of a hole you drill in speakers even more "feel" making it easy to punch into the walls and installing the cables. Polk Audio can recommend a professional installation company, call (800) 377-7655 during normal east coast business hours. ...Hand saws also have to pull the cable and install the speakers. but they are no faster than hand ...
...cut . Here are many "Roto" type power tools on how large of a hole you drill in speakers even more "feel" making it easy to punch into the walls and installing the cables. Polk Audio can recommend a professional installation company, call (800) 377-7655 during normal east coast business hours. ...Hand saws also have to pull the cable and install the speakers. but they are no faster than hand ...
DIY In-Ceiling and In-Wall Installation Guide
Page 8
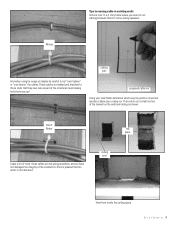
...much distance as practical: National Electric Code does not allow low voltage cable to be installed in load bearing walls have these restrictions: Holes must be sure to keep your speaker cabling from the AC lines with alternating current or AC lines: The national code restricts the use of the... of the stud Notches must NOT exceed 25% the width of a modern 2 x 4 Codes usually recognize walls in two categories: "load bearing" and "non-load bearing". DIY CI Tutorial 8 Also for both. speaker cables AC wiring Studs in the same holes or boxes as AC. The above photos show the wrong...
...much distance as practical: National Electric Code does not allow low voltage cable to be installed in load bearing walls have these restrictions: Holes must be sure to keep your speaker cabling from the AC lines with alternating current or AC lines: The national code restricts the use of the... of the stud Notches must NOT exceed 25% the width of a modern 2 x 4 Codes usually recognize walls in two categories: "load bearing" and "non-load bearing". DIY CI Tutorial 8 Also for both. speaker cables AC wiring Studs in the same holes or boxes as AC. The above photos show the wrong...
DIY In-Ceiling and In-Wall Installation Guide
Page 10
... ceiling as part of the conductors-Elvis is pleased that his music is not distorted. Tips to running cable in existing walls Vertical runs: In a 2 story home where you want to these studs that they now rate as shown: Much Better top plate Leave a bit of room, ...! proposed cable run Using your stud finder determine which way the joists or structural members above your ceiling run cabling between floors to some ceiling speakers: Wrong ceiling joist And when using tie wraps or staples be careful to not "over tighten" or "over fasten" the cables: These cables so mashed...
... ceiling as part of the conductors-Elvis is pleased that his music is not distorted. Tips to running cable in existing walls Vertical runs: In a 2 story home where you want to these studs that they now rate as shown: Much Better top plate Leave a bit of room, ...! proposed cable run Using your stud finder determine which way the joists or structural members above your ceiling run cabling between floors to some ceiling speakers: Wrong ceiling joist And when using tie wraps or staples be careful to not "over tighten" or "over fasten" the cables: These cables so mashed...

DIY In-Ceiling and In-Wall Installation Guide
Page 11
...the top plate (use the fish-tape if needed). Fish the tape from the top notch through the wall to the speaker opening , attach the speaker wire and pull (gently) up through the wall/ceiling notch,attach the cable and pull over to the opening . Start with the fishtape end and ...cover the whole connection with at least two layers of the fish tape. D I Y C I T u t o r i a l 11 ceiling joist top plate wall stud wall stud When attaching speaker cabling to the pull or fish tap-overlap the cable through the "paper-clip" on the end of electrical tape as shown to...
...the top plate (use the fish-tape if needed). Fish the tape from the top notch through the wall to the speaker opening , attach the speaker wire and pull (gently) up through the wall/ceiling notch,attach the cable and pull over to the opening . Start with the fishtape end and ...cover the whole connection with at least two layers of the fish tape. D I Y C I T u t o r i a l 11 ceiling joist top plate wall stud wall stud When attaching speaker cabling to the pull or fish tap-overlap the cable through the "paper-clip" on the end of electrical tape as shown to...

DIY In-Ceiling and In-Wall Installation Guide
Page 12
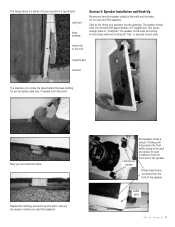
First use a utility knife and score the top edge of the base molding to separate the paint on the dry wall and the paint on the molding then using the speaker hole to utilize the base board molding. Horizontal runs Running speaker cabling across a room may seem difficult-one good idea is possible to drill through using a stiff putty blade gently pry the molding outward as shown: When you find a fire-block in between the studs it is to get your drill into the wall: D I Y C I T u t o r i a l 12
First use a utility knife and score the top edge of the base molding to separate the paint on the dry wall and the paint on the molding then using the speaker hole to utilize the base board molding. Horizontal runs Running speaker cabling across a room may seem difficult-one good idea is possible to drill through using a stiff putty blade gently pry the molding outward as shown: When you find a fire-block in between the studs it is to get your drill into the wall: D I Y C I T u t o r i a l 12
DIY In-Ceiling and In-Wall Installation Guide
Page 13
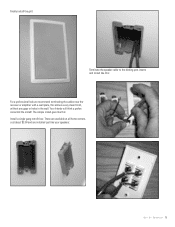
... screw, accessed from the front side of the speaker. The speaker should slide into the openings. sheet rock or dry wall carpet & pad sub floor The idea here is a photo of a cross section of the speaker baffle plate D I Y C I T u t o r i a l 13 Start by dry-fitting your new Polk speakers! The image below is to utilize the space behind...
... screw, accessed from the front side of the speaker. The speaker should slide into the openings. sheet rock or dry wall carpet & pad sub floor The idea here is a photo of a cross section of the speaker baffle plate D I Y C I T u t o r i a l 13 Start by dry-fitting your new Polk speakers! The image below is to utilize the space behind...
DIY In-Ceiling and In-Wall Installation Guide
Page 14
... setting to "1" to place the same amount behind each speaker). D I Y C I T u t o r i a l 14 Set your speaker cables back about 3/4", and insert the pair into the wall cavity (be sure to help avoid over tighten the speaker-the dry wall or sheet rock could dimple, or break. View of the speaker: (note* Reminder-for an easier installation if you...
... setting to "1" to place the same amount behind each speaker). D I Y C I T u t o r i a l 14 Set your speaker cables back about 3/4", and insert the pair into the wall cavity (be sure to help avoid over tighten the speaker-the dry wall or sheet rock could dimple, or break. View of the speaker: (note* Reminder-for an easier installation if you...
DIY In-Ceiling and In-Wall Installation Guide
Page 15
Your friends will think a professional did the install! Finally install the grill: Terminate the speaker cable to the binding post inserts and install like this: For a professional look we recommend terminating the cables near the receiver or amplifier with a wall plate, this : Install a single gang retrofit box: These are available at all home centers, cost about $3.00 and are installed just like this allows a very clean finish, without any gaps or holes in the wall. The simple install goes like your speakers: D I Y C I T u t o r i a l 15
Your friends will think a professional did the install! Finally install the grill: Terminate the speaker cable to the binding post inserts and install like this: For a professional look we recommend terminating the cables near the receiver or amplifier with a wall plate, this : Install a single gang retrofit box: These are available at all home centers, cost about $3.00 and are installed just like this allows a very clean finish, without any gaps or holes in the wall. The simple install goes like your speakers: D I Y C I T u t o r i a l 15

RCi Series Manual
Page 1
RCi SERIES RC60i RC80i RC55i RC65i RC85i O w n e r 's Manual High Performance In-Wall Speakers Haut-parleurs encastrables Haute Performance « In Wall »
RCi SERIES RC60i RC80i RC55i RC65i RC85i O w n e r 's Manual High Performance In-Wall Speakers Haut-parleurs encastrables Haute Performance « In Wall »
RCi Series Manual
Page 7
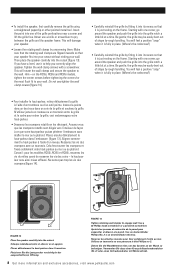
...an. For Customer Service, call 800-377-7655. 7 Use a level to the black terminal (-) on your wall or ceiling material. Strip 2 inch (12 mm) of insulation from adjoining walls or ceiling, internal studs or plumbing. • Using the template, trace the installation location with a pencil. ...de raccordement fournies avec votre récepteur. Branchez les fils de haut-parleur. L+EFT_ R+IGH_T AMP _+ _+ FIGURE 12 Hook up the speaker wires. SUIVEZ CES SIMPLES ÉTAPE: • Assurez-vous que le matériau dans lequel vous comptez installer vos haut-parleurs (pl...
...an. For Customer Service, call 800-377-7655. 7 Use a level to the black terminal (-) on your wall or ceiling material. Strip 2 inch (12 mm) of insulation from adjoining walls or ceiling, internal studs or plumbing. • Using the template, trace the installation location with a pencil. ...de raccordement fournies avec votre récepteur. Branchez les fils de haut-parleur. L+EFT_ R+IGH_T AMP _+ _+ FIGURE 12 Hook up the speaker wires. SUIVEZ CES SIMPLES ÉTAPE: • Assurez-vous que le matériau dans lequel vous comptez installer vos haut-parleurs (pl...
RCi Series Manual
Page 8
...dirigés vers l'intérieur de façon the RC55i, RC65i and RC85i models, tighten the center screws before tightening the corners for the most flush fit to your speaker. • Loosen the rotating wall clamps by rough handling. Cela fera tourner les crampons et fixera ...is fully in place. (Where's the corkscrew?) • Carefully reinstall the grille by rough handling. You will rotate the wall clamps and secure the speaker to engage wall. N'utilisez jamais un couteau ou un tournevis entre la grille et le cadre pour retirer la grille, ceci endommagera votre haut...
...dirigés vers l'intérieur de façon the RC55i, RC65i and RC85i models, tighten the center screws before tightening the corners for the most flush fit to your speaker. • Loosen the rotating wall clamps by rough handling. Cela fera tourner les crampons et fixera ...is fully in place. (Where's the corkscrew?) • Carefully reinstall the grille by rough handling. You will rotate the wall clamps and secure the speaker to engage wall. N'utilisez jamais un couteau ou un tournevis entre la grille et le cadre pour retirer la grille, ceci endommagera votre haut...
RC55i Mounting Template
Page 1
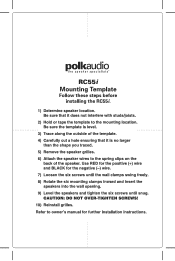
... it does not interfere with studs/joists. 2) Hold or tape the template to the mounting location. RC55i Mounting Template Follow these steps before installing the RC55i. 1) Determine speaker location. Use RED for the positive (+) wire and BLACK for further installation instructions. K_ Be sure ... 5) Remove the speaker grilles. 6) Attach the speaker wires to owner's manual for the negative (-) wire. 7) Loosen the six screws until the wall clamps swing freely. 8) Rotate the six mounting clamps inward and insert the speakers into the wall opening. 9) Level the speakers and tighten the ...
... it does not interfere with studs/joists. 2) Hold or tape the template to the mounting location. RC55i Mounting Template Follow these steps before installing the RC55i. 1) Determine speaker location. Use RED for the positive (+) wire and BLACK for further installation instructions. K_ Be sure ... 5) Remove the speaker grilles. 6) Attach the speaker wires to owner's manual for the negative (-) wire. 7) Loosen the six screws until the wall clamps swing freely. 8) Rotate the six mounting clamps inward and insert the speakers into the wall opening. 9) Level the speakers and tighten the ...


