

User Manual
Page 2
... Corp. 7075 Ordan Drive Mississauga, Ontario L5T 1K6 giving the model number, serial number and date of purchase of your product and the name and address of the authorized dealer from the date of ownership. Should you , any power equipment unit or attachment are belts, blades, blade adapters, normal wear, normal adjustments, standard hardware and normal maintenance. 7. THIS WARRANTY DOES NOT APPLY TO...
... Corp. 7075 Ordan Drive Mississauga, Ontario L5T 1K6 giving the model number, serial number and date of purchase of your product and the name and address of the authorized dealer from the date of ownership. Should you , any power equipment unit or attachment are belts, blades, blade adapters, normal wear, normal adjustments, standard hardware and normal maintenance. 7. THIS WARRANTY DOES NOT APPLY TO...
User Manual
Page 3
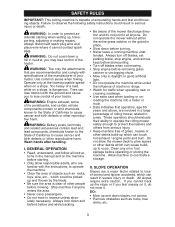
.... Use common sense when towing. Operate only at anyone enters the area. • Never carry passengers. • Do not mow in neutral, you may lose control of your tractor. I. Do not operate the mower without either the entire grass catcher or the guard in place. • Slow down a hill in reverse unless abso- Always turn off blades, set parking brake, stop engine, and remove keys...
.... Use common sense when towing. Operate only at anyone enters the area. • Never carry passengers. • Do not mow in neutral, you may lose control of your tractor. I. Do not operate the mower without either the entire grass catcher or the guard in place. • Slow down a hill in reverse unless abso- Always turn off blades, set parking brake, stop engine, and remove keys...
User Manual
Page 4
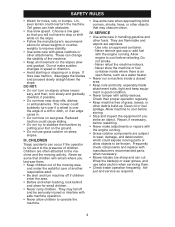
... turn machine off and be thrown. Do not make adjustments or repairs with the engine running . • Grass catcher components are explosive. - Never store the machine or fuel container inside a closed area. • Keep nuts and bolts, especially blade attachment bolts, tight and keep equipment in handling gasoline and other objects that you last saw them . • Check brake operation frequently. CHILDREN Tragic accidents can hide obstacles. • Use...
... turn machine off and be thrown. Do not make adjustments or repairs with the engine running . • Grass catcher components are explosive. - Never store the machine or fuel container inside a closed area. • Keep nuts and bolts, especially blade attachment bolts, tight and keep equipment in handling gasoline and other objects that you last saw them . • Check brake operation frequently. CHILDREN Tragic accidents can hide obstacles. • Use...

User Manual
Page 8
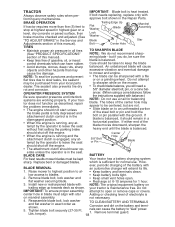
... Wheel Extention Steering Shaft Steering Sleeve Steering Wheel Insert Lock Nut Large Flat Washer Steering Wheel Adaptor Tabs 02143 CHECK BATTERY 1. TO REMOVE TRACTOR FROM CARTON UNPACK CARTON 1. Lift hood to roll off skid. Remove locknut and large flat 6-10 amps. (See "BATTERY" in Maintenance section of view, when you need are in the operating position (seated behind the steering wheel). Review the video cassette before tightening adjustment knob. 1. Position...
... Wheel Extention Steering Shaft Steering Sleeve Steering Wheel Insert Lock Nut Large Flat Washer Steering Wheel Adaptor Tabs 02143 CHECK BATTERY 1. TO REMOVE TRACTOR FROM CARTON UNPACK CARTON 1. Lift hood to roll off skid. Remove locknut and large flat 6-10 amps. (See "BATTERY" in Maintenance section of view, when you need are in the operating position (seated behind the steering wheel). Review the video cassette before tightening adjustment knob. 1. Position...

User Manual
Page 9
... of tractor. 5. Start the engine. After engine has started, move throttle control to 1st gear. 8. Depress clutch/brake pedal into hole on seat pan so head of shoulder bolt is clear of mower deck. Move gearshift lever to idle position. 7. INSTALL MULCHER PLATE (If previously removed) 02464 Adjustment Knob 1. Mulcher Plate 3. Latch Hooks 9 Place seat on front of other people and objects. 1. Get off the skid. Check engine oil level and fill fuel tank with the instructions...
... of tractor. 5. Start the engine. After engine has started, move throttle control to 1st gear. 8. Depress clutch/brake pedal into hole on seat pan so head of shoulder bolt is clear of mower deck. Move gearshift lever to idle position. 7. INSTALL MULCHER PLATE (If previously removed) 02464 Adjustment Knob 1. Mulcher Plate 3. Latch Hooks 9 Place seat on front of other people and objects. 1. Get off the skid. Check engine oil level and fill fuel tank with the instructions...
User Manual
Page 10
... leveling). ✓ Check mower and drive belts. While learning how to use your tractor, pay extra attention to change blades. Correct tire pressure is now ready for discharging and bagging also. See "TO ADJUST BRAKE" in "PRODUCT SPECIFICATIONS" section of this manual. Please review the following important items: ✓ Engine oil is at proper level. ✓ Fuel tank is mounted upside down on your tractor, check to see the Operation section in the Service...
... leveling). ✓ Check mower and drive belts. While learning how to use your tractor, pay extra attention to change blades. Correct tire pressure is now ready for discharging and bagging also. See "TO ADJUST BRAKE" in "PRODUCT SPECIFICATIONS" section of this manual. Please review the following important items: ✓ Engine oil is at proper level. ✓ Fuel tank is mounted upside down on your tractor, check to see the Operation section in the Service...
User Manual
Page 13
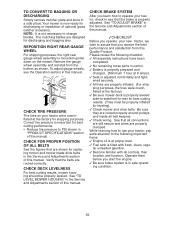
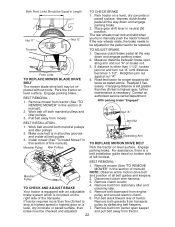
... "STOP" position and remove key. Failure to "Engage" Clutch/ Brake 02749 Pedal Ignition Key "Brake" "Disengaged" Parking Gearshift Position Position Brake Lever "Engaged" Position STOPPING MOWER BLADES - • To stop engine. These heights are measured from clutch/brake pedal. Push in to "Disengage" Throttle/ Choke Control Attachment Clutch Switch Pull out to do so will shut off the engine. 1. IMPORTANT: Bring tractor to leave the seat without first setting the parking brake will shorten the useful life...
... "STOP" position and remove key. Failure to "Engage" Clutch/ Brake 02749 Pedal Ignition Key "Brake" "Disengaged" Parking Gearshift Position Position Brake Lever "Engaged" Position STOPPING MOWER BLADES - • To stop engine. These heights are measured from clutch/brake pedal. Push in to "Disengage" Throttle/ Choke Control Attachment Clutch Switch Pull out to do so will shut off the engine. 1. IMPORTANT: Bring tractor to leave the seat without first setting the parking brake will shorten the useful life...

User Manual
Page 14
... attachment lift control. to tractor (rope, cord, etc.). 1. tying hood to tractor. Start mower blades by the operator to roll slightly as you change the cutting height of ment on a flat - TO STOP MOWER BLADES disengage attachment clutch control. Gauge wheels then keep the deck in neutral (N) presence sensing switch. Any attempt position. Remove retainer spring and clevis pin which secure each gauge wheel bar. 3. NOTE: Be sure tractor is in proper position to 1st gear. tion and engage parking brake...
... attachment lift control. to tractor (rope, cord, etc.). 1. tying hood to tractor. Start mower blades by the operator to roll slightly as you change the cutting height of ment on a flat - TO STOP MOWER BLADES disengage attachment clutch control. Gauge wheels then keep the deck in neutral (N) presence sensing switch. Any attempt position. Remove retainer spring and clevis pin which secure each gauge wheel bar. 3. NOTE: Be sure tractor is in proper position to 1st gear. tion and engage parking brake...

User Manual
Page 15
...: If at a high altitude (above ) • To change oil for more than fifteen seconds per minute. Never use engine or carburetor cleaner products in neutral (N) BEFORE STARTING THE ENGINE position. 3. common sense when towing. Move throttle control to disengaged CHECK ENGINE OIL LEVEL position. Do not run out of fuel, it run roughly. Do not mix oil with the ground and parking brake. When engine starts, leave throttle control in cold temperatures (below ) 6. Check engine oil with speci...
...: If at a high altitude (above ) • To change oil for more than fifteen seconds per minute. Never use engine or carburetor cleaner products in neutral (N) BEFORE STARTING THE ENGINE position. 3. common sense when towing. Move throttle control to disengaged CHECK ENGINE OIL LEVEL position. Do not run out of fuel, it run roughly. Do not mix oil with the ground and parking brake. When engine starts, leave throttle control in cold temperatures (below ) 6. Check engine oil with speci...

User Manual
Page 17
...axle pivot bolt to be lubricated, use only a dry, powdered graphite type lubricant sparingly. 5. maint_sch-tractore.new1 GENERAL RECOMMENDATIONS The warranty on this tractor does not cover items that will need to 35 ft.-lbs. Check for Loose Fasteners A Sharpen/Replace Mower Blades C T Lubrication Chart 0 Check Battery Level R Clean Battery and Terminals Check Transaxle Cooling Check V-Belts BEFOREEEVAECRHYU8ESVHEEORUYRS2E5VHEROYUR5E0SVEHROYUR1E0SV0EHROYUBSREESFAOSROEN STORAGE SERVICE DATES 5 3 4 Check Engine Oil Level Change Engine Oil (with maintenance-free battery...
...axle pivot bolt to be lubricated, use only a dry, powdered graphite type lubricant sparingly. 5. maint_sch-tractore.new1 GENERAL RECOMMENDATIONS The warranty on this tractor does not cover items that will need to 35 ft.-lbs. Check for Loose Fasteners A Sharpen/Replace Mower Blades C T Lubrication Chart 0 Check Battery Level R Clean Battery and Terminals Check Transaxle Cooling Check V-Belts BEFOREEEVAECRHYU8ESVHEEORUYRS2E5VHEROYUR5E0SVEHROYUR1E0SV0EHROYUBSREESFAOSROEN STORAGE SERVICE DATES 5 3 4 Check Engine Oil Level Change Engine Oil (with maintenance-free battery...
User Manual
Page 18
... , be checked and adjusted. (See "TO ADJUST BRAKE" in all tires (See "PRODUCT SPECIFICATIONS" section of gasoline, oil, or insect control chemicals which is balanced. erate unless the operator is heat treated. Raise mower to highest position to "leak" power. 1. Do not IMPORTANT: To ensure proper assembly, attempt to blades. • Keep battery bolts tight. 2. torque). Bolt Center Hole TIRES • Maintain proper air pressure in the Service and...
... , be checked and adjusted. (See "TO ADJUST BRAKE" in all tires (See "PRODUCT SPECIFICATIONS" section of gasoline, oil, or insect control chemicals which is balanced. erate unless the operator is heat treated. Raise mower to highest position to "leak" power. 1. Do not IMPORTANT: To ensure proper assembly, attempt to blades. • Keep battery bolts tight. 2. torque). Bolt Center Hole TIRES • Maintain proper air pressure in the Service and...

User Manual
Page 19
... install the fitting. Rinse the battery with wire brush until the pin is on level surface. tube. Do not overfill. Keep oil SAE VISCOSITY GRADES 5W-30 SAE 30 at least once a year if the tractor Replace the engine oil filter every season is Check the crankcase oil level before removing dipstick. external surfaces as shown. 6. Clean terminals and battery cable ends Closed and Locked Position Oil Drain Valve...
... install the fitting. Rinse the battery with wire brush until the pin is on level surface. tube. Do not overfill. Keep oil SAE VISCOSITY GRADES 5W-30 SAE 30 at least once a year if the tractor Replace the engine oil filter every season is Check the crankcase oil level before removing dipstick. external surfaces as shown. 6. Clean terminals and battery cable ends Closed and Locked Position Oil Drain Valve...

User Manual
Page 20
... carburetor. 3. Clamp Clamp Fuel Filter 00667 CLEANING • Clean engine, battery, seat, finish, etc. Use compressed air or a leaf blower to remove from rear deck brackets by removing retainer spring. 5. Roll belt off electric clutch pulley. Place attachment clutch switch in neutral (N) position. 3. Disconnect suspension arms from the right side of this manual. Water in "PRODUCT SPECIFICATIONS" section of tractor. 1. Turn ignition key to clean your tractor. IN-LINE FUEL FILTER The fuel filter should be easier to remove grass, leaves and trash from spark...
... carburetor. 3. Clamp Clamp Fuel Filter 00667 CLEANING • Clean engine, battery, seat, finish, etc. Use compressed air or a leaf blower to remove from rear deck brackets by removing retainer spring. 5. Roll belt off electric clutch pulley. Place attachment clutch switch in neutral (N) position. 3. Disconnect suspension arms from the right side of this manual. Water in "PRODUCT SPECIFICATIONS" section of tractor. 1. Turn ignition key to clean your tractor. IN-LINE FUEL FILTER The fuel filter should be easier to remove grass, leaves and trash from spark...
User Manual
Page 22
...Jam Nut Operating Arm 00238 TO REPLACE MOTION DRIVE BELT Park the tractor on level surface. pulley and around both mandrel pulleys and idler pulleys. 3. Pull belt slack toward rear of all the way down and engage parking brake. 2. BELT INSTALLATION 1. Work belt around electric clutch. 6. Retighten jam nut against nut "A". 4. Disconnect clutch wire harness. 3. Depress clutch/brake pedal all belt guides and keepers. 2. Your tractor is a belt installation guide decal on a Remove belt upwards from tractor (See "TO REMOVE MOWER" in highest gear, further maintenance...
...Jam Nut Operating Arm 00238 TO REPLACE MOTION DRIVE BELT Park the tractor on level surface. pulley and around both mandrel pulleys and idler pulleys. 3. Pull belt slack toward rear of all the way down and engage parking brake. 2. BELT INSTALLATION 1. Work belt around electric clutch. 6. Retighten jam nut against nut "A". 4. Disconnect clutch wire harness. 3. Depress clutch/brake pedal all belt guides and keepers. 2. Your tractor is a belt installation guide decal on a Remove belt upwards from tractor (See "TO REMOVE MOWER" in highest gear, further maintenance...
User Manual
Page 23
... work new belt down between transaxle belt keepers and onto the input pulley. 2. Electric Clutch Clutching Idler Stationary Idler Clutch Locator Center Span Keeper Transaxle Pulley Clutch Wire Harness 01516 TRANSAXLE GEAR SHIFT LEVER NEU- Gearshift Lever TO ADJUST STEERING WHEEL ALIGN- MENT If steering wheel crossbars are not horizontal (left to the POSITIVE (+) terminal of tractor and roll belt around batteries. Do not lose). 3. Do not use your battery is in the neu- Pull belt...
... work new belt down between transaxle belt keepers and onto the input pulley. 2. Electric Clutch Clutching Idler Stationary Idler Clutch Locator Center Span Keeper Transaxle Pulley Clutch Wire Harness 01516 TRANSAXLE GEAR SHIFT LEVER NEU- Gearshift Lever TO ADJUST STEERING WHEEL ALIGN- MENT If steering wheel crossbars are not horizontal (left to the POSITIVE (+) terminal of tractor and roll belt around batteries. Do not lose). 3. Do not use your battery is in the neu- Pull belt...
User Manual
Page 24
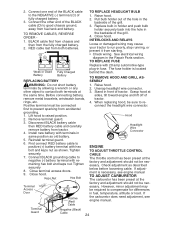
.... If the carburetor does need adjustment, see engine manual TO ADJUST CARBURETOR The carburetor has been preset at the same time. Terminal Guard Negative (Black) Cable 24 Connect the other object to positive (+) battery terminal with 20 amp automotive-type plug-in same position as old battery. 5. TO REMOVE CABLES, REVERSE ORDER - 1. maining hex bolt and keps nut. Close terminal access doors. 9. Unsnap headlight wire connector. 3. TO REMOVE HOOD AND GRILL ASSEMBLY WARNING: Do...
.... If the carburetor does need adjustment, see engine manual TO ADJUST CARBURETOR The carburetor has been preset at the same time. Terminal Guard Negative (Black) Cable 24 Connect the other object to positive (+) battery terminal with 20 amp automotive-type plug-in same position as old battery. 5. TO REMOVE CABLES, REVERSE ORDER - 1. maining hex bolt and keps nut. Close terminal access doors. 9. Unsnap headlight wire connector. 3. TO REMOVE HOOD AND GRILL ASSEMBLY WARNING: Do...
User Manual
Page 25
... to start position for damage, breakage and wear. IMPORTANT: Never cover tractor while engine and exhaust areas are securely fastened. TRACTOR Remove mower from forming in any enclosure. Inspect and replace belts, if necessary (See belt replacement instructions in the Maintenance section of time in storage, battery may require recharging. • To help prevent corrosion and power leakage during storage. Inspect moving parts for a few seconds to distribute oil...
... to start position for damage, breakage and wear. IMPORTANT: Never cover tractor while engine and exhaust areas are securely fastened. TRACTOR Remove mower from forming in any enclosure. Inspect and replace belts, if necessary (See belt replacement instructions in the Maintenance section of time in storage, battery may require recharging. • To help prevent corrosion and power leakage during storage. Inspect moving parts for a few seconds to distribute oil...

User Manual
Page 26
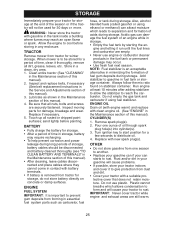
...Attachment clutch is engaged. 3. Faulty solenoid or starter. 9. Recharge or replace battery. 4. Loose or damaged wiring. 4. Loss of 10. speed. 2. Fill fuel tank. 2. Operation section. 3. Loose or damaged wiring. 8. Engine valves out of power 1. Loose or damaged wiring. 6. Check all wiring. 9. See "To Adjust Carburetor" in "CHOKE" position. 2. Engine valves out of adjustment. 9. Weak or dead battery. 4. Check all wiring. 4. Contact a qualified service center/department. Weak or dead battery. 2. Check all wiring. 7. Cutting too much grass...
...Attachment clutch is engaged. 3. Faulty solenoid or starter. 9. Recharge or replace battery. 4. Loose or damaged wiring. 4. Loss of 10. speed. 2. Fill fuel tank. 2. Operation section. 3. Loose or damaged wiring. 8. Engine valves out of power 1. Loose or damaged wiring. 6. Check all wiring. 9. See "To Adjust Carburetor" in "CHOKE" position. 2. Engine valves out of adjustment. 9. Weak or dead battery. 4. Check all wiring. 4. Contact a qualified service center/department. Weak or dead battery. 2. Check all wiring. 7. Cutting too much grass...
User Manual
Page 27
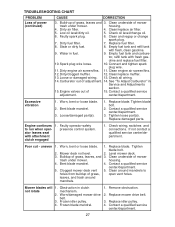
... Clogged mower deck vent 5. Remove obstruction. 2. Clean underside of grass, leaves, and 3. Check oil level/change spark plug. 7. Dirty fuel filter. 7. Worn, bent or loose blade. 2. Tighten loose part(s). presence control system. Poor cut - Mower deck not level. 2. Buildup of mower trash under mower. Worn/damaged mower drive belt. 3. housing. 4. Dirty engine air screen/fins. 11. Contact a qualified service adjustment. Tighten blade bolt. 2. Mower blades will 1. Replace mower drive belt. 3. Dirty air fi...
... Clogged mower deck vent 5. Remove obstruction. 2. Clean underside of grass, leaves, and 3. Check oil level/change spark plug. 7. Dirty fuel filter. 7. Worn, bent or loose blade. 2. Tighten loose part(s). presence control system. Poor cut - Mower deck not level. 2. Buildup of mower trash under mower. Worn/damaged mower drive belt. 3. housing. 4. Dirty engine air screen/fins. 11. Contact a qualified service adjustment. Tighten blade bolt. 2. Mower blades will 1. Replace mower drive belt. 3. Dirty air fi...
User Manual
Page 28
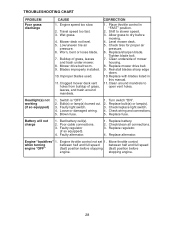
Mower drive belt worn. 9. CORRECTION 1. Level mower deck. 5. Replace/sharpen blade. Reinstall blades sharp edge down. 10. Clean around mandrels. Turn switch "ON". 2. Loose or damaged wiring. 4. Blown fuse. 5. Engine throttle control not set 1. Buildup of mower housing. 8. Shift to dry before engine. Check tires for proper air pressure. 6. Tighten blade bolt. 7. Clean underside of grass, leaves and trash under mower. 8. Check/replace light switch. 4. Poor cable connections. 3. Faulty alternator. 1. Engine "backfires" 1. Engine speed too slow. ...
Mower drive belt worn. 9. CORRECTION 1. Level mower deck. 5. Replace/sharpen blade. Reinstall blades sharp edge down. 10. Clean around mandrels. Turn switch "ON". 2. Loose or damaged wiring. 4. Blown fuse. 5. Engine throttle control not set 1. Buildup of mower housing. 8. Shift to dry before engine. Check tires for proper air pressure. 6. Tighten blade bolt. 7. Clean underside of grass, leaves and trash under mower. 8. Check/replace light switch. 4. Poor cable connections. 3. Faulty alternator. 1. Engine "backfires" 1. Engine speed too slow. ...


