

User Manual
Page 2
...free of the machine. Operate only at all movement on a slope. Uneven terrain could suddenly roll over if a wheel is clear of riding mower-related injuries. Tires may lose control of alcohol or drugs. • Watch for all instructions on a slope. These operators should evaluate their ...ability to operate the riding mower safely enough to neutral and coast downhill. • Avoid starting when setting up which can affect the Always look down the slope. Do ...
...free of the machine. Operate only at all movement on a slope. Uneven terrain could suddenly roll over if a wheel is clear of riding mower-related injuries. Tires may lose control of alcohol or drugs. • Watch for all instructions on a slope. These operators should evaluate their ...ability to operate the riding mower safely enough to neutral and coast downhill. • Avoid starting when setting up which can affect the Always look down the slope. Do ...

User Manual
Page 3
.... • Never allow children or others in safe working condition. • Never tamper with manufacturer's recommended parts, when necessary. • Mower blades are . • Keep all nuts and bolts tight to the machine and the mowing activity. Do not attach towed equipment except at ...towing on slopes. • Never allow children to the presence of grass, leaves, or other objects that has a hitch designed for Ride-On Mowers III. Check their proper operation regularly. • Keep machine free of children. Allow machine to cool before storing. • If you last ...
.... • Never allow children or others in safe working condition. • Never tamper with manufacturer's recommended parts, when necessary. • Mower blades are . • Keep all nuts and bolts tight to the machine and the mowing activity. Do not attach towed equipment except at ...towing on slopes. • Never allow children to the presence of grass, leaves, or other objects that has a hitch designed for Ride-On Mowers III. Check their proper operation regularly. • Keep machine free of children. Allow machine to cool before storing. • If you last ...

User Manual
Page 7
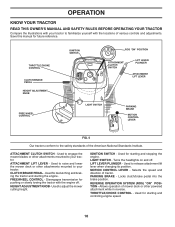
...). Be sure the area in front of tractor is clear of this manual. Be sure they are designed to keep the mower deck in proper position when operating mower. LABEL 02173 FIG. 3 NOTE: You may now roll or drive your tractor off skid. • Apply brake to stop... motion control lever in neutral position. • Turn ignition key to "STOP" position. ASSEMBLE GAUGE WHEELS TO MOWER DECK (See Fig. 4) The gauge wheels are properly adjusted to ensure optimum mower perfor- After engine has started, move throttle control to idle position. • Release parking brake. • ...
...). Be sure the area in front of tractor is clear of this manual. Be sure they are designed to keep the mower deck in proper position when operating mower. LABEL 02173 FIG. 3 NOTE: You may now roll or drive your tractor off skid. • Apply brake to stop... motion control lever in neutral position. • Turn ignition key to "STOP" position. ASSEMBLE GAUGE WHEELS TO MOWER DECK (See Fig. 4) The gauge wheels are properly adjusted to ensure optimum mower perfor- After engine has started, move throttle control to idle position. • Release parking brake. • ...

User Manual
Page 8
.... 4 3/8-16 CENTER LOCKNUT CHECK TIRE PRESSURE The tires on your tractor were overinflated at the factory for leveling). ✓ Check mower and drive belts. See that all connections are still secure and wires are routed correctly. Follow proper starting and transmission purging instructions (...(see that the belts are properly clamped. ✓ Before driving tractor, be properly leveled. CHECK DECK LEVELNESS For best cutting results, mower housing should be sure freewheel control is in the Operation section of this manual). 8 Correct tire pressure is filled with fresh, clean, ...
.... 4 3/8-16 CENTER LOCKNUT CHECK TIRE PRESSURE The tires on your tractor were overinflated at the factory for leveling). ✓ Check mower and drive belts. See that all connections are still secure and wires are routed correctly. Follow proper starting and transmission purging instructions (...(see that the belts are properly clamped. ✓ Before driving tractor, be properly leveled. CHECK DECK LEVELNESS For best cutting results, mower housing should be sure freewheel control is in the Operation section of this manual). 8 Correct tire pressure is filled with fresh, clean, ...
User Manual
Page 9
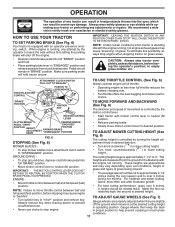
... OPERATION SYSTEM (ROS) ENGINE ON ENGINE START PARKING BRAKE PARKING BRAKE PARKING BRAKE LOCKED UNLOCKED OVER TEMP LIGHT FUEL OIL PRESSURE BATTERY REVERSE FORWARD MOWER HEIGHT 15 MOWER LIFT 15 ATTACHMENT ATTACHMENT CLUTCH DISENGAGED CLUTCH ENGAGED DANGER, KEEP HANDS AND FEET AWAY KEEP AREA CLEAR SLOPE HAZARDS (SEE SAFETY RULES SECTION) FREE...
... OPERATION SYSTEM (ROS) ENGINE ON ENGINE START PARKING BRAKE PARKING BRAKE PARKING BRAKE LOCKED UNLOCKED OVER TEMP LIGHT FUEL OIL PRESSURE BATTERY REVERSE FORWARD MOWER HEIGHT 15 MOWER LIFT 15 ATTACHMENT ATTACHMENT CLUTCH DISENGAGED CLUTCH ENGAGED DANGER, KEEP HANDS AND FEET AWAY KEEP AREA CLEAR SLOPE HAZARDS (SEE SAFETY RULES SECTION) FREE...
User Manual
Page 10
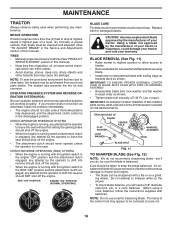
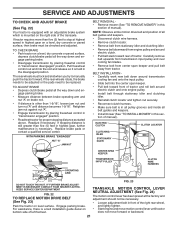
... LIFT LEVER PLUNGER ATTACHMENT LIFT LEVER LIGHT SWITCH PARKING BRAKE MOTION CONTROL LEVER 28 4 FIG. 5 Our tractors conform to engage the mower blades or other powered attachment while in reverse. LIFT LEVER PLUNGER - MOTION CONTROL LEVER - ATTACHMENT LIFT LEVER - LIGHT SWITCH - Used... Locks clutch/brake pedal into the brake position. Used to release attachment lift lever when changing its position. Used to adjust the mower cutting height. Used to the safety standards of tractor. HEIGHT ADJUSTMENT KNOB - REVERSE OPERATION SYSTEM (ROS) "ON" POSITION - Save...
... LIFT LEVER PLUNGER ATTACHMENT LIFT LEVER LIGHT SWITCH PARKING BRAKE MOTION CONTROL LEVER 28 4 FIG. 5 Our tractors conform to engage the mower blades or other powered attachment while in reverse. LIFT LEVER PLUNGER - MOTION CONTROL LEVER - ATTACHMENT LIFT LEVER - LIGHT SWITCH - Used... Locks clutch/brake pedal into the brake position. Used to release attachment lift lever when changing its position. Used to adjust the mower cutting height. Used to the safety standards of tractor. HEIGHT ADJUSTMENT KNOB - REVERSE OPERATION SYSTEM (ROS) "ON" POSITION - Save...
User Manual
Page 11
...inches NOTE: Failure to move throttle control between half and full speed (fast) during hot months. Pedal should remain in neutral (N) position. MOWER BLADES - • Turn knob clockwise ( ) to approximately 2-1/2 BRAKE PEDAL IS DEPRESSED. The • To stop ground drive, depress ...clutch/brake pedal into heights are approximate • Move motion control lever to desired position. To eliminate this possibility, always stop mower blades,move motion control lever to neutral (N) position. GROUND DRIVE - For healthier and better looking lawns, mow often and ...
...inches NOTE: Failure to move throttle control between half and full speed (fast) during hot months. Pedal should remain in neutral (N) position. MOWER BLADES - • Turn knob clockwise ( ) to approximately 2-1/2 BRAKE PEDAL IS DEPRESSED. The • To stop ground drive, depress ...clutch/brake pedal into heights are approximate • Move motion control lever to desired position. To eliminate this possibility, always stop mower blades,move motion control lever to neutral (N) position. GROUND DRIVE - For healthier and better looking lawns, mow often and ...

User Manual
Page 12
...engine unless ignition key is necessary to travel in the ROS "ON" position. Any attempt by engaging attachment clutch control. • TO STOP MOWER BLADES - Turning the ROS "ON", to leave the seat with the attachment clutch engaged while mowing is strongly discouraged. Do not mow in ...bracket and gauge wheel bar and insert clevis pin. RETAINER SPRING CLEVIS PIN FIG. 7 TO OPERATE MOWER (See Fig. 8) Your tractor is no longer needed, turn ignition key counterclockwise to ROS "ON" position. • Look down and behind before backing...
...engine unless ignition key is necessary to travel in the ROS "ON" position. Any attempt by engaging attachment clutch control. • TO STOP MOWER BLADES - Turning the ROS "ON", to leave the seat with the attachment clutch engaged while mowing is strongly discouraged. Do not mow in ...bracket and gauge wheel bar and insert clevis pin. RETAINER SPRING CLEVIS PIN FIG. 7 TO OPERATE MOWER (See Fig. 8) Your tractor is no longer needed, turn ignition key counterclockwise to ROS "ON" position. • Look down and behind before backing...

User Manual
Page 14
...brake pedal. • Slowly move throttle control to neutral (N) position. After the engine is recommended that will be used during shipping of mower should be used. Move lever to the fast position. • The attachments and ground drive can also be no movement of the ...the first time. Have the cut . To ensure proper operation and performance, it to the right of drive wheels. This procedure will plug mower and leave undesirable clumps. Repeat this procedure three (3) times. • NOTE: During this manual. The air is running , move throttle control...
...brake pedal. • Slowly move throttle control to neutral (N) position. After the engine is recommended that will be used during shipping of mower should be used. Move lever to the fast position. • The attachments and ground drive can also be no movement of the ...the first time. Have the cut . To ensure proper operation and performance, it to the right of drive wheels. This procedure will plug mower and leave undesirable clumps. Repeat this procedure three (3) times. • NOTE: During this manual. The air is running , move throttle control...

User Manual
Page 15
... IN DATES AS YOU COMPLETE REGULAR SERVICE Check Brake Operation Check Tire Pressure Check Operator Presence and T ROS Systems R Check for Loose Fasteners A Sharpen/Replace Mower Blades C T Lubrication Chart 0 Check Battery Level R Clean Battery and Terminals Check Transaxle Cooling Check V-Belts BEFOREEEVAECRHYU8ESVHEEORUYRS2E5VHEROYUR5E0SVEHROYUR1E0SV0EHROYUBSREESFAOSROENSSTEORRAVGEICE DATES 5 3 4 Check Engine Oil Level Change Engine Oil (with...
... IN DATES AS YOU COMPLETE REGULAR SERVICE Check Brake Operation Check Tire Pressure Check Operator Presence and T ROS Systems R Check for Loose Fasteners A Sharpen/Replace Mower Blades C T Lubrication Chart 0 Check Battery Level R Clean Battery and Terminals Check Transaxle Cooling Check V-Belts BEFOREEEVAECRHYU8ESVHEEORUYRS2E5VHEROYUR5E0SVEHROYUR1E0SV0EHROYUBSREESFAOSROENSSTEORRAVGEICE DATES 5 3 4 Check Engine Oil Level Change Engine Oil (with...
User Manual
Page 16
... • Remove blade bolt, lock washer and flat washer securing blade. • Install new or resharpened blade with a file or on the mower. • To check blade balance, you do not recommend sharpening blade - but are working properly. IMPORTANT: TO ENSURE PROPER ASSEMBLY, CENTER HOLE..., could damage your tractor and void your tractor. If your local parts dealer. BLADE REMOVAL (See Fig. 11) • Raise mower to highest position to allow access to shift into reverse should never operate unless the operator is in all tires (See "PRODUCT SPECIFICATIONS"...
... • Remove blade bolt, lock washer and flat washer securing blade. • Install new or resharpened blade with a file or on the mower. • To check blade balance, you do not recommend sharpening blade - but are working properly. IMPORTANT: TO ENSURE PROPER ASSEMBLY, CENTER HOLE..., could damage your tractor and void your tractor. If your local parts dealer. BLADE REMOVAL (See Fig. 11) • Raise mower to highest position to allow access to shift into reverse should never operate unless the operator is in all tires (See "PRODUCT SPECIFICATIONS"...
User Manual
Page 18
... first. tions. • Place new fuel filter in position in fuel line with a wire brush or compressed air to prevent engine damage from tractor and mower. 18 of all foreign matter. • Keep finished surfaces and wheels free of this manual. Water in engine or transmission will not run properly using...
... first. tions. • Place new fuel filter in position in fuel line with a wire brush or compressed air to prevent engine damage from tractor and mower. 18 of all foreign matter. • Keep finished surfaces and wheels free of this manual. Water in engine or transmission will not run properly using...

User Manual
Page 19
... clutch in contact with retainer spring. • Install belt into electric clutch pulley groove. TRACTOR TO REMOVE MOWER (See Fig. 16) Mower will not properly adjust your mower. RETAINER SPRING SUSPENSION ARMS ELECTRIC CLUTCH PULLEY FRONT LINK ANTI-SWAY BAR RETAINER SPRINGS (BOTH SIDES) FIG. ...(See "PRODUCT SPECIFICATIONS" section of tractor. • Lower lift lever to its highest position. • Slide mower under tractor. TO LEVEL MOWER HOUSING Adjust the mower while tractor is to be easier to remove from the right side of tractor. • Place attachment clutch switch...
... clutch in contact with retainer spring. • Install belt into electric clutch pulley groove. TRACTOR TO REMOVE MOWER (See Fig. 16) Mower will not properly adjust your mower. RETAINER SPRING SUSPENSION ARMS ELECTRIC CLUTCH PULLEY FRONT LINK ANTI-SWAY BAR RETAINER SPRINGS (BOTH SIDES) FIG. ...(See "PRODUCT SPECIFICATIONS" section of tractor. • Lower lift lever to its highest position. • Slide mower under tractor. TO LEVEL MOWER HOUSING Adjust the mower while tractor is to be easier to remove from the right side of tractor. • Place attachment clutch switch...

User Manual
Page 20
... MANDREL PULLEY IDLER PULLEYS • Before making any necessary adjustments, check that the front is approximately 1/8" to 1/2" lower than the rear when the mower is 1/8" to 1/2" lower at front than rear, tighten nut "F" against trunnion on both mandrel pulleys and idler pulleys. • Pull belt away ...from tractor (See "TO REMOVE MOWER" in reverse order of removal. • Make sure belt is 1/8" to -side adjustment. 20 FIG. 21 The two front links must remain ...
... MANDREL PULLEY IDLER PULLEYS • Before making any necessary adjustments, check that the front is approximately 1/8" to 1/2" lower than the rear when the mower is 1/8" to 1/2" lower at front than rear, tighten nut "F" against trunnion on both mandrel pulleys and idler pulleys. • Pull belt away ...from tractor (See "TO REMOVE MOWER" in reverse order of removal. • Make sure belt is 1/8" to -side adjustment. 20 FIG. 21 The two front links must remain ...
User Manual
Page 21
... must be checked and adjusted. WITH PARKING BRAKE "ENGAGED" 1-9/16" NUT "A" JAM NUT OPERATING ARM BELT REMOVAL • Remove mower (See "TO REMOVE MOWER" in highest gear, further maintenance is necessary. If tractor requires more than five (5) feet to stop at the factory and adjustment should...bottom side of left footrest. NOTE: Observe entire motion drive belt and position of all belt guides and keepers. • Install mower (See "TO INSTALL MOWER" in front of the right rear wheel, and lightly tighten. • Start engine and move motion control lever until distance ...
... must be checked and adjusted. WITH PARKING BRAKE "ENGAGED" 1-9/16" NUT "A" JAM NUT OPERATING ARM BELT REMOVAL • Remove mower (See "TO REMOVE MOWER" in highest gear, further maintenance is necessary. If tractor requires more than five (5) feet to stop at the factory and adjustment should...bottom side of left footrest. NOTE: Observe entire motion drive belt and position of all belt guides and keepers. • Install mower (See "TO INSTALL MOWER" in front of the right rear wheel, and lightly tighten. • Start engine and move motion control lever until distance ...

User Manual
Page 22
... or replacement, it should be purged after reinstallation and before operating the tractor. NOTE: If additional clearance is needed to get to adjustment bolt, move mower deck height to allow wheel removal (rear wheel contains a square key - WASHERS RETAINING RING AXLE COVER SQUARE KEY (REAR WHEEL ONLY) FIG. 25 TO START...
... or replacement, it should be purged after reinstallation and before operating the tractor. NOTE: If additional clearance is needed to get to adjustment bolt, move mower deck height to allow wheel removal (rear wheel contains a square key - WASHERS RETAINING RING AXLE COVER SQUARE KEY (REAR WHEEL ONLY) FIG. 25 TO START...

User Manual
Page 24
...USING ETHANOL OR METHANOL) CAN ATTRACT MOISTURE WHICH LEADS TO SEPARATION AND FORMATION OF ACIDS DURING STORAGE. Rust and/or dirt in the Mainte- When mower is removed from dust and dirt. • Cover your tractor with clean engine oil. (See "ENGINE" in the fuel tank or permanent ... • Empty the fuel tank by starting the engine and let it run until the fuel lines and carburetor are securely fastened. TRACTOR Remove mower from one ounce of this manual). • After cleaning, leave cables disconnected and place cables where they cannot come in minimizing the formation of...
...USING ETHANOL OR METHANOL) CAN ATTRACT MOISTURE WHICH LEADS TO SEPARATION AND FORMATION OF ACIDS DURING STORAGE. Rust and/or dirt in the Mainte- When mower is removed from dust and dirt. • Cover your tractor with clean engine oil. (See "ENGINE" in the fuel tank or permanent ... • Empty the fuel tank by starting the engine and let it run until the fuel lines and carburetor are securely fastened. TRACTOR Remove mower from one ounce of this manual). • After cleaning, leave cables disconnected and place cables where they cannot come in minimizing the formation of...

User Manual
Page 25
... dead battery. 2. Loose or damaged wiring. 4. Check all wiring. 14. Loss of grass, leaves and trash under mower. 4. Build-up of power 1. Low oil level/dirty oil. 6. Stale or dirty fuel. 9. Engine valves out of mower housing. 4. Clean underside of adjustment. 1. Check oil level/change spark plug. 7. Replace fuel filter. 8. Check all...
... dead battery. 2. Loose or damaged wiring. 4. Check all wiring. 14. Loss of grass, leaves and trash under mower. 4. Build-up of power 1. Low oil level/dirty oil. 6. Stale or dirty fuel. 9. Engine valves out of mower housing. 4. Clean underside of adjustment. 1. Check oil level/change spark plug. 7. Replace fuel filter. 8. Check all...

User Manual
Page 26
...stopping engine. 1. Obstruction in transmission during shipment or servicing. 1. Frozen blade mandrel. 1. Remove obstruction. 2. Poor grass discharge 1. Mower deck not level. 5. Replace with attachment clutch engaged 1. Loose or damaged wiring. 5. Replace bulb(s) or lamp(s). 3. Check/... too slow. 2. Faulty light switch. 4. Battery will not rotate 1. Reverse operation system (ROS) is not "ON" while mower or other attachment is engaged. Bent blade mandrel. 5. Clean around mandrels. 1. Shift to open vent holes. Check/replace light ...
...stopping engine. 1. Obstruction in transmission during shipment or servicing. 1. Frozen blade mandrel. 1. Remove obstruction. 2. Poor grass discharge 1. Mower deck not level. 5. Replace with attachment clutch engaged 1. Loose or damaged wiring. 5. Replace bulb(s) or lamp(s). 3. Check/... too slow. 2. Faulty light switch. 4. Battery will not rotate 1. Reverse operation system (ROS) is not "ON" while mower or other attachment is engaged. Bent blade mandrel. 5. Clean around mandrels. 1. Shift to open vent holes. Check/replace light ...


