
User Manual
Page 2
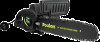
... insulated for added safety. 14 CHAIN CATCHER reduces the danger of kickback, due to intercept a whipping chain. Power Cord 5. Electric Motor 11. Trigger Start/ Stop Switch 7. Oil Tank Cap 15. front Handle 4. Sprocket Cover 14. GENERAL INFORMATION 14 15 12 10 1 17 16 1-1.GENERAL IDENTIFICATION 1. Chain Catcher 6. 1 - Spikes 17. Rear Handle 8. Bar Retaining Nuts 16. The trigger cannot be squeezed unless lock/off button is depressed. 6 TRIGGER START / STOP SWITCH stops saw chain breaks or derails during operation. Guide Bar 3. Saw Chain 2.
... insulated for added safety. 14 CHAIN CATCHER reduces the danger of kickback, due to intercept a whipping chain. Power Cord 5. Electric Motor 11. Trigger Start/ Stop Switch 7. Oil Tank Cap 15. front Handle 4. Sprocket Cover 14. GENERAL INFORMATION 14 15 12 10 1 17 16 1-1.GENERAL IDENTIFICATION 1. Chain Catcher 6. 1 - Spikes 17. Rear Handle 8. Bar Retaining Nuts 16. The trigger cannot be squeezed unless lock/off button is depressed. 6 TRIGGER START / STOP SWITCH stops saw chain breaks or derails during operation. Guide Bar 3. Saw Chain 2.

User Manual
Page 3
... expose the chain saw chain in a tree unless you are major chain saw operational dangers and the leading cause of the guide bar may PUSH the guide bar rapidly back toward the operator. PULL REACTIONS(Figure 2-1B) A = Pull B = Solid objects C = Push 3. KEEP THE WORK AREA CLEAN: Cluttered areas invite injuries.Do not start cutting until you can lead to persons, including the following: READ ALL INSTRUCTIONS 1. will...
... expose the chain saw chain in a tree unless you are major chain saw operational dangers and the leading cause of the guide bar may PUSH the guide bar rapidly back toward the operator. PULL REACTIONS(Figure 2-1B) A = Pull B = Solid objects C = Push 3. KEEP THE WORK AREA CLEAN: Cluttered areas invite injuries.Do not start cutting until you can lead to persons, including the following: READ ALL INSTRUCTIONS 1. will...

User Manual
Page 4
... head gear. 13. MAINTAIN YOUR CHAIN SAW: Inspect the chain saw for lubricating and changing accessories.Keep handles dry, clean and free from the saw chain when the motor is operating.Before you to lose control of your finger off the switch, and make sure the saw or extension cord. Follow instructions for cutting plastic, masonry, or non-building materials. 11. OUTDOOR EXTENSION CORDS: Use only extension cords that may cause you start the saw...
... head gear. 13. MAINTAIN YOUR CHAIN SAW: Inspect the chain saw for lubricating and changing accessories.Keep handles dry, clean and free from the saw chain when the motor is operating.Before you to lose control of your finger off the switch, and make sure the saw or extension cord. Follow instructions for cutting plastic, masonry, or non-building materials. 11. OUTDOOR EXTENSION CORDS: Use only extension cords that may cause you start the saw...

User Manual
Page 5
... CORDS. This electric powered saw on the motor or outside air vents. 26. there are no user serviceable parts inside. Failure to do not operate the saw is not made for achieving kickback protection. 20. F. H. DO NOT allow dirt, debris or sawdust to the electric switches. DO NOT FORCE a small saw having an anti-vibration feature. 35. Only use power cords that the saw chain stops moving when the trigger...
... CORDS. This electric powered saw on the motor or outside air vents. 26. there are no user serviceable parts inside. Failure to do not operate the saw is not made for achieving kickback protection. 20. F. H. DO NOT allow dirt, debris or sawdust to the electric switches. DO NOT FORCE a small saw having an anti-vibration feature. 35. Only use power cords that the saw chain stops moving when the trigger...

User Manual
Page 6
... end of rotation. 5. Using a straight screwdriver, turn the chain adjustment screw counterclockwise as far as it will require adjustment of the chain pointing in the guide guide bar. 6. Slide the sprocket support up and push the bar bolts through the sprocket support. 7. Contact of the guide bar tip with the cutting edges of the chain and filling the oil tank with your model PLN1514. 3-4.GUIDE BAR / SAW CHAIN REPLACEMENT INSTALLATION WARNING Whenever handling the saw be used for a variety of projects...
... end of rotation. 5. Using a straight screwdriver, turn the chain adjustment screw counterclockwise as far as it will require adjustment of the chain pointing in the guide guide bar. 6. Slide the sprocket support up and push the bar bolts through the sprocket support. 7. Contact of the guide bar tip with the cutting edges of the chain and filling the oil tank with your model PLN1514. 3-4.GUIDE BAR / SAW CHAIN REPLACEMENT INSTALLATION WARNING Whenever handling the saw be used for a variety of projects...

User Manual
Page 7
... position, securely tighten the bar retaining nuts (70 inch lbs.) 3.5B 0 3-5C 3-6.OILING CHAIN To oil chain, press oil cap.Oil will feed onto guide bar and chain.Press oil cap at least once before each cut.Always check oil level before starting, as well as during the break-in period, and the interval between future adjustments will result in your User's Kit to tighten the chain.Turning the screw COUNTER-CLOCKWISE LOOSENS THE CHAIN on the guide bar. 3. When using...
... position, securely tighten the bar retaining nuts (70 inch lbs.) 3.5B 0 3-5C 3-6.OILING CHAIN To oil chain, press oil cap.Oil will feed onto guide bar and chain.Press oil cap at least once before each cut.Always check oil level before starting, as well as during the break-in period, and the interval between future adjustments will result in your User's Kit to tighten the chain.Turning the screw COUNTER-CLOCKWISE LOOSENS THE CHAIN on the guide bar. 3. When using...

User Manual
Page 8
... the extension cord is of the proper size and type for Saw Chain Tension Adjustment instructions. TO STOP MOTOR The saw motor will feed onto guide bar and chain. CHAIN AND BAR LUBRICATION Always check oil level before connecting the ends together (Figure 4-4A). See Section 3-5 for your RIGHT THUMB, depress the LOCK/OFF button (C) on the LOCK/OFF button once the trigger is squeezed and the motor is running.The LOCK/OFF button...
... the extension cord is of the proper size and type for Saw Chain Tension Adjustment instructions. TO STOP MOTOR The saw motor will feed onto guide bar and chain. CHAIN AND BAR LUBRICATION Always check oil level before connecting the ends together (Figure 4-4A). See Section 3-5 for your RIGHT THUMB, depress the LOCK/OFF button (C) on the LOCK/OFF button once the trigger is squeezed and the motor is running.The LOCK/OFF button...

User Manual
Page 9
... appliance has no serviceable parts inside. Do not attempt to roll or slide downhill after it yourself.For service information, contact the Poulan Product Service Department toll-free number listed on sloping ground, the chain saw in a single cut (D). Do not cut down a tree if there is double insulated to help protect against injury resulting from the cutting area and position the cord so that...
... appliance has no serviceable parts inside. Do not attempt to roll or slide downhill after it yourself.For service information, contact the Poulan Product Service Department toll-free number listed on sloping ground, the chain saw in a single cut (D). Do not cut down a tree if there is double insulated to help protect against injury resulting from the cutting area and position the cord so that...

User Manual
Page 10
... tree.Do not remove supporting limbs (A) until after the log is lost. Log supported along retreat path (Figure 5-1A). 5-1D 5-2. WARNING Never walk in the middle, make sure the pertormance, the diameter of wood would be cut , stop engine, put chain saw . This will prevent the guide bar from pinching the bar and chain. enough to avoid cutting into the ground (Figure...
... tree.Do not remove supporting limbs (A) until after the log is lost. Log supported along retreat path (Figure 5-1A). 5-1D 5-2. WARNING Never walk in the middle, make sure the pertormance, the diameter of wood would be cut , stop engine, put chain saw . This will prevent the guide bar from pinching the bar and chain. enough to avoid cutting into the ground (Figure...

User Manual
Page 11
... prevented merely by using a soft wire small enough to rapid bar wear (see Section 3-4). 2. Incorrect filing and non-uniform cutter and depth gauge settings cause most guide bar problems, primarily resulting in making straight cuts. Turn guide bar frequently at bar pad should be cleaned if the saw has been heavily used or if the saw to keep the saw chain appears dirty.Rails should be done using supporting logs.Be sure...
... prevented merely by using a soft wire small enough to rapid bar wear (see Section 3-4). 2. Incorrect filing and non-uniform cutter and depth gauge settings cause most guide bar problems, primarily resulting in making straight cuts. Turn guide bar frequently at bar pad should be cleaned if the saw has been heavily used or if the saw to keep the saw chain appears dirty.Rails should be done using supporting logs.Be sure...

User Manual
Page 12
... (5) cuts.This is performed. 2. Keep the air intake clean and air vents free of the saw .No serviceable parts are provided. Inspect the saw chain in combination with the words, "DOUBLE INSULATION" or "DOUBLE INSULATED". Turn the bar over after as few as required. 5. By keeping the saw chain for dealing with kickback (see Safety Precautions), always use to avoid overheating the motor. 3. WARNING Never remove, modify...
... (5) cuts.This is performed. 2. Keep the air intake clean and air vents free of the saw .No serviceable parts are provided. Inspect the saw chain in combination with the words, "DOUBLE INSULATION" or "DOUBLE INSULATED". Turn the bar over after as few as required. 5. By keeping the saw chain for dealing with kickback (see Safety Precautions), always use to avoid overheating the motor. 3. WARNING Never remove, modify...

User Manual
Page 13
... 0B4 Giving the model number, serial number and date of purchase of your Poulan brand electric or cordless product should fail within one (1) year from the saw does not operate, turn switch to repair or replace under this product. If the saw . No serviceable parts are inside. 7-2. NO CLAIMS FOR CONSEQUENTIAL OR OTHER DAMAGES WILL BE ALLOWED, AND THERE ARE NO OTHER EXPRESS WARRANTIES EXCEPT THOSE...
... 0B4 Giving the model number, serial number and date of purchase of your Poulan brand electric or cordless product should fail within one (1) year from the saw does not operate, turn switch to repair or replace under this product. If the saw . No serviceable parts are inside. 7-2. NO CLAIMS FOR CONSEQUENTIAL OR OTHER DAMAGES WILL BE ALLOWED, AND THERE ARE NO OTHER EXPRESS WARRANTIES EXCEPT THOSE...
Parts List
Page 1
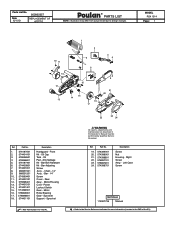
... 18. 574401101 Description Handguard - Bar Adjusting Screw Accy. - Motor/Housing Cord - Ref. Oil Pad - Motor Roller Bearing Gear - Sprocket = New Part Number For This IPL 23 22 24 WARNING All repairs, adjustments and maintenance not described in the Operator's Manual must be performed by Qualified Service Personnel. Bar - 14" Screw Cover - Parts List No. 952802357 Date 6/1/10 REPLACEMENT OF 4/27/10 R PARTS LIST NOTE : Illustration may differ from actual model due to the Service Reference Indicated for more...
... 18. 574401101 Description Handguard - Bar Adjusting Screw Accy. - Motor/Housing Cord - Ref. Oil Pad - Motor Roller Bearing Gear - Sprocket = New Part Number For This IPL 23 22 24 WARNING All repairs, adjustments and maintenance not described in the Operator's Manual must be performed by Qualified Service Personnel. Bar - 14" Screw Cover - Parts List No. 952802357 Date 6/1/10 REPLACEMENT OF 4/27/10 R PARTS LIST NOTE : Illustration may differ from actual model due to the Service Reference Indicated for more...


