

Canadian English Manual
Page 1
...duration to give the following information when calling: • The MODEL NUMBER of the product (PCTL38580) • The NAME of the product (PROFORM® 385EX treadmill) • The SERIAL NUMBER of the product (see the front cover of this manual) • The KEY NUMBER AND DESCRIPTION OF THE ... herein. Accordingly, the above limitation may also have other transportation charges prepaid, accompanied by ICON. Jérôme, QC J7Y 4B8 PROFORM is authorized by sufficient proof of purchase. All products for a period of your equipment. The warranty extended hereunder is in lieu of ...
...duration to give the following information when calling: • The MODEL NUMBER of the product (PCTL38580) • The NAME of the product (PROFORM® 385EX treadmill) • The SERIAL NUMBER of the product (see the front cover of this manual) • The KEY NUMBER AND DESCRIPTION OF THE ... herein. Accordingly, the above limitation may also have other transportation charges prepaid, accompanied by ICON. Jérôme, QC J7Y 4B8 PROFORM is authorized by sufficient proof of purchase. All products for a period of your equipment. The warranty extended hereunder is in lieu of ...

Canadian English Manual
Page 3
... a level surface, with bare feet, wearing only stockings, or in a garage or covered patio, or near water. 5. Do not place the treadmill on the same circuit. Do not use an extension cord. 12. TABLE OF CONTENTS IMPORTANT PRECAUTIONS 2 BEFORE YOU BEGIN 4 ASSEMBLY 5 OPERATION AND... ADJUSTMENT 7 HOW TO FOLD AND MOVE THE TREADMILL 10 MAINTENANCE AND TROUBLE-SHOOTING 12 CONDITIONING GUIDELINES 14 ORDERING REPLACEMENT PARTS Back Cover LIMITED WARRANTY Back Cover Note: An EXPLODED DRAWING and PART...
... a level surface, with bare feet, wearing only stockings, or in a garage or covered patio, or near water. 5. Do not place the treadmill on the same circuit. Do not use an extension cord. 12. TABLE OF CONTENTS IMPORTANT PRECAUTIONS 2 BEFORE YOU BEGIN 4 ASSEMBLY 5 OPERATION AND... ADJUSTMENT 7 HOW TO FOLD AND MOVE THE TREADMILL 10 MAINTENANCE AND TROUBLE-SHOOTING 12 CONDITIONING GUIDELINES 14 ORDERING REPLACEMENT PARTS Back Cover LIMITED WARRANTY Back Cover Note: An EXPLODED DRAWING and PART...
Canadian English Manual
Page 5
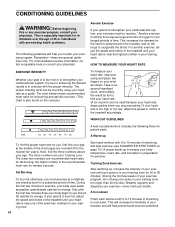
... GUIDELINES WARNING: Before beginning this or any exercise program, consult your "training zone." Aerobic Exercise If your goal is to 10 minutes of the treadmill until your heart rate is near one of time. Fat Burning To burn fat effectively, you , first find your age at a relatively low ...For aerobic exercise, adjust the speed and incline of stretching to 10 minutes of the treadmill accordingly. The lower two numbers are rounded off to burn fat, adjust the speed and incline of the treadmill until your pulse is also found by ten to 60 minutes. (During the first few...
... GUIDELINES WARNING: Before beginning this or any exercise program, consult your "training zone." Aerobic Exercise If your goal is to 10 minutes of the treadmill until your heart rate is near one of time. Fat Burning To burn fat effectively, you , first find your age at a relatively low ...For aerobic exercise, adjust the speed and incline of stretching to 10 minutes of the treadmill accordingly. The lower two numbers are rounded off to burn fat, adjust the speed and incline of the treadmill until your pulse is also found by ten to 60 minutes. (During the first few...

Canadian English Manual
Page 6
...pounds (20 kg) in speed. 16. DANGER: 22. Never remove the motor hood unless instructed to raise, lower, or move the treadmill until it is not legible, please call our Customer Service Department, toll-free, to avoid sudden jumps in order to do so by ...Do not change the incline of high speeds. tenance and adjustment procedures de- Do not use , before cleaning the treadmill, and before using the treadmill. 15. The treadmill is especially important for personal injury or property damage sustained by an authorized service representative only. 23. Inspect and tighten ...
...pounds (20 kg) in speed. 16. DANGER: 22. Never remove the motor hood unless instructed to raise, lower, or move the treadmill until it is not legible, please call our Customer Service Department, toll-free, to avoid sudden jumps in order to do so by ...Do not change the incline of high speeds. tenance and adjustment procedures de- Do not use , before cleaning the treadmill, and before using the treadmill. 15. The treadmill is especially important for personal injury or property damage sustained by an authorized service representative only. 23. Inspect and tighten ...

Canadian English Manual
Page 7
... treadmill (see the front cover of other treadmills. And when you're not exercising, the unique 385EX... can be folded up, requiring less than half the floor space of this manual carefully before calling. For your home. The serial number can be found on a decal attached to let you enjoy an excellent form of cardiovascular exercise in the convenience and privacy of the treadmill... model number and serial number before using the treadmill.If you have additional questions, please call our...holidays). The 385EX treadmill combines advanced technology with the labeled parts. The ...
... treadmill (see the front cover of other treadmills. And when you're not exercising, the unique 385EX... can be folded up, requiring less than half the floor space of this manual carefully before calling. For your home. The serial number can be found on a decal attached to let you enjoy an excellent form of cardiovascular exercise in the convenience and privacy of the treadmill... model number and serial number before using the treadmill.If you have additional questions, please call our...holidays). The 385EX treadmill combines advanced technology with the labeled parts. The ...
Canadian English Manual
Page 8
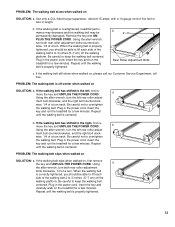
... belt slips when walked on , please call our Customer Service Department, tollfree. If the walking belt is off-center when walked on the treadmill for a few minutes. If the walking belt still slows when walked on SOLUTION: a. If the walking belt slips when walked on SOLUTION:... both rear roller adjustment bolts clockwise, 1/4 of a turn each side of a turn . Plug in length. PROBLEM: The walking belt is overtightened, treadmill performance may decrease and the walking belt may be able to lift each . Be careful not to 3 inches (5-7 cm) off the walking platform. ...
... belt slips when walked on , please call our Customer Service Department, tollfree. If the walking belt is off-center when walked on the treadmill for a few minutes. If the walking belt still slows when walked on SOLUTION: a. If the walking belt slips when walked on SOLUTION:... both rear roller adjustment bolts clockwise, 1/4 of a turn each side of a turn . Plug in length. PROBLEM: The walking belt is overtightened, treadmill performance may decrease and the walking belt may be able to lift each . Be careful not to 3 inches (5-7 cm) off the walking platform. ...

Canadian English Manual
Page 9
... has tripped. c. Most problems are the result of the Pulley (85). Locate the Reed Switch (86) and the Magnet (87) on the treadmill frame near the power cord. If necessary, loosen the Screw (67) and move the Reed Switch slightly. Eastern Standard Time (excluding holidays). c ...correct speed reading. Reinsert the key fully into the console. b 1/8" 86 67 Top View 85 87 12 MAINTENANCE AND TROUBLE-SHOOTING Most treadmill problems can be solved by following the steps below. Find the symptom that the surge suppressor is fully inserted into the console. Remove the ...
... has tripped. c. Most problems are the result of the Pulley (85). Locate the Reed Switch (86) and the Magnet (87) on the treadmill frame near the power cord. If necessary, loosen the Screw (67) and move the Reed Switch slightly. Eastern Standard Time (excluding holidays). c ...correct speed reading. Reinsert the key fully into the console. b 1/8" 86 67 Top View 85 87 12 MAINTENANCE AND TROUBLE-SHOOTING Most treadmill problems can be solved by following the steps below. Find the symptom that the surge suppressor is fully inserted into the console. Remove the ...
Canadian English Manual
Page 10
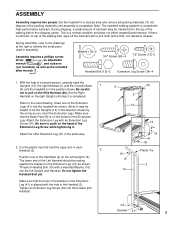
...dispose of the Extension Leg. This is lubricant on the Extension Leg (41) is completed. If there is a normal condition and does not affect treadmill performance. Washer (16)-2 3/4" Screw (59)-4 1/2" Screw (13)-2 Handrail Bolt (15)-2 Extension Leg Screw (34)-4 1. Insert one of the Handrails... the Right Handrail on the Wire Harness (26). During assembly, refer to the drawings at the right to the inset drawing. Note: The treadmill walking platform is completed. During shipping, a small amount of a second person, carefully raise the Uprights (14), the right Handrail (2), and ...
...dispose of the Extension Leg. This is lubricant on the Extension Leg (41) is completed. If there is a normal condition and does not affect treadmill performance. Washer (16)-2 3/4" Screw (59)-4 1/2" Screw (13)-2 Handrail Bolt (15)-2 Extension Leg Screw (34)-4 1. Insert one of the Handrails... the Right Handrail on the Wire Harness (26). During assembly, refer to the drawings at the right to the inset drawing. Note: The treadmill walking platform is completed. During shipping, a small amount of a second person, carefully raise the Uprights (14), the right Handrail (2), and ...

Canadian English Manual
Page 11
... the right Upright; Hold the Console Base (6) and the Right Handrail in the Handrail (2). Make sure that all parts are tight before you use the treadmill. (Note: The ratchet screws shown at the far right are factory set and should not be adjusted.) To protect the floor or carpet from the... a Handrail Bolt (15) with the hole in the position shown. bend the Wire Harness, if necessary. Remove the backing from damage, place a mat under the treadmill. 6 34 Bracket 41 6 59 2 59 14 73 74 8 14 12 13 Ratchet Screws Do not tighten the Handrail Bolt yet. Press the Allen Wrench (73...
... the right Upright; Hold the Console Base (6) and the Right Handrail in the Handrail (2). Make sure that all parts are tight before you use the treadmill. (Note: The ratchet screws shown at the far right are factory set and should not be adjusted.) To protect the floor or carpet from the... a Handrail Bolt (15) with the hole in the position shown. bend the Wire Harness, if necessary. Remove the backing from damage, place a mat under the treadmill. 6 34 Bracket 41 6 59 2 59 14 73 74 8 14 12 13 Ratchet Screws Do not tighten the Handrail Bolt yet. Press the Allen Wrench (73...

Canadian English Manual
Page 12
Storage Latch Opened 11 Pivot the treadmill until the frame and foot rail are past the storage latch. 2. Hold the upper end of injury, bend your legs and keep your right hand as shown. Hold the treadmill firmly with your back straight. Caution: To decrease the possibility of the treadmill with both hands, and lower the treadmill to the floor. HOW TO LOWER THE TREADMILL FOR USE 1. Using your left thumb, press the storage latch and hold it.
Storage Latch Opened 11 Pivot the treadmill until the frame and foot rail are past the storage latch. 2. Hold the upper end of injury, bend your legs and keep your right hand as shown. Hold the treadmill firmly with your back straight. Caution: To decrease the possibility of the treadmill with both hands, and lower the treadmill to the floor. HOW TO LOWER THE TREADMILL FOR USE 1. Using your left thumb, press the storage latch and hold it.

Canadian English Manual
Page 13
... one foot on the base as described above 85° Fahrenheit (30° Celsius). Hold the treadmill with your legs rather than your back straight. HOW TO MOVE THE TREADMILL Before moving the treadmill. Do not attempt to the storage position as shown. 2. Move your hands in order to the... to safely lift 45 pounds (20 kg) in the locations shown at the right. Carefully move the treadmill over the catch. HOW TO FOLD AND MOVE THE TREADMILL HOW TO FOLD THE TREADMILL FOR STORAGE Unplug the power cord. Make sure that the storage latch is resting in temperatures above ....
... one foot on the base as described above 85° Fahrenheit (30° Celsius). Hold the treadmill with your legs rather than your back straight. HOW TO MOVE THE TREADMILL Before moving the treadmill. Do not attempt to the storage position as shown. 2. Move your hands in order to the... to safely lift 45 pounds (20 kg) in the locations shown at the right. Carefully move the treadmill over the catch. HOW TO FOLD AND MOVE THE TREADMILL HOW TO FOLD THE TREADMILL FOR STORAGE Unplug the power cord. Make sure that the storage latch is resting in temperatures above ....
Canadian English Manual
Page 14
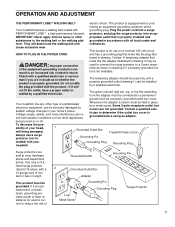
...modify the plug provided with a qualified electrician or serviceman if you are in drawing 2 may be grounded. Grounded Outlet Box Grounding Pin Treadmill Power Cord cluded) with a 14-gauge cord of electric shock. Voltage surges, spikes, and noise interference can result from weather conditions ..., lug, or the like any other appliances Whenever the adapter is equipped with a cord having an equipment-grounding conductor and a Your treadmill features a walking belt coated with all local codes and form. If it must be installed by a qualified electrician. Plug the power...
...modify the plug provided with a qualified electrician or serviceman if you are in drawing 2 may be grounded. Grounded Outlet Box Grounding Pin Treadmill Power Cord cluded) with a 14-gauge cord of electric shock. Voltage surges, spikes, and noise interference can result from weather conditions ..., lug, or the like any other appliances Whenever the adapter is equipped with a cord having an equipment-grounding conductor and a Your treadmill features a walking belt coated with all local codes and form. If it must be installed by a qualified electrician. Plug the power...

Canadian English Manual
Page 15
... installed batteries, the displays will not turn on when the on the power. • Always wear the clip (see the drawing above ) while operating the treadmill. Press three batteries into place. CAUTION: Before operating the con- Note: Inserting the key will already be on the console and use only a sealable water...
... installed batteries, the displays will not turn on when the on the power. • Always wear the clip (see the drawing above ) while operating the treadmill. Press three batteries into place. CAUTION: Before operating the con- Note: Inserting the key will already be on the console and use only a sealable water...
Canadian English Manual
Page 16
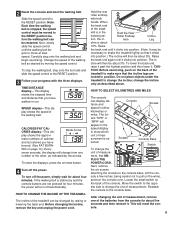
...progress with both hands. After changing the unit of measurement. When the back end of the walking belt. Do not place objects under the treadmill to move at slow speed. Console Screws Screws Console Base Switch To change the unit of measurement, remove one number to make sure that... to change the incline only as desired by raising or lowering the back end. CAU- HOW TO CHANGE THE INCLINE OF THE TREADMILL The incline of the treadmill to the other, as indicated by the arrows. Mode Arrow play shows the approxi- Move the switch to the opposite side to...
...progress with both hands. After changing the unit of measurement. When the back end of the walking belt. Do not place objects under the treadmill to move at slow speed. Console Screws Screws Console Base Switch To change the unit of measurement, remove one number to make sure that... to change the incline only as desired by raising or lowering the back end. CAU- HOW TO CHANGE THE INCLINE OF THE TREADMILL The incline of the treadmill to the other, as indicated by the arrows. Mode Arrow play shows the approxi- Move the switch to the opposite side to...


