Pyle PLTTB1 Support and Manuals
Get Help and Manuals for this Pyle item

Pyle PLTTB1 Videos

Pyle Belt Drive USB Turntable -- Review PLTTB1
Duration: 2:04
Total Views: 10,106
Duration: 2:04
Total Views: 10,106
Popular Pyle PLTTB1 Manual Pages
PLTTB1 Manual 1 - Page 1
0
se
PLTTB-1 STEREO TURNTABLE
ica CE0
es
INSTRUCTION MANUAL
PLTTB1 Manual 1 - Page 2
... allsafety, installation and operating instructions carefully. Keep the packaging in case of Contents:
Components and Connectors Installing the Turntable Platter Installing the Counterweight Setting the Stylus Pressure Setting the Antiskating Control Installing the Dust Cover Connecting the Turntable Operating the Turntable Changing the Cartridge Technical Specifications
2 3 4 4-6 7 7 8 8-10...
PLTTB1 Manual 1 - Page 3
PYLE PRO PLTTB-1 Stereo Turntable
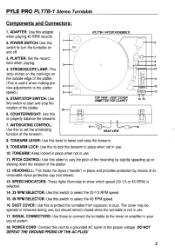
Components and Connectors:
1. PLATTER: Set the record here when playing.
4. STROBOSCOPE LAMP: This lamp shines on the markings on and off....
10. DO NOT DEFEAT THE GROUND PRONG OF THE AC PLUG!
2 HEADSHELL: This holds the stylus ("needle") in place and provides protection by slightly speeding up or slowing down the rotation of the proper voltage. SPEED...
PLTTB1 Manual 1 - Page 4
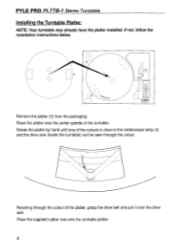
... is close to the stroboscope lamp (4) and the drive axle (inside the turntable) can be seen through the cutout of the platter, grasp the drive belt and pull it over the center spindle of the turntable. If not, follow the installation instructions below.
3
I
Remove the platter (3) from the packaging. Place the platter over the...
PLTTB1 Manual 1 - Page 5
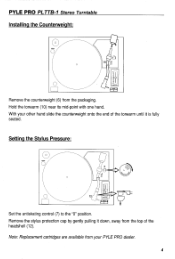
PYLE PRO PLTTB-1 Stereo Turntable Installing_ the Counterweight:
0
PrICKADJ SP ED
Remove the counterweight (6) from your other hand slide the counterweight onto the end of the headshell (12). Setting the Stylus Pressure:
7 0
0
12
Set the antiskating control (7) to the "0" position. Note: Replacement cartridges are available from the packaging. Remove the stylus protection cap by gently pulling...
PLTTB1 Manual 1 - Page 6
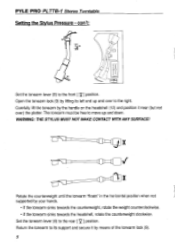
... its support and secure it near (but not over to the right. WARNING: THE STYLUS MUST NOT MAKE CONTACT WITH ANY SURFACE! Set the tonearm lever (8) to the front [ V ] position. Return the tonearm to move up and over ) the platter. Set the tonearm lever (8) to the rear [ Z7 ] position. PYLE PRO PLTTB-1 Stereo Turntable Setting the...
PLTTB1 Manual 1 - Page 7
... correspond to the pressure required by the stylus attached to the manufacturer's requirements.
6 For other stylus systems adjust the counterweight according to the tonearm. PYLE PRO PLTTB-1 Stereo Turntable Setting the Stylus Pressure - Rotate the counterweight and its surface). con't:
0 0
'
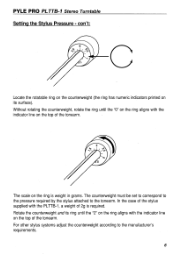
Locate the rotatable ring on the counterweight (the ring has numeric indicators printed...
PLTTB1 Manual 1 - Page 8

... the dust cover to match the setting of the counterweight (6). If not, follow the installation instructions below. The number on the back of the turntable base.
Attach the hinges to match the counterweight (in use. 7 PYLE PRO PLTTB-1 Stereo Turntable Setting the Antiskating Control:
CANN
a
a
The antiskating control (7) must be replaced when the turntable is the value of the...
PLTTB1 Manual 1 - Page 9
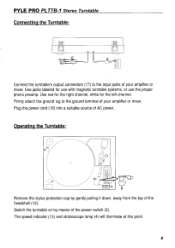
... amplifier or mixer. Firmly attach the ground lug to the input jacks of the headshell (12). PYLE PRO PLTTB-1 Stereo Turntable Connecting the Turntable:
17
RIGHTO4- Use red for the right channel, white for use with magnetic turntable systems, or use the proper phono preamp.
The speed indicator (13) and stroboscope lamp (4) will illuminate...
PLTTB1 Manual 1 - Page 10
... Turntable Operating the Turntable - Carefully lift the tonearm by the illuminated spot over to the right. Set the tonearm lever (8) to the front [ V ] position. When playing singles, use the adapter (1).
The speed is indicated by the handle on the headshell (12) and position it so the stylus is above the beginning of the record...
PLTTB1 Manual 1 - Page 11
... tonearm in its support by means of the start/stop switch (5) to the replacement cartridge terminals.
connect the lead wire to lift the stylus from the record when finished playing.
Replacing the Cartridge:
Most replacement cartridges come color coded -
Most cartridge terminals come with the cartridge.
10 PYLE PRO PLTTB-1 Stereo Turntable Operating the Turntable -
Use the...
PLTTB1 Manual 1 - Page 12
PYLE PRO PLTTB-1 Stereo Turntable
Technical Specifications:
Tonearm Effective Length Tonearm Overhang Tunrtable Platter Speeds Pitch Control Starting Time Braking Wow and Flutter Rumble Power Supply Dimensions (W x H x D) Weight
8.31" (211mm) 1.38" (35mm) Plastic, 11.81" (300mm) diameter, 8 oz. (200 g) 33-1/3 and 45 RPM ±8%
Pyle PLTTB1 Reviews
We have not received any reviews for Pyle yet.