
PLTTB1 Manual 1
Page 2
...Platter Installing the Counterweight Setting the Stylus Pressure Setting the Antiskating Control Installing the Dust Cover Connecting the Turntable Operating the Turntable Changing the Cartridge Technical Specifications 2 3 4 4-6 7 7 8 8-10 10 back cover NOTE: To minimize damage during transportation, this product is ...OR INJURY, PLEASE FOLLOW THESE PRECAUTIONARY GUIDELINES: CAUTION: TO REDUCE THE RISK OF ELECTRIC SHOCK, DO NOT OPEN CHASSIS; PYLE PRO PLTTB-1 Stereo Turntable Table of future need. INTERNE TEILE KONNEN NICHT VON BENUTZER GEVVARTET WERDEN. EXPLANATION OF GRAPHICAL SYMBOLS...
...Platter Installing the Counterweight Setting the Stylus Pressure Setting the Antiskating Control Installing the Dust Cover Connecting the Turntable Operating the Turntable Changing the Cartridge Technical Specifications 2 3 4 4-6 7 7 8 8-10 10 back cover NOTE: To minimize damage during transportation, this product is ...OR INJURY, PLEASE FOLLOW THESE PRECAUTIONARY GUIDELINES: CAUTION: TO REDUCE THE RISK OF ELECTRIC SHOCK, DO NOT OPEN CHASSIS; PYLE PRO PLTTB-1 Stereo Turntable Table of future need. INTERNE TEILE KONNEN NICHT VON BENUTZER GEVVARTET WERDEN. EXPLANATION OF GRAPHICAL SYMBOLS...
PLTTB1 Manual 1
Page 5
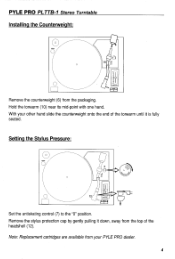
Setting the Stylus Pressure: 7 0 0 12 Set the antiskating control (7) to the "0" position. Remove the stylus protection cap by gently pulling it is fully seated. Note: Replacement cartridges are available from your other hand slide the counterweight onto the end of the headshell (12). PYLE PRO PLTTB-1 Stereo Turntable Installing_ the Counterweight: 0 PrICKADJ SP ED Remove the counterweight (6) from the top of the tonearm until it down, away from the packaging. Hold the tonearm (10) near its mid-point with one hand. With your PYLE PRO dealer. 4
Setting the Stylus Pressure: 7 0 0 12 Set the antiskating control (7) to the "0" position. Remove the stylus protection cap by gently pulling it is fully seated. Note: Replacement cartridges are available from your other hand slide the counterweight onto the end of the headshell (12). PYLE PRO PLTTB-1 Stereo Turntable Installing_ the Counterweight: 0 PrICKADJ SP ED Remove the counterweight (6) from the top of the tonearm until it down, away from the packaging. Hold the tonearm (10) near its mid-point with one hand. With your PYLE PRO dealer. 4
PLTTB1 Manual 1
Page 11
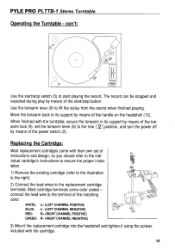
...LEFT CHANNEL POSITIVE) BLUE: L- (LEFT CHANNEL NEGATIVE) 0 RED: R+ (RIGHT CHANNEL POSITIVE) GREEN: R- (RIGHT CHANNEL NEGATIVE) 3) Mount the replacement cartridge into the headshell and tighten it using the screws included with the turntable, secure the tonearm in its support by means of the ton- The...connect the lead wire to its support by means of the handle on the headshell (12). Replacing the Cartridge: Most replacement cartridges come color coded - PYLE PRO PLTTB-1 Stereo Turntable Operating the Turntable - con't: c08 O 2 1 Use the start /stop switch (5) to ...
...LEFT CHANNEL POSITIVE) BLUE: L- (LEFT CHANNEL NEGATIVE) 0 RED: R+ (RIGHT CHANNEL POSITIVE) GREEN: R- (RIGHT CHANNEL NEGATIVE) 3) Mount the replacement cartridge into the headshell and tighten it using the screws included with the turntable, secure the tonearm in its support by means of the ton- The...connect the lead wire to its support by means of the handle on the headshell (12). Replacing the Cartridge: Most replacement cartridges come color coded - PYLE PRO PLTTB-1 Stereo Turntable Operating the Turntable - con't: c08 O 2 1 Use the start /stop switch (5) to ...


