
PLTTB1 Manual 1
Page 1
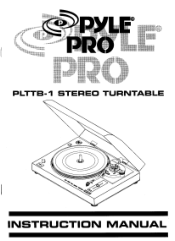
0 se PLTTB-1 STEREO TURNTABLE ica CE0 es INSTRUCTION MANUAL
0 se PLTTB-1 STEREO TURNTABLE ica CE0 es INSTRUCTION MANUAL
PLTTB1 Manual 1
Page 2
...FOLLOW THESE PRECAUTIONARY GUIDELINES: CAUTION: TO REDUCE THE RISK OF ELECTRIC SHOCK, DO NOT OPEN CHASSIS; PYLE PRO PLTTB-1 Stereo Turntable Table of future need. Readand follow allsafety, installation and operating instructions carefully. REFER SERVICING TO QUALIFIED ...the packaging in case of Contents: Components and Connectors Installing the Turntable Platter Installing the Counterweight Setting the Stylus Pressure Setting the Antiskating Control Installing the Dust Cover Connecting the Turntable Operating the Turntable Changing the Cartridge Technical Specifications 2 3 4 4-6 7 7...
...FOLLOW THESE PRECAUTIONARY GUIDELINES: CAUTION: TO REDUCE THE RISK OF ELECTRIC SHOCK, DO NOT OPEN CHASSIS; PYLE PRO PLTTB-1 Stereo Turntable Table of future need. Readand follow allsafety, installation and operating instructions carefully. REFER SERVICING TO QUALIFIED ...the packaging in case of Contents: Components and Connectors Installing the Turntable Platter Installing the Counterweight Setting the Stylus Pressure Setting the Antiskating Control Installing the Dust Cover Connecting the Turntable Operating the Turntable Changing the Cartridge Technical Specifications 2 3 4 4-6 7 7...
PLTTB1 Manual 1
Page 3
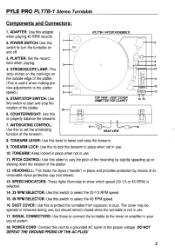
... platter. (This is useful when making precise adjustments to the mixer or amplifier in use . 11. SIGNAL CONNECTORS: Use these to connect the turntable to the platter speed.) 5. STROBOSCOPE LAMP: This lamp shines on the markings on and off. (PLTTB-1AFTER ASSEMBLY) O 3. ANTISKATING CONTROL: ...to select the 45 RPM speed. 16. POWER CORD: Connect this switch to a grounded AC outlet of the platter. 16- 6. PYLE PRO PLTTB-1 Stereo Turntable Components and Connectors: 1. START/STOP SWITCH: Use this cord to start and stop the rotation of the proper voltage. COUNTERWEIGHT: Use ...
... platter. (This is useful when making precise adjustments to the mixer or amplifier in use . 11. SIGNAL CONNECTORS: Use these to connect the turntable to the platter speed.) 5. STROBOSCOPE LAMP: This lamp shines on the markings on and off. (PLTTB-1AFTER ASSEMBLY) O 3. ANTISKATING CONTROL: ...to select the 45 RPM speed. 16. POWER CORD: Connect this switch to a grounded AC outlet of the platter. 16- 6. PYLE PRO PLTTB-1 Stereo Turntable Components and Connectors: 1. START/STOP SWITCH: Use this cord to start and stop the rotation of the proper voltage. COUNTERWEIGHT: Use ...
PLTTB1 Manual 1
Page 4
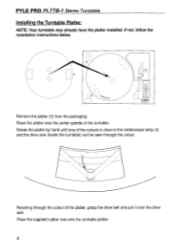
PYLE PRO PLTTB-1 Stereo Turntable Installing the Turntable Platter: NOTE: Your turntable may already have the platter installed. Place the platter over the center spindle of the platter, grasp the drive belt and pull it over the drive axle. Reaching through the cutout. Place the supplied rubber mat onto the turntable platter. 3 If not, follow the...
PYLE PRO PLTTB-1 Stereo Turntable Installing the Turntable Platter: NOTE: Your turntable may already have the platter installed. Place the platter over the center spindle of the platter, grasp the drive belt and pull it over the drive axle. Reaching through the cutout. Place the supplied rubber mat onto the turntable platter. 3 If not, follow the...
PLTTB1 Manual 1
Page 5
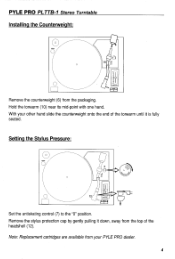
PYLE PRO PLTTB-1 Stereo Turntable Installing_ the Counterweight: 0 PrICKADJ SP ED Remove the counterweight (6) from the top of the headshell (12). Note: Replacement cartridges are available from your other hand slide the counterweight onto the end of the tonearm until it down, away from the packaging. Hold the tonearm (10) near its mid-point with one hand. Remove the stylus protection cap by gently pulling it is fully seated. Setting the Stylus Pressure: 7 0 0 12 Set the antiskating control (7) to the "0" position. With your PYLE PRO dealer. 4
PYLE PRO PLTTB-1 Stereo Turntable Installing_ the Counterweight: 0 PrICKADJ SP ED Remove the counterweight (6) from the top of the headshell (12). Note: Replacement cartridges are available from your other hand slide the counterweight onto the end of the tonearm until it down, away from the packaging. Hold the tonearm (10) near its mid-point with one hand. Remove the stylus protection cap by gently pulling it is fully seated. Setting the Stylus Pressure: 7 0 0 12 Set the antiskating control (7) to the "0" position. With your PYLE PRO dealer. 4
PLTTB1 Manual 1
Page 6
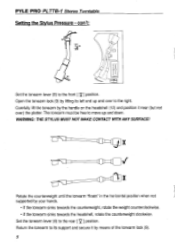
... MUST NOT MAKE CONTACT WITH ANY SURFACE! Set the tonearm lever (8) to the rear [ Z7 ] position. The tonearm must be free to the right. PYLE PRO PLTTB-1 Stereo Turntable Setting the Stylus Pressure - con't: O 12 PRCH ADJ. Open the tonearm lock (9) by the handle on the headshell (12) and position it by...
... MUST NOT MAKE CONTACT WITH ANY SURFACE! Set the tonearm lever (8) to the rear [ Z7 ] position. The tonearm must be free to the right. PYLE PRO PLTTB-1 Stereo Turntable Setting the Stylus Pressure - con't: O 12 PRCH ADJ. Open the tonearm lock (9) by the handle on the headshell (12) and position it by...
PLTTB1 Manual 1
Page 7
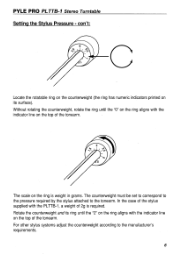
... of 2g is weight in grams. The counterweight must be set to correspond to the pressure required by the stylus attached to the manufacturer's requirements. 6 PYLE PRO PLTTB-1 Stereo Turntable Setting the Stylus Pressure -
... of 2g is weight in grams. The counterweight must be set to correspond to the pressure required by the stylus attached to the manufacturer's requirements. 6 PYLE PRO PLTTB-1 Stereo Turntable Setting the Stylus Pressure -

PLTTB1 Manual 1
Page 8
... dust cover hinges from above) is not in this case, "2"). PYLE PRO PLTTB-1 Stereo Turntable Setting the Antiskating Control: CANN a a The antiskating control (7) must be replaced when the turntable is the value of the control's setting. Installing the Dust Cover: NOTE: Your turntable may be remove for convenience (such as during disco-style usage...
... dust cover hinges from above) is not in this case, "2"). PYLE PRO PLTTB-1 Stereo Turntable Setting the Antiskating Control: CANN a a The antiskating control (7) must be replaced when the turntable is the value of the control's setting. Installing the Dust Cover: NOTE: Your turntable may be remove for convenience (such as during disco-style usage...
PLTTB1 Manual 1
Page 9
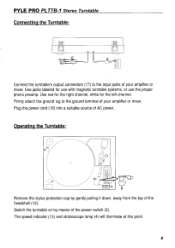
...into a suitable source of the headshell (12). PYLE PRO PLTTB-1 Stereo Turntable Connecting the Turntable: 17 RIGHTO4- Operating the Turntable: a 12 ° 113 Remove the stylus protection cap by means of the power switch (2). LEFT ®4GPM 04- 18 opo Connect the turntable's output connectors (17) to the ground terminal ...jacks labeled for the left channel. The speed indicator (13) and stroboscope lamp (4) will illuminate at this point. 8 Switch the turntable on by gently pulling it down, away from the top of AC power. Use red for the right channel, white for use with ...
...into a suitable source of the headshell (12). PYLE PRO PLTTB-1 Stereo Turntable Connecting the Turntable: 17 RIGHTO4- Operating the Turntable: a 12 ° 113 Remove the stylus protection cap by means of the power switch (2). LEFT ®4GPM 04- 18 opo Connect the turntable's output connectors (17) to the ground terminal ...jacks labeled for the left channel. The speed indicator (13) and stroboscope lamp (4) will illuminate at this point. 8 Switch the turntable on by gently pulling it down, away from the top of AC power. Use red for the right channel, white for use with ...
PLTTB1 Manual 1
Page 10
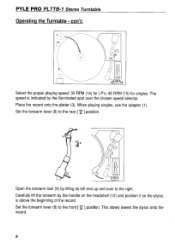
... 14110=15 Select the proper playing speed: 33 RPM (14) for LP's; 45 RPM (15) for singles. When playing singles, use the adapter (1). PYLE PRO PLTTB-1 Stereo Turntable Operating the Turntable - Set the tonearm lever (8) to the front [ V ] position. Set the tonearm lever (8) to the rear [ Q ] position. Place the record onto the platter...
... 14110=15 Select the proper playing speed: 33 RPM (14) for LP's; 45 RPM (15) for singles. When playing singles, use the adapter (1). PYLE PRO PLTTB-1 Stereo Turntable Operating the Turntable - Set the tonearm lever (8) to the front [ V ] position. Set the tonearm lever (8) to the rear [ Q ] position. Place the record onto the platter...
PLTTB1 Manual 1
Page 11
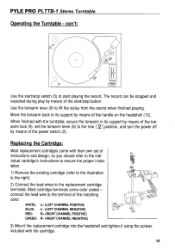
... NEGATIVE) 0 RED: R+ (RIGHT CHANNEL POSITIVE) GREEN: R- (RIGHT CHANNEL NEGATIVE) 3) Mount the replacement cartridge into the headshell and tighten it using the screws included with the turntable, secure the tonearm in its support by means of the handle on the headshell (12...
... NEGATIVE) 0 RED: R+ (RIGHT CHANNEL POSITIVE) GREEN: R- (RIGHT CHANNEL NEGATIVE) 3) Mount the replacement cartridge into the headshell and tighten it using the screws included with the turntable, secure the tonearm in its support by means of the handle on the headshell (12...
PLTTB1 Manual 1
Page 12
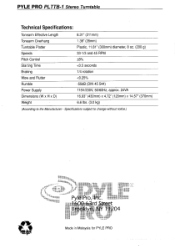
PYLE PRO PLTTB-1 Stereo Turntable Technical Specifications: Tonearm Effective Length Tonearm Overhang Tunrtable Platter Speeds Pitch Control Starting Time Braking Wow and Flutter Rumble Power Supply Dimensions (W x H x D) Weight 8.31" (211mm) 1.38" (35mm) Plastic, 11.81" (300mm) diameter, 8 oz. (200 g) 33-1/3 and 45 RPM ±8%
PYLE PRO PLTTB-1 Stereo Turntable Technical Specifications: Tonearm Effective Length Tonearm Overhang Tunrtable Platter Speeds Pitch Control Starting Time Braking Wow and Flutter Rumble Power Supply Dimensions (W x H x D) Weight 8.31" (211mm) 1.38" (35mm) Plastic, 11.81" (300mm) diameter, 8 oz. (200 g) 33-1/3 and 45 RPM ±8%


