
Owners Manual
Page 3
... carefully and follow them without fail. ■ WARNINGS IN THE MANUAL WARNING This mark indicates instructions which must be followed in the use of Saw Chain and Guide Bar .........23 11. Specifications 4 3. For safe operation 6 5. Installing guide bar and saw...
... carefully and follow them without fail. ■ WARNINGS IN THE MANUAL WARNING This mark indicates instructions which must be followed in the use of Saw Chain and Guide Bar .........23 11. Specifications 4 3. For safe operation 6 5. Installing guide bar and saw...
Owners Manual
Page 4
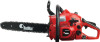
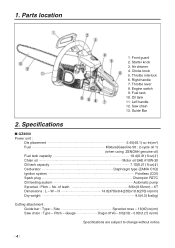
1. Throttle interlock 6. Fuel tank 10. Left handle 12. Specifications ■ GZ4000 Power unit : Dis placement 2.45(40.1) cu-in (cm) Saw chain : Type - Air cleaner 4. Throttle lever 8. Oil tank 11. Saw chain 13. No. Size Sprocket nose - 16(40) in (cm3) Fuel Mixture(Gasoline 50 : 2-cycle oil 1) (when ...using ZENOAH genuine oil) Fuel tank capacity 10.4(0.31) fl.oz( ) Chain oil Motor oil SAE #10W-30 Oil tank capacity 7.10(0.21) fl.oz( ) Carburetor Diaphragm type (ZAMA C1Q) lgnition system Pointless (CDI) Spark plug...
1. Throttle interlock 6. Fuel tank 10. Left handle 12. Specifications ■ GZ4000 Power unit : Dis placement 2.45(40.1) cu-in (cm) Saw chain : Type - Air cleaner 4. Throttle lever 8. Oil tank 11. Saw chain 13. No. Size Sprocket nose - 16(40) in (cm3) Fuel Mixture(Gasoline 50 : 2-cycle oil 1) (when ...using ZENOAH genuine oil) Fuel tank capacity 10.4(0.31) fl.oz( ) Chain oil Motor oil SAE #10W-30 Oil tank capacity 7.10(0.21) fl.oz( ) Carburetor Diaphragm type (ZAMA C1Q) lgnition system Pointless (CDI) Spark plug...

Owners Manual
Page 5
...mode when the engine is The Slow-speed adjustment screw. The screw under the "L" stamp is cool. Position: Left side of the chain cover IMPORTANT ENGINE INFORMATION THIS ENGINE MEETS U.S. Symbols on the machine WARNING For safe operation and maintenance, symbols are carved in relief on...référer au Manuel de l'utilisateur pour les spécifications d'entretien et les réglages. Manufacturé : MADE IN JAPAN Use RedMax 50:1 Oil ! 5 Position: Front of the rear handle (f). INFORMATION IMPORTANTE CONCERNANT LE MOTEUR Ce moteur est conformc aux normcs ...
...mode when the engine is The Slow-speed adjustment screw. The screw under the "L" stamp is cool. Position: Left side of the chain cover IMPORTANT ENGINE INFORMATION THIS ENGINE MEETS U.S. Symbols on the machine WARNING For safe operation and maintenance, symbols are carved in relief on...référer au Manuel de l'utilisateur pour les spécifications d'entretien et les réglages. Manufacturé : MADE IN JAPAN Use RedMax 50:1 Oil ! 5 Position: Front of the rear handle (f). INFORMATION IMPORTANTE CONCERNANT LE MOTEUR Ce moteur est conformc aux normcs ...
Owners Manual
Page 6
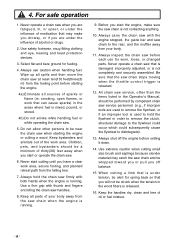
... tension in the wood fibers is not completely and securely assembled. Children, pets, and bystanders should be performed by competent chain saw chain is under tension, be near the chain saw firmly with both hands when the engine is running . Keep all sources of thirty(30) feet away when you...hold the flywheel in the areas where fuel is mixed, poured, or stored. 4b) Do not smoke while handling fuel or while operating the chain saw chain stops moving when the throttle control trigger is released. 12. Before you off the engine before each use caution when handling fuel. 4. Use ...
... tension in the wood fibers is not completely and securely assembled. Children, pets, and bystanders should be performed by competent chain saw chain is under tension, be near the chain saw firmly with both hands when the engine is running . Keep all sources of thirty(30) feet away when you...hold the flywheel in the areas where fuel is mixed, poured, or stored. 4b) Do not smoke while handling fuel or while operating the chain saw chain stops moving when the throttle control trigger is released. 12. Before you off the engine before each use caution when handling fuel. 4. Use ...

Owners Manual
Page 7
... which you are operating the saw . 19. Use a firm grip with a spark arrester built-in place. 20. KICKBACK SAFETY PRECAUTIONS FOR CHAIN SAW USERS WARNING ● Kickback may cause a lightning fast reverse reaction, kicking the guide bar up and back towards the operator. Sudden surprise... wood closes in the cut above shoulder height. (6) Follow manufacturers sharpening and maintenance instructions for saw is running. Pinching the saw chain along the top of the guide bar may cause you reduce kickback and maintain control of the guide bar contacts an object. Never...
... which you are operating the saw . 19. Use a firm grip with a spark arrester built-in place. 20. KICKBACK SAFETY PRECAUTIONS FOR CHAIN SAW USERS WARNING ● Kickback may cause a lightning fast reverse reaction, kicking the guide bar up and back towards the operator. Sudden surprise... wood closes in the cut above shoulder height. (6) Follow manufacturers sharpening and maintenance instructions for saw is running. Pinching the saw chain along the top of the guide bar may cause you reduce kickback and maintain control of the guide bar contacts an object. Never...
Owners Manual
Page 8
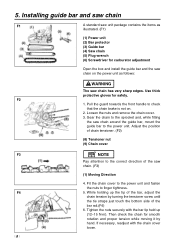
..., readjust with the bar tip held up the tip of the bar, adjust the chain tension by hand. Pull the guard towards the front handle to the power unit. Fit the chain cover to the power unit and fasten the nuts to the correct direction of the bar... rail.(F4) 6. Tighten the nuts securely with the chain cover loose. 8 Installing guide bar and saw chain F1 A standard saw chain on . 2. Loosen the nuts and remove the chain cover. 3. F2 1. Use thick protective gloves for carburetor adjustment Open the box and...
..., readjust with the bar tip held up the tip of the bar, adjust the chain tension by hand. Pull the guard towards the front handle to the power unit. Fit the chain cover to the power unit and fasten the nuts to the correct direction of the bar... rail.(F4) 6. Tighten the nuts securely with the chain cover loose. 8 Installing guide bar and saw chain F1 A standard saw chain on . 2. Loosen the nuts and remove the chain cover. 3. F2 1. Use thick protective gloves for carburetor adjustment Open the box and...
Owners Manual
Page 9
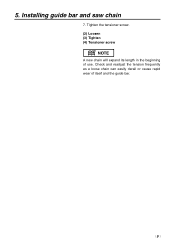
5. Installing guide bar and saw chain 7. Tighten the tensioner screw. (2) Loosen (3) Tighten (4) Tensioner screw NOTE A new chain will expand its length in the beginning of itseif and the guide bar. 9 Check and readjust the tension frequently as a loose chain can easily derail or cause rapid wear of use.
5. Installing guide bar and saw chain 7. Tighten the tensioner screw. (2) Loosen (3) Tighten (4) Tensioner screw NOTE A new chain will expand its length in the beginning of itseif and the guide bar. 9 Check and readjust the tension frequently as a loose chain can easily derail or cause rapid wear of use.

Owners Manual
Page 10
.... Measure out the quantities of gasoline and oil to stop the engine and allow it cool before starting the engine. • The RedMax engines are lubricated by the fundamental engine parameters and components(eq., carburation, ignition timing and port timing) without addition of any flame or... sparks near fuel. 6. Fuel and Chain oil WARNING • Gasoline is recommended to reduce the contamination of the air for air-cooled 2-cycle gasoline engine use a gasoline of a...
.... Measure out the quantities of gasoline and oil to stop the engine and allow it cool before starting the engine. • The RedMax engines are lubricated by the fundamental engine parameters and components(eq., carburation, ignition timing and port timing) without addition of any flame or... sparks near fuel. 6. Fuel and Chain oil WARNING • Gasoline is recommended to reduce the contamination of the air for air-cooled 2-cycle gasoline engine use a gasoline of a...

Owners Manual
Page 11
... easy identification. ■ FUELING THE UNIT 1. Fasten the fuel cap securely and wipe up with no functional influence are not covered by the warranty. ■ CHAIN OIL Use motor oil SAE 10W-30 all year round, or SAE 30-40 in summer and SAE 20 in the section Limited Warranty carefully... time, clean the fuel tank after rendering it only at an authorized repository site. Mixed fuels which have been left unused for fueling. 2. Fuel and Chain oil again for a long period of the composite fuel. 6.
... easy identification. ■ FUELING THE UNIT 1. Fasten the fuel cap securely and wipe up with no functional influence are not covered by the warranty. ■ CHAIN OIL Use motor oil SAE 10W-30 all year round, or SAE 30-40 in summer and SAE 20 in the section Limited Warranty carefully... time, clean the fuel tank after rendering it only at an authorized repository site. Mixed fuels which have been left unused for fueling. 2. Fuel and Chain oil again for a long period of the composite fuel. 6.

Owners Manual
Page 12
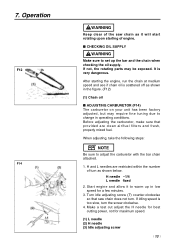
...the engine. 6. When engine has ignited first, puch in the starting engine, make sure that mounts broken parts or lacks any parts. Fill fuel and chain oil tanks respectively, and tighten the caps securely. (F7) 2. The saw with the throttle lever pulled slightly. Operation F7 F8 F9 F10 F11 &#... position (choke open and throttle lever in the choke knob to the first-stage position and pull the starter again to "I" position. (F8) (1) Chain oil (2) Fuel (3) Switch (4) Throttle lever (5) Throttle interlock 3. It's very dangerous. 5. Put the switch to start the engine while hanging the...
...the engine. 6. When engine has ignited first, puch in the starting engine, make sure that mounts broken parts or lacks any parts. Fill fuel and chain oil tanks respectively, and tighten the caps securely. (F7) 2. The saw with the throttle lever pulled slightly. Operation F7 F8 F9 F10 F11 &#... position (choke open and throttle lever in the choke knob to the first-stage position and pull the starter again to "I" position. (F8) (1) Chain oil (2) Fuel (3) Switch (4) Throttle lever (5) Throttle interlock 3. It's very dangerous. 5. Put the switch to start the engine while hanging the...
Owners Manual
Page 13
... OIL SUPPLY WARNING Make sure to warm up the bar and the chain when checking the oil supply. If idling speed is very dangerous. Operation F12 F14 WARNING Keep clear of the... saw chain does not turn as shown in low speed for maximum speed. (1) L needle (2) H needle (3) Idle...fuel. Start engine and allow it will start rotatIng upon starting the engine, run the chain at medium speed and see if chain oil is scattered off as shown below. If not, the rotating parts may require fine...
... OIL SUPPLY WARNING Make sure to warm up the bar and the chain when checking the oil supply. If idling speed is very dangerous. Operation F12 F14 WARNING Keep clear of the... saw chain does not turn as shown in low speed for maximum speed. (1) L needle (2) H needle (3) Idle...fuel. Start engine and allow it will start rotatIng upon starting the engine, run the chain at medium speed and see if chain oil is scattered off as shown below. If not, the rotating parts may require fine...
Owners Manual
Page 14
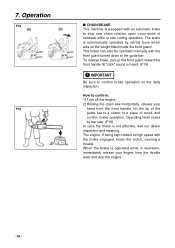
...at high speed with the front guard turned down to confirm brake operation on the weight fitted inside the front guard. Operation F15 F16 ■ CHAIN BRAKE This machine is heard. (F15) IMPORTANT Be sure to the guide bar. When the brake is not effective, ask our dealer inspection ..., immediately release your fingers from the front handle, hit the tip of the guide bar to confirm: 1) Turn off the engine. 2) Holding the chain saw horizontally, release your hand from the throttle lever and stop saw cutting operation. This brake can also be operated manually with the brake engaged...
...at high speed with the front guard turned down to confirm brake operation on the weight fitted inside the front guard. Operation F15 F16 ■ CHAIN BRAKE This machine is heard. (F15) IMPORTANT Be sure to the guide bar. When the brake is not effective, ask our dealer inspection ..., immediately release your fingers from the front handle, hit the tip of the guide bar to confirm: 1) Turn off the engine. 2) Holding the chain saw horizontally, release your hand from the throttle lever and stop saw cutting operation. This brake can also be operated manually with the brake engaged...
Owners Manual
Page 15
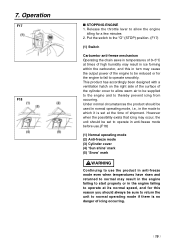
Put the switch to the "O" (STOP) position. (F17) (1) Switch Carburetor anti-freeze mechanism Operating the chain saws in temperatures of 0-5°C at times of icing occurring. 15 This product has accordingly been designed with a ventilation hatch on the right ...
Put the switch to the "O" (STOP) position. (F17) (1) Switch Carburetor anti-freeze mechanism Operating the chain saws in temperatures of 0-5°C at times of icing occurring. 15 This product has accordingly been designed with a ventilation hatch on the right ...

Owners Manual
Page 17
... fixed stands. Vibrations and kickback vary with different materials and the requirements of kickback if operating properly. Do not use and that the chain brake be checked for I -2 seconds and pushing the front hand guard forward. Apply only light pressure while running the saw at full... moving or splitting objects. Sawing F21 WARNING • Before proceeding to first practice sawing easy logs. that will stop immediately with a chain brake that are not specified by running the engine at full the throttle for proper operation before each usage by the manufacturer. •...
... fixed stands. Vibrations and kickback vary with different materials and the requirements of kickback if operating properly. Do not use and that the chain brake be checked for I -2 seconds and pushing the front hand guard forward. Apply only light pressure while running the saw at full... moving or splitting objects. Sawing F21 WARNING • Before proceeding to first practice sawing easy logs. that will stop immediately with a chain brake that are not specified by running the engine at full the throttle for proper operation before each usage by the manufacturer. •...

Owners Manual
Page 22
.... (F34) (1) Fuel filter (b) Disassemble the filter and wash with gasoline, or replace with new one . If the wearing is found obviously, replace it with the chain drive. Sprocket Check for cracks and for excessive wear interfenng with new one if needed. Never fit a new...
.... (F34) (1) Fuel filter (b) Disassemble the filter and wash with gasoline, or replace with new one . If the wearing is found obviously, replace it with the chain drive. Sprocket Check for cracks and for excessive wear interfenng with new one if needed. Never fit a new...
Owners Manual
Page 23
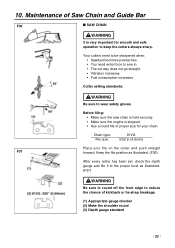
... way does not go straight. • Vibration increases. • Fuel consumption increases. Before filing: • Make sure the saw in (4.0mm) Place your chain. Keep the file position as illustrated. (F36) After every cutter has been set, check the depth gauge and file it to the proper level as...• Sawdust becomes powder-like. • You need extra force to saw chain is held securely. • Make sure the engine is stopped. • Use a round file of Saw Chain and Guide Bar F36 ■ SAW CHAIN WARNING It is very important for your file on the cutter and push straight...
... way does not go straight. • Vibration increases. • Fuel consumption increases. Before filing: • Make sure the saw in (4.0mm) Place your chain. Keep the file position as illustrated. (F36) After every cutter has been set, check the depth gauge and file it to the proper level as...• Sawdust becomes powder-like. • You need extra force to saw chain is held securely. • Make sure the engine is stopped. • Use a round file of Saw Chain and Guide Bar F36 ■ SAW CHAIN WARNING It is very important for your file on the cutter and push straight...
Owners Manual
Page 24
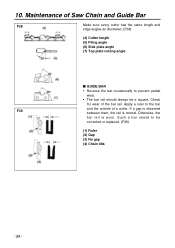
... is observed F39 between them, the rail is worn. Such a bar needs to be a square. Maintenance of the bar rail. Check for wear of Saw Chain and Guide Bar F38 Make sure every cutter has the same length and edge angles as illustrated. (F38) (4) Cutter length (5) Filing angle (6) Side plate angle... the outside of a cutter. Apply a ruler to prevent partial wear. • The bar rail should always be corrected or replaced. (F39) (1) Ruler (2) Gap (3) No gap (4) Chain tilts 24 10.
... is observed F39 between them, the rail is worn. Such a bar needs to be a square. Maintenance of the bar rail. Check for wear of Saw Chain and Guide Bar F38 Make sure every cutter has the same length and edge angles as illustrated. (F38) (4) Cutter length (5) Filing angle (6) Side plate angle... the outside of a cutter. Apply a ruler to prevent partial wear. • The bar rail should always be corrected or replaced. (F39) (1) Ruler (2) Gap (3) No gap (4) Chain tilts 24 10.

Owners Manual
Page 29
GZ4000 Fig.1 POWER UNIT (S/N 60322501 and up) Key# PART NUMBER DESCRIPTION 1 848-C50-1211 CYLINDER ASSY 2 848-C50-12C1 • TR COVER MAG 3 848-C50-12D1 &#...-21230 STAD 22 T2100-21310 GASKET 23 4820-21310 BOLT 24 T2100-21400 PIPE OUT COMP. - • PIPE - • PIN 27 848-C30-66F1 CATCHER, chain 28 2850-25220 SCREW 29 2850-25411 PLATE 30 2670-25430 SCREW 31 848-C30-6732 PIPE IN COMP. - • PIPE IN - • JOINT 34...
GZ4000 Fig.1 POWER UNIT (S/N 60322501 and up) Key# PART NUMBER DESCRIPTION 1 848-C50-1211 CYLINDER ASSY 2 848-C50-12C1 • TR COVER MAG 3 848-C50-12D1 &#...-21230 STAD 22 T2100-21310 GASKET 23 4820-21310 BOLT 24 T2100-21400 PIPE OUT COMP. - • PIPE - • PIN 27 848-C30-66F1 CATCHER, chain 28 2850-25220 SCREW 29 2850-25411 PLATE 30 2670-25430 SCREW 31 848-C30-6732 PIPE IN COMP. - • PIPE IN - • JOINT 34...
Owners Manual
Page 35
...WARRANTED PARTS STILL UNDER WARRANTY. IMPORTANT: YOU WILL RECEIVE A WARRANTY REGISTRATION CARD AT TIME OF PURCHASE.PLEASE FILL OUT THE CARD AND SEND IT TO RedMax / KOMATSU ZENOA AMERICA WITHIN SEVEN (7) DAYS.BE SURE TO KEEP A COPY FOR YOUR RECORDS. IF YOU NEED TO OBTAIN INFORMATION ABOUT THE NEAREST... SHALL BE WARRANTED FOR THE PERIOD OF TIME UP TO THE FIRST SCHEDULED REPLACEMNET POINT FOR THE PART. AT (770)-381-5147. RedMax CHAIN SAWS LIMITED WARRANTY EMISSION-RELATED PARTS, FOR TWO (2) YEARS FROM THE DATE OF ORIGINAL DELIVERY, KOMATSU ZENOAH AMERICA INC. (THE COMPANY), THROUGH ...
...WARRANTED PARTS STILL UNDER WARRANTY. IMPORTANT: YOU WILL RECEIVE A WARRANTY REGISTRATION CARD AT TIME OF PURCHASE.PLEASE FILL OUT THE CARD AND SEND IT TO RedMax / KOMATSU ZENOA AMERICA WITHIN SEVEN (7) DAYS.BE SURE TO KEEP A COPY FOR YOUR RECORDS. IF YOU NEED TO OBTAIN INFORMATION ABOUT THE NEAREST... SHALL BE WARRANTED FOR THE PERIOD OF TIME UP TO THE FIRST SCHEDULED REPLACEMNET POINT FOR THE PART. AT (770)-381-5147. RedMax CHAIN SAWS LIMITED WARRANTY EMISSION-RELATED PARTS, FOR TWO (2) YEARS FROM THE DATE OF ORIGINAL DELIVERY, KOMATSU ZENOAH AMERICA INC. (THE COMPANY), THROUGH ...

Parts List
Page 4
GZ4000 Fig.1 POWER UNIT (S/N 60322501 and up) Key# PART NUMBER DESCRIPTION 1 848-C50-1211 CYLINDER ASSY 2 848-C50-12C1 • TR COVER MAG 3 848-C50-12D1 &#...-21230 STAD 22 T2100-21310 GASKET 23 4820-21310 BOLT 24 T2100-21400 PIPE OUT COMP. - • PIPE - • PIN 27 848-C30-66F1 CATCHER, chain 28 2850-25220 SCREW 29 2850-25411 PLATE 30 2670-25430 SCREW 31 848-C30-6732 PIPE IN COMP. - • PIPE IN - • JOINT 34...
GZ4000 Fig.1 POWER UNIT (S/N 60322501 and up) Key# PART NUMBER DESCRIPTION 1 848-C50-1211 CYLINDER ASSY 2 848-C50-12C1 • TR COVER MAG 3 848-C50-12D1 &#...-21230 STAD 22 T2100-21310 GASKET 23 4820-21310 BOLT 24 T2100-21400 PIPE OUT COMP. - • PIPE - • PIN 27 848-C30-66F1 CATCHER, chain 28 2850-25220 SCREW 29 2850-25411 PLATE 30 2670-25430 SCREW 31 848-C30-6732 PIPE IN COMP. - • PIPE IN - • JOINT 34...
