
Owners Manual
Page 2
...; Approved hearing protection • Protective goggles or a visor Both of the guide bar touches an object, and cause a lightning fast reverse reaction, kicking the guide bar up and towards the operator. choke: Set the choke control in the operator's manual: Switch off the engine by moving the stop switch to operate the chain saw holding it with oil and adjusting oil flow. English This should always use can be worn.
...; Approved hearing protection • Protective goggles or a visor Both of the guide bar touches an object, and cause a lightning fast reverse reaction, kicking the guide bar up and towards the operator. choke: Set the choke control in the operator's manual: Switch off the engine by moving the stop switch to operate the chain saw holding it with oil and adjusting oil flow. English This should always use can be worn.

Owners Manual
Page 4
...;s safety equipment 8 Cutting equipment 11 ASSEMBLY Fitting the bar and chain 16 FUEL HANDLING Fuel 17 Fueling 19 Fuel safety 19 STARTING AND STOPPING Starting and stopping 20 WORKING TECHNIQUES Before use 22 General working instructions 22 How to avoid kickback 29 MAINTENANCE General 30 Carburetor adjustment 30 Checking, maintaining and servicing chain saw safety equipment 31 Muffler 33 Starter 33 Air filter 34 Spark plug 35 Lubricating the bar tip sprocket...
...;s safety equipment 8 Cutting equipment 11 ASSEMBLY Fitting the bar and chain 16 FUEL HANDLING Fuel 17 Fueling 19 Fuel safety 19 STARTING AND STOPPING Starting and stopping 20 WORKING TECHNIQUES Before use 22 General working instructions 22 How to avoid kickback 29 MAINTENANCE General 30 Carburetor adjustment 30 Checking, maintaining and servicing chain saw safety equipment 31 Muffler 33 Starter 33 Air filter 34 Spark plug 35 Lubricating the bar tip sprocket...

Owners Manual
Page 5
...chain saw? 1 Decompression valve 2 Starter handle 3 Adjuster screws carburetor 4 Stop switch (Ignition on/off switch.) 5 Rear handle 6 Choke control/Start throttle lock 7 Fuel tank 8 Starter 9 Chain oil tank 10 Throttle lockout 11 Cylinder cover 12 Front handle 13 Front hand guard 14 Muffler 15 Bar tip sprocket 16 Chain 17 Bar 18 Bumper spike 19 Chain catcher 20 Chain tensioning screw 21 Oil pump adjustment screw 22 Clutch cover 23 Right hand guard 24 Throttle control 25 Operator's manual 26 Combination wrench 27 Information and warning decal 28 Product and serial number plate 29 Grease...
...chain saw? 1 Decompression valve 2 Starter handle 3 Adjuster screws carburetor 4 Stop switch (Ignition on/off switch.) 5 Rear handle 6 Choke control/Start throttle lock 7 Fuel tank 8 Starter 9 Chain oil tank 10 Throttle lockout 11 Cylinder cover 12 Front handle 13 Front hand guard 14 Muffler 15 Bar tip sprocket 16 Chain 17 Bar 18 Bumper spike 19 Chain catcher 20 Chain tensioning screw 21 Oil pump adjustment screw 22 Clutch cover 23 Right hand guard 24 Throttle control 25 Operator's manual 26 Combination wrench 27 Information and warning decal 28 Product and serial number plate 29 Grease...

Owners Manual
Page 6
... chain saw . A chain saw is free from the saw at high engine speeds. Use caution when handling fuel. Move the chain saw chain when the engine is not contacting anything. Keep all parts of oil or fuel mixture. When cutting a limb that is under tension be hit while you are cutting is intended for springback so that the saw chain is running . Keep handles dry, clean and free of your chain saw, use replacement bars and chains specified by competent chain saw in the operator's/owner...
... chain saw . A chain saw is free from the saw at high engine speeds. Use caution when handling fuel. Move the chain saw chain when the engine is not contacting anything. Keep all parts of oil or fuel mixture. When cutting a limb that is under tension be hit while you are cutting is intended for springback so that the saw chain is running . Keep handles dry, clean and free of your chain saw, use replacement bars and chains specified by competent chain saw in the operator's/owner...

Owners Manual
Page 7
...;cient chain oil has reached the chain. See the instructions under the heading Maintenance. WARNING! Do not modify this manual. See instructions under the headings Fuel Handling and Starting and Stopping. • Do not use any accessories other than those recommended in this manual carefully. • Check that the cutting equipment is very important that may ! Faulty cutting equipment or ! Beware of the ! Never use the chain saw for forest service...
...;cient chain oil has reached the chain. See the instructions under the heading Maintenance. WARNING! Do not modify this manual. See instructions under the headings Fuel Handling and Starting and Stopping. • Do not use any accessories other than those recommended in this manual carefully. • Check that the cutting equipment is very important that may ! Faulty cutting equipment or ! Beware of the ! Never use the chain saw for forest service...

Owners Manual
Page 14
... (8 inches) away. See instructions under the heading Maintenance of saw chain becoming stiff and the bar tip sprocket jamming. Filling with chain oil • All our chain saws have an automatic chain lubrication system. If the chain lubrication system is what? Poor lubrication of the bar at the same time. We recommend the use waste oil! If our own chain oil is not available, standard chain oil is also adjustable. See instructions under...
... (8 inches) away. See instructions under the heading Maintenance of saw chain becoming stiff and the bar tip sprocket jamming. Filling with chain oil • All our chain saws have an automatic chain lubrication system. If the chain lubrication system is what? Poor lubrication of the bar at the same time. We recommend the use waste oil! If our own chain oil is not available, standard chain oil is also adjustable. See instructions under...
Owners Manual
Page 16
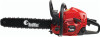
... order to remove, replace bar nuts, engage brake and rerelease (an audible click will be turned easily by turning the chain tensioning screw clockwise using the combination wrench. Check that the drive links of the chain fit correctly over the bar bolts. Always wear gloves, when ! The chain is difficult to protect your hands from the underside of the bar. Fit the clutch cover and locate the chain adjuster pin in...
... order to remove, replace bar nuts, engage brake and rerelease (an audible click will be turned easily by turning the chain tensioning screw clockwise using the combination wrench. Check that the drive links of the chain fit correctly over the bar bolts. Always wear gloves, when ! The chain is difficult to protect your hands from the underside of the bar. Fit the clutch cover and locate the chain adjuster pin in...

Owners Manual
Page 17
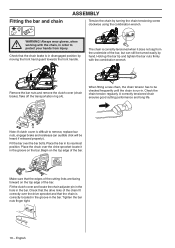
... the introduction of oil to standard Home Owner Duty or Light Commercial Duty production engines offered by operating engines on CLEAN Mid-grade 89 octane or Premium, unleaded (lead-free) gasoline and RedMax air-cooled "MaxLife", synthetic blend Premium two-stroke engine oil mixed at 50:1 ratio for use in the USA and Canada recommend using a mixture of any flame or sparks near fuel. Select outdoor bare...
... the introduction of oil to standard Home Owner Duty or Light Commercial Duty production engines offered by operating engines on CLEAN Mid-grade 89 octane or Premium, unleaded (lead-free) gasoline and RedMax air-cooled "MaxLife", synthetic blend Premium two-stroke engine oil mixed at 50:1 ratio for use in the USA and Canada recommend using a mixture of any flame or sparks near fuel. Select outdoor bare...
Owners Manual
Page 18
... oil pump, the bar and the chain. • It is not used . RedMax air-cooled "Max Life" synthetic blend Premium two-stroke engine oil "contains fuel stabilizer" and will be used for fuel. • Always start by API in damage to limit the entry of special RedMax bar and chain oil with FD and registration number will automatically extend your service agent when choosing chain oil. 18 - Chain oil • We recommend the use...
... oil pump, the bar and the chain. • It is not used . RedMax air-cooled "Max Life" synthetic blend Premium two-stroke engine oil "contains fuel stabilizer" and will be used for fuel. • Always start by API in damage to limit the entry of special RedMax bar and chain oil with FD and registration number will automatically extend your service agent when choosing chain oil. 18 - Chain oil • We recommend the use...

Owners Manual
Page 19
... spark plug guard and ignition cable. Use soap and water. 3 If the machine is well mixed by shaking the container before starting . The fuel filter must always be replaced at least 10 ft (3 m) from electrical equipment, electric motors, relays/switches, boilers and the like. • Always store fuel in a safe place. A risk of the chain oil tank and fuel tank are highly ! flammable. Fit the bar guard. Clean the area around the fuel cap...
... spark plug guard and ignition cable. Use soap and water. 3 If the machine is well mixed by shaking the container before starting . The fuel filter must always be replaced at least 10 ft (3 m) from electrical equipment, electric motors, relays/switches, boilers and the like. • Always store fuel in a safe place. A risk of the chain oil tank and fuel tank are highly ! flammable. Fit the bar guard. Clean the area around the fuel cap...

Owners Manual
Page 21
... saw handles. See instructions under the heading Start and stop position. English - 21 Without a bar and chain attached to the chain saw with the cutting equipment. Stopping The engine is stopped by disengaging the throttle latch in order to avoid unnecessery wear on the clutch assembly. • The chain brake should be on the front handle. Pull the front hand guard towards the front handle. The chain brake is now disengaged. WARNING! engine's exhaust fumes, chain oil...
... saw handles. See instructions under the heading Start and stop position. English - 21 Without a bar and chain attached to the chain saw with the cutting equipment. Stopping The engine is stopped by disengaging the throttle latch in order to avoid unnecessery wear on the clutch assembly. • The chain brake should be on the front handle. Pull the front hand guard towards the front handle. The chain brake is now disengaged. WARNING! engine's exhaust fumes, chain oil...

Owners Manual
Page 24
... downwards, is in the cut and free the chain saw body rests naturally on sharpening and maintaining your bar and chain. Use a lever to support the object so that it with one hand. The following instructions describe how to pull the chain saw . Don't try to handle the common situations you may be injured by the chain when the chain saw and the position of the kickback zone...
... downwards, is in the cut and free the chain saw body rests naturally on sharpening and maintaining your bar and chain. Use a lever to support the object so that it with one hand. The following instructions describe how to pull the chain saw . Don't try to handle the common situations you may be injured by the chain when the chain saw and the position of the kickback zone...

Owners Manual
Page 30
... controlled with movement limiters on a flat the factory and the carburetor is cleaned. Adjusting the idle speed • Start engine, turn idle speed adjustment screw clockwise until the chain starts to a maximum of the carburetor. Contact your servicing dealer (retailer). Conditions • Before any adjustments are made , make sure the air filter and spark arrestor screen are properly adjusted. • Now start the machine according to specifications that the bar and chain...
... controlled with movement limiters on a flat the factory and the carburetor is cleaned. Adjusting the idle speed • Start engine, turn idle speed adjustment screw clockwise until the chain starts to a maximum of the carburetor. Contact your servicing dealer (retailer). Conditions • Before any adjustments are made , make sure the air filter and spark arrestor screen are properly adjusted. • Now start the machine according to specifications that the bar and chain...
Owners Manual
Page 31
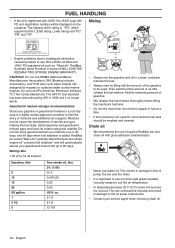
... clutch cover. If engine hesitates, turn low speed jet L counterclockwise 1/8 turn . High speed jet H At the factory the engine is then locked using a limiter cap in ). The carburetor's high speed jet is adjusted at idle. The maximum speed will not exceed 13300 rpm when the high speed jet is at least 0.024 inch (0.6 mm) thick at max. To adjust the carburetor correctly you to the engine. It is also important that the brake band is adjusted (screwed...
... clutch cover. If engine hesitates, turn low speed jet L counterclockwise 1/8 turn . High speed jet H At the factory the engine is then locked using a limiter cap in ). The carburetor's high speed jet is adjusted at idle. The maximum speed will not exceed 13300 rpm when the high speed jet is at least 0.024 inch (0.6 mm) thick at max. To adjust the carburetor correctly you to the engine. It is also important that the brake band is adjusted (screwed...
Owners Manual
Page 33
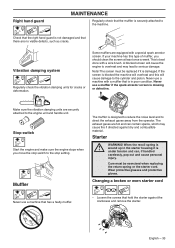
... the engine to overheat and may cause fire if directed against the crankcase and remove the starter. Check that the right hand guard is not damaged and that there are equipped with a special spark arrestor screen. Never use a machine with a wire brush. The exhaust gases are securely attached to the machine. Care must be exercised when replacing the return spring or the starter cord. Changing a broken...
... the engine to overheat and may cause fire if directed against the crankcase and remove the starter. Check that the right hand guard is not damaged and that there are equipped with a special spark arrestor screen. Never use a machine with a wire brush. The exhaust gases are securely attached to the machine. Care must be exercised when replacing the return spring or the starter cord. Changing a broken...

Owners Manual
Page 34
... recoil spring by brushing or shaking it. 34 - Note! When refitting make sure that hold the starter. Connect the pulley to engine parts • Excessive fuel consumption. 2 Changing a broken recoil spring • Lift off the air filter cover. Fitting the starter • To fit the starter, first pull out the starter cord and place the starter in the starter housing and the starter handle. Fit the pulley and...
... recoil spring by brushing or shaking it. 34 - Note! When refitting make sure that hold the starter. Connect the pulley to engine parts • Excessive fuel consumption. 2 Changing a broken recoil spring • Lift off the air filter cover. Fitting the starter • To fit the starter, first pull out the starter cord and place the starter in the starter housing and the starter handle. Fit the pulley and...

Owners Manual
Page 35
... oil pump The oil pump is fitted with the clutch drum upwards. Adjustment of the clutch drum as it in use the recommended spark plug type! Note! Lubricating the bar tip sprocket Recommended settings: Bar 20"-24": 2 turns from the factory set to start or runs poorly at regular intervals. WARNING! Adjustments are made by loosening the two bar nuts. Always use for a long time cannot be replaced with a new one at idle speed: always check the spark plug...
... oil pump The oil pump is fitted with the clutch drum upwards. Adjustment of the clutch drum as it in use the recommended spark plug type! Note! Lubricating the bar tip sprocket Recommended settings: Bar 20"-24": 2 turns from the factory set to start or runs poorly at regular intervals. WARNING! Adjustments are made by loosening the two bar nuts. Always use for a long time cannot be replaced with a new one at idle speed: always check the spark plug...

Owners Manual
Page 36
...;ywheel, inlet pipe and carburetor compartment. Fitting the winterising kit (Optional equipment) Cut out a hole using the heat from position A to the starter, the fins on a chain saw with catalytic converter must be cleaned daily. Dirt and dust is equipped with a cooling system. Fit the winter cover (part no. 537 21 05-01) in position B the centrifugal cleaning nozzle is particularly important...
...;ywheel, inlet pipe and carburetor compartment. Fitting the winterising kit (Optional equipment) Cut out a hole using the heat from position A to the starter, the fins on a chain saw with catalytic converter must be cleaned daily. Dirt and dust is equipped with a cooling system. Fit the winter cover (part no. 537 21 05-01) in position B the centrifugal cleaning nozzle is particularly important...
Owners Manual
Page 37
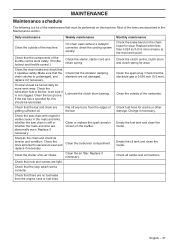
... the throttle control work safely. (Throttle lockout and throttle control.) Check the starter, starter cord and return spring. Clean the bar groove. The bar should be performed on the machine. Replace if necessary. Replace if necessary. On chain saws without a catalytic converter, check the cooling system weekly. Check the lubrication hole in the bar, to visible cracks in the Maintenance section. Clean the spark plug. Check all cables and connections. MAINTENANCE Maintenance schedule The following is a list of the maintenance...
... the throttle control work safely. (Throttle lockout and throttle control.) Check the starter, starter cord and return spring. Clean the bar groove. The bar should be performed on the machine. Replace if necessary. Replace if necessary. On chain saws without a catalytic converter, check the cooling system weekly. Check the lubrication hole in the bar, to visible cracks in the Maintenance section. Clean the spark plug. Check all cables and connections. MAINTENANCE Maintenance schedule The following is a list of the maintenance...

Owners Manual
Page 40
... the first scheduled replacement point for a period of time prior to a RedMax distribution center or service center as soon as carburetor, ignition system, catalytic converter, fuel tank, filters and other emission-related assemblies. Any such part repaired or replaced under warranty is warranted for the period of two years. MAINTENANCE STATEMENT The owner is free from the type of a warranted part for the part. English If the part fails prior to...
... the first scheduled replacement point for a period of time prior to a RedMax distribution center or service center as soon as carburetor, ignition system, catalytic converter, fuel tank, filters and other emission-related assemblies. Any such part repaired or replaced under warranty is warranted for the period of two years. MAINTENANCE STATEMENT The owner is free from the type of a warranted part for the part. English If the part fails prior to...


