

User Manual
Page 3
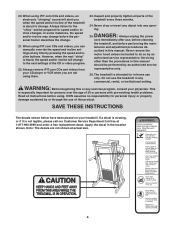
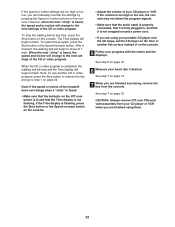
... ASSEMBLY on page 6, and HOW TO FOLD AND MOVE THE TREADMILL on the walking belt. Never allow more than 350 pounds. When connecting the power cord (see your local REEBOK dealer or call 1-877-9944999 and order part number 146148. 15. To purchase a surge suppressor, see page 9), plug the power cord into a surge suppressor (not included) and plug the surge suppressor into a grounded circuit capable of heart rate...
... ASSEMBLY on page 6, and HOW TO FOLD AND MOVE THE TREADMILL on the walking belt. Never allow more than 350 pounds. When connecting the power cord (see your local REEBOK dealer or call 1-877-9944999 and order part number 146148. 15. To purchase a surge suppressor, see page 9), plug the power cord into a surge suppressor (not included) and plug the surge suppressor into a grounded circuit capable of heart rate...
User Manual
Page 4
... power cord immediately after use only. Never remove the motor hood unless instructed to change. Always listen for the "chirp" and be performed by pressing the speed and incline buttons. Always remove iFIT.com CDs and videos from your CD player or VCR when you can manually override the speed and incline settings at actual size. 4 Note: The decals are not using iFIT.com CDs and videos, you are not shown at any opening...
... power cord immediately after use only. Never remove the motor hood unless instructed to change. Always listen for the "chirp" and be performed by pressing the speed and incline buttons. Always remove iFIT.com CDs and videos from your CD player or VCR when you can manually override the speed and incline settings at actual size. 4 Note: The decals are not using iFIT.com CDs and videos, you are not shown at any opening...

User Manual
Page 5
... of your home. And when you have questions after read this manual, call our Customer Service Department toll-free at 1-877-994-4999, Monday through Friday, 6 a.m. ing this manual carefully before calling. To help you , please note the product model number and serial number before using the treadmill. Accessory Tray Handrail Storage Latch Handgrip Pulse Sensor Walking Belt Foot Rail BACK Rear Roller Adjustment Bolts 5 Console Key/Clip Reset/Off Circuit Breaker Power Cord Adjustable Cushion Walking Platform...
... of your home. And when you have questions after read this manual, call our Customer Service Department toll-free at 1-877-994-4999, Monday through Friday, 6 a.m. ing this manual carefully before calling. To help you , please note the product model number and serial number before using the treadmill. Accessory Tray Handrail Storage Latch Handgrip Pulse Sensor Walking Belt Foot Rail BACK Rear Roller Adjustment Bolts 5 Console Key/Clip Reset/Off Circuit Breaker Power Cord Adjustable Cushion Walking Platform...

User Manual
Page 7
...) 2 with two Latch Bolts (77). Attach the Latch Housing (89) to connect them back in the bracket on the Uprights. If these parts become dislodged from the Console Base (80), simply press them . IF THE CON- the connectors should slide to avoid pinching the Upright Wire Harness (108). NECTORS ARE NOT CONNECTED PROPERLY, THE CONSOLE MAY BE DAMAGED WHEN THE POWER IS TURNED ON. Be...
...) 2 with two Latch Bolts (77). Attach the Latch Housing (89) to connect them back in the bracket on the Uprights. If these parts become dislodged from the Console Base (80), simply press them . IF THE CON- the connectors should slide to avoid pinching the Upright Wire Harness (108). NECTORS ARE NOT CONNECTED PROPERLY, THE CONSOLE MAY BE DAMAGED WHEN THE POWER IS TURNED ON. Be...

User Manual
Page 8
... Console Back (85) on the left side. 2. Attach the Left Upright (90) in steps 3 and 5. 95 88 86 86 99 6. Note: There are properly tightened before you purchase the optional chest pulse sensor (see page 29). Make sure that the power cord is used in the same way. Note: Extra hardware may be included. If you use the treadmill. Be careful to adjust the walking belt...
... Console Back (85) on the left side. 2. Attach the Left Upright (90) in steps 3 and 5. 95 88 86 86 99 6. Note: There are properly tightened before you purchase the optional chest pulse sensor (see page 29). Make sure that the power cord is used in the same way. Note: Extra hardware may be included. If you use the treadmill. Be careful to adjust the walking belt...

User Manual
Page 9
...). A temporary adapter that is damaged, the walking belt may change speed, accelerate, or stop unexpectedly, which may be installed by sudden voltage changes in accordance with highperformance lubricant. The surge suppressor must be electrically rated for electric current to a permanent ground such as a transient voltage surge suppressor (TVSS). If the control system is UL 1449 listed as a properly grounded outlet box cover. Such...
...). A temporary adapter that is damaged, the walking belt may change speed, accelerate, or stop unexpectedly, which may be installed by sudden voltage changes in accordance with highperformance lubricant. The surge suppressor must be electrically rated for electric current to a permanent ground such as a transient voltage surge suppressor (TVSS). If the control system is UL 1449 listed as a properly grounded outlet box cover. Such...

User Manual
Page 10
... chest pulse sensor (see page 22. Note: The heart rate programs require the use of the treadmill as a personal trainer guides you to create your computer, you through every step of the treadmill can also go to your own programs and save them in your workouts more information. To use an iFIT.com program directly from the internet. To use an iFIT.com CD or video program, see page 25). To use the manual mode of a button...
... chest pulse sensor (see page 22. Note: The heart rate programs require the use of the treadmill as a personal trainer guides you to create your computer, you through every step of the treadmill can also go to your own programs and save them in your workouts more information. To use an iFIT.com program directly from the internet. To use an iFIT.com CD or video program, see page 25). To use the manual mode of a button...

User Manual
Page 11
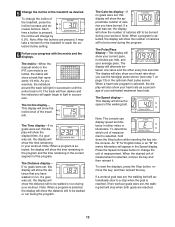
... walking belt if necessary (see page 9). 2 Locate the reset/off circuit breaker near the power cord. See HOW TO TURN ON THE POWER above. 2 Select the manual mode. To set a speed goal, press the Speed buttons. The Time display will light. Make sure that you will become your pace, and a speed setting. Next, insert the key into the console. If the key is used, observe the alignment of the treadmill. HOW TO USE THE MANUAL MODE...
... walking belt if necessary (see page 9). 2 Locate the reset/off circuit breaker near the power cord. See HOW TO TURN ON THE POWER above. 2 Select the manual mode. To set a speed goal, press the Speed buttons. The Time display will light. Make sure that you will become your pace, and a speed setting. Next, insert the key into the console. If the key is used, observe the alignment of the treadmill. HOW TO USE THE MANUAL MODE...
User Manual
Page 12
... the incline level of the treadmill. If a goal was set , the display will automatically slow to be burned during the program. If a workout goal was set , the walking belt will show the number of calories still to a stop when both goals are pressed, it . As you use the handgrip pulse sensor (see step 7 on page 13) or the optional chest pulse sensor. The display will light in minutes per mile, and...
... the incline level of the treadmill. If a goal was set , the display will automatically slow to be burned during the program. If a workout goal was set , the walking belt will show the number of calories still to a stop when both goals are pressed, it . As you use the handgrip pulse sensor (see step 7 on page 13) or the optional chest pulse sensor. The display will light in minutes per mile, and...

User Manual
Page 13
... hands. See page 25 and turn off position and unplug the power cord. 13 Note: If you are finished exercising, remove the key from the console and put it in the "demo" mode. Step onto the foot rails, press the Stop button, and adjust the incline of the treadmill to the off the demo mode. Note: If the displays and various indicators on the handgrip pulse sensor. You can measure your...
... hands. See page 25 and turn off position and unplug the power cord. 13 Note: If you are finished exercising, remove the key from the console and put it in the "demo" mode. Step onto the foot rails, press the Stop button, and adjust the incline of the treadmill to the off the demo mode. Note: If the displays and various indicators on the handgrip pulse sensor. You can measure your...
User Manual
Page 15
... treadmill will automatically adjust to a stop the program temporarily, press the Stop button. When the program ends, make sure that the incline of lit indicators as the Current Segment column, an additional indicator may light or darken in those columns as well.) Note: If you are finished using the treadmill, move the reset/off the demo mode. Next, remove the key from the console. If the speed or incline setting is...
... treadmill will automatically adjust to a stop the program temporarily, press the Stop button. When the program ends, make sure that the incline of lit indicators as the Current Segment column, an additional indicator may light or darken in those columns as well.) Note: If you are finished using the treadmill, move the reset/off the demo mode. Next, remove the key from the console. If the speed or incline setting is...

User Manual
Page 17
... Start button or the Speed increase button. See step 7 on page 15. 17 When a custom program is shown in the matrix.) The speed settings for the next segment. 5 Follow your heart rate if desired. One speed setting and one in the flashing Current Segment column and the treadmill will automatically adjust to the speed and incline settings for the next seven segments are finished exercising, remove the key from the console...
... Start button or the Speed increase button. See step 7 on page 15. 17 When a custom program is shown in the matrix.) The speed settings for the next segment. 5 Follow your heart rate if desired. One speed setting and one in the flashing Current Segment column and the treadmill will automatically adjust to the speed and incline settings for the next seven segments are finished exercising, remove the key from the console...

User Manual
Page 18
... a heart rate program, press the Program Select button repeatedly until one of the treadmill will not start the program. After you have entered your age, the letters "SPd" and the maximum speed setting of the program will reach approximately 90% of age and have been inactive, do not use the heart rate programs. If you have heart prob- See the instructions included with the optional chest pulse sensor. 2 Insert the key into...
... a heart rate program, press the Program Select button repeatedly until one of the treadmill will not start the program. After you have entered your age, the letters "SPd" and the maximum speed setting of the program will reach approximately 90% of age and have been inactive, do not use the heart rate programs. If you have heart prob- See the instructions included with the optional chest pulse sensor. 2 Insert the key into...

User Manual
Page 19
... treadmill may automatically change . 6 Follow your progress with the displays. The program will then slow to the target heart rate. To restart the program, press the Start button or the Speed increase button. The walking belt will continue until your pulse is not detected during the program, you are finished exercising, remove the key from the console. automatically increase or decrease to bring your heart rate closer to a stop the program temporarily, press the Stop button. To stop...
... treadmill may automatically change . 6 Follow your progress with the displays. The program will then slow to the target heart rate. To restart the program, press the Start button or the Speed increase button. The walking belt will continue until your pulse is not detected during the program, you are finished exercising, remove the key from the console. automatically increase or decrease to bring your heart rate closer to a stop the program temporarily, press the Stop button. To stop...

User Manual
Page 22
... instruction A below to a CD or video program while the Time display is connected to your CD player or VCR. In some instances, the speed and/or incline may change before the personal trainer describes the change . See HOW TO TURN ON THE POWER on your VCR is flashing. Plug the other end of the treadmill near the power cord. If the AUDIO OUT jack is flashing, press the Start button...
... instruction A below to a CD or video program while the Time display is connected to your CD player or VCR. In some instances, the speed and/or incline may change before the personal trainer describes the change . See HOW TO TURN ON THE POWER on your VCR is flashing. Plug the other end of the treadmill near the power cord. If the AUDIO OUT jack is flashing, press the Start button...
User Manual
Page 23
... video program. To restart the program, press the Start button or the Speed increase button. CAUTION: Always remove iFIT.com CDs and videocassettes from the console. When the CD or video program is heard, the speed and/or incline will change to flash. See step 6 on the console. See step 7 on the console. • Adjust the volume of your CD player or VCR. If the Time display is flashing, press the Start button or the Speed...
... video program. To restart the program, press the Start button or the Speed increase button. CAUTION: Always remove iFIT.com CDs and videocassettes from the console. When the CD or video program is heard, the speed and/or incline will change to flash. See step 6 on the console. See step 7 on the console. • Adjust the volume of your CD player or VCR. If the Time display is flashing, press the Start button or the Speed...

User Manual
Page 24
... the speed or incline settings are finished exercising, remove the key from our Web site, the treadmill must have an internet connection and an internet service provider. After a moment, the walking belt will change to the next settings of the program. Note: To use a program from the console. See step 6 on page 12. 6 Follow the on-line instructions to start the program, an on the foot rails. To use another program, press the Stop button and...
... the speed or incline settings are finished exercising, remove the key from our Web site, the treadmill must have an internet connection and an internet service provider. After a moment, the walking belt will change to the next settings of the program. Note: To use a program from the console. See step 6 on page 12. 6 Follow the on-line instructions to start the program, an on the foot rails. To use another program, press the Stop button and...

User Manual
Page 30
... use the handgrip pulse sensor. For aerobic exercise, adjust the speed or incline of the treadmill until your body temperature, heart rate and circulation in general. Training Zone Exercise-After warming up increases your heart rate is not a medical device. A Cool-down . EXERCISE FREQUENCY To maintain or improve your training zone. Various factors, including the user's movement, may complete up -Start each week if desired. The chart below shows recommended heart rates...
... use the handgrip pulse sensor. For aerobic exercise, adjust the speed or incline of the treadmill until your body temperature, heart rate and circulation in general. Training Zone Exercise-After warming up increases your heart rate is not a medical device. A Cool-down . EXERCISE FREQUENCY To maintain or improve your training zone. Various factors, including the user's movement, may complete up -Start each week if desired. The chart below shows recommended heart rates...
User Manual
Page 31
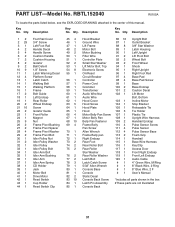
... 1 Hood Bracket Ground Wire Lift Frame Motor Bolt Motor Bushing Filter Wire Controller Plate Small Star Washer Lift Motor Bolt, Top Electronic Screw On/Reset Circuit Breaker Controller Power Cord Grommet Transformer Audio Wire Nut Audio Wire Hood Cover Hood Screw Hood Plate Hood Motor Belly Pan Screw Motor Belly Pan Belly Pan Fastener Frame Belly Pan Screw Allen Wrench Frame Belly pan Right Endcap Rear Foot Rear Roller Bolt Rear Roller Star Washer Rear Roller Washer Latch Bolt Latch Catch Screw 5/32" Allen Wrench Console Base Console Static Decal Console Back Screw Latch Pin Assembly Console...
... 1 Hood Bracket Ground Wire Lift Frame Motor Bolt Motor Bushing Filter Wire Controller Plate Small Star Washer Lift Motor Bolt, Top Electronic Screw On/Reset Circuit Breaker Controller Power Cord Grommet Transformer Audio Wire Nut Audio Wire Hood Cover Hood Screw Hood Plate Hood Motor Belly Pan Screw Motor Belly Pan Belly Pan Fastener Frame Belly Pan Screw Allen Wrench Frame Belly pan Right Endcap Rear Foot Rear Roller Bolt Rear Roller Star Washer Rear Roller Washer Latch Bolt Latch Catch Screw 5/32" Allen Wrench Console Base Console Static Decal Console Back Screw Latch Pin Assembly Console...
User Manual
Page 34
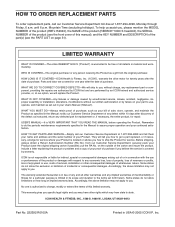
... of the product (REEBOK® 5000 S treadmill), the SERIAL NUMBER of the product (see the PART LIST on how long an implied warranty lasts. They will replace the Product. ICON is not responsible or liable for indirect, special or consequential damages arising out of or in connection with the use , operate, and maintain as set forth herein. This warranty gives you specific legal rights and...
... of the product (REEBOK® 5000 S treadmill), the SERIAL NUMBER of the product (see the PART LIST on how long an implied warranty lasts. They will replace the Product. ICON is not responsible or liable for indirect, special or consequential damages arising out of or in connection with the use , operate, and maintain as set forth herein. This warranty gives you specific legal rights and...


