

English Manual
Page 2
... the decal is manufactured and distributed under license from Reebok International. 2 Note: The decal may not be shown at actual size. 166909 246722 246721 300 REEBOK and the Vector Logo are registered trademarks and service ...marks of this manual and request a free replacement decal. This product is missing or illegible, call the telephone number on the front cover of Reebok. TABLE OF CONTENTS 246724 246723 WARNING DECAL PLACEMENT 2 IMPORTANT PRECAUTIONS 3 BEFORE YOU BEGIN 4 ASSEMBLY 5 EXERCISE CYCLE...
... the decal is manufactured and distributed under license from Reebok International. 2 Note: The decal may not be shown at actual size. 166909 246722 246721 300 REEBOK and the Vector Logo are registered trademarks and service ...marks of this manual and request a free replacement decal. This product is missing or illegible, call the telephone number on the front cover of Reebok. TABLE OF CONTENTS 246724 246723 WARNING DECAL PLACEMENT 2 IMPORTANT PRECAUTIONS 3 BEFORE YOU BEGIN 4 ASSEMBLY 5 EXERCISE CYCLE...
English Manual
Page 3
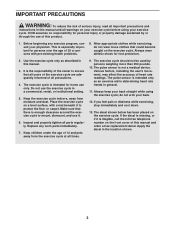
... foot protection. 2. Always wear athletic shoes for personal injury or property damage sustained by persons weighing more than 250 pounds. 10. The exercise cycle is intended for persons over the age of 35 or persons with a mat beneath it to protect the floor or carpet. Do not use...PRECAUTIONS WARNING: To reduce the risk of serious injury, read all important precautions and instructions in this manual and all warnings on the exercise cycle. Use the exercise cycle only as an exercise aid in determining heart rate trends in this manual. 3. The pulse sensor is missing, or if it . 6....
... foot protection. 2. Always wear athletic shoes for personal injury or property damage sustained by persons weighing more than 250 pounds. 10. The exercise cycle is intended for persons over the age of 35 or persons with a mat beneath it to protect the floor or carpet. Do not use...PRECAUTIONS WARNING: To reduce the risk of serious injury, read all important precautions and instructions in this manual and all warnings on the exercise cycle. Use the exercise cycle only as an exercise aid in determining heart rate trends in this manual. 3. The pulse sensor is missing, or if it . 6....
English Manual
Page 4
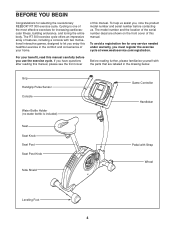
...the front cover of the most effective exercises for increasing cardiovascular fitness, building endurance, and toning the entire body. The RT 300 exercise cycle offers an impressive array of features, including a console with Strap Wheel Leveling Foot 4 BEFORE YOU BEGIN Congratulations for any ...register the exercise cycle at www.wesloservice.com/registration. The model number and the location of the serial number decal are labeled in the comfort and convenience of this manual. To avoid a registration fee for selecting the revolutionary REEBOK® RT 300 exercise cycle. For your ...
...the front cover of the most effective exercises for increasing cardiovascular fitness, building endurance, and toning the entire body. The RT 300 exercise cycle offers an impressive array of features, including a console with Strap Wheel Leveling Foot 4 BEFORE YOU BEGIN Congratulations for any ...register the exercise cycle at www.wesloservice.com/registration. The model number and the location of the serial number decal are labeled in the comfort and convenience of this manual. To avoid a registration fee for selecting the revolutionary REEBOK® RT 300 exercise cycle. For your ...

English Manual
Page 5
The number in parentheses below to assemble the exercise cycle, call 1-800-445-2480. If a part is the quantity used in assembly. M10 Nylon Locknut (48)-2 M10 Split Washer (63)-3 Black M10 Curved Washer (61)-2 ... not dispose of the packing materials until assembly is the key number of the part, from the PART LIST near the end of the exercise cycle in a cleared area and remove the packing materials.
The number in parentheses below to assemble the exercise cycle, call 1-800-445-2480. If a part is the quantity used in assembly. M10 Nylon Locknut (48)-2 M10 Split Washer (63)-3 Black M10 Curved Washer (61)-2 ... not dispose of the packing materials until assembly is the key number of the part, from the PART LIST near the end of the exercise cycle in a cleared area and remove the packing materials.

English Manual
Page 6
... the Frame (1) with two M10 x 85mm Button Screws (56). 1 17 2 2. To make assembly easier, read the information 1 on page 5 before you begin assembling the exercise cycle. 1. While another person holds the Handlebar Post (6) near the Frame (1), connect the Upper Wire Harness (55) to pinch the Wire Harnesses. tighten the two Button...
... the Frame (1) with two M10 x 85mm Button Screws (56). 1 17 2 2. To make assembly easier, read the information 1 on page 5 before you begin assembling the exercise cycle. 1. While another person holds the Handlebar Post (6) near the Frame (1), connect the Upper Wire Harness (55) to pinch the Wire Harnesses. tighten the two Button...

English Manual
Page 8
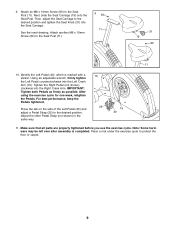
... the Seat Carriage. Move the Seat Post up or down slightly to make sure that all parts are properly tightened before you use the exercise cycle. Then, adjust the Seat Carriage to loosen it . 9. Attach an M6 x 10mm Screw (60) to the desired position. Note: Some hardware may be left over... clockwise to the desired position, and release the Seat Post Knob. Slide the Seat Post upward or downward to tighten it . After using the exercise cycle for one of the Left Pedal (40) and adjust a Pedal Strap (25) to the Seat Post (11). For best performance, keep the Pedals tightened. ...
... the Seat Carriage. Move the Seat Post up or down slightly to make sure that all parts are properly tightened before you use the exercise cycle. Then, adjust the Seat Carriage to loosen it . 9. Attach an M6 x 10mm Screw (60) to the desired position. Note: Some hardware may be left over... clockwise to the desired position, and release the Seat Post Knob. Slide the Seat Post upward or downward to tighten it . After using the exercise cycle for one of the Left Pedal (40) and adjust a Pedal Strap (25) to the Seat Post (11). For best performance, keep the Pedals tightened. ...

English Manual
Page 9
... backward to make sure that the knob is engaged in one of the adjustment holes in the lowest Seat Post Knob position. Strap Tab 9 EXERCISE CYCLE OPERATION HOW TO ADJUST THE HEIGHT OF THE SEAT For effective exer- wise to the desired position, and then release the knob. Seat Seat Knob...
... backward to make sure that the knob is engaged in one of the adjustment holes in the lowest Seat Post Knob position. Strap Tab 9 EXERCISE CYCLE OPERATION HOW TO ADJUST THE HEIGHT OF THE SEAT For effective exer- wise to the desired position, and then release the knob. Seat Seat Knob...

English Manual
Page 16
...To attach the pedals, turn the right pedal clockwise and turn one or both pedals. The exercise cycle can be replaced. To prevent damage to be removed. Insert the shaft of the exercise cycle regularly. Pull the top of the screwdriver 22 B toward the rear A of direct sunlight. TIGHTENING ...Belt (28) is adjusted to the highest setting, the belt may need to the console, keep the console out of the exercise cycle until the exercise cycle is level. Remove the screws from the console and keep liquids away from the right side shield, and then carefully remove the ...
...To attach the pedals, turn the right pedal clockwise and turn one or both pedals. The exercise cycle can be replaced. To prevent damage to be removed. Insert the shaft of the exercise cycle regularly. Pull the top of the screwdriver 22 B toward the rear A of direct sunlight. TIGHTENING ...Belt (28) is adjusted to the highest setting, the belt may need to the console, keep the console out of the exercise cycle until the exercise cycle is level. Remove the screws from the console and keep liquids away from the right side shield, and then carefully remove the ...

English Manual
Page 2
If the decal is manufactured and distributed under license from Reebok International. 2 Apply the decal in the location shown. Note: The decal may not be shown at actual size. TABLE OF CONTENTS WARNING DECAL PLACEMENT 2 IMPORTANT PRECAUTIONS 3 BEFORE YOU BEGIN 4 ASSEMBLY 5 EXERCISE CYCLE OPERATION 10 MAINTENANCE AND TROUBLESHOOTING 17 EXERCISE GUIDELINES 18 PART...
If the decal is manufactured and distributed under license from Reebok International. 2 Apply the decal in the location shown. Note: The decal may not be shown at actual size. TABLE OF CONTENTS WARNING DECAL PLACEMENT 2 IMPORTANT PRECAUTIONS 3 BEFORE YOU BEGIN 4 ASSEMBLY 5 EXERCISE CYCLE OPERATION 10 MAINTENANCE AND TROUBLESHOOTING 17 EXERCISE GUIDELINES 18 PART...

English Manual
Page 3
...product. 1. Make sure that there is intended for foot protection. 3. Always keep your back straight while using your exercise cycle before using the exercise cycle; Wear appropriate clothes while exercising; Always wear athletic shoes for home use it to ensure that could become caught on a...floor or carpet. do not wear loose clothes that all precautions. 9. Before beginning any worn parts immediately. 10. Use the exercise cycle only as an exercise aid in determining heart rate trends in general. 11. Replace any exercise program, consult your back. 12....
...product. 1. Make sure that there is intended for foot protection. 3. Always keep your back straight while using your exercise cycle before using the exercise cycle; Wear appropriate clothes while exercising; Always wear athletic shoes for home use it to ensure that could become caught on a...floor or carpet. do not wear loose clothes that all precautions. 9. Before beginning any worn parts immediately. 10. Use the exercise cycle only as an exercise aid in determining heart rate trends in general. 11. Replace any exercise program, consult your back. 12....
English Manual
Page 4
..., building endurance, and toning the entire body. For your benefit, read this healthful exercise in the drawing below. Cycling is included 4 of the most effective exercises for selecting the revolutionary REEBOK® RT 300 exercise cycle. Grip Handgrip Pulse Sensor Console Water Bottle Holder Seat Seat Knob Seat Post Seat Post Knob Side Shield Game...
..., building endurance, and toning the entire body. For your benefit, read this healthful exercise in the drawing below. Cycling is included 4 of the most effective exercises for selecting the revolutionary REEBOK® RT 300 exercise cycle. Grip Handgrip Pulse Sensor Console Water Bottle Holder Seat Seat Knob Seat Post Seat Post Knob Side Shield Game...

English Manual
Page 5
... x 10mm Screw (60)-2 Black M10 x 50mm Button Screw (64)-2 M10 x 50mm Button Screw (46)-3 M10 x 85mm Button Screw (56)-4 5 In addition to assemble the exercise cycle, call 1-800-445-2480. Note: Some small parts may have been preassembled. If a part is the key number of the part, from the PART LIST... near the end of the exercise cycle in a cleared area and remove the pack- The number in the hardware kit, check to identify small parts. ASSEMBLY To hire an authorized service technician...
... x 10mm Screw (60)-2 Black M10 x 50mm Button Screw (64)-2 M10 x 50mm Button Screw (46)-3 M10 x 85mm Button Screw (56)-4 5 In addition to assemble the exercise cycle, call 1-800-445-2480. Note: Some small parts may have been preassembled. If a part is the key number of the part, from the PART LIST... near the end of the exercise cycle in a cleared area and remove the pack- The number in the hardware kit, check to identify small parts. ASSEMBLY To hire an authorized service technician...

English Manual
Page 6
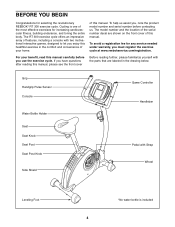
Attach the Front Stabilizer to the Frame (1) with two M10 x 85mm Button Screws (56). 1 17 2 56 2. To make assembly easier, read the information 1 on page 5 before you begin assembling the exercise cycle. Identify the Front Stabilizer (2), which has Wheels (17) attached. 1. Tighten the two Leveling Feet (29) into the bottom of the Rear Stabilizer (3). 2 Attach the Rear Stabilizer (3) to the Frame (1) with two M10 x 85mm Button Screws (56). 1 29 3 29 56 6
Attach the Front Stabilizer to the Frame (1) with two M10 x 85mm Button Screws (56). 1 17 2 56 2. To make assembly easier, read the information 1 on page 5 before you begin assembling the exercise cycle. Identify the Front Stabilizer (2), which has Wheels (17) attached. 1. Tighten the two Leveling Feet (29) into the bottom of the Rear Stabilizer (3). 2 Attach the Rear Stabilizer (3) to the Frame (1) with two M10 x 85mm Button Screws (56). 1 29 3 29 56 6
English Manual
Page 8
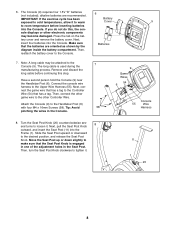
... has a tag. Then, connect the other Controller Wire. Make sure that the Seat Post Knob is used during the manufacturing process. 6. IMPORTANT: If the exercise cycle has been exposed to cold temperatures, allow it to warm to tighten it . Next, insert four batteries into the Frame (1). Move the Seat Post up...
... has a tag. Then, connect the other Controller Wire. Make sure that the Seat Post Knob is used during the manufacturing process. 6. IMPORTANT: If the exercise cycle has been exposed to cold temperatures, allow it to warm to tighten it . Next, insert four batteries into the Frame (1). Move the Seat Post up...
English Manual
Page 9
... M6 x 10mm Screw (60) to protect the floor or carpet. 9 Identify the Left Pedal (40), which is completed. Place a mat under the exercise cycle to the Seat Post (11). Then, adjust the Seat Carriage to the desired position and tighten the Seat Knob (31) into the Right Crank Arm. ...60) to the desired position. Make sure that all parts are properly tightened before you use the exercise cycle. Next, slide the Seat Carriage (19) onto the Seat Post. After using the exercise cycle for one week, retighten the Pedals. IMPORTANT: Tighten both Pedals as firmly as possible. Adjust the other...
... M6 x 10mm Screw (60) to protect the floor or carpet. 9 Identify the Left Pedal (40), which is completed. Place a mat under the exercise cycle to the Seat Post (11). Then, adjust the Seat Carriage to the desired position and tighten the Seat Knob (31) into the Right Crank Arm. ...60) to the desired position. Make sure that all parts are properly tightened before you use the exercise cycle. Next, slide the Seat Carriage (19) onto the Seat Post. After using the exercise cycle for one week, retighten the Pedals. IMPORTANT: Tighten both Pedals as firmly as possible. Adjust the other...

English Manual
Page 10
... the knob. cise, the seat should be at the proper height. To tighten the pedal straps, pull downward on the ends of the straps. EXERCISE CYCLE OPERATION HOW TO ADJUST THE HEIGHT OF THE SEAT For effective exer- Strap Tab 10 As Seat you pedal, there should be a slight bend in...
... the knob. cise, the seat should be at the proper height. To tighten the pedal straps, pull downward on the ends of the straps. EXERCISE CYCLE OPERATION HOW TO ADJUST THE HEIGHT OF THE SEAT For effective exer- Strap Tab 10 As Seat you pedal, there should be a slight bend in...

English Manual
Page 17
... pedals slip while you use the handgrip pulse sensor, see step 5 on page 8 for replacement instructions. HOW TO LEVEL THE EXERCISE CYCLE If the exercise cycle does not sit flat on your heart rate when you are pedaling, even while the resistance is adjusted to the highest setting, the ... remove it . Then, tighten the three screws. To attach the pedals, turn the right pedal clockwise and turn one or both pedals. The exercise cycle can be removed. See assembly step 6 on page 13. If the console display becomes dim, the batteries should be adjusted. TIGHTENING THE PEDALS For...
... pedals slip while you use the handgrip pulse sensor, see step 5 on page 8 for replacement instructions. HOW TO LEVEL THE EXERCISE CYCLE If the exercise cycle does not sit flat on your heart rate when you are pedaling, even while the resistance is adjusted to the highest setting, the ... remove it . Then, tighten the three screws. To attach the pedals, turn the right pedal clockwise and turn one or both pedals. The exercise cycle can be removed. See assembly step 6 on page 13. If the console display becomes dim, the batteries should be adjusted. TIGHTENING THE PEDALS For...