Operating Instructions
Page 7
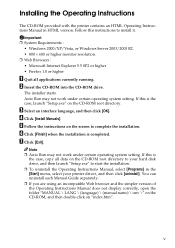
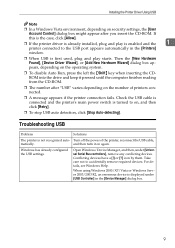
... using an incompatible Web browser and the simpler version of the Operating Instructions Manual does not display correctly, open the folder "MANUAL \ LANG \ (language) \ (manual name) \ unv \" on the CD-ROM, and then double-click on the CD-ROM root directory. D Click [Install Manuals]. F Click [Finish] when the installation is the case, copy all applications currently running. Auto Run may not work under certain operating system setting...
... using an incompatible Web browser and the simpler version of the Operating Instructions Manual does not display correctly, open the folder "MANUAL \ LANG \ (language) \ (manual name) \ unv \" on the CD-ROM, and then double-click on the CD-ROM root directory. D Click [Install Manuals]. F Click [Finish] when the installation is the case, copy all applications currently running. Auto Run may not work under certain operating system setting...

Operating Instructions
Page 62
... the Laser Scanning Unit on the control panel light up, or the message "No Toner. Open the indicated cover, and then replace the Toner Cartridge. Change the color mode setting to replace the print cartridge If the Alert indicator or any of the toner indicators on the underside of the upper cover (the white area in black and white or color until the black print cartridge is replaced. Replacing Consumables ❖ When to Black and White using black toner. The following toner has...
... the Laser Scanning Unit on the control panel light up, or the message "No Toner. Open the indicated cover, and then replace the Toner Cartridge. Change the color mode setting to replace the print cartridge If the Alert indicator or any of the toner indicators on the underside of the upper cover (the white area in black and white or color until the black print cartridge is replaced. Replacing Consumables ❖ When to Black and White using black toner. The following toner has...

Operating Instructions
Page 94
... clean the belt: A Open the top cover while the power is on the computer's display. C Close the top cover with both side paper guides to appear on again. Then, perform the print job again. A printed image is printing. • If lines appear on prints, turn the printer off, wait a few moments, and then turn it back on printed paper and other malfunctions. Paper is dirty. See Software Guide. Set the desired input tray using the control panel. Troubleshooting Status Images are using the Windows...
... clean the belt: A Open the top cover while the power is on the computer's display. C Close the top cover with both side paper guides to appear on again. Then, perform the print job again. A printed image is printing. • If lines appear on prints, turn the printer off, wait a few moments, and then turn it back on printed paper and other malfunctions. Paper is dirty. See Software Guide. Set the desired input tray using the control panel. Troubleshooting Status Images are using the Windows...
Operating Instructions
Page 6
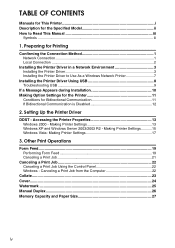
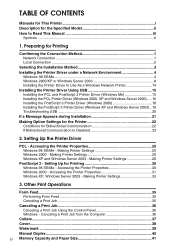
...25 Manual Duplex...26 Memory Capacity and Paper Size 27 iv Making Printer Settings 13 Windows XP and Windows Server 2003/2003 R2 - Accessing the Printer Properties 13 Windows 2000 - Other Print Operations Form Feed...19 Performing Form Feed 19 Canceling a Print Job 21 Canceling a Print Job 22 Canceling a Print Job Using the Control Panel 22 Windows - Preparing for Printing Confirming the Connection Method 1 Network Connection 1 Local Connection ...2 Installing the Printer Driver in a Network Environment 3 Installing the Printer Driver 3 Installing the Printer Driver to Use...
...25 Manual Duplex...26 Memory Capacity and Paper Size 27 iv Making Printer Settings 13 Windows XP and Windows Server 2003/2003 R2 - Accessing the Printer Properties 13 Windows 2000 - Other Print Operations Form Feed...19 Performing Form Feed 19 Canceling a Print Job 21 Canceling a Print Job 22 Canceling a Print Job Using the Control Panel 22 Windows - Preparing for Printing Confirming the Connection Method 1 Network Connection 1 Local Connection ...2 Installing the Printer Driver in a Network Environment 3 Installing the Printer Driver 3 Installing the Printer Driver to Use...

Operating Instructions
Page 14
... [Standard TCP/IP Port], and then click [New Port...]. G Click [Finish]. 6 Preparing for network printer fails, see p.6 "If the network printer search fails". To continue the installation, click [Yes]. 1 ❒ Auto Run might appear. If this printer. Reference For details about reconfiguring the printer's IP address, see Hardware Guide. For details about the network connection, see p.4 "Specifying the printer's IP address" ❖ Reconfigure the port settings A On the [Start] menu, open the [Printers] window...
... [Standard TCP/IP Port], and then click [New Port...]. G Click [Finish]. 6 Preparing for network printer fails, see p.6 "If the network printer search fails". To continue the installation, click [Yes]. 1 ❒ Auto Run might appear. If this printer. Reference For details about reconfiguring the printer's IP address, see Hardware Guide. For details about the network connection, see p.4 "Specifying the printer's IP address" ❖ Reconfigure the port settings A On the [Start] menu, open the [Printers] window...
Operating Instructions
Page 17
... displayed under [Universal Serial Bus controllers], remove any conflicting devices. Conflicting devices have a [!] or [?] icon by them. When using Windows 2000/XP/Vista or Windows Server 2003/2003 R2, an erroneous device is enabled and the 1 printer connected to the USB port appears automatically in the [Device Manager] dialog box. 9 Check the USB cable is connected and the printer's main power switch is not recognized auto- Windows has already configured the USB settings. Turn off the power of printers connected. ❒ A message appears if the printer connection...
... displayed under [Universal Serial Bus controllers], remove any conflicting devices. Conflicting devices have a [!] or [?] icon by them. When using Windows 2000/XP/Vista or Windows Server 2003/2003 R2, an erroneous device is enabled and the 1 printer connected to the USB port appears automatically in the [Device Manager] dialog box. 9 Check the USB cable is connected and the printer's main power switch is not recognized auto- Windows has already configured the USB settings. Turn off the power of printers connected. ❒ A message appears if the printer connection...

Operating Instructions
Page 37
...server settings. ❒ If the HTTP port is disabled, connection to update the printer information. ❒ We recommend using Web Image Monitor in the main area to the printer using the printer's URL cannot be remotely performed using a proxy server, change settings. ❖ Available operations The following operations can check the printer status and change the Web browser settings. Contact your network administrator for paper loaded into each input tray • Making input tray settings • Printing a test page • Making network protocol settings ❖ Configuring...
...server settings. ❒ If the HTTP port is disabled, connection to update the printer information. ❒ We recommend using Web Image Monitor in the main area to the printer using the printer's URL cannot be remotely performed using a proxy server, change settings. ❖ Available operations The following operations can check the printer status and change the Web browser settings. Contact your network administrator for paper loaded into each input tray • Making input tray settings • Printing a test page • Making network protocol settings ❖ Configuring...

Operating Instructions
Page 41
... cannot change them. ❖ Paper Displays the [Paper] page. On the [Network] page, following operations are possible: • Checking the information of the printer • Interface settings • Protocol settings • Resetting to configure the settings. Log on and made the settings, always click [Logout]. Log off . On the [Paper] page, following operations are possible: • Setting the paper size and type on the tray • Printing a test page ❖ Network Displays the [Network] page. trator" appears under [Login]. If you access Web Image...
... cannot change them. ❖ Paper Displays the [Paper] page. On the [Network] page, following operations are possible: • Checking the information of the printer • Interface settings • Protocol settings • Resetting to configure the settings. Log on and made the settings, always click [Logout]. Log off . On the [Paper] page, following operations are possible: • Setting the paper size and type on the tray • Printing a test page ❖ Network Displays the [Network] page. trator" appears under [Login]. If you access Web Image...

Operating Instructions
Page 44
...and supply information • Printing a list of printer configurations 4 • Specifying the printer's IP address • Making settings for paper loaded into each input tray • Making input tray settings • Changing the factory-set default settings • Making system, access code and language settings • Making network protocol settings • Making printer settings Reference The Smart Organizing Monitor functions you to check printer status. You can use Smart Organizing Monitor to make printer settings, such as an Administrators or Power Users...
...and supply information • Printing a list of printer configurations 4 • Specifying the printer's IP address • Making settings for paper loaded into each input tray • Making input tray settings • Changing the factory-set default settings • Making system, access code and language settings • Making network protocol settings • Making printer settings Reference The Smart Organizing Monitor functions you to check printer status. You can use Smart Organizing Monitor to make printer settings, such as an Administrators or Power Users...
Operating Instructions
Page 46
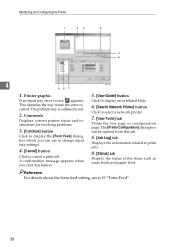
The problem tray is outlined in red. 2. A confirmation message appears when you can be opened from this button. 5. [User Guide] button Click to display error related Help. 6. [Search Network Printer] button Click to select a network printer. 7. [User Tools] tab Prints the test page or configuration page. The [Printer Configuration] dialog box can use to change input tray settings. 4. [Cancel] button Click to print jobs. 9. [Status] tab Display the status of the items such as toner levels and paper level. Comments Displays current printer status and instructions for resolving...
The problem tray is outlined in red. 2. A confirmation message appears when you can be opened from this button. 5. [User Guide] button Click to display error related Help. 6. [Search Network Printer] button Click to select a network printer. 7. [User Tools] tab Prints the test page or configuration page. The [Printer Configuration] dialog box can use to change input tray settings. 4. [Cancel] button Click to print jobs. 9. [Status] tab Display the status of the items such as toner levels and paper level. Comments Displays current printer status and instructions for resolving...

Operating Instructions
Page 69
...] folder. F Follow the instructions on the screen. C Double-click the [Mac OS X] folder. E Double-click the package file icon. Using Smart Organizing Monitor Using Smart Organizing Monitor This section explains about using Smart Organizing Monitor under Mac OS X. A Insert the CD-ROM into each input tray • Making input tray settings • Changing factory-set default settings • Making network protocol settings • Making printer settings • Displaying the printer status and supply information Installing Smart Organizing Monitor Follow...
...] folder. F Follow the instructions on the screen. C Double-click the [Mac OS X] folder. E Double-click the package file icon. Using Smart Organizing Monitor Using Smart Organizing Monitor This section explains about using Smart Organizing Monitor under Mac OS X. A Insert the CD-ROM into each input tray • Making input tray settings • Changing factory-set default settings • Making network protocol settings • Making printer settings • Displaying the printer status and supply information Installing Smart Organizing Monitor Follow...

Operating Instructions
Page 79
...-up lines such as ISDN, printing may not be deleted, we recommend making settings in [Delete unfinished print jobs at logout] of bitmap images or using the server in a server farm. We strongly recommend testing this function in your work. 8 • If the printer drivers are not properly copied, install them directly onto each time the client computer logs on to its defaults each server. 71 The settings for optional equipment...
...-up lines such as ISDN, printing may not be deleted, we recommend making settings in [Delete unfinished print jobs at logout] of bitmap images or using the server in a server farm. We strongly recommend testing this function in your work. 8 • If the printer drivers are not properly copied, install them directly onto each time the client computer logs on to its defaults each server. 71 The settings for optional equipment...

Administration Guide
Page 42
... an interface language, and then click [OK]. Follow this is the case, launch "Setup.exe" on the CD-ROM root directory to your printer driver, and then click [uninstall]. Auto Run may not work under certain operating system setting. Note ❒ Auto Run may not work under certain operating system setting. If this instructions to complete the installation. v Important ❒ System Requirements : • Windows...
... an interface language, and then click [OK]. Follow this is the case, launch "Setup.exe" on the CD-ROM root directory to your printer driver, and then click [uninstall]. Auto Run may not work under certain operating system setting. Note ❒ Auto Run may not work under certain operating system setting. If this instructions to complete the installation. v Important ❒ System Requirements : • Windows...

Administration Guide
Page 97
... printer driver. • If black toner runs out, you cannot print in the illustration below). 52 ASH106S Change the color mode setting to Black and White using black toner. Open the indicated cover, and then replace the Toner Cartridge. Important ❒ Do not allow paper clips, staples, or other small metallic objects to fall inside the machine. ❒ Do not expose the print cartridge without its cover to direct sunlight for a 5 long time...
... printer driver. • If black toner runs out, you cannot print in the illustration below). 52 ASH106S Change the color mode setting to Black and White using black toner. Open the indicated cover, and then replace the Toner Cartridge. Important ❒ Do not allow paper clips, staples, or other small metallic objects to fall inside the machine. ❒ Do not expose the print cartridge without its cover to direct sunlight for a 5 long time...

Administration Guide
Page 129
See p.34 "Loading Paper". B Remove all the print cartridges. C Close the top cover with both side paper guides to appear on printed paper and other malfunctions. The printer enters cleaning mode automatically. Horizontal lines appear on the computer's display. Paper is dirty. ASH102S Images are printed diagonally to the pages Adjust the front end paper guide and both hands carefully. Follow the procedure below to clean the belt: A Open the top cover while the power is on again...
See p.34 "Loading Paper". B Remove all the print cartridges. C Close the top cover with both side paper guides to appear on printed paper and other malfunctions. The printer enters cleaning mode automatically. Horizontal lines appear on the computer's display. Paper is dirty. ASH102S Images are printed diagonally to the pages Adjust the front end paper guide and both hands carefully. Follow the procedure below to clean the belt: A Open the top cover while the power is on again...
Administration Guide
Page 163
...3 Installing the Printer Driver under a Network Environment 4 Windows 98 SE/Me...4 Windows 2000/XP or Windows Server 2003 8 Installing the Printer Driver to Read This Manual iii Symbols ...iii 1. Setting Up the Printer Driver PCL - Making Printer Settings 26 Windows XP and Windows Server 2003 - Canceling a Print Job from the Computer 36 Collate ...37 Cover ...38 Watermark ...39 Manual Duplex...40 iv Memory Capacity and Paper Size 41 Making Printer Settings 28 PostScript 3 - Accessing the Printer Properties 31 Windows XP, Windows Server 2003 - Other Print Operations Form Feed...
...3 Installing the Printer Driver under a Network Environment 4 Windows 98 SE/Me...4 Windows 2000/XP or Windows Server 2003 8 Installing the Printer Driver to Read This Manual iii Symbols ...iii 1. Setting Up the Printer Driver PCL - Making Printer Settings 26 Windows XP and Windows Server 2003 - Canceling a Print Job from the Computer 36 Collate ...37 Cover ...38 Watermark ...39 Manual Duplex...40 iv Memory Capacity and Paper Size 41 Making Printer Settings 28 PostScript 3 - Accessing the Printer Properties 31 Windows XP, Windows Server 2003 - Other Print Operations Form Feed...

Administration Guide
Page 218
...: • Setting the paper size and type on each tray • Changing the tray priority • Printing lists of configuration of the printer 53 Note ❒ When you cannot change them. ❖ Paper Displays the [Paper] page. Log on and made the settings, always click [Logout]. Important ❒ To make printer settings, you must access Web Image Monitor in administra- On the [Paper] page, following operations are available to access Web Image Monitor in the administrator mode. Using Web Image Monitor Access in...
...: • Setting the paper size and type on each tray • Changing the tray priority • Printing lists of configuration of the printer 53 Note ❒ When you cannot change them. ❖ Paper Displays the [Paper] page. Log on and made the settings, always click [Logout]. Important ❒ To make printer settings, you must access Web Image Monitor in administra- On the [Paper] page, following operations are available to access Web Image Monitor in the administrator mode. Using Web Image Monitor Access in...

Administration Guide
Page 220
... be monitored from Web Image Monitor. Important ❒ To make the settings about network connection and communication. ed. 5 ❖ PCL Configuration/Font Page The installed PCL font list is printed. ❖ PS Configuration/Font Page The installed PS font list is print- Using Web Image Monitor Printing the printer configurations On the [Paper] page, you want to active. • TCP/IP port settings • SMTP Settings • SNMP Settings • IPX Settings • AppleTalk Settings 55 Making the network related settings You can set configurations about TCP/IP...
... be monitored from Web Image Monitor. Important ❒ To make the settings about network connection and communication. ed. 5 ❖ PCL Configuration/Font Page The installed PCL font list is printed. ❖ PS Configuration/Font Page The installed PS font list is print- Using Web Image Monitor Printing the printer configurations On the [Paper] page, you want to active. • TCP/IP port settings • SMTP Settings • SNMP Settings • IPX Settings • AppleTalk Settings 55 Making the network related settings You can set configurations about TCP/IP...
Administration Guide
Page 238
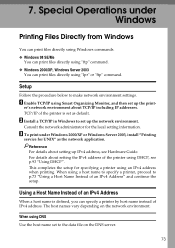
... IPv4 address. When using DHCP, see Hardware Guide. TCP/IP of an IPv4 Address" and continue the setup. For details about setting the IPv4 address of the printer using a host name to specify a printer, proceed to p.73 "Using a Host Name Instead of the printer is defined, you can print files directly using Smart Organizing Monitor, and then set to make network environment settings. Special Operations under Windows 2000/XP or Windows Server 2003, install "Printing service...
... IPv4 address. When using DHCP, see Hardware Guide. TCP/IP of an IPv4 Address" and continue the setup. For details about setting the IPv4 address of the printer using a host name to specify a printer, proceed to p.73 "Using a Host Name Instead of the printer is defined, you can print files directly using Smart Organizing Monitor, and then set to make network environment settings. Special Operations under Windows 2000/XP or Windows Server 2003, install "Printing service...

Administration Guide
Page 250
C Double-click the [Mac OS X] folder. Using Smart Organizing Monitor, you can check the printer status and change printer settings from your client computer. The following operations are possible with Smart Organizing Monitor: • Displaying printer status or settings • Printing a list of printer configurations • Making settings for paper loaded into each input tray • Making input tray settings • Changing factory-set default settings • Making network protocol settings • Making printer settings • Displaying the printer status and supply ...
C Double-click the [Mac OS X] folder. Using Smart Organizing Monitor, you can check the printer status and change printer settings from your client computer. The following operations are possible with Smart Organizing Monitor: • Displaying printer status or settings • Printing a list of printer configurations • Making settings for paper loaded into each input tray • Making input tray settings • Changing factory-set default settings • Making network protocol settings • Making printer settings • Displaying the printer status and supply ...


