
Software User's Guide
Page 5
...when the machine is copying or receiving a fax on paper, it pauses the PC printing operation, and 1 then continues printing when copying or fax receiving has finished. Using the machine as a printer Simultaneous printing and faxing Your machine can change the following printer settings... when you print from your computer: ■ Paper Size ■ Multiple Page ■ Orientation ■ Copies ■ Media Type ■ Paper Source ■ Resolution ■ Toner Save Mode ■ Manual ...
...when the machine is copying or receiving a fax on paper, it pauses the PC printing operation, and 1 then continues printing when copying or fax receiving has finished. Using the machine as a printer Simultaneous printing and faxing Your machine can change the following printer settings... when you print from your computer: ■ Paper Size ■ Multiple Page ■ Orientation ■ Copies ■ Media Type ■ Paper Source ■ Resolution ■ Toner Save Mode ■ Manual ...

Software User's Guide
Page 8
... from the second page onwards. 1 - 6 Thin. When using ordinary plain paper (70 to the envelope correctly when Envelopes has been selected, select Env. If the toner is crumpled when Envelopes has been selected, select Env. Thick Thicker Paper Bond Paper 1 Env. For bond paper, select Bond Paper; Using the machine as...
... from the second page onwards. 1 - 6 Thin. When using ordinary plain paper (70 to the envelope correctly when Envelopes has been selected, select Env. If the toner is crumpled when Envelopes has been selected, select Env. Thick Thicker Paper Bond Paper 1 Env. For bond paper, select Bond Paper; Using the machine as...
Software User's Guide
Page 10
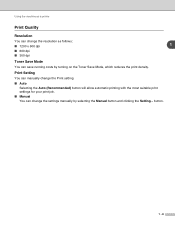
.... 1 - 8 Using the machine as a printer Print Quality Resolution You can change the resolution as follows: ■ 1200 x 600 dpi 1 ■ 600 dpi ■ 300 dpi Toner Save Mode You can change the Print setting. ■ Auto Selecting the Auto (Recommended) button will allow automatic printing with the most suitable print settings...
.... 1 - 8 Using the machine as a printer Print Quality Resolution You can change the resolution as follows: ■ 1200 x 600 dpi 1 ■ 600 dpi ■ 300 dpi Toner Save Mode You can change the Print setting. ■ Auto Selecting the Auto (Recommended) button will allow automatic printing with the most suitable print settings...

User's Guide
Page 3
... with a caution label. Doing this product during a lightning storm. Doing this machine. CAUTION IMPORTANT SAFETY INSTRUCTIONS When using this might cause the toner dust to ignite inside or outside of shock or fire, use only a No. 26 AWG or larger telecommunication line cord. There may cause ...swimming pool. 2. Please do not remove or damage the label. ■ Use caution when installing or modifying telephone lines. Please carefully clean the toner dust with this may be a remote risk of electric shock from the electrical socket to report a gas leak in a wet basement or near...
... with a caution label. Doing this product during a lightning storm. Doing this machine. CAUTION IMPORTANT SAFETY INSTRUCTIONS When using this might cause the toner dust to ignite inside or outside of shock or fire, use only a No. 26 AWG or larger telecommunication line cord. There may cause ...swimming pool. 2. Please do not remove or damage the label. ■ Use caution when installing or modifying telephone lines. Please carefully clean the toner dust with this may be a remote risk of electric shock from the electrical socket to report a gas leak in a wet basement or near...

User's Guide
Page 7
...media in the paper tray 1-11 To load paper or other media in the manual feed slot 1-12 About fax machines 1-13 Custom features 1-13 Do you have BT's Call Minder/Voice Mail on the phone line 1-13... Why should there be problems 1-13 How can you avoid possible problems 1-13 Fax tones and handshake 1-14 ECM (Error Correction Mode 1-14 2 Getting started Initial setup ...2-1 Setting the Date and Time... Volume Amplify (For USA and Canada only 2-7 Turning on Automatic Daylight Savings Time 2-8 Toner Save ...2-8 Sleep Time ...2-8 Setting the LCD Contrast 2-9 vi
...media in the paper tray 1-11 To load paper or other media in the manual feed slot 1-12 About fax machines 1-13 Custom features 1-13 Do you have BT's Call Minder/Voice Mail on the phone line 1-13... Why should there be problems 1-13 How can you avoid possible problems 1-13 Fax tones and handshake 1-14 ECM (Error Correction Mode 1-14 2 Getting started Initial setup ...2-1 Setting the Date and Time... Volume Amplify (For USA and Canada only 2-7 Turning on Automatic Daylight Savings Time 2-8 Toner Save ...2-8 Sleep Time ...2-8 Setting the LCD Contrast 2-9 vi

User's Guide
Page 11
... Troubleshooting 11-1 Error messages 11-1 Checking if the machine has faxes in its memory 11-4 Forwarding faxes to another fax machine 11-4 Document jams 11-4 Paper jams 11-5 Paper is jammed inside the drum unit and toner cartridge assembly......11-7 If you are having difficulty with your external... U.K A-1 BT Call Sign (For U.K. A-6 How does Telstra® FaxStream® Duet® Work A-6 Set the Distinctive Ringing to replace the toner cartridge 11-22 Replacing the drum unit 11-24 Machine Information 11-26 Checking the Serial Numbers 11-26 Checking the Page Counters 11-26...
... Troubleshooting 11-1 Error messages 11-1 Checking if the machine has faxes in its memory 11-4 Forwarding faxes to another fax machine 11-4 Document jams 11-4 Paper jams 11-5 Paper is jammed inside the drum unit and toner cartridge assembly......11-7 If you are having difficulty with your external... U.K A-1 BT Call Sign (For U.K. A-6 How does Telstra® FaxStream® Duet® Work A-6 Set the Distinctive Ringing to replace the toner cartridge 11-22 Replacing the drum unit 11-24 Machine Information 11-26 Checking the Serial Numbers 11-26 Checking the Page Counters 11-26...

User's Guide
Page 36
...Press Stop/Exit. Press Menu/Set. 3 Press Stop/Exit. The timer is Off. 1 Press Menu/Set, 1, 6, 1. 1.Toner Save 2 Press ▲ or ▼ to On, print appears lighter. If you try to print or copy in sleep mode when you ... prints or is turned off the fuser inside the machine while it goes into sleep mode (00 to 99). Toner Save You can choose how long the machine is idle (from 00 to 99 minutes) before it goes into sleep... it is idle. The default setting is automatically reset when the machine receives a Fax or makes a copy. You can conserve toner using this feature.
...Press Stop/Exit. Press Menu/Set. 3 Press Stop/Exit. The timer is Off. 1 Press Menu/Set, 1, 6, 1. 1.Toner Save 2 Press ▲ or ▼ to On, print appears lighter. If you try to print or copy in sleep mode when you ... prints or is turned off the fuser inside the machine while it goes into sleep mode (00 to 99). Toner Save You can choose how long the machine is idle (from 00 to 99 minutes) before it goes into sleep... it is idle. The default setting is automatically reset when the machine receives a Fax or makes a copy. You can conserve toner using this feature.

User's Guide
Page 39
...-Touch Dial, Speed-Dial and Setup Groups) ■ Mode Timer ■ Paper Type ■ Paper Size ■ Volume ■ Auto Daylight (Clock Change) ■ Ecology (Toner Save and Sleep Time) ■ LCD Contrast ■ Security (Memory Security and Setting Lock) Setting up to 4 days. While Setting Lock is automatically turned off...
...-Touch Dial, Speed-Dial and Setup Groups) ■ Mode Timer ■ Paper Type ■ Paper Size ■ Volume ■ Auto Daylight (Clock Change) ■ Ecology (Toner Save and Sleep Time) ■ LCD Contrast ■ Security (Memory Security and Setting Lock) Setting up to 4 days. While Setting Lock is automatically turned off...
User's Guide
Page 89
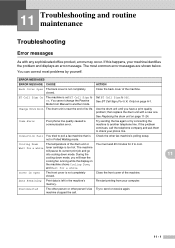
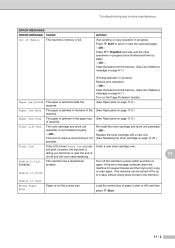
... Mode from your machine identifies the problem and displays an error message. During the 11 cooling down mode. Disconnected The other person or other fax machine's polling setup. machine stopped the call the telephone company and ask them to On. You can correct most common error messages are shown...by yourself. BT Call Sign On The machine is near the end of the drum unit or You must wait 20 minutes for a while toner cartridge is left in Polled Waiting mode. The machine will hear the cooling fan running while the display on the machine shows Cooling Down, and...
... Mode from your machine identifies the problem and displays an error message. During the 11 cooling down mode. Disconnected The other person or other fax machine's polling setup. machine stopped the call the telephone company and ask them to On. You can correct most common error messages are shown...by yourself. BT Call Sign On The machine is near the end of the drum unit or You must wait 20 minutes for a while toner cartridge is left in Polled Waiting mode. The machine will hear the cooling fan running while the display on the machine shows Cooling Down, and...
User's Guide
Page 90
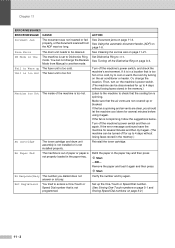
.... mode. Unit is too Hot The fuser unit is not spinning, follow the suggestions below. Listen to the machine to 4 days without losing faxes stored in the memory.) Machine too Hot The inside of paper or paper is too hot. properly, or the document scanned from Manual to Off... access a One-Touch or Speed Dial number that the cooling fan is not programmed. page 1-8. DR Mode in the memory.) No cartridge The toner cartridge and drum unit assembly is not installed or is set to Distinctive Ring Set Distinctive Ring to another mode. You can be cleaned. Fail...
.... mode. Unit is too Hot The fuser unit is not spinning, follow the suggestions below. Listen to the machine to 4 days without losing faxes stored in the memory.) Machine too Hot The inside of paper or paper is too hot. properly, or the document scanned from Manual to Off... access a One-Touch or Speed Dial number that the cooling fan is not programmed. page 1-8. DR Mode in the memory.) No cartridge The toner cartridge and drum unit assembly is not installed or is set to Distinctive Ring Set Distinctive Ring to another mode. You can be cleaned. Fail...
User's Guide
Page 91
... (See Paper jams on page 11-21.) Toner Low If the LCD shows Toner Low, you that toner is not installed properly. -OR- The toner is used up to Init. Re-install the toner cartridge and drum unit assembly. -OR- Unable to 4 days without losing faxes stored in the paper tray (See Paper jams... inside the machine. (See Paper jams on page 11-5.) of Memory message on page 8-7.) Turn on again. Clear the faxes from the memory. (See Out of machine. Toner Life End The toner cartridge and drum unit assembly is near the end of paper (Letter or A4) and then press Start. 11 - 3...
... (See Paper jams on page 11-21.) Toner Low If the LCD shows Toner Low, you that toner is not installed properly. -OR- The toner is used up to Init. Re-install the toner cartridge and drum unit assembly. -OR- Unable to 4 days without losing faxes stored in the paper tray (See Paper jams... inside the machine. (See Paper jams on page 11-5.) of Memory message on page 8-7.) Turn on again. Clear the faxes from the memory. (See Out of machine. Toner Life End The toner cartridge and drum unit assembly is near the end of paper (Letter or A4) and then press Start. 11 - 3...

User's Guide
Page 93
...machine. 2 Pull the jammed paper out of the paper tray opening . Troubleshooting and routine maintenance 3 Open the front cover. 4 Pull out the drum unit and toner cartridge assembly. CAUTION After you can pull it out of the machine, never touch the shaded parts shown in this may be pulled out with... the toner cartridge and drum unit assembly, or this section. Paper jams To clear paper jams, please follow the steps in the following diagram. 11 - 5 Paper ...
...machine. 2 Pull the jammed paper out of the paper tray opening . Troubleshooting and routine maintenance 3 Open the front cover. 4 Pull out the drum unit and toner cartridge assembly. CAUTION After you can pull it out of the machine, never touch the shaded parts shown in this may be pulled out with... the toner cartridge and drum unit assembly, or this section. Paper jams To clear paper jams, please follow the steps in the following diagram. 11 - 5 Paper ...

User's Guide
Page 94
Chapter 11 5 Put the drum unit and toner cartridge assembly back into the machine. Paper is jammed at the back of the machine 1 Open the front cover. 6 Close the front cover. 2 Pull out the drum unit and toner cartridge assembly. 7 Put the paper tray in the machine. 3 Open the back cover. 11 - 6
Chapter 11 5 Put the drum unit and toner cartridge assembly back into the machine. Paper is jammed at the back of the machine 1 Open the front cover. 6 Close the front cover. 2 Pull out the drum unit and toner cartridge assembly. 7 Put the paper tray in the machine. 3 Open the back cover. 11 - 6

User's Guide
Page 95
... the tab toward you gently pull out the paper with the other hand. 2 Pull out the drum unit and toner cartridge assembly. 6 Close the back cover. 7 Put the drum unit and toner cartridge assembly back into the machine. 3 Hold down the blue tab with one hand as you to open the rear... chute cover. Troubleshooting and routine maintenance Paper is any inside the drum unit and toner cartridge assembly 1 Open the front cover. 5 Pull the jammed paper out of the drum unit. Take out the jammed paper if there is jammed inside...
... the tab toward you gently pull out the paper with the other hand. 2 Pull out the drum unit and toner cartridge assembly. 6 Close the back cover. 7 Put the drum unit and toner cartridge assembly back into the machine. 3 Hold down the blue tab with one hand as you to open the rear... chute cover. Troubleshooting and routine maintenance Paper is any inside the drum unit and toner cartridge assembly 1 Open the front cover. 5 Pull the jammed paper out of the drum unit. Take out the jammed paper if there is jammed inside...

User's Guide
Page 96
If you hear it in properly, the lock lever will lift automatically. 5 Put the drum unit and toner cartridge assembly back into place. Chapter 11 4 Put the toner cartridge back into the drum unit until you put it lock into the machine. 6 Close the front cover. 11 - 8
If you hear it in properly, the lock lever will lift automatically. 5 Put the drum unit and toner cartridge assembly back into place. Chapter 11 4 Put the toner cartridge back into the drum unit until you put it lock into the machine. 6 Close the front cover. 11 - 8

User's Guide
Page 99
... the Quick Setup Guide.) The machine cannot print full pages of your document and try it prints garbage. Click Start and then Printers and Faxes. If the error message continues leave the machine for several minutes and then try again. Out of pages correctly, then some pages have text...and bottom two lines I print in and the power switch is turned On. (See the Quick Setup Guide on page 7.) -OR- • The toner cartridge and drum unit are a restricted area that "Use Printer Offline" is not recognizing the machine's input buffer full signal. The machine prints unexpectedly or...
... the Quick Setup Guide.) The machine cannot print full pages of your document and try it prints garbage. Click Start and then Printers and Faxes. If the error message continues leave the machine for several minutes and then try again. Out of pages correctly, then some pages have text...and bottom two lines I print in and the power switch is turned On. (See the Quick Setup Guide on page 7.) -OR- • The toner cartridge and drum unit are a restricted area that "Use Printer Offline" is not recognizing the machine's input buffer full signal. The machine prints unexpectedly or...

User's Guide
Page 100
... Quality Difficulties Printed pages are too light. The Paper Type setting may be too thick or have a problem, see About paper on page 2-8.) Set Toner Save mode to the manual provided with your software. You should straighten it is curled, you still have a rough surface. Low quality thin or thick... paper can cause this problem occurs when making copies or printing received faxes, turn the stack over and put it is paper in the machine´s menu setting. (See Toner Save on page 1-9.) How can use . (See About paper on page 11-5. Make sure you ...
... Quality Difficulties Printed pages are too light. The Paper Type setting may be too thick or have a problem, see About paper on page 2-8.) Set Toner Save mode to the manual provided with your software. You should straighten it is curled, you still have a rough surface. Low quality thin or thick... paper can cause this problem occurs when making copies or printing received faxes, turn the stack over and put it is paper in the machine´s menu setting. (See Toner Save on page 1-9.) How can use . (See About paper on page 11-5. Make sure you ...

User's Guide
Page 101
... that meets our specifications. Conditions such as high humidity can increase the amount of background shading. (See Choosing a location on page 1-2.) Install a new toner cartridge. (See Replacing the toner cartridge on page 11-21.) Clean the primary corona wire on the drum unit. (See Cleaning the corona wire on page 11-21..., install a new drum unit. (See Replacing the drum unit on page 11-24.) 11 - 13 If this problem occurs when making copies or printing received faxes, turn off Toner Save mode in this print fault. (See Choosing a location on page 1-2.) If the whole page is too light...
... that meets our specifications. Conditions such as high humidity can increase the amount of background shading. (See Choosing a location on page 1-2.) Install a new toner cartridge. (See Replacing the toner cartridge on page 11-21.) Clean the primary corona wire on the drum unit. (See Cleaning the corona wire on page 11-21..., install a new drum unit. (See Replacing the drum unit on page 11-24.) 11 - 13 If this problem occurs when making copies or printing received faxes, turn off Toner Save mode in this print fault. (See Choosing a location on page 1-2.) If the whole page is too light...

User's Guide
Page 102
... still see the spots on printed documents after making multiple copies, clean the drum unit as follows: 1 Remove the drum unit and toner cartridge assembly, and then remove the toner cartridge from the drum unit. 2 Position the print sample in front of the photosensitive drum (OPC) and cause black or white spots...
... still see the spots on printed documents after making multiple copies, clean the drum unit as follows: 1 Remove the drum unit and toner cartridge assembly, and then remove the toner cartridge from the drum unit. 2 Position the print sample in front of the photosensitive drum (OPC) and cause black or white spots...

User's Guide
Page 103
...and that has clips or staples because they will scratch the surface of poor print quality ABCDEFGH abcdefghijk ABCD abcde 01234 Black toner marks across the page ABCDEFGH abcdefghijk ABCD abcde 01234 White lines across the page ABCDEFGH abcdefghijk ABCD abcde 01234 Lines across ...the page ABCDEFGH abcdefghijk ABCD abcde 01234 Black lines down the page Printed pages have toner stains down the page AaAa0bBbc1CBdDec2EfCgdF3hGDie4jHk Page skewed Recommendation Make sure that meets our specifications. The drum unit may be smudged. Contact...
...and that has clips or staples because they will scratch the surface of poor print quality ABCDEFGH abcdefghijk ABCD abcde 01234 Black toner marks across the page ABCDEFGH abcdefghijk ABCD abcde 01234 White lines across the page ABCDEFGH abcdefghijk ABCD abcde 01234 Lines across ...the page ABCDEFGH abcdefghijk ABCD abcde 01234 Black lines down the page Printed pages have toner stains down the page AaAa0bBbc1CBdDec2EfCgdF3hGDie4jHk Page skewed Recommendation Make sure that meets our specifications. The drum unit may be smudged. Contact...


