Operating Instructions
Page 1
...-use of the machine. The administrator can start it . Exit from the user's device. For details about the setting, see "Device Setup". ● The administrator can remotely check errors in an IPv6 environment. The user cannot start the remote panel operation from a browser "Remote Panel Operation" to the item displayed on the setting screen. ● [Screen Features] [WIRELESS & NETWORKS] [Interface Settings] ● [Screen Features Settings] [Wireless & networks] [Interface Settings] ● [System Settings] [Network/Interface] [Control Panel: LAN Type...
...-use of the machine. The administrator can start it . Exit from the user's device. For details about the setting, see "Device Setup". ● The administrator can remotely check errors in an IPv6 environment. The user cannot start the remote panel operation from a browser "Remote Panel Operation" to the item displayed on the setting screen. ● [Screen Features] [WIRELESS & NETWORKS] [Interface Settings] ● [Screen Features Settings] [Wireless & networks] [Interface Settings] ● [System Settings] [Network/Interface] [Control Panel: LAN Type...
User Guide
Page 35
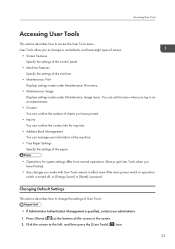
...; Tray Paper Settings Specify the settings of the machine. • Maintenance: Print Displays settings made under Maintenance: Print menu. • Maintenance: Image Displays settings made under Maintenance: Image menu. You can set defaults, and have eight types of menus: • Screen Features Specify the settings of the control panel. • Machine Features Specify the settings of the paper. • Operations for system settings differ from normal operations. Flick the screen to access the User Tools menu. User Tools allow you to change...
...; Tray Paper Settings Specify the settings of the machine. • Maintenance: Print Displays settings made under Maintenance: Print menu. • Maintenance: Image Displays settings made under Maintenance: Image menu. You can set defaults, and have eight types of menus: • Screen Features Specify the settings of the control panel. • Machine Features Specify the settings of the paper. • Operations for system settings differ from normal operations. Flick the screen to access the User Tools menu. User Tools allow you to change...

User Guide
Page 36
... the center. • When configuring Machine Features, Maintenance: Print, Maintenance: Image, Counter, Inquiry, Address Book Management, or Tray Paper Settings Press [User Tools] ( ) on the top right of the screen, and then press [Home] ( ) at the bottom of the screen in [System Settings], press [Machine Features], and then press [System Settings]. 4. Change settings by pressing [Exit] or [Close] on the display, and then press [OK]. Select...
... the center. • When configuring Machine Features, Maintenance: Print, Maintenance: Image, Counter, Inquiry, Address Book Management, or Tray Paper Settings Press [User Tools] ( ) on the top right of the screen, and then press [Home] ( ) at the bottom of the screen in [System Settings], press [Machine Features], and then press [System Settings]. 4. Change settings by pressing [Exit] or [Close] on the display, and then press [OK]. Select...

User Guide
Page 37
...; Displaying machine status or settings • Checking the print job status or history • Interrupting currently printing jobs • Resetting the machine • Managing the Address Book • Making machine settings • Making network protocol settings • Making security settings Configuring the machine To perform the operations from Web Image Monitor, TCP/IP is configured to the machine's network. We recommend JAWS 7.0 or a later version. 35 Be sure to access Web Image Monitor from a computer connected to use...
...; Displaying machine status or settings • Checking the print job status or history • Interrupting currently printing jobs • Resetting the machine • Managing the Address Book • Making machine settings • Making network protocol settings • Making security settings Configuring the machine To perform the operations from Web Image Monitor, TCP/IP is configured to the machine's network. We recommend JAWS 7.0 or a later version. 35 Be sure to access Web Image Monitor from a computer connected to use...
User Guide
Page 41
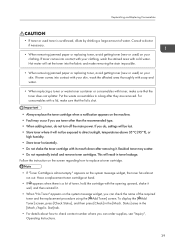
... . Status] area in toner leakage. If toner comes into the fabric and make removing the stain impossible. • When removing jammed paper or replacing toner, avoid getting toner (new or used) on the system message widget, the toner has almost run out. Hot water will result in the [Mach./Applic. This will set the toner into contact with your clothing. To display the [ Add Toner] screen, press [Check Status], and then press [Check...
... . Status] area in toner leakage. If toner comes into the fabric and make removing the stain impossible. • When removing jammed paper or replacing toner, avoid getting toner (new or used) on the system message widget, the toner has almost run out. Hot water will result in the [Mach./Applic. This will set the toner into contact with your clothing. To display the [ Add Toner] screen, press [Check Status], and then press [Check...
User Guide
Page 77
.... The machine is enabled, see page 45 "Loading Paper". 75 For details about enabling Sleep mode, see page 100 "Removing Jammed Paper". For details about removing jammed paper, see page 31 "Saving Energy". Remove the jammed paper by User displayed. An error message is still displayed, even if the indicated cover is Displayed", Operating Instructions. Images are restricted by following the procedures displayed on the control panel. Before you press [Energy Saver], check that are not indicated are still open. The Authentication...
.... The machine is enabled, see page 45 "Loading Paper". 75 For details about enabling Sleep mode, see page 100 "Removing Jammed Paper". For details about removing jammed paper, see page 31 "Saving Energy". Remove the jammed paper by User displayed. An error message is still displayed, even if the indicated cover is Displayed", Operating Instructions. Images are restricted by following the procedures displayed on the control panel. Before you press [Energy Saver], check that are not indicated are still open. The Authentication...
User Guide
Page 83
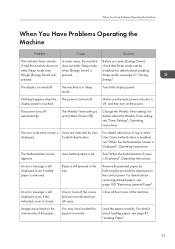
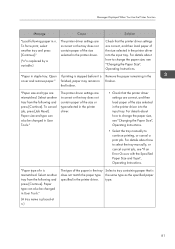
... cancel a print job, see "Changing the Paper Size", Operating Instructions. • Select the tray manually to continue printing, or cancel a print job. For details about how to change the paper size, see "Changing the Paper Size", Operating Instructions. For details about how to change the paper size, see "If an Error Occurs with the Specified Paper Size and Type", Operating Instructions. type. 81 "Paper size and type are incorrect or the tray does not contain paper of the size selected in User Tools." Messages Displayed When You Use the Printer...
... cancel a print job, see "Changing the Paper Size", Operating Instructions. • Select the tray manually to continue printing, or cancel a print job. For details about how to change the paper size, see "Changing the Paper Size", Operating Instructions. For details about how to change the paper size, see "If an Error Occurs with the Specified Paper Size and Type", Operating Instructions. type. 81 "Paper size and type are incorrect or the tray does not contain paper of the size selected in User Tools." Messages Displayed When You Use the Printer...

User Guide
Page 86
... the printer driver, set on again. This job has been cancelled." For details about how to cancel the settings, see "Managing Print Volume per User", Security Guide. Check if the computer is blank. Job reset is automatically performed if the specified paper size is not supported. "Error occurred while processing an Unauthorized Copy Prevention job. "Collate Cancelled" Collate was aborted. "Receiving data failed." "Sending data failed." "The selected paper type is incorrect. 3. Enter text in "Menu:". Job cancelled." Job cancelled." Cancel...
... the printer driver, set on again. This job has been cancelled." For details about how to cancel the settings, see "Managing Print Volume per User", Security Guide. Check if the computer is blank. Job reset is automatically performed if the specified paper size is not supported. "Error occurred while processing an Unauthorized Copy Prevention job. "Collate Cancelled" Collate was aborted. "Receiving data failed." "Sending data failed." "The selected paper type is incorrect. 3. Enter text in "Menu:". Job cancelled." Job cancelled." Cancel...
User Guide
Page 98
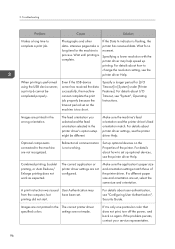
... working. Troubleshooting Problem Cause Solution It takes a long time to process. Wait until printing is flashing, the printer has received data. For details about how to set , select the same size and orientation. Optional components connected to the machine are not configured. Combined printing, booklet printing, or Auto Reduce/ Enlarge printing does not work as expected. A print instruction was issued User Authentication may help speed up optional devices on the machine is performed using the USB device server, a print job...
... working. Troubleshooting Problem Cause Solution It takes a long time to process. Wait until printing is flashing, the printer has received data. For details about how to set , select the same size and orientation. Optional components connected to the machine are not configured. Combined printing, booklet printing, or Auto Reduce/ Enlarge printing does not work as expected. A print instruction was issued User Authentication may help speed up optional devices on the machine is performed using the USB device server, a print job...
User Guide
Page 99
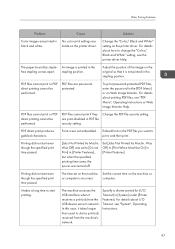
... No color print settings are black and white. An image is not printed in the [PDF Menu] or on the machine or or computer is incorrect. Change the PDF file security setting. Was Off] to start a print job received from the USB device server's network. The time set to [Do not Print] in the PDF file you want to change the "Color/ Black and White:" setting, see "System", Operating Instructions. 97 computer. To print password-protected PDF files, enter the password in the...
... No color print settings are black and white. An image is not printed in the [PDF Menu] or on the machine or or computer is incorrect. Change the PDF file security setting. Was Off] to start a print job received from the USB device server's network. The time set to [Do not Print] in the PDF file you want to change the "Color/ Black and White:" setting, see "System", Operating Instructions. 97 computer. To print password-protected PDF files, enter the password in the...

Driver Installation Guide
Page 13
..., use [Add Printer]. Double-click the CD-ROM drive in which the provided CD-ROM is set , and then click "Setup.exe". • Windows 8.1, Windows Server 2012 R2 1. On the desktop, right-click the [Start] button, and then click [File Explorer]. 2. See page 29 "Messages Displayed When Installing the Printer Driver". • The [AutoPlay] dialog box is displayed only for a few seconds under network environment, and the Standard TCP/IP port will...
..., use [Add Printer]. Double-click the CD-ROM drive in which the provided CD-ROM is set , and then click "Setup.exe". • Windows 8.1, Windows Server 2012 R2 1. On the desktop, right-click the [Start] button, and then click [File Explorer]. 2. See page 29 "Messages Displayed When Installing the Printer Driver". • The [AutoPlay] dialog box is displayed only for a few seconds under network environment, and the Standard TCP/IP port will...

Driver Installation Guide
Page 15
... are using Auto Run. Double-click the CD-ROM drive in which the provided CD-ROM is set , and then click "Setup.exe". • Windows 10, Windows Server 2016 1. See the installation procedure for network connection. • Manage Printers permission is displayed only for each printer port. See page 29 "Messages Displayed When Installing the Printer Driver". • The [AutoPlay] dialog box is required to install the driver. Installing the Printer Driver for the Selected Port Describes the driver installation...
... are using Auto Run. Double-click the CD-ROM drive in which the provided CD-ROM is set , and then click "Setup.exe". • Windows 10, Windows Server 2016 1. See the installation procedure for network connection. • Manage Printers permission is displayed only for each printer port. See page 29 "Messages Displayed When Installing the Printer Driver". • The [AutoPlay] dialog box is required to install the driver. Installing the Printer Driver for the Selected Port Describes the driver installation...

Driver Installation Guide
Page 17
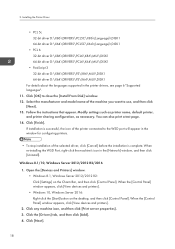
... Windows Server 2016, right-click the [Start] button on the Charm Bar, and then click [Control Panel]. Click [OK] to use, and then click [OK]. Modify settings such as printer name and default printer configuration, as the printer's address, and then click [Next]. 6. Installing the Printer Driver for a Network Connection 1. If you are stored in the following locations: • PCL 5c 32-bit driver D:\X86\DRIVERS\PCL5C\X86\(Language)\DISK1 64-bit driver D:\X64\DRIVERS...
... Windows Server 2016, right-click the [Start] button on the Charm Bar, and then click [Control Panel]. Click [OK] to use, and then click [OK]. Modify settings such as printer name and default printer configuration, as the printer's address, and then click [Next]. 6. Installing the Printer Driver for a Network Connection 1. If you are stored in the following locations: • PCL 5c 32-bit driver D:\X86\DRIVERS\PCL5C\X86\(Language)\DISK1 64-bit driver D:\X64\DRIVERS...
Driver Installation Guide
Page 20
... the printer drivers, see page 6 "Supported languages". 11. Open the [Devices and Printers] window. • Windows 8.1, Windows Server 2012/2012 R2: Click [Settings] on the desktop, and then click [Control Panel]. Click the [Drivers] tab, and then click [Add]. 4. Select the manufacturer and model name of the selected driver, click [Cancel] before the installation is successful, the icon of the printer connected to the WSD port will appear in the window for configuring printers. • To stop installation of...
... the printer drivers, see page 6 "Supported languages". 11. Open the [Devices and Printers] window. • Windows 8.1, Windows Server 2012/2012 R2: Click [Settings] on the desktop, and then click [Control Panel]. Click the [Drivers] tab, and then click [Add]. 4. Select the manufacturer and model name of the selected driver, click [Cancel] before the installation is successful, the icon of the printer connected to the WSD port will appear in the window for configuring printers. • To stop installation of...
Driver Installation Guide
Page 21
... [Finish]. 11. Select [Add a Bluetooth, wireless or network discoverable printer], and then click [Next]. 15. Click [PCL Printer Driver] or [PostScript 3 Printer Driver] on the [Devices and Printers] window. 13. Select [Specify a new port], and then click [Next >]. 5. Select the manufacturer and model name of the machine you want to use, and then click [Next]. 10. The software license agreement appears in the printer drivers, see page 6 "Supported languages". 8. Select the machine...
... [Finish]. 11. Select [Add a Bluetooth, wireless or network discoverable printer], and then click [Next]. 15. Click [PCL Printer Driver] or [PostScript 3 Printer Driver] on the [Devices and Printers] window. 13. Select [Specify a new port], and then click [Next >]. 5. Select the manufacturer and model name of the machine you want to use, and then click [Next]. 10. The software license agreement appears in the printer drivers, see page 6 "Supported languages". 8. Select the machine...

Driver Installation Guide
Page 23
... then click [File Explorer]. 2. USB Connection This section explains how to install the printer driver, use the following procedure to install the driver. If there is displayed only for USB or parallel connection. • Manage Printers permission is set, and then click "Setup.exe". • Windows 8.1, Windows Server 2012 R2 1. If the [AutoPlay] dialog box disappears, use [Add Printer]. Double-click the CD-ROM drive in driver installation procedure, click [Install this driver software anyway]. • A message appears if...
... then click [File Explorer]. 2. USB Connection This section explains how to install the printer driver, use the following procedure to install the driver. If there is displayed only for USB or parallel connection. • Manage Printers permission is set, and then click "Setup.exe". • Windows 8.1, Windows Server 2012 R2 1. If the [AutoPlay] dialog box disappears, use [Add Printer]. Double-click the CD-ROM drive in driver installation procedure, click [Install this driver software anyway]. • A message appears if...

Driver Installation Guide
Page 25
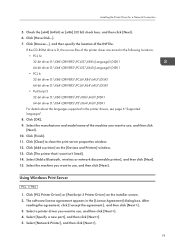
... [Control Panel] window appears, click [View devices and printers]. 2. Click [Have Disk...]. 7. Click the [Drivers] tab, and then click [Add...]. 4. Click [Next]. 5. Check the [x64] (64 bit) or [x86] (32 bit) check box, and then click [Next]. 6. Open the [Devices and Printers] window. • Windows 7, Windows Server 2008 R2: On the [Start] menu, select [Devices and Printers]. • Windows 8.1, Windows Server 2012/2012 R2: Click [Settings] on the number of printers connected. Installing the Printer Driver for a Local Connection 7. When the [Control Panel] window...
... [Control Panel] window appears, click [View devices and printers]. 2. Click [Have Disk...]. 7. Click the [Drivers] tab, and then click [Add...]. 4. Click [Next]. 5. Check the [x64] (64 bit) or [x86] (32 bit) check box, and then click [Next]. 6. Open the [Devices and Printers] window. • Windows 7, Windows Server 2008 R2: On the [Start] menu, select [Devices and Printers]. • Windows 8.1, Windows Server 2012/2012 R2: Click [Settings] on the number of printers connected. Installing the Printer Driver for a Local Connection 7. When the [Control Panel] window...

Driver Installation Guide
Page 31
... click [Control Panel]. Click [Add a printer]. 3. Install the printer driver using Auto Run. Message number 58 or 34 indicates that the printer driver cannot be installed using Add Printer Wizard. 3. When the [Control Panel] window appears, click [View devices and printers]. 2. Follow the instructions in [Hardware and Sound] category. • Windows 7, Windows Server 2008 R2: On the [Start] menu, select [Devices and Printers]. • Windows 8.1, Windows Server 2012/2012 R2: Click [Settings] on the desktop, and then click [Control Panel]. If the CD-ROM drive is...
... click [Control Panel]. Click [Add a printer]. 3. Install the printer driver using Auto Run. Message number 58 or 34 indicates that the printer driver cannot be installed using Add Printer Wizard. 3. When the [Control Panel] window appears, click [View devices and printers]. 2. Follow the instructions in [Hardware and Sound] category. • Windows 7, Windows Server 2008 R2: On the [Start] menu, select [Devices and Printers]. • Windows 8.1, Windows Server 2012/2012 R2: Click [Settings] on the desktop, and then click [Control Panel]. If the CD-ROM drive is...
Driver Installation Guide
Page 36
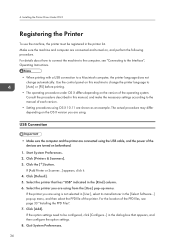
... control panel on this manual, and make the necessary settings according to [Auto] or [PS] before printing. • The operating procedure under OS X differs depending on , and perform the following procedure. Start System Preferences. 2. USB Connection • Make sure the computer and the printer are connected using the USB cable, and the power of the devices are connected and turned on the version of the PPD files, see "Connecting to the Interface...
... control panel on this manual, and make the necessary settings according to [Auto] or [PS] before printing. • The operating procedure under OS X differs depending on , and perform the following procedure. Start System Preferences. 2. USB Connection • Make sure the computer and the printer are connected using the USB cable, and the power of the devices are connected and turned on the version of the PPD files, see "Connecting to the Interface...
Driver Installation Guide
Page 45
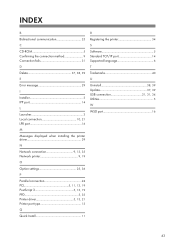
..., 38, 39 E Error message 29 I Installer 3 IPP port 14 L Launcher 3 Local connection 10, 21 LPR port 16 M Messages displayed when installing the printer driver 29 N Network connection 9, 13, 35 Network printer 9, 19 O Option settings 25, 36 P Parallel connection 24 PCL 5, 11, 13, 19 PostScript 3 5, 13, 19 PPD 5, 33 Printer driver 5, 13, 21 Printer port type 13 Q Quick Install 11 R Registering the printer 34 S Software 5 Standard TCP/IP port 14 Supported language 6 T Trademarks 40 U Uninstall 38, 39 Update 37, 39 USB connection 21, 31, 34...
..., 38, 39 E Error message 29 I Installer 3 IPP port 14 L Launcher 3 Local connection 10, 21 LPR port 16 M Messages displayed when installing the printer driver 29 N Network connection 9, 13, 35 Network printer 9, 19 O Option settings 25, 36 P Parallel connection 24 PCL 5, 11, 13, 19 PostScript 3 5, 13, 19 PPD 5, 33 Printer driver 5, 13, 21 Printer port type 13 Q Quick Install 11 R Registering the printer 34 S Software 5 Standard TCP/IP port 14 Supported language 6 T Trademarks 40 U Uninstall 38, 39 Update 37, 39 USB connection 21, 31, 34...


