
Owners Manual
Page 1
K-380 Drain Cleaning Machine OPERATOR'S MANUAL • Français - 13 • Castellano - Failure to understand and follow the contents of this tool. Read this Operator's Manual carefully before using this manual may result in electrical shock, fire and/or serious personal injury. pág. 27 WARNING!
K-380 Drain Cleaning Machine OPERATOR'S MANUAL • Français - 13 • Castellano - Failure to understand and follow the contents of this tool. Read this Operator's Manual carefully before using this manual may result in electrical shock, fire and/or serious personal injury. pág. 27 WARNING!

Owners Manual
Page 2
... ...5 Machine and Work Area Set Up ...6 Cleaning Sink Clogs ...7 Operating Instructions Using Manual Feed Machine...7 Using Autofeed Machine ...8 Special Procedures Reverse Operation ...9 Installing Replacement Cable...9 To remove Damaged or Worn Cable ...9 To Install Replacement Cable ...9 Accessories Cable Selection ...10 Additional Tools Available for 3/8″ & 1/2″ Cable ...10 Maintenance Instructions Lubrication ...10 Autofeed Assembly ...10 Cables ...11 Machine Storage ...11 Service and Repair ...11 Trouble Shooting ...12 Wiring Diagram ...12 Lifetime Warranty...Back Cover ii...
... ...5 Machine and Work Area Set Up ...6 Cleaning Sink Clogs ...7 Operating Instructions Using Manual Feed Machine...7 Using Autofeed Machine ...8 Special Procedures Reverse Operation ...9 Installing Replacement Cable...9 To remove Damaged or Worn Cable ...9 To Install Replacement Cable ...9 Accessories Cable Selection ...10 Additional Tools Available for 3/8″ & 1/2″ Cable ...10 Maintenance Instructions Lubrication ...10 Autofeed Assembly ...10 Cables ...11 Machine Storage ...11 Service and Repair ...11 Trouble Shooting ...12 Wiring Diagram ...12 Lifetime Warranty...Back Cover ii...

Owners Manual
Page 3
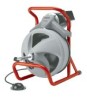
K-380 Drain Cleaning Machine K-380 Drain Cleaner Record Serial Number below and retain product serial number which is located on nameplate. Serial No.
K-380 Drain Cleaning Machine K-380 Drain Cleaner Record Serial Number below and retain product serial number which is located on nameplate. Serial No.

Owners Manual
Page 4
... drop, loss of electrical shock. • Use only three-wire extension cords which have the switch ON invites accidents. • Remove adjusting keys or switches before plugging in moving parts. • Avoid accidental starting. Damaged cords increase the risk of electrical shock. • When operating a tool outside, use and reduce the risk of power. GFCI reduces the risk of inattention while operating power tools may result in electric shock, fire, and...
... drop, loss of electrical shock. • Use only three-wire extension cords which have the switch ON invites accidents. • Remove adjusting keys or switches before plugging in moving parts. • Avoid accidental starting. Damaged cords increase the risk of electrical shock. • When operating a tool outside, use and reduce the risk of power. GFCI reduces the risk of inattention while operating power tools may result in electric shock, fire, and...

Owners Manual
Page 5
... reach of electrical shock. • Wear safety glasses and rubber soled, non-slip shoes. Keep cutting tools sharp and clean. Accessories that are easier to understand and follow maintenance instructions may be repaired. • Disconnect the plug from some drain cleaning compounds. • Do not operate machine if operator or machine is designed. • Do not use only identical replacement parts. Avoid direct contact with...
... reach of electrical shock. • Wear safety glasses and rubber soled, non-slip shoes. Keep cutting tools sharp and clean. Accessories that are easier to understand and follow maintenance instructions may be repaired. • Disconnect the plug from some drain cleaning compounds. • Do not operate machine if operator or machine is designed. • Do not use only identical replacement parts. Avoid direct contact with...

Owners Manual
Page 6
... Tool Set K-380 Machine w/Gloves & Std. C-45 IW 1/2″ x 75′ Solid Core (Integral Wound) Cable - Equipment - T-260 Tool Set Auto Feed Assembly Two-Wheel Transport Cart 4 Ridge Tool Company The drum is attached to the cable hits a snag the drum stops rotating, allowing the operator to the following chart for disconnecting tools. When the cutting tool that is belt-driven by a 1/3 HP electric motor that...
... Tool Set K-380 Machine w/Gloves & Std. C-45 IW 1/2″ x 75′ Solid Core (Integral Wound) Cable - Equipment - T-260 Tool Set Auto Feed Assembly Two-Wheel Transport Cart 4 Ridge Tool Company The drum is attached to the cable hits a snag the drum stops rotating, allowing the operator to the following chart for disconnecting tools. When the cutting tool that is belt-driven by a 1/3 HP electric motor that...

Owners Manual
Page 7
... 3/8″ Cable and Tools Instructions For Mounting Autofeed 1. Figure 3 - Be sure to use . 1. Screw handle into the center hole of the autofeed while the two (2) holes in the frame from the back (Figure 3). Place the mounting bracket onto the back of the K-380 using the two (2) 5/16″ x 1″ flat head screws. Do not operate the machine without a foot switch. Mounting Auto Feed Onto...
... 3/8″ Cable and Tools Instructions For Mounting Autofeed 1. Figure 3 - Be sure to use . 1. Screw handle into the center hole of the autofeed while the two (2) holes in the frame from the back (Figure 3). Place the mounting bracket onto the back of the K-380 using the two (2) 5/16″ x 1″ flat head screws. Do not operate the machine without a foot switch. Mounting Auto Feed Onto...

Owners Manual
Page 8
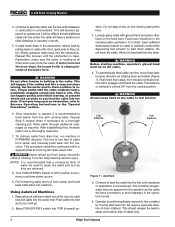
.... Inspect the power cord, Ground Fault Circuit Interrupter (GFCI) and plug for wear and damage. Lubricate the Drain Cleaning Machine, if necessary, according to a tool or control slipping from all equipment handles and controls. Check belt guard to the frame. This reduces the risk of injury due to the Maintenance Instructions. 7. Position the air foot switch pedal for one person operation. 4.
.... Inspect the power cord, Ground Fault Circuit Interrupter (GFCI) and plug for wear and damage. Lubricate the Drain Cleaning Machine, if necessary, according to a tool or control slipping from all equipment handles and controls. Check belt guard to the frame. This reduces the risk of injury due to the Maintenance Instructions. 7. Position the air foot switch pedal for one person operation. 4.

Owners Manual
Page 9
... opportunity to start tool and cable into sewer inlet. Wear gloves when handling cable and avoid direct contact to control its way into inlet as far as possible and follow the operating instructions below 50′/14 AWG 50′-100′). If the wire thickness is pushed in Electrical Safety section. • The cord is unplugged. When test button is...
... opportunity to start tool and cable into sewer inlet. Wear gloves when handling cable and avoid direct contact to control its way into inlet as far as possible and follow the operating instructions below 50′/14 AWG 50′-100′). If the wire thickness is pushed in Electrical Safety section. • The cord is unplugged. When test button is...
Owners Manual
Page 10
... cable. Pull one to OFF position and remove cord from drain line, run machine in operator's hands. 5. Turn FOR/OFF/REV Switch to two feet of cable loop. 8 Ridge Tool Company Manually pull sufficient cable out of excessive force. sition. Push feed lever away from sewer and manually push back into line, move feed lever in the neutral position (vertical or...
... cable. Pull one to OFF position and remove cord from drain line, run machine in operator's hands. 5. Turn FOR/OFF/REV Switch to two feet of cable loop. 8 Ridge Tool Company Manually pull sufficient cable out of excessive force. sition. Push feed lever away from sewer and manually push back into line, move feed lever in the neutral position (vertical or...

Owners Manual
Page 11
.... Hand feed the cable into the obstruction. Use reverse only to avoid kinks occurring inside the sewer inlet, release the air foot switch pedal and allow machine to come to rotate. Tighten screw on nose of excessive force. If machine has automatic feed, move feed knob to free the cutter and relieve the load on the cable to neutral position. Operating...
.... Hand feed the cable into the obstruction. Use reverse only to avoid kinks occurring inside the sewer inlet, release the air foot switch pedal and allow machine to come to rotate. Tighten screw on nose of excessive force. If machine has automatic feed, move feed knob to free the cutter and relieve the load on the cable to neutral position. Operating...

Owners Manual
Page 12
... compounds. Insert about 4 inches from power source before proceeding. To prevent serious injury, use , store cables indoors to prevent damaging effects of cable through the guide tube into the drum in use only the accessories listed below. No lubrication of the drum. Cables Cables should coil into the drum. When not in a counter-clockwise direction (Figure 9). K-380 Drain Cleaning Machine To Install Replacement...
... compounds. Insert about 4 inches from power source before proceeding. To prevent serious injury, use , store cables indoors to prevent damaging effects of cable through the guide tube into the drum in use only the accessories listed below. No lubrication of the drum. Cables Cables should coil into the drum. When not in a counter-clockwise direction (Figure 9). K-380 Drain Cleaning Machine To Install Replacement...

Owners Manual
Page 13
... identical replacement parts should be used. Any problems not addressed by this machine, call or write to the factory. Store the machine in rainy weather. Service and Repair WARNING The "Maintenance Instructions" will take care of most of the service needs of children and people unfamiliar with drain cleaners. K-380 Drain Cleaning Machine Machine Storage WARNING Motor-driven equipment must be handled by...
... identical replacement parts should be used. Any problems not addressed by this machine, call or write to the factory. Store the machine in rainy weather. Service and Repair WARNING The "Maintenance Instructions" will take care of most of the service needs of children and people unfamiliar with drain cleaners. K-380 Drain Cleaning Machine Machine Storage WARNING Motor-driven equipment must be handled by...

Owners Manual
Page 14
... in motor. Faulty reverse switch. Short circuit in diaphragm switch. Wiring Diagram 12 Ridge Tool Company Cable exposed to 4″ lines. Let the cutter do the work. tion but cage is Torque limiter slipping because cable is being forced. Damaged power cord. not. Take motor to reverse. Replace cord set . Clean and oil cables routinely. Faulty Ground Fault Circuit Interrupter. Do Not Force Cable! Motor turning but...
... in motor. Faulty reverse switch. Short circuit in diaphragm switch. Wiring Diagram 12 Ridge Tool Company Cable exposed to 4″ lines. Let the cutter do the work. tion but cage is Torque limiter slipping because cable is being forced. Damaged power cord. not. Take motor to reverse. Replace cord set . Clean and oil cables routinely. Faulty Ground Fault Circuit Interrupter. Do Not Force Cable! Motor turning but...


