
Owners Manual
Page 9
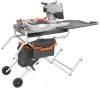
...RPM) TILE CUTTING WHEEL WHEEL WHEEL GUARD GUARD LOCK SLIDING TABLE MICRO-CUT FENCE SUPPORT DEPTH STOP KNOB BEVEL LOCK KNOB ON/OFF SWITCH WATER TRAY EXTENSIONS EXACTLINE™ ADJUSTABLE LASER ALIGNMENT SYSTEM LOCK KNOB LED WORKLIGHT MITER GUIDE SLIDING TABLE LOCK LEVER RUBBER BOOT 14 13 12 11 10... 9 8 WATER TRAY FRAME TABLE STOP BY-PASS SPAN-DECK CLAMP READY RACK™ TILE CARRIER VARIABLE FLOW VALVE CLEANING NOZZLE TABLE STOP DRAINAGE WSUV™ ...
...RPM) TILE CUTTING WHEEL WHEEL WHEEL GUARD GUARD LOCK SLIDING TABLE MICRO-CUT FENCE SUPPORT DEPTH STOP KNOB BEVEL LOCK KNOB ON/OFF SWITCH WATER TRAY EXTENSIONS EXACTLINE™ ADJUSTABLE LASER ALIGNMENT SYSTEM LOCK KNOB LED WORKLIGHT MITER GUIDE SLIDING TABLE LOCK LEVER RUBBER BOOT 14 13 12 11 10... 9 8 WATER TRAY FRAME TABLE STOP BY-PASS SPAN-DECK CLAMP READY RACK™ TILE CARRIER VARIABLE FLOW VALVE CLEANING NOZZLE TABLE STOP DRAINAGE WSUV™ ...

Owners Manual
Page 10
...to quickly stop wheel rotation after the switch is recycled into the water tank. READY RACK™ TILE CARRIER - The clamp supports mosaic tile for a miter cut with all operating features and safety rules. 10 in . WATER TRAY EXTENSIONS - A 10 in . With the diverter valve turned to... scale) are attempting. Exactline™ Adjustable Laser Alignment System - This system separates sediment and debris filtering the water before they can get into the cutting wheel for...
...to quickly stop wheel rotation after the switch is recycled into the water tank. READY RACK™ TILE CARRIER - The clamp supports mosaic tile for a miter cut with all operating features and safety rules. 10 in . WATER TRAY EXTENSIONS - A 10 in . With the diverter valve turned to... scale) are attempting. Exactline™ Adjustable Laser Alignment System - This system separates sediment and debris filtering the water before they can get into the cutting wheel for...
Owners Manual
Page 11
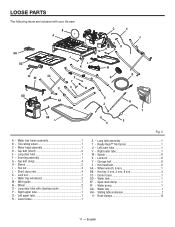
... r t S ii Fig. 5 A - Lock nut 1 L - Miter guide 1 N - Hex head bolt 2 AA - Hose clamps 12 11 - Cap bolt (long 4 H - Water tray extensions 2 M - Spacer 8 X - Water tray 1 HH - Motor head assembly 1 D - Cap bolt (short 2 E - Wheel 2 O - Right outer tube 1 W - Wheel wrench, 6 mm 1 BB - Span-deck clamp ...tube with your tile saw: B A I - Long tube assembly 1 T - Water tray frame assembly 1 B - Tile cutting wheel 1 C - Left upper tube 1 R - Hex key, 3 mm, 4 mm, 8 mm 3 CC - Water pump 1 GG - English Hex nut 4 J - Lower brace 1 S - ...
... r t S ii Fig. 5 A - Lock nut 1 L - Miter guide 1 N - Hex head bolt 2 AA - Hose clamps 12 11 - Cap bolt (long 4 H - Water tray extensions 2 M - Spacer 8 X - Water tray 1 HH - Motor head assembly 1 D - Cap bolt (short 2 E - Wheel 2 O - Right outer tube 1 W - Wheel wrench, 6 mm 1 BB - Span-deck clamp ...tube with your tile saw: B A I - Long tube assembly 1 T - Water tray frame assembly 1 B - Tile cutting wheel 1 C - Left upper tube 1 R - Hex key, 3 mm, 4 mm, 8 mm 3 CC - Water pump 1 GG - English Hex nut 4 J - Lower brace 1 S - ...

Owners Manual
Page 14
... tube covering the connector. Grasp the diverter valve firmly then push the end of a short clear tube. Secure with a hose clamp. Water tray frame assembly Lock nut Table stop and turning it locks into holes and tighten securely using the tube clips on the stop by-pass Leg.... Secure with a hose clamp. Finger tighten. Tighten all cap bolts using nuts. Slide long cap bolts into holes. ASSEMBLY Installing the water tray frame assembly to the leg stand See Figure 7. Lock the table stop by-pass by pulling up on top of the leg stand. ...
... tube covering the connector. Grasp the diverter valve firmly then push the end of a short clear tube. Secure with a hose clamp. Water tray frame assembly Lock nut Table stop and turning it locks into holes and tighten securely using the tube clips on the stop by-pass Leg.... Secure with a hose clamp. Finger tighten. Tighten all cap bolts using nuts. Slide long cap bolts into holes. ASSEMBLY Installing the water tray frame assembly to the leg stand See Figure 7. Lock the table stop by-pass by pulling up on top of the leg stand. ...

Owners Manual
Page 15
... fence. Pull boot over the connector on electrical cord and plug pump into an outlet or extension cord. Sliding table Water tray Water tray frame Fig. 11 Water tray frame Water tray extension Fig. 12 Particle trap Grooves Water tray extension Fig. 10 15 - ASSEMBLY Push the short clear tube of the T-connector assembly over cord connections to the...
... fence. Pull boot over the connector on electrical cord and plug pump into an outlet or extension cord. Sliding table Water tray Water tray frame Fig. 11 Water tray frame Water tray extension Fig. 12 Particle trap Grooves Water tray extension Fig. 10 15 - ASSEMBLY Push the short clear tube of the T-connector assembly over cord connections to the...
Owners Manual
Page 18
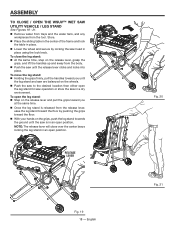
... saw to the desired location then either open THE WSUV™ Wet Saw Utility Vehicle / leg stand See Figures 19 - 21. Remove water from trays and the water tank, and any workpieces from the body. Push the saw in an open the leg stand: Step on the release lever and...
... saw to the desired location then either open THE WSUV™ Wet Saw Utility Vehicle / leg stand See Figures 19 - 21. Remove water from trays and the water tank, and any workpieces from the body. Push the saw in an open the leg stand: Step on the release lever and...

Owners Manual
Page 21
... serious personal injury. WARNING: Do not use the submersible pump: Unscrew the drain plug located under the water tray. Fill the water tank two-thirds full. Center the water tank on . C) With the pump switch in position C (button in possible serious injury. OPERATION WARNING: Do ... eye protection with On/Off Switch Pump switch always on the saw is always running. The use the nozzle to clean the wheel, water tray, etc. Turn the diverter valve to inflict serious injury. To use any attachments or accessories not recommended by the manufacturer of...
... serious personal injury. WARNING: Do not use the submersible pump: Unscrew the drain plug located under the water tray. Fill the water tank two-thirds full. Center the water tank on . C) With the pump switch in position C (button in possible serious injury. OPERATION WARNING: Do ... eye protection with On/Off Switch Pump switch always on the saw is always running. The use the nozzle to clean the wheel, water tray, etc. Turn the diverter valve to inflict serious injury. To use any attachments or accessories not recommended by the manufacturer of...

Owners Manual
Page 28
...the unit is plugged into a functioning power outlet and the pump is plugged into the electrical plug. Be sure there is adequate water in the water tank and that brush moves freely in . NOTE: Do not handle the pump while it is required: Unplug the saw flushing... the clean water through the tubes and over the cutting wheel. Turn the diverter valve to clean the rails often. Tighten securely. Empty dirty water from the water tank and dry off the tool. Once the table has been removed, rinse the rails and water tray, and water tray frame. ...
...the unit is plugged into a functioning power outlet and the pump is plugged into the electrical plug. Be sure there is adequate water in the water tank and that brush moves freely in . NOTE: Do not handle the pump while it is required: Unplug the saw flushing... the clean water through the tubes and over the cutting wheel. Turn the diverter valve to clean the rails often. Tighten securely. Empty dirty water from the water tank and dry off the tool. Once the table has been removed, rinse the rails and water tray, and water tray frame. ...


