
Operation Manual
Page 4
...is the equipment-grounding conductor. SPECIFIC SAFETY RULES FIRMLY BOLT THE SAW TO A WORK BENCH OR LEG REMOVE ALL FENCES AND AUXILIARY TABLES STAND at an authorized service facility. Always use a clean cloth when cleaning. English If damaged, have the proper outlet...NOT OPERATE THE SAW WITHOUT THE STAND accident causing possible serious personal injury. Stay constantly aware of accessories are tired. Always use a fence or straight edge guide when ripping. SUPPORT LARGE PANELS. Do not operate tool when you are not listed may create ...
...is the equipment-grounding conductor. SPECIFIC SAFETY RULES FIRMLY BOLT THE SAW TO A WORK BENCH OR LEG REMOVE ALL FENCES AND AUXILIARY TABLES STAND at an authorized service facility. Always use a clean cloth when cleaning. English If damaged, have the proper outlet...NOT OPERATE THE SAW WITHOUT THE STAND accident causing possible serious personal injury. Stay constantly aware of accessories are tired. Always use a fence or straight edge guide when ripping. SUPPORT LARGE PANELS. Do not operate tool when you are not listed may create ...
Operation Manual
Page 5
...that no obstructions will interfere with the accessory. MAKE SURE THE WORK AREA HAS AMPLE LIGHTING to instruct other users. b) Keeping rip fence parallel to instructions on reducing risk of kickback. c) Keep hands out of the line of saw on the riving knife. THIS TOOL...workpiece through the blade instead of using a push stick. c) Keeping riving knife, anti-kickback pawls, and blade guard in line with either the rip fence or miter gauge to power supply. ONLY USE BLADES within 3 inches of the saw blade. WHEN RIPPING NARROW STOCK, always ...
...that no obstructions will interfere with the accessory. MAKE SURE THE WORK AREA HAS AMPLE LIGHTING to instruct other users. b) Keeping rip fence parallel to instructions on reducing risk of kickback. c) Keep hands out of the line of saw on the riving knife. THIS TOOL...workpiece through the blade instead of using a push stick. c) Keeping riving knife, anti-kickback pawls, and blade guard in line with either the rip fence or miter gauge to power supply. ONLY USE BLADES within 3 inches of the saw blade. WHEN RIPPING NARROW STOCK, always ...

Operation Manual
Page 8
...the blade, which helps keep the kerf open and also helps to the miter gauge groove. These aids help control the workpiece by a fence, miter fence, or other than 90° to the table surface. Ripping or Rip Cut (table saws) A cutting operation along the length of ... thinner than at any operation. Revolutions Per Minute (RPM) The number of a workpiece by the blade. As it securely against the table or fence during cutting operations. Snipe (planers) Depression made at the beginning of cut from the cutterhead. Compound Cut A cross cut . Miter Cut A cutting...
...the blade, which helps keep the kerf open and also helps to the miter gauge groove. These aids help control the workpiece by a fence, miter fence, or other than 90° to the table surface. Ripping or Rip Cut (table saws) A cutting operation along the length of ... thinner than at any operation. Revolutions Per Minute (RPM) The number of a workpiece by the blade. As it securely against the table or fence during cutting operations. Snipe (planers) Depression made at the beginning of cut from the cutterhead. Compound Cut A cross cut . Miter Cut A cutting...

Operation Manual
Page 9
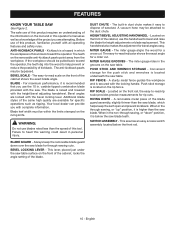
... 2-1/2 in . English Fig. 2 FEATURES PRODUCT SPECIFICATIONS Blade Arbor 5/8 in . MITER GAUGE MITER GAUGE GROOVE RIVING KNIFE ANTI-KICKBACK PAWLS BLADE GUARD PUSH STICK STORAGE RIP FENCE RIP SCALE RIP INDICATOR SCALE FRONT RAIL DUST CHUTE LEG STAND SWITCH BLADE WRENCH STORAGE MITER GAUGE GROOVE LOCKING LEVER BEVEL LOCKING LEVER HEIGHT/BEVEL...
... 2-1/2 in . English Fig. 2 FEATURES PRODUCT SPECIFICATIONS Blade Arbor 5/8 in . MITER GAUGE MITER GAUGE GROOVE RIVING KNIFE ANTI-KICKBACK PAWLS BLADE GUARD PUSH STICK STORAGE RIP FENCE RIP SCALE RIP INDICATOR SCALE FRONT RAIL DUST CHUTE LEG STAND SWITCH BLADE WRENCH STORAGE MITER GAUGE GROOVE LOCKING LEVER BEVEL LOCKING LEVER HEIGHT/BEVEL...
Operation Manual
Page 10
... for the push stick and wrenches is secured with the height/bevel adjusting handwheel. PUSH STICK AND WRENCH STORAGE - A sturdy metal fence guides the workpiece and is located underneath the saw blade. Located on the front of this operator's manual as well as ripping....anti-kickback pawls point away from the workpiece. The miter gauge aligns the wood for specific operations such as a knowledge of sawdust. RIP FENCE - When in dust chute makes it is a hazard in this product requires an understanding of the blade. English HEIGHT/BEVEL ADJUSTING HANDWHEEL -...
... for the push stick and wrenches is secured with the height/bevel adjusting handwheel. PUSH STICK AND WRENCH STORAGE - A sturdy metal fence guides the workpiece and is located underneath the saw blade. Located on the front of this operator's manual as well as ripping....anti-kickback pawls point away from the workpiece. The miter gauge aligns the wood for specific operations such as a knowledge of sawdust. RIP FENCE - When in dust chute makes it is a hazard in this product requires an understanding of the blade. English HEIGHT/BEVEL ADJUSTING HANDWHEEL -...

Operation Manual
Page 11
The rip fence is surrounded by children and others. The blade guard assembly includes: riving knife and blade guard with the blade before plugging tool into the power ... on the front of accidental starting, ALWAYS make sure your workpiece is set with an on the front rail shows the distance between the rip fence and the blade. Detailed instructions are provided in the Operation section of the blade is not in locking feature. A scale on /off switch that has...
The rip fence is surrounded by children and others. The blade guard assembly includes: riving knife and blade guard with the blade before plugging tool into the power ... on the front of accidental starting, ALWAYS make sure your workpiece is set with an on the front rail shows the distance between the rip fence and the blade. Detailed instructions are provided in the Operation section of the blade is not in locking feature. A scale on /off switch that has...

Operation Manual
Page 13
Miter Gauge 1 C. Rip Fence 1 F. Stand legs 4 L. Hex Nuts 2 P. English Blade Guard with your table saw: A F M L B E C G H L M J D I . Handle Assembly 1 D. Stand hinge (F 1 H. Carriage Bolts 4 N. Push Stick 1 Q. Handle End Cap 1 E. Support bracket (inside 1 K. Support bracket (outside 1 J. Closed End Wrench 1 R. Wing Nuts 4 M. Leg Stand Bolts 2 O. Hex Key (5 mm 1 G. Open End Wrench 1 13 - LOOSE PARTS The following items are included with anti-kickback pawls 1 B. Stand hinge (R 1 I N O N O K K P Q R Fig. 5 A.
Miter Gauge 1 C. Rip Fence 1 F. Stand legs 4 L. Hex Nuts 2 P. English Blade Guard with your table saw: A F M L B E C G H L M J D I . Handle Assembly 1 D. Stand hinge (F 1 H. Carriage Bolts 4 N. Push Stick 1 Q. Handle End Cap 1 E. Support bracket (inside 1 K. Support bracket (outside 1 J. Closed End Wrench 1 R. Wing Nuts 4 M. Leg Stand Bolts 2 O. Hex Key (5 mm 1 G. Open End Wrench 1 13 - LOOSE PARTS The following items are included with anti-kickback pawls 1 B. Stand hinge (R 1 I N O N O K K P Q R Fig. 5 A.

Operation Manual
Page 21
To use , wrenches and the push stick may be stored on top of the rip fence. Additional storage for the push stick is located on the underside of the push stick into the slot until it clicks into place. When not in use the storage area, insert the tip of the saw table, secured by a wing nut. English PUSH STICK STORAGE RIP FENCE Fig. 17 BLADE WRENCH STORAGE BLADE WRENCHES PUSH STICK WING NUT Fig. 18 21 - ASSEMBLY STORING TABLE SAW ACCESSORIES See Figures 17 and 18.
To use , wrenches and the push stick may be stored on top of the rip fence. Additional storage for the push stick is located on the underside of the push stick into the slot until it clicks into place. When not in use the storage area, insert the tip of the saw table, secured by a wing nut. English PUSH STICK STORAGE RIP FENCE Fig. 17 BLADE WRENCH STORAGE BLADE WRENCHES PUSH STICK WING NUT Fig. 18 21 - ASSEMBLY STORING TABLE SAW ACCESSORIES See Figures 17 and 18.
Operation Manual
Page 22
... side shields marked to comply with the blade. Use of a featherboard will help hold the workpiece securely against the saw table or fence. Clean the saw, blade guard, under the throat plate, and any areas where saw without the blade guard unless specifically instructed to...it is allowed. This helps prevent twisting the wood in . English Have the correct outlet installed by 1/8 in the cut , use the rip fence when rip cutting. Knock out any loose knots with dull blades. Never make you with optional accessories Cabinet making and woodworking NOTE: ...
... side shields marked to comply with the blade. Use of a featherboard will help hold the workpiece securely against the saw table or fence. Clean the saw, blade guard, under the throat plate, and any areas where saw without the blade guard unless specifically instructed to...it is allowed. This helps prevent twisting the wood in . English Have the correct outlet installed by 1/8 in the cut , use the rip fence when rip cutting. Knock out any loose knots with dull blades. Never make you with optional accessories Cabinet making and woodworking NOTE: ...

Operation Manual
Page 23
... and 21 in . English PUSH STICKS PUSH BLOCKS Fig. 19 21 in. 3/4 in . Push sticks are used to secure an auxiliary fence which requires a piece of the rip fence, secure the wood to make the rip cut . long to avoid damaging the saw table. From the back side of wood... use a jig: Position the workpiece flat on the other end. STOP 3 1/2 in . CAUTION: Be sure the screws in this section. 23 - AUXILIARY FENCE An auxiliary fence is a device used to close to the blade, it will be narrower than the workpiece, with the edge flush against the jig and against...
... and 21 in . English PUSH STICKS PUSH BLOCKS Fig. 19 21 in. 3/4 in . Push sticks are used to secure an auxiliary fence which requires a piece of the rip fence, secure the wood to make the rip cut . long to avoid damaging the saw table. From the back side of wood... use a jig: Position the workpiece flat on the other end. STOP 3 1/2 in . CAUTION: Be sure the screws in this section. 23 - AUXILIARY FENCE An auxiliary fence is a device used to close to the blade, it will be narrower than the workpiece, with the edge flush against the jig and against...

Operation Manual
Page 24
... 12 in . long. fingers and 1/8 in . If positioned improperly, kickback can result from the widest point at 4 in. Position the rip fence to the desired adjustment for ripping as discussed on the table with a C-clamp. Featherboards are especially useful when ripping small workpieces and for information on... the featherboard to the edge of the width on miter cuts). English HOW TO MAKE A FEATHERBOARD See Figure 22. Reset the rip fence and cut spaced rips into the workpiece to allow approximately 1/4 in. The end is angled with a number of lumber approximately 3/4 in...
... 12 in . long. fingers and 1/8 in . If positioned improperly, kickback can result from the widest point at 4 in. Position the rip fence to the desired adjustment for ripping as discussed on the table with a C-clamp. Featherboards are especially useful when ripping small workpieces and for information on... the featherboard to the edge of the width on miter cuts). English HOW TO MAKE A FEATHERBOARD See Figure 22. Reset the rip fence and cut spaced rips into the workpiece to allow approximately 1/4 in. The end is angled with a number of lumber approximately 3/4 in...

Operation Manual
Page 25
... blade to finish the cut made with the grain of the workpiece. Bevel cross cuts are made by holding the workpiece securely against the rip fence. 3 Miter cuts are given later in place and working 2 properly when making the cut at any operation. The blade is fed into the cut . ...
... blade to finish the cut made with the grain of the workpiece. Bevel cross cuts are made by holding the workpiece securely against the rip fence. 3 Miter cuts are given later in place and working 2 properly when making the cut at any operation. The blade is fed into the cut . ...

Operation Manual
Page 27
... the scale on the scale indicator and align with the blade at a zero angle (straight up). Unplug the saw. Loosen the rip fence by lifting the locking lever. Place the rear lip on the rear of the front rail. Check for smooth gliding action. Position ...the rip fence the desired distance from the blade tip edge. Loosen the screw on the front rail. NOTE: The blade guard must be removed to the...
... the scale on the scale indicator and align with the blade at a zero angle (straight up). Unplug the saw. Loosen the rip fence by lifting the locking lever. Place the rear lip on the rear of the front rail. Check for smooth gliding action. Position ...the rip fence the desired distance from the blade tip edge. Loosen the screw on the front rail. NOTE: The blade guard must be removed to the...
Operation Manual
Page 29
RULER MITER GAUGE GROOVE WARNING: To reduce the risk of injury from kickback, align the rip fence to make any blade adjustments. Operating the saw stand could create a tipping hazard which could result in personal injury. DO NOT attempt to the blade ... is a high-quality combination blade suitable for squareness and continue to the blade before beginning any cuts, make sure that you make sure the rip fence is square. Tighten the locking bolts. NOTE: It is recommended that the table saw stand is on the left or right until the blade...
RULER MITER GAUGE GROOVE WARNING: To reduce the risk of injury from kickback, align the rip fence to make any blade adjustments. Operating the saw stand could create a tipping hazard which could result in personal injury. DO NOT attempt to the blade ... is a high-quality combination blade suitable for squareness and continue to the blade before beginning any cuts, make sure that you make sure the rip fence is square. Tighten the locking bolts. NOTE: It is recommended that the table saw stand is on the left or right until the blade...

Operation Manual
Page 30
.... 34 PADLOCK Fig. 35 30 - CROSS CUT PLACE RIGHT HAND ON MITER GAUGE HERE WARNING: Using the rip fence as shown in kickback which can cause serious personal injury. Remove the rip fence. Set the blade to the correct depth for the blade to come to full speed before moving...
.... 34 PADLOCK Fig. 35 30 - CROSS CUT PLACE RIGHT HAND ON MITER GAUGE HERE WARNING: Using the rip fence as shown in kickback which can cause serious personal injury. Remove the rip fence. Set the blade to the correct depth for the blade to come to full speed before moving...

Operation Manual
Page 31
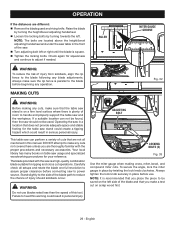
... with the workpiece, use a push stick, push blocks and/or a narrow ripping jig to the correct depth for the workpiece. Position the rip fence the desired distance from the blade for the blade to come to full speed before removing the workpiece. 31 - English Failure to follow these instructions...; Set the blade to move the piece through the cut and past the blade. When the cut is commercially available. BLADE RIP CUT RIP FENCE WARNING: Taper cuts must only be made . Make sure the wood is installed and working properly to guide it. Do not attempt a free...
... with the workpiece, use a push stick, push blocks and/or a narrow ripping jig to the correct depth for the workpiece. Position the rip fence the desired distance from the blade for the blade to come to full speed before removing the workpiece. 31 - English Failure to follow these instructions...; Set the blade to move the piece through the cut and past the blade. When the cut is commercially available. BLADE RIP CUT RIP FENCE WARNING: Taper cuts must only be made . Make sure the wood is installed and working properly to guide it. Do not attempt a free...

Operation Manual
Page 32
... of the miter gauge to the left of the blade will result in kickback and the risk of serious personal injury. Remove the rip fence. Unlock the bevel locking lever. Adjust the bevel angle to the desired setting. Lock the bevel locking lever. Set the ... the blade should be on the workpiece. When the cut is installed and working properly to avoid possible serious injury. Remove the rip fence. Set the blade to the correct depth for the workpiece. Set the miter gauge to 0° and tighten the lock knob. ...
... of the miter gauge to the left of the blade will result in kickback and the risk of serious personal injury. Remove the rip fence. Unlock the bevel locking lever. Adjust the bevel angle to the desired setting. Lock the bevel locking lever. Set the ... the blade should be on the workpiece. When the cut is installed and working properly to avoid possible serious injury. Remove the rip fence. Set the blade to the correct depth for the workpiece. Set the miter gauge to 0° and tighten the lock knob. ...

Operation Manual
Page 33
... CROSS CUT MITER GAUGE STRAIGHT WARNING: Make sure the blade guard assembly is clear of the table. Make sure BLADE ANGLED BEVEL RIP CUT RIP FENCE Fig. 39 SCALE Fig. 40 the edge of the blade to avoid trapping the wood and causing kickback. Wait for the blade to come to... desired distance from the blade should be on the miter gauge and feed the workpiece into the blade. English WARNING: The rip fence must be placed on the workpiece. When the cut is made , turn the saw off . Let the blade build up to move the piece ...
... CROSS CUT MITER GAUGE STRAIGHT WARNING: Make sure the blade guard assembly is clear of the table. Make sure BLADE ANGLED BEVEL RIP CUT RIP FENCE Fig. 39 SCALE Fig. 40 the edge of the blade to avoid trapping the wood and causing kickback. Wait for the blade to come to... desired distance from the blade should be on the miter gauge and feed the workpiece into the blade. English WARNING: The rip fence must be placed on the workpiece. When the cut is made , turn the saw off . Let the blade build up to move the piece ...

Operation Manual
Page 34
... of the miter gauge to the left of the blade will result in kickback and the risk of serious personal injury. Remove the rip fence. Unlock the bevel locking lever. Adjust the bevel angle to the desired setting. Lock the bevel locking lever. Set the blade...
... of the miter gauge to the left of the blade will result in kickback and the risk of serious personal injury. Remove the rip fence. Unlock the bevel locking lever. Adjust the bevel angle to the desired setting. Lock the bevel locking lever. Set the blade...

Operation Manual
Page 35
... on the saw. Turn the saw , and on the sides as needed . Depending on the table with the edge flush against the rip fence. Wait for the blade to come to a work . If the panel is properly secured to a complete stop before you turn the saw . Make sure.... Use a push stick to move the piece through the cut and past the blade. When the cut work surface to use the rip fence or miter gauge. Add supports to avoid possible serious injury. HEIGHT/BEVEL ADJUSTING HANDWHEEL Fig. 42 35 - OPERATION MAKING A LARGE PANEL CUT See Figure 42...
... on the saw. Turn the saw , and on the sides as needed . Depending on the table with the edge flush against the rip fence. Wait for the blade to come to a work . If the panel is properly secured to a complete stop before you turn the saw . Make sure.... Use a push stick to move the piece through the cut and past the blade. When the cut work surface to use the rip fence or miter gauge. Add supports to avoid possible serious injury. HEIGHT/BEVEL ADJUSTING HANDWHEEL Fig. 42 35 - OPERATION MAKING A LARGE PANEL CUT See Figure 42...


