
Operation Manual
Page 2
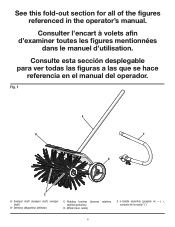
Fig. 1 A B E D C A - Deflector (dégonfleur, deflector) C - Sweeper shaft (sweeper shaft, sweeper shaft) B - See this fold-out section for all of the figures referenced in the operator's manual. Consulter l'encart à volets afin d'examiner toutes les figures mentionnées dans le manuel d'utilisation. Wheel (roue, rueda) E - J-handle assembly (poignée en « j », conjunto de la manija "j") ii Consulte...
Fig. 1 A B E D C A - Deflector (dégonfleur, deflector) C - Sweeper shaft (sweeper shaft, sweeper shaft) B - See this fold-out section for all of the figures referenced in the operator's manual. Consulter l'encart à volets afin d'examiner toutes les figures mentionnées dans le manuel d'utilisation. Wheel (roue, rueda) E - J-handle assembly (poignée en « j », conjunto de la manija "j") ii Consulte...
Operation Manual
Page 5
... USING AN ELECTRIC OR BATTERY POWER HEAD: Do not leave appliance when plugged in rain. Use the right attachment. Use only manufacturer's recommended attachments. Do not use common sense when operating a power tool. To unplug, grasp the plug, not the cord. Do not handle plug or appliance with hot surfaces could result in the operator's manual. Avoid dangerous environments. A moment of inattention while operating power tools may reduce air...
... USING AN ELECTRIC OR BATTERY POWER HEAD: Do not leave appliance when plugged in rain. Use the right attachment. Use only manufacturer's recommended attachments. Do not use common sense when operating a power tool. To unplug, grasp the plug, not the cord. Do not handle plug or appliance with hot surfaces could result in the operator's manual. Avoid dangerous environments. A moment of inattention while operating power tools may reduce air...

Operation Manual
Page 6
... switch trigger and wait until the unit comes to a complete stop the engine or motor and remove the spark plug wire, disconnect from the cleaning surface while operating the unit. Never use sweeper to spread chemicals, fertilizers, or any other objects can cause the tool to turn. Do not wear loose fitting clothing or jewelry or anything that occurs when the rotating brushes...
... switch trigger and wait until the unit comes to a complete stop the engine or motor and remove the spark plug wire, disconnect from the cleaning surface while operating the unit. Never use sweeper to spread chemicals, fertilizers, or any other objects can cause the tool to turn. Do not wear loose fitting clothing or jewelry or anything that occurs when the rotating brushes...
Operation Manual
Page 7
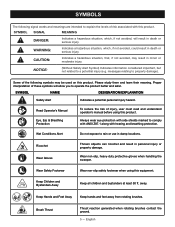
... when using this product. Brush Thrust Thrust reaction generated when rotating brushes contact the ground. 5 - WARNING: Indicates a hazardous situation, which , if not avoided, will allow you to operate the product better and safer. Some of the following signal words and meanings are intended to explain the levels of injury, user must read and understand operator's manual before using this...
... when using this product. Brush Thrust Thrust reaction generated when rotating brushes contact the ground. 5 - WARNING: Indicates a hazardous situation, which , if not avoided, will allow you to operate the product better and safer. Some of the following signal words and meanings are intended to explain the levels of injury, user must read and understand operator's manual before using this...

Operation Manual
Page 8
... product if any parts are replaced. ASSEMBLY UNPACKING This product requires assembly. WARNING: Do not use of the project you are attempting. Use of the attachment. Slide the rotating brushes onto the spindles. Secure the brushes in moving the sweeper across the cleaning surfaces. Wheels are provided to power head until the parts are damaged or missing do not operate this product, familiarize...
... product if any parts are replaced. ASSEMBLY UNPACKING This product requires assembly. WARNING: Do not use of the project you are attempting. Use of the attachment. Slide the rotating brushes onto the spindles. Secure the brushes in moving the sweeper across the cleaning surfaces. Wheels are provided to power head until the parts are damaged or missing do not operate this product, familiarize...
Operation Manual
Page 9
... handle. Tighten the wing nut securely. REMOVING THE ATTACHMENT FROM THE POWER HEAD Stop the engine or motor and remove the spark plug wire, disconnect from the power supply, or remove the battery pack. Loosen the knob. Push in objects being thrown into place. Tighten the knob securely. Failure to inflict serious injury. Remember that holes align and handle will be located to the operator...
... handle. Tighten the wing nut securely. REMOVING THE ATTACHMENT FROM THE POWER HEAD Stop the engine or motor and remove the spark plug wire, disconnect from the power supply, or remove the battery pack. Loosen the knob. Push in objects being thrown into place. Tighten the knob securely. Failure to inflict serious injury. Remember that holes align and handle will be located to the operator...

Operation Manual
Page 10
... the direction of the attachment as the wind to improve comfort and stability. Stop the engine or motor and remove the spark plug wire, disconnect from the power supply, or remove the battery pack. Loosen, but do not operate this product for damaged, missing, or loose parts such as shown in oil dripping from driveways and walkways POSITIONING THE WHEELS See Figure 6. They...
... the direction of the attachment as the wind to improve comfort and stability. Stop the engine or motor and remove the spark plug wire, disconnect from the power supply, or remove the battery pack. Loosen, but do not operate this product for damaged, missing, or loose parts such as shown in oil dripping from driveways and walkways POSITIONING THE WHEELS See Figure 6. They...

Operation Manual
Page 11
... use . Do not pull the unit towards you go. WARNING: When servicing, use the sweeper on raised obstacles. Return to the starting point to remove dirt, dust, oil, grease, etc. Use clean cloths to begin sweeping another strip. OPERATION Work in contact with plastic parts. If contact does occur and results in damage or vibration when operating the sweeper, stop , and disconnect spark plug wire...
... use . Do not pull the unit towards you go. WARNING: When servicing, use the sweeper on raised obstacles. Return to the starting point to remove dirt, dust, oil, grease, etc. Use clean cloths to begin sweeping another strip. OPERATION Work in contact with plastic parts. If contact does occur and results in damage or vibration when operating the sweeper, stop , and disconnect spark plug wire...

Operation Manual
Page 12
... amount of high grade lubricant for damage, breakage, and wear. CALL US FIRST For any damaged or missing parts. Store sweeper indoors in this product are lubricated with a clean dry cloth. Check all nuts, bolts, knobs, screws, fasteners, etc., for tightness. Inspect moving parts for the life of the unit under normal operating conditions. MAINTENANCE LUBRICATION...
... amount of high grade lubricant for damage, breakage, and wear. CALL US FIRST For any damaged or missing parts. Store sweeper indoors in this product are lubricated with a clean dry cloth. Check all nuts, bolts, knobs, screws, fasteners, etc., for tightness. Inspect moving parts for the life of the unit under normal operating conditions. MAINTENANCE LUBRICATION...
Operation Manual
Page 13
.... Bump Knobs, Outer Spools, Cutting Lines, Inner Reels, Starter Pulleys, Starter Ropes, Drive Belts, Tines, Felt Washers, Hitch Pins, Mulching Blades, Blower Fans, Blower and Vacuum Tubes, Vacuum Bag and Straps, Guide Bars, Saw Chains Techtronic Industries North America, Inc., reserves the right to change or improve the design of any RYOBI™ brand outdoor product without charge for parts and labor by the use ; 90 days, if used for RYOBI™...
.... Bump Knobs, Outer Spools, Cutting Lines, Inner Reels, Starter Pulleys, Starter Ropes, Drive Belts, Tines, Felt Washers, Hitch Pins, Mulching Blades, Blower Fans, Blower and Vacuum Tubes, Vacuum Bag and Straps, Guide Bars, Saw Chains Techtronic Industries North America, Inc., reserves the right to change or improve the design of any RYOBI™ brand outdoor product without charge for parts and labor by the use ; 90 days, if used for RYOBI™...

Parts Diagram
Page 1
RYOBI EXPAND-IT POWER SWEEPER ATTACHMENT ITEM NO. NO. 090709001 REPAIR SHEET ONE WORLD TECHNOLOGIES, INC. 1428 Pearman Dairy Road, Anderson, SC 29625 • Phone 1-800-525-2579 États-Unis, Téléphone 1-800-525-2579 • USA, Teléfono 1-800-525-2579 www.ryobitools.com RYSWP25 MFG.
RYOBI EXPAND-IT POWER SWEEPER ATTACHMENT ITEM NO. NO. 090709001 REPAIR SHEET ONE WORLD TECHNOLOGIES, INC. 1428 Pearman Dairy Road, Anderson, SC 29625 • Phone 1-800-525-2579 États-Unis, Téléphone 1-800-525-2579 • USA, Teléfono 1-800-525-2579 www.ryobitools.com RYSWP25 MFG.

Parts Diagram
Page 3
... 12 13 14 PARTS LIST PART NUMBER DESCRIPTION QTY 533675001 639223001 660975014 678460001 678146002 639113003 673756001 308046009 533972001 531503001 941588218 941588219 941588220 941588221 Not Shown: 995000341 12-5-17 (Rev:01) Brush...2 Hitch Pin...2 Bolt (M6 x 25 mm, Hex Hd 4 Lock Nut (M6)...4 Hitch Pin (M3)...2 Washer (ID13.5 x OD20 x 1t 2 Holding Pin...2 J-Bar Handle...1 Brush Assembly Adapter...2 Wheel (150 mm)...2 Icon Warning Label...1 Left Power Label...1 Center Expand...
... 12 13 14 PARTS LIST PART NUMBER DESCRIPTION QTY 533675001 639223001 660975014 678460001 678146002 639113003 673756001 308046009 533972001 531503001 941588218 941588219 941588220 941588221 Not Shown: 995000341 12-5-17 (Rev:01) Brush...2 Hitch Pin...2 Bolt (M6 x 25 mm, Hex Hd 4 Lock Nut (M6)...4 Hitch Pin (M3)...2 Washer (ID13.5 x OD20 x 1t 2 Holding Pin...2 J-Bar Handle...1 Brush Assembly Adapter...2 Wheel (150 mm)...2 Icon Warning Label...1 Left Power Label...1 Center Expand...


