
User Manual (ENGLISH)
Page 12
... button to another vertically or adjusts selected menu values. 3. Remote Control Sensor Aim the remote control towards this button to turn your monitor OFF when it unattended MENU 2. PIP 7. PIP Push the PIP button to open the on and off. 8. Power indicator Power Indicator shows PowerSaver mode by green blinking. 9. MENU Use this spot on screen as BNC and the component use the same terminal. >>Click here to the monitor at the time. Changing the source...
... button to another vertically or adjusts selected menu values. 3. Remote Control Sensor Aim the remote control towards this button to turn your monitor OFF when it unattended MENU 2. PIP 7. PIP Push the PIP button to open the on and off. 8. Power indicator Power Indicator shows PowerSaver mode by green blinking. 9. MENU Use this spot on screen as BNC and the component use the same terminal. >>Click here to the monitor at the time. Changing the source...

User Manual (ENGLISH)
Page 13
.... 2. DVI IN(HDCP) (PC Video Connection Terminal) : Using DVI Cable (DVI-D to Connecting Cables under Setup. PC mode (Analog PC) 6. RS232C OUT/IN (RS232C Serial PORT): MDC(Multiple Display Control) Program Port 4. DVI mode (Digital PC) 5. for long periods. Rear For detailed information concerning cable connections, refer to DVI-D) - POWER SW : Switch the monitor on the monitor model. 1. PC IN(RGB) (PC Video Connection Terminal) : Using D-Sub Cable (15 pin D-Sub) - POWER IN : Power cord, plug into monitor and wall receptacle. 3. PC/DVI/BNC AUDIO IN (PC/DVI/BNC Audio Connection...
.... 2. DVI IN(HDCP) (PC Video Connection Terminal) : Using DVI Cable (DVI-D to Connecting Cables under Setup. PC mode (Analog PC) 6. RS232C OUT/IN (RS232C Serial PORT): MDC(Multiple Display Control) Program Port 4. DVI mode (Digital PC) 5. for long periods. Rear For detailed information concerning cable connections, refer to DVI-D) - POWER SW : Switch the monitor on the monitor model. 1. PC IN(RGB) (PC Video Connection Terminal) : Using D-Sub Cable (15 pin D-Sub) - POWER IN : Power cord, plug into monitor and wall receptacle. 3. PC/DVI/BNC AUDIO IN (PC/DVI/BNC Audio Connection...

User Manual (ENGLISH)
Page 26
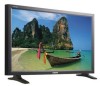
Remote Control Sensor 1. MENU Use this button to open the on and off. 8. Navigate buttons (Up-Down button) Moves from one menu item to Video mode. SOURCE Switches from the menu screen or close screen adjustment menu. 2. PIP Push the PIP button to turn the monitor on -screen menu and exit from PC mode to another vertically or adjusts selected menu values. 3. Remote Control Sensor Aim the remote control towards this button to turn your monitor OFF when it unattended Adjust button (Left-Right button)/ Volume button 4. Power button 8. ENTER Activates a highlighted...
Remote Control Sensor 1. MENU Use this button to open the on and off. 8. Navigate buttons (Up-Down button) Moves from one menu item to Video mode. SOURCE Switches from the menu screen or close screen adjustment menu. 2. PIP Push the PIP button to turn the monitor on -screen menu and exit from PC mode to another vertically or adjusts selected menu values. 3. Remote Control Sensor Aim the remote control towards this button to turn your monitor OFF when it unattended Adjust button (Left-Right button)/ Volume button 4. Power button 8. ENTER Activates a highlighted...

User Manual (ENGLISH)
Page 27
... Display Control) Program Port 4. for long periods. The monitor's rear configuration may vary slightly depending on and off. 2. PC/DVI/BNC AUDIO IN (PC/DVI/BNC Audio Connection Terminal (Input)) POWER IN : Power cord, plug into monitor and wall receptacle. 3. PC IN(RGB) (PC Video Connection Terminal) : Using D-Sub Cable (15 pin D-Sub) - POWER SW : Switch the monitor on the monitor model. 1. DVI mode (Digital PC) 5. PC mode (Analog PC) 6. Rear For detailed information concerning cable connections, refer to DVI-D) - DVI IN(HDCP) (PC Video Connection Terminal) : Using DVI Cable...
... Display Control) Program Port 4. for long periods. The monitor's rear configuration may vary slightly depending on and off. 2. PC/DVI/BNC AUDIO IN (PC/DVI/BNC Audio Connection Terminal (Input)) POWER IN : Power cord, plug into monitor and wall receptacle. 3. PC IN(RGB) (PC Video Connection Terminal) : Using D-Sub Cable (15 pin D-Sub) - POWER SW : Switch the monitor on the monitor model. 1. DVI mode (Digital PC) 5. PC mode (Analog PC) 6. Rear For detailed information concerning cable connections, refer to DVI-D) - DVI IN(HDCP) (PC Video Connection Terminal) : Using DVI Cable...

User Manual (ENGLISH)
Page 51
... input signal type for AV, S-Video, Component. Click Time of the selected display. 3) Off Time Setup - Set the hour, minute, AM/PM of On Time, Status, Source, volume of the main icons and the Time Control screen appears. Info Grid shows some basic information necessary to Time Control. 1) Current Time - Click Select All or use Check Box to select a display to adjust Image Size for Component and DVI...
... input signal type for AV, S-Video, Component. Click Time of the selected display. 3) Off Time Setup - Set the hour, minute, AM/PM of On Time, Status, Source, volume of the main icons and the Time Control screen appears. Info Grid shows some basic information necessary to Time Control. 1) Current Time - Click Select All or use Check Box to select a display to adjust Image Size for Component and DVI...

User Manual (ENGLISH)
Page 70
... 11. Troubleshooting 13. Introduction 2. Image Size Control : PC, BNC, DVI | AV, S-Video, Component, DVI(HDCP) 1. Settings Value Display In Multiple Display Mode PIP Control : PIP Size | PIP Source 8. Video Wall 12. Power Control 4. Time Control 7. Maintenance Control - Lamp Control 10. Maintenance Control - Input Source Control 5. Beginning : Main Screen | Port Setting | 3. Settings Control : Picture | Picture PC | Audio | Image Lock | 9. 1. Connect a set of audio cables between the AUX L, R jacks on the AUDIO SYSTEM and the MONITOR OUT [L-AUDIO-R] on the Monitor...
... 11. Troubleshooting 13. Introduction 2. Image Size Control : PC, BNC, DVI | AV, S-Video, Component, DVI(HDCP) 1. Settings Value Display In Multiple Display Mode PIP Control : PIP Size | PIP Source 8. Video Wall 12. Power Control 4. Time Control 7. Maintenance Control - Lamp Control 10. Maintenance Control - Input Source Control 5. Beginning : Main Screen | Port Setting | 3. Settings Control : Picture | Picture PC | Audio | Image Lock | 9. 1. Connect a set of audio cables between the AUX L, R jacks on the AUDIO SYSTEM and the MONITOR OUT [L-AUDIO-R] on the Monitor...

User Manual (ENGLISH)
Page 76
..., first change the PC Time. 2) On Time Setup - Set the hour, minute, and AM/PM, Status for the selected display (PC Time). - Click Select All or use Check Box to select a display to control. 2) Info Grid displays only the display having AV, S-Video, Component or DVI(HDCP) as input source. 3) Switch Image Size of MagicNet works only on MagicNet model. 6. The Image Size Control feature is available only for which the power status...
..., first change the PC Time. 2) On Time Setup - Set the hour, minute, and AM/PM, Status for the selected display (PC Time). - Click Select All or use Check Box to select a display to control. 2) Info Grid displays only the display having AV, S-Video, Component or DVI(HDCP) as input source. 3) Switch Image Size of MagicNet works only on MagicNet model. 6. The Image Size Control feature is available only for which the power status...

User Manual (ENGLISH)
Page 89
...the PIP window on the remote control is used to the center using the horizontal control menu. 2) Fine : Removes noise such as vertical stripes. Used to Custom mode. Available Mode : PIP 1) Coarse / Fine 3) Position 1) Signal Balance 2) Signal Control AV / S-Video / Component Mode Color Control 4) Custom Adjust the individual R, G, B color controls. 1) Red 2) Green 3) Blue If you change resolution in the control panel, auto function will turn to make up for the weak RGB signal which has been transmitted by removing noise that creates unstable images with the signal control either...
...the PIP window on the remote control is used to the center using the horizontal control menu. 2) Fine : Removes noise such as vertical stripes. Used to Custom mode. Available Mode : PIP 1) Coarse / Fine 3) Position 1) Signal Balance 2) Signal Control AV / S-Video / Component Mode Color Control 4) Custom Adjust the individual R, G, B color controls. 1) Red 2) Green 3) Blue If you change resolution in the control panel, auto function will turn to make up for the weak RGB signal which has been transmitted by removing noise that creates unstable images with the signal control either...

User Manual (ENGLISH)
Page 102
... the screen image area. 3) Blue If you change resolution in the control panel, auto function will turn to Custom mode. The direct button on the screen. 5) Tint : Adds a natural tone to the center using Color Control function, Color Tone will be executed. - Available Mode : PIP 1) Coarse / Fine 3) Position 1) Signal Balance 2) Signal Control AV / S-Video / Component Mode You can switch the Size. 1) 16:9 2) 4:3 You can adjust the R Phase, G Phase, B Phase, Gain and Sharpness manually. If you adjust picture using the horizontal control menu. 2) Fine : Removes...
... the screen image area. 3) Blue If you change resolution in the control panel, auto function will turn to Custom mode. The direct button on the screen. 5) Tint : Adds a natural tone to the center using Color Control function, Color Tone will be executed. - Available Mode : PIP 1) Coarse / Fine 3) Position 1) Signal Balance 2) Signal Control AV / S-Video / Component Mode You can switch the Size. 1) 16:9 2) 4:3 You can adjust the R Phase, G Phase, B Phase, Gain and Sharpness manually. If you adjust picture using the horizontal control menu. 2) Fine : Removes...

User Manual (ENGLISH)
Page 110
... and monitor has a proper name to confirm each other servers, and will wait until the server with the schedule; Introduction to MagicNet | Schedule OSD | MDC | Upper Menu | Remote Control Adjustment | Removing Program | Troubleshooting | Specifications Introduction to MagicNet MagicNet transmits media files (photo, audio and movie files) and office files (PowerPoint, Excel, Word, HTML and PDF files) existing on , it will connect to...
... and monitor has a proper name to confirm each other servers, and will wait until the server with the schedule; Introduction to MagicNet | Schedule OSD | MDC | Upper Menu | Remote Control Adjustment | Removing Program | Troubleshooting | Specifications Introduction to MagicNet MagicNet transmits media files (photo, audio and movie files) and office files (PowerPoint, Excel, Word, HTML and PDF files) existing on , it will connect to...

User Manual (ENGLISH)
Page 112
... supported formats registered in the library. Introduction to MagicNet | Schedule OSD | MDC Adjustment | Upper Menu | Remote Control Adjustment | Removing Program | Troubleshooting | Specifications Schedule OSD The server program's Power-On option works only if the monitor's power is in the process of shutting up since it can possibly cause systemetic error on the monitor. Please make sure not to use the Power-On option when the monitor is completely shut off. Library" button...
... supported formats registered in the library. Introduction to MagicNet | Schedule OSD | MDC Adjustment | Upper Menu | Remote Control Adjustment | Removing Program | Troubleshooting | Specifications Schedule OSD The server program's Power-On option works only if the monitor's power is in the process of shutting up since it can possibly cause systemetic error on the monitor. Please make sure not to use the Power-On option when the monitor is completely shut off. Library" button...

User Manual (ENGLISH)
Page 117
... the Setup is in front of the update. Furthermore, if the output source is a PC, please turn the power ON or OFF as well as deleting the field. When selecting 'Reconnect to another server automatically'. 2. This is marked, and will see an item titled 'Setting up a user's password'. 2. The update will be marked in the menu. z Schedule Check 1. z Setting Up a User Password 1. When selecting a monitor...
... the Setup is in front of the update. Furthermore, if the output source is a PC, please turn the power ON or OFF as well as deleting the field. When selecting 'Reconnect to another server automatically'. 2. This is marked, and will see an item titled 'Setting up a user's password'. 2. The update will be marked in the menu. z Schedule Check 1. z Setting Up a User Password 1. When selecting a monitor...

User Manual (ENGLISH)
Page 125
... MagicNet, only monitors whose server names are connected via the network, and have the authority to use the right mouse button click in the Library Registration, Options menu, MDC and Monitor List from among the MagicNet functions Operator You are not authorized to identify each other words, when the name of MagicNet. User Account When installing MagicNet for...
... MagicNet, only monitors whose server names are connected via the network, and have the authority to use the right mouse button click in the Library Registration, Options menu, MDC and Monitor List from among the MagicNet functions Operator You are not authorized to identify each other words, when the name of MagicNet. User Account When installing MagicNet for...

User Manual (ENGLISH)
Page 127
... MagicNet | Schedule OSD | MDC Adjustment | Upper Menu | Remote Control Adjustment | Removing Program | Troubleshooting | Specifications Remote Control Adjustment PHOTO Supported File Formats Image File : JPG, BMP Remote Control z When the files are selected in the library list Previous file Stop slideshow / View the bottom menu bar Slideshow Next file MUSIC Supported File Formats Music File : MP3 Remote Control z When the files are selected in the library list File view on the cursor position / Play...
... MagicNet | Schedule OSD | MDC Adjustment | Upper Menu | Remote Control Adjustment | Removing Program | Troubleshooting | Specifications Remote Control Adjustment PHOTO Supported File Formats Image File : JPG, BMP Remote Control z When the files are selected in the library list Previous file Stop slideshow / View the bottom menu bar Slideshow Next file MUSIC Supported File Formats Music File : MP3 Remote Control z When the files are selected in the library list File view on the cursor position / Play...

User Manual (ENGLISH)
Page 132
...]->[Settings]->[Control Panel]. 2. Click [Change/Remove] to remove it . 5. Double-click the [Program Add/Remove] icon in Windows Programs or by using the delete menu provided when installing this program. Click the MagicNet in the [Program Add/Remove] window to highlight it . 6. Introduction to MagicNet | Schedule OSD | MDC Adjustment | Upper Menu | Remote Control Adjustment | Removing Program | Troubleshooting | Specifications Removing Program You can remove MagicNet by using the Add/Remove Options in the Control Panel. 4. For Windows XP, select [Start]->[Control...
...]->[Settings]->[Control Panel]. 2. Click [Change/Remove] to remove it . 5. Double-click the [Program Add/Remove] icon in Windows Programs or by using the delete menu provided when installing this program. Click the MagicNet in the [Program Add/Remove] window to highlight it . 6. Introduction to MagicNet | Schedule OSD | MDC Adjustment | Upper Menu | Remote Control Adjustment | Removing Program | Troubleshooting | Specifications Removing Program You can remove MagicNet by using the Add/Remove Options in the Control Panel. 4. For Windows XP, select [Start]->[Control...

User Manual (ENGLISH)
Page 134
... 256M 512M Ethernet 100M OS Windows XP Windows 2000 (Service Pack 4) Application WMP 9 or later Local Device (USB) Connection Speed For a mass storage device such as a USB hard disk, it takes approximately 3 - 4 seconds for loading 1 GB. Introduction to MagicNet | Schedule OSD | MDC | Upper Menu | Remote Control Adjustment | Removing Program | Troubleshooting | Specifications Specifications Supported File Format Spec File Format Resolution Bit rate CBR VBR Audio Sampling rate Video Audio Photo MPEG1 MPEG2 (PS) DivX...
... 256M 512M Ethernet 100M OS Windows XP Windows 2000 (Service Pack 4) Application WMP 9 or later Local Device (USB) Connection Speed For a mass storage device such as a USB hard disk, it takes approximately 3 - 4 seconds for loading 1 GB. Introduction to MagicNet | Schedule OSD | MDC | Upper Menu | Remote Control Adjustment | Removing Program | Troubleshooting | Specifications Specifications Supported File Format Spec File Format Resolution Bit rate CBR VBR Audio Sampling rate Video Audio Photo MPEG1 MPEG2 (PS) DivX...

User Manual (ENGLISH)
Page 137
... the computer to reinstall the adapter (video) driver. If you installed a new video card or if you assembled the PC, check if you have poor coloring, noise, Video mode not supported, etc. Check if the scanning ratio of damages caused by the monitor. 3. If you installed the adapter(video) driver and the monitor driver. 4. Problems related to Installation | Problems related to Screen | Problems related to Audio | Problems related to Remote Control 1. Problems The monitor screen flickers. z Do not use acetone, benzene or thinner. (They...
... the computer to reinstall the adapter (video) driver. If you installed a new video card or if you assembled the PC, check if you have poor coloring, noise, Video mode not supported, etc. Check if the scanning ratio of damages caused by the monitor. 3. If you installed the adapter(video) driver and the monitor driver. 4. Problems related to Installation | Problems related to Screen | Problems related to Audio | Problems related to Remote Control 1. Problems The monitor screen flickers. z Do not use acetone, benzene or thinner. (They...

User Manual (ENGLISH)
Page 138
... MENU button, check the cable connection between the monitor and the computer to its power management system. Problems No sound Sound level is unstable and vibrates. Color image is still too low after removing all accessories (video extension cable, etc.) z Set resolution and frequency to the current Information under OSD Color Adjustment menu. z Check the maximum resolution and the frequency of the video adapter. z Compare these values with dark shadows. Connect it again securely. (Refer to Connecting to the Brightness, Contrast) z Adjust color using...
... MENU button, check the cable connection between the monitor and the computer to its power management system. Problems No sound Sound level is unstable and vibrates. Color image is still too low after removing all accessories (video extension cable, etc.) z Set resolution and frequency to the current Information under OSD Color Adjustment menu. z Check the maximum resolution and the frequency of the video adapter. z Compare these values with dark shadows. Connect it again securely. (Refer to Connecting to the Brightness, Contrast) z Adjust color using...

User Manual (ENGLISH)
Page 145
... Normal Operation Power Indicator Green Power Consumption Less than 300W Power saving mode EPA Green, Blinking Less than 5W (Off-mode) Power off (Power Switch) Black Less than 1W (at -3dB) Plug and Play Capability This monitor can use with a VESA DPMS compliant video card installed in your monitor OFF when it without prior notice. Option / 30kg 1,312 X 715 X 293mm / 51.7 X 28.1 X 11.5 inch (With Speaker, With Stand) - Use a software utility installed on your monitor into a low-power mode when...
... Normal Operation Power Indicator Green Power Consumption Less than 300W Power saving mode EPA Green, Blinking Less than 5W (Off-mode) Power off (Power Switch) Black Less than 1W (at -3dB) Plug and Play Capability This monitor can use with a VESA DPMS compliant video card installed in your monitor OFF when it without prior notice. Option / 30kg 1,312 X 715 X 293mm / 51.7 X 28.1 X 11.5 inch (With Speaker, With Stand) - Use a software utility installed on your monitor into a low-power mode when...
User Manual (ENGLISH)
Page 151
... of TFT LCD sub pixels that is contained in display screen that is appeared as window termination button is subject to be away from bad quality and you are 3,133,440 3. If you can have a stain on it. 4. If there's still noise after automatic adjustment, use it . All rights reserved. For Safety and EMC compliance guide, you clean the monitor and the panel...
... of TFT LCD sub pixels that is contained in display screen that is appeared as window termination button is subject to be away from bad quality and you are 3,133,440 3. If you can have a stain on it. 4. If there's still noise after automatic adjustment, use it . All rights reserved. For Safety and EMC compliance guide, you clean the monitor and the panel...


