

Quick Guide (ENGLISH)
Page 3
... any way. 2. The LCD screen has been Keep the Camcorder away from inside to outside to charge it . However, there may cause condensation to direct sunlight. If your Samsung product are normal and do not affect the recorded picture in this manual or other documentation provided with a dry type cleaning cassette. - Direct sunlight can damage the CCD(Charge Coupled Device). Dropping the Battery pack may damage it...
... any way. 2. The LCD screen has been Keep the Camcorder away from inside to outside to charge it . However, there may cause condensation to direct sunlight. If your Samsung product are normal and do not affect the recorded picture in this manual or other documentation provided with a dry type cleaning cassette. - Direct sunlight can damage the CCD(Charge Coupled Device). Dropping the Battery pack may damage it...
Quick Guide (ENGLISH)
Page 4
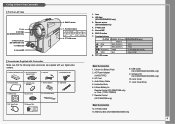
... LCD screen Accessories Supplied with Camcorder Make sure that the following basic accessories are supplied with your digital video camera. 1. S-Video Cable 13. Lens 2. Internal MIC 6. EASY Q button 7. AC Power Adapter (AA-E8 TYPE) 3. Lens 2. Remote sensor (SC-D354/D355 only) 4. Internal MIC 6. Remote Control 8. S-Video Cable 13. Lithium Battery (CR2025) 7. Memory Stick (SC-D353/D354/D355 only) 4 Software CD (SC-D352/D353/D354/D355 only) 10. Memory Stick 1. REV : FF REC SEARCH + FWD : PLAY/STILL FADE S.SHOW(SLIDE SHOW) : STOP BLC...
... LCD screen Accessories Supplied with Camcorder Make sure that the following basic accessories are supplied with your digital video camera. 1. S-Video Cable 13. Lens 2. Internal MIC 6. EASY Q button 7. AC Power Adapter (AA-E8 TYPE) 3. Lens 2. Remote sensor (SC-D354/D355 only) 4. Internal MIC 6. Remote Control 8. S-Video Cable 13. Lithium Battery (CR2025) 7. Memory Stick (SC-D353/D354/D355 only) 4 Software CD (SC-D352/D353/D354/D355 only) 10. Memory Stick 1. REV : FF REC SEARCH + FWD : PLAY/STILL FADE S.SHOW(SLIDE SHOW) : STOP BLC...
Quick Guide (ENGLISH)
Page 7
... ✤ To play the recorded tape in Player mode. Connecting to PLAYER. 2. Playback Tape Playback ✤ The playback function works only in Player mode. 3. Playback on the TV to a TV which has Audio/Video input jacks 1. Connect the Camcorder and TV with the Audio/Video cable. ■ The yellow jack: Video ■ The white jack: Audio(L) - Video input-Yellow Audio input (left )-White Audio input (right)-Red Camcorder TV Antenna Audio/Video S-Video 4. Mono ■ The red jack: Audio(R) 2. Set the Mode switch to the TV user's manual. 5. Refer to TAPE. (SC...
... ✤ To play the recorded tape in Player mode. Connecting to PLAYER. 2. Playback Tape Playback ✤ The playback function works only in Player mode. 3. Playback on the TV to a TV which has Audio/Video input jacks 1. Connect the Camcorder and TV with the Audio/Video cable. ■ The yellow jack: Video ■ The white jack: Audio(L) - Video input-Yellow Audio input (left )-White Audio input (right)-Red Camcorder TV Antenna Audio/Video S-Video 4. Mono ■ The red jack: Audio(R) 2. Set the Mode switch to the TV user's manual. 5. Refer to TAPE. (SC...

Quick Guide (ENGLISH)
Page 8
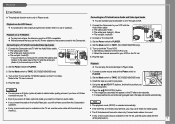
... using a videocassette. - If the picture quality has not improved, repeat the operation. ■ Clean the video heads with a dry type cassette cleaner. ■ Some cleaning cassette products stop recording, press the Start/Stop button again. ■ STBY is displayed on the LCD screen. Basic Recording Making your First Recording 1.Connect a power source to the Camcorder. 1 2 (A Battery pack or a AC Power adapter) ■ Insert a cassette. 2.Remove the Lens cover. 3.Set the Power switch to CAMERA. ■ Open the LCD screen. √ √ ■ Set the Mode switch to TAPE...
... using a videocassette. - If the picture quality has not improved, repeat the operation. ■ Clean the video heads with a dry type cassette cleaner. ■ Some cleaning cassette products stop recording, press the Start/Stop button again. ■ STBY is displayed on the LCD screen. Basic Recording Making your First Recording 1.Connect a power source to the Camcorder. 1 2 (A Battery pack or a AC Power adapter) ■ Insert a cassette. 2.Remove the Lens cover. 3.Set the Power switch to CAMERA. ■ Open the LCD screen. √ √ ■ Set the Mode switch to TAPE...

User Manual (ENGLISH)
Page 21
... du zoom. - It is fully charged. Connect the DC cable to a wall socket. 3. mode d'utilisation (caméscope/appareil photo/visée à l'aide de l'écran ACL...) ; - Il est conseillé de prévoir des batteries supplémentaires. The type and capacity of the Battery pack you are using . - Connect the AC Power adapter to an AC Cord and connect the AC Cord to...
... du zoom. - It is fully charged. Connect the DC cable to a wall socket. 3. mode d'utilisation (caméscope/appareil photo/visée à l'aide de l'écran ACL...) ; - Il est conseillé de prévoir des batteries supplémentaires. The type and capacity of the Battery pack you are using . - Connect the AC Power adapter to an AC Cord and connect the AC Cord to...

User Manual (ENGLISH)
Page 77
... LCD screen. Press the (PLAY/STILL) button to be dubbed. 4. I To utilize an external MIC or sound source, connect a microphone to the MIC jack or use an external microphone, 1 DV connect the microphone to connect external sound source input. Placez l'interrupteur Mode sur TAPE. 3. I L'icône de post-sonorisation ( ) s'affiche sur l'écran ACL. I Audio Dubbing icon ( ) will not be erased. MIC 3. I If you want to use the AV cable to the external MIC USB input jack on the Camcorder...
... LCD screen. Press the (PLAY/STILL) button to be dubbed. 4. I To utilize an external MIC or sound source, connect a microphone to the MIC jack or use an external microphone, 1 DV connect the microphone to connect external sound source input. Placez l'interrupteur Mode sur TAPE. 3. I L'icône de post-sonorisation ( ) s'affiche sur l'écran ACL. I Audio Dubbing icon ( ) will not be erased. MIC 3. I If you want to use the AV cable to the external MIC USB input jack on the Camcorder...

User Manual (ENGLISH)
Page 101
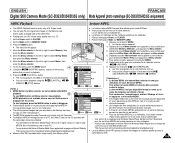
... Power switch to MEMORY CARD. 3. Press the MENU button. Placez l'interrupteur Mode sur MEMORY CARD. 3. Memory then press the Menu selector. Memory or Memory card, a message All M.Play Select format ? Déplacez le bouton Menu selector vers la gauche ou vers la droite pour sélectionner Yes puis appuyez sur Menu selector. I Formatting the Memory card using a different device will be erased completely and erased still 7 images/motion clips cannot be recovered. 2/46 800x600 I A Memory Stick with this Camcorder has been formatted...
... Power switch to MEMORY CARD. 3. Press the MENU button. Placez l'interrupteur Mode sur MEMORY CARD. 3. Memory then press the Menu selector. Memory or Memory card, a message All M.Play Select format ? Déplacez le bouton Menu selector vers la gauche ou vers la droite pour sélectionner Yes puis appuyez sur Menu selector. I Formatting the Memory card using a different device will be erased completely and erased still 7 images/motion clips cannot be recovered. 2/46 800x600 I A Memory Stick with this Camcorder has been formatted...
User Manual (ENGLISH)
Page 103
... de Microsoft. - Set the Power switch to MEMORY CARD. 3. I You can control playback using the (PLAY/STILL) / M.Player Mode √Memory M.Play Select Delete Delete All Protect Print Mark √Photo √Off 9. Pour quitter le menu, appuyez sur le bouton MENU. 8. I La liste des menus apparaît. 4. Player mode. ✤ You can download the Microsoft Windows Media Player applied each languages on the Memory card may not play on by this Camcorder. Pour commencer l'enregistrement...
... de Microsoft. - Set the Power switch to MEMORY CARD. 3. I You can control playback using the (PLAY/STILL) / M.Player Mode √Memory M.Play Select Delete Delete All Protect Print Mark √Photo √Off 9. Pour quitter le menu, appuyez sur le bouton MENU. 8. I La liste des menus apparaît. 4. Player mode. ✤ You can download the Microsoft Windows Media Player applied each languages on the Memory card may not play on by this Camcorder. Pour commencer l'enregistrement...

Flash Guide (flash Manual) (English)
Page 2
... Battery Installation 19 Battery Installation for the Internal Clock 19 Battery Installation for the Remote Control (SC-D354/D355 only 19 Connecting a Power Source 20 To use the AC Power Adapter and DC Cable 20 To select the Camcorder Mode (SC-D353/D354/D355 only 20 Using the Lithium Ion Battery Pack 21 Charging the Lithium Ion Battery Pack 21 Table of continuous Recording Time based on Model and Battery Type ......22 Battery Level Display 23 OSD (On Screen Display in Camera/Play Modes...
... Battery Installation 19 Battery Installation for the Internal Clock 19 Battery Installation for the Remote Control (SC-D354/D355 only 19 Connecting a Power Source 20 To use the AC Power Adapter and DC Cable 20 To select the Camcorder Mode (SC-D353/D354/D355 only 20 Using the Lithium Ion Battery Pack 21 Charging the Lithium Ion Battery Pack 21 Table of continuous Recording Time based on Model and Battery Type ......22 Battery Level Display 23 OSD (On Screen Display in Camera/Play Modes...

Flash Guide (flash Manual) (English)
Page 3
... 51 53 Rec Mode ( 54 Audio Mode ( 55 Wind Cut ( 56 Shutter Speed & Exposure ( 57 57 Auto Focus /Manual Focus ( / 58 ...58 ...58 White Balance ( 59 : 60 DIS (Digital Image Stabilizer 61 : DIS (Digital Image Stabilizer 62 (Program AE 63 (Program AE 64 : (Program AE 64 3 ENGLISH Contents Basic Recording 35 Using the Viewfinder 35 Adjusting the Focus 35 Inserting and Ejecting a Cassette 36 Hints for Stable Image Recording 37 Recording with the LCD Screen 37 Recording with the...
... 51 53 Rec Mode ( 54 Audio Mode ( 55 Wind Cut ( 56 Shutter Speed & Exposure ( 57 57 Auto Focus /Manual Focus ( / 58 ...58 ...58 White Balance ( 59 : 60 DIS (Digital Image Stabilizer 61 : DIS (Digital Image Stabilizer 62 (Program AE 63 (Program AE 64 : (Program AE 64 3 ENGLISH Contents Basic Recording 35 Using the Viewfinder 35 Adjusting the Focus 35 Inserting and Ejecting a Cassette 36 Hints for Stable Image Recording 37 Recording with the LCD Screen 37 Recording with the...
Flash Guide (flash Manual) (English)
Page 4
... Sound 77 Dubbed Audio Playback 78 IEEE 1394 Data Transfer 79 USB Interface (SC-D352/D353/D354/D355 only 81 Digital Still Camera Mode (SC-D353/D354/D355 only)...... 87 Memory Stick (Optional Accessory 87 Memory Stick Functions 87 Inserting and Ejecting the Memory Card 88 Structure of Folders and Files on the Memory Card 89 Image Format 89 Selecting the Camcorder Mode 89 Selecting the Built-in Memory (SC-D354/D355 only 90 Using Quick Menu: Memory Type 90 Digital...
... Sound 77 Dubbed Audio Playback 78 IEEE 1394 Data Transfer 79 USB Interface (SC-D352/D353/D354/D355 only 81 Digital Still Camera Mode (SC-D353/D354/D355 only)...... 87 Memory Stick (Optional Accessory 87 Memory Stick Functions 87 Inserting and Ejecting the Memory Card 88 Structure of Folders and Files on the Memory Card 89 Image Format 89 Selecting the Camcorder Mode 89 Selecting the Built-in Memory (SC-D354/D355 only 90 Using Quick Menu: Memory Type 90 Digital...

Flash Guide (flash Manual) (English)
Page 12
... 1. Lens Cover Strap 3. Lens Cover 11. Memory Stick 1. 2. (AA-E8 ) 3. 4. Lithium Ion Battery Pack 2. Instruction Book 6. USB ( SC-D352/ D353/D354/D355) 9. Lens Cover 2. AC Power Adapter (AA-E8 TYPE) 5. Software CD (SC-D352/D353/D354/D355 only) 10. Audio/Video Cable 7. S-Video Cable 12 13. AC Cord 6. Basic Accessories 1. AC Power Adapter (AA-E8 TYPE) 3. Lithium Battery for Remote Control (SC-D354/D355 only) or Clock. (TYPE: CR2025) 7. ENGLISH Getting to Know Your Camcorder Accessories Supplied with Camcorder...
... 1. Lens Cover Strap 3. Lens Cover 11. Memory Stick 1. 2. (AA-E8 ) 3. 4. Lithium Ion Battery Pack 2. Instruction Book 6. USB ( SC-D352/ D353/D354/D355) 9. Lens Cover 2. AC Power Adapter (AA-E8 TYPE) 5. Software CD (SC-D352/D353/D354/D355 only) 10. Audio/Video Cable 7. S-Video Cable 12 13. AC Cord 6. Basic Accessories 1. AC Power Adapter (AA-E8 TYPE) 3. Lithium Battery for Remote Control (SC-D354/D355 only) or Clock. (TYPE: CR2025) 7. ENGLISH Getting to Know Your Camcorder Accessories Supplied with Camcorder...

Flash Guide (flash Manual) (English)
Page 17
.... ZOOM 7. (FF) ( ) 18. Direction ( / ) (see page 74) 17. ZERO MEMORY 5. Direction SC-D354/D355 18. PHOTO ( ) ( 68 ) 11. SELF TIMER ( ) ( 43 ) 4. A.DUB( ) ( 77 ) 17. DISPLAY 9. (PLAY) 10. START/STOP 3. Zoom 16. START/STOP 3. PHOTO SEARCH 6. PHOTO SEARCH ( ) 16. SELF TIMER 4. DISPLAY 17. X2 15. PHOTO 2. DATE/TIME 16. DISPLAY 2. ADV 1. Zoom 18. X2 (see page 73) 8. (REW) ( ) 9. (PLAY) 10. ( / ) ( 73 ) 17 START/STOP ( / ) 12. (STOP) ( ) 3. X2 ( 74 ) 6. ENGLISH Getting to Know Your Camcorder Remote Control...
.... ZOOM 7. (FF) ( ) 18. Direction ( / ) (see page 74) 17. ZERO MEMORY 5. Direction SC-D354/D355 18. PHOTO ( ) ( 68 ) 11. SELF TIMER ( ) ( 43 ) 4. A.DUB( ) ( 77 ) 17. DISPLAY 9. (PLAY) 10. START/STOP 3. Zoom 16. START/STOP 3. PHOTO SEARCH 6. PHOTO SEARCH ( ) 16. SELF TIMER 4. DISPLAY 17. X2 15. PHOTO 2. DATE/TIME 16. DISPLAY 2. ADV 1. Zoom 18. X2 (see page 73) 8. (REW) ( ) 9. (PLAY) 10. ( / ) ( 73 ) 17 START/STOP ( / ) 12. (STOP) ( ) 3. X2 ( 74 ) 6. ENGLISH Getting to Know Your Camcorder Remote Control...

Flash Guide (flash Manual) (English)
Page 32
...Select MENU Exit Camera Mode Back LCD Bright [18] LCD Color Date/Time TV Display Adjust Select MENU Exit 1. POWER( ) PLAYER( ) CAMERA( ) 2. I 4. ENGLISH Display Menu Setting Adjusting the LCD Screen ✤ This function works in Camera/Player/M.Cam/M.Player modes. ✤ Camera Player ,M.Cam,M.Player ✤ Your Camcorder is equipped with a 2.36 inch color Liquid Crystal ✤ 2.36 , Display(LCD) screen, which enables you to view what you are recording or playing back directly. ✤ Depending on the conditions under which you are using the Camcorder (indoors...
...Select MENU Exit Camera Mode Back LCD Bright [18] LCD Color Date/Time TV Display Adjust Select MENU Exit 1. POWER( ) PLAYER( ) CAMERA( ) 2. I 4. ENGLISH Display Menu Setting Adjusting the LCD Screen ✤ This function works in Camera/Player/M.Cam/M.Player modes. ✤ Camera Player ,M.Cam,M.Player ✤ Your Camcorder is equipped with a 2.36 inch color Liquid Crystal ✤ 2.36 , Display(LCD) screen, which enables you to view what you are recording or playing back directly. ✤ Depending on the conditions under which you are using the Camcorder (indoors...

Flash Guide (flash Manual) (English)
Page 33
... data area of a tape. - Set the Power switch to TAPE or MEMORY CARD. 2. LCD Bright LCD Color Date/Time √Off TV Display √On 5. , Date/Time Menu selector( ) I , Date/Time( / ) "12:00 AM JAN.1,2005" - - I Display, then press the Menu selector. 5. ENGLISH Display Menu Setting Displaying the Date/Time Date/Time ( / ) ✤ The Date/Time function works in Camera/Player/M.Cam/M.Player ✤ Camera Player ,M.Cam,M.Player modes. ✤ Date/Time( / ) ✤ The date and time are automatically recorded on page 27. Set the Mode switch to CAMERA...
... data area of a tape. - Set the Power switch to TAPE or MEMORY CARD. 2. LCD Bright LCD Color Date/Time √Off TV Display √On 5. , Date/Time Menu selector( ) I , Date/Time( / ) "12:00 AM JAN.1,2005" - - I Display, then press the Menu selector. 5. ENGLISH Display Menu Setting Displaying the Date/Time Date/Time ( / ) ✤ The Date/Time function works in Camera/Player/M.Cam/M.Player ✤ Camera Player ,M.Cam,M.Player modes. ✤ Date/Time( / ) ✤ The date and time are automatically recorded on page 27. Set the Mode switch to CAMERA...

Flash Guide (flash Manual) (English)
Page 69
... after connecting the Camcorder to view. (see page 32) 1. I To stop the play operation, press the (STOP) button. Adjusting the LCD Bright/Color during Playback 5 ✤ You can monitor the playback picture on the LCD screen. ✤ Player( ) 1. I , , 6. I I (PLAY/STILL( / )) , , (STOP( )) ✤ / ✤ ( 32 ) [ Notes ] I For searching and viewing still images recorded onto tape. I 5. (REW( )) , I , (STOP( )) I Adjust the angle of the LCD screen and set the brightness or color if necessary. 5. Set the Power switch to TAPE. 1 (SC...
... after connecting the Camcorder to view. (see page 32) 1. I To stop the play operation, press the (STOP) button. Adjusting the LCD Bright/Color during Playback 5 ✤ You can monitor the playback picture on the LCD screen. ✤ Player( ) 1. I , , 6. I I (PLAY/STILL( / )) , , (STOP( )) ✤ / ✤ ( 32 ) [ Notes ] I For searching and viewing still images recorded onto tape. I 5. (REW( )) , I , (STOP( )) I Adjust the angle of the LCD screen and set the brightness or color if necessary. 5. Set the Power switch to TAPE. 1 (SC...

Flash Guide (flash Manual) (English)
Page 86
.... 2. Set the Mode switch to MEMORY CARD, set the Power switch to the USB port on the Camcorder and the other end to CAMERA or PLAYER. 2. USB ✤ USB ✤ ✤ "avi" DV Driver, Video Codec, DirectX 9.0 , "jpg" 1. DV USB AV MIC I I audio ✤ 1. 2. Setup and execute Windows Movie Maker or the Ulead VIDEO Studio Software application provided on a PC. 1. If this occurs, remove all USB devices from the PC or the Camcorder while transferring, the data transmission will stop...
.... 2. Set the Mode switch to MEMORY CARD, set the Power switch to the USB port on the Camcorder and the other end to CAMERA or PLAYER. 2. USB ✤ USB ✤ ✤ "avi" DV Driver, Video Codec, DirectX 9.0 , "jpg" 1. DV USB AV MIC I I audio ✤ 1. 2. Setup and execute Windows Movie Maker or the Ulead VIDEO Studio Software application provided on a PC. 1. If this occurs, remove all USB devices from the PC or the Camcorder while transferring, the data transmission will stop...

Flash Guide (flash Manual) (English)
Page 117
..., and cannot be dirty. The Viewfinder lens has not been adjusted. work in the Manual Focus mode. button does not work. Check the Power switch is too great for more than 5 minutes without using it is too low. Check the Battery pack or the AC Power adapter. ENGLISH Troubleshooting ✤ If these instructions do not solve your problem, contact your ✤ nearest Samsung authorized service center. Charge runs out quickly. The Camcorder shuts off automatically.
..., and cannot be dirty. The Viewfinder lens has not been adjusted. work in the Manual Focus mode. button does not work. Check the Power switch is too great for more than 5 minutes without using it is too low. Check the Battery pack or the AC Power adapter. ENGLISH Troubleshooting ✤ If these instructions do not solve your problem, contact your ✤ nearest Samsung authorized service center. Charge runs out quickly. The Camcorder shuts off automatically.

Flash Guide (flash Manual) (English)
Page 118
... LCD screen/Viewfinder Size/dot number LCD screen Method Viewfinder 2.36 inchs 112k TFT LCD B/W LCD (SC-D351/D352/D353/D354 only), Color LCD (SC-D355 only) Connectors Video output S-video output Audio output DV input/output USB output External mic 1Vp-p (75Ω terminated) Y: 1Vp-p, 75Ω, C: 0. 286Vp-p, 75Ω -7.5dBs (600Ω terminated) 4pin special in/out connector Mini-B type connector Ø3.5 stereo General Power source Power source type Power consumption (Recording) Operating temperature Storage temperature External dimension Weight Internal MIC Remote control...
... LCD screen/Viewfinder Size/dot number LCD screen Method Viewfinder 2.36 inchs 112k TFT LCD B/W LCD (SC-D351/D352/D353/D354 only), Color LCD (SC-D355 only) Connectors Video output S-video output Audio output DV input/output USB output External mic 1Vp-p (75Ω terminated) Y: 1Vp-p, 75Ω, C: 0. 286Vp-p, 75Ω -7.5dBs (600Ω terminated) 4pin special in/out connector Mini-B type connector Ø3.5 stereo General Power source Power source type Power consumption (Recording) Operating temperature Storage temperature External dimension Weight Internal MIC Remote control...

Flash Guide (flash Manual) (English)
Page 119
... Strap 18 - B - Cassette ( Cleaning ( Clock Set ( Connecting ( 36 113 27 71 - Date/Time 33 DC Cable (DC 20 Deleting 99 Demonstration 31 DIS ( 61 DIigital Effect ( 65 DV 79,80 - F - IEEE1394 79 LCD monitor ( - Memory card ( 88 Memory Stick 87 MJPEG Recording ( MJPEG 102 - P - USB 81~86 Viewfinder ( -V 35 -W - ENGLISH Index - S Shutter Speed 57 Sound 70 Speaker 70 Still images 95 -T Tele MACRO 44 TV Display 34 - Rec Mode ( Rec Search ( Remote control ( 54 41 17...
... Strap 18 - B - Cassette ( Cleaning ( Clock Set ( Connecting ( 36 113 27 71 - Date/Time 33 DC Cable (DC 20 Deleting 99 Demonstration 31 DIS ( 61 DIigital Effect ( 65 DV 79,80 - F - IEEE1394 79 LCD monitor ( - Memory card ( 88 Memory Stick 87 MJPEG Recording ( MJPEG 102 - P - USB 81~86 Viewfinder ( -V 35 -W - ENGLISH Index - S Shutter Speed 57 Sound 70 Speaker 70 Still images 95 -T Tele MACRO 44 TV Display 34 - Rec Mode ( Rec Search ( Remote control ( 54 41 17...


