Owners Manual
Page 1
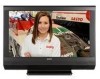
... Digital Television. Model Nos.: DP26648 Nos. de Modelo: Nos de modèle : DP32648 Welcome to the World of Contents . . . . 4 ESPAÑOL TV de LCD HDTV Manual de Instrucciones Contenido 22 FRANÇAIS TVHD ACL Manuel d'instructions Table des matières . . 39 Need assistance? ENGLISH LCD HDTV Owner's Manual Table of Sanyo Thank you for Performance, Reliability, Features, Value, and Styling. © 2008 Sanyo Manufacturing Corporation Part...
... Digital Television. Model Nos.: DP26648 Nos. de Modelo: Nos de modèle : DP32648 Welcome to the World of Contents . . . . 4 ESPAÑOL TV de LCD HDTV Manual de Instrucciones Contenido 22 FRANÇAIS TVHD ACL Manuel d'instructions Table des matières . . 39 Need assistance? ENGLISH LCD HDTV Owner's Manual Table of Sanyo Thank you for Performance, Reliability, Features, Value, and Styling. © 2008 Sanyo Manufacturing Corporation Part...

Owners Manual
Page 2
...-5032 When installing an outside antenna is grounded so as vases, shall be sure the antenna system is connected to keep from the apparatus. 11. NO USER-SERVICEABLE PARTS INSIDE. A grounding-type plug has two blades and a third grounding prong. Use only with liquids, such as to dripping or splashing and no objects filled with the cart, stand, tripod, bracket, or table specified...
...-5032 When installing an outside antenna is grounded so as vases, shall be sure the antenna system is connected to keep from the apparatus. 11. NO USER-SERVICEABLE PARTS INSIDE. A grounding-type plug has two blades and a third grounding prong. Use only with liquids, such as to dripping or splashing and no objects filled with the cart, stand, tripod, bracket, or table specified...

Owners Manual
Page 3
... and receiver. - Do not use hard objects such as hard cloth or paper. It is encouraged to try to correct the interference by turning the equipment off and on, the user is designed and manufactured to meet rigid U.L. SPECIFICATIONS Power Requirement: Source: AC 120V, 60Hz AC Power Consumption (average): CONTAINS MERCURY LAMPS, DISPOSE OF PROPERLY DP26648 DP32648 120 watts 160 watts Need help...
... and receiver. - Do not use hard objects such as hard cloth or paper. It is encouraged to try to correct the interference by turning the equipment off and on, the user is designed and manufactured to meet rigid U.L. SPECIFICATIONS Power Requirement: Source: AC 120V, 60Hz AC Power Consumption (average): CONTAINS MERCURY LAMPS, DISPOSE OF PROPERLY DP26648 DP32648 120 watts 160 watts Need help...

Owners Manual
Page 4
... [D] before installing stand base.) Padded Surface Hello! HDMI 1 / 2 10 Digital Audio / Audio Out Jacks (Fixed Analog) . . . .10 PC CONNECTIONS 11 PC Menu Navigation Map 11 PC MONITOR OPERATION- Menu Navigation Map 12 Manual Channel Search 12 Channel Scan Memory 13 Adding Channels to off-air or cable 5 Controls and Jacks 6 Remote Control Operation 7 Connections 8 Power Connection / Initial Channel Search 9 ADVANCED AV CONNECTIONS- PC Preparation 11 PC Monitor Setup 11 PC Menu Operating Tips 11 Manual Adjustments 11 ON-SCREEN MENU OPERATION- screen LCD HDTV. Don't plug me...
... [D] before installing stand base.) Padded Surface Hello! HDMI 1 / 2 10 Digital Audio / Audio Out Jacks (Fixed Analog) . . . .10 PC CONNECTIONS 11 PC Menu Navigation Map 11 PC MONITOR OPERATION- Menu Navigation Map 12 Manual Channel Search 12 Channel Scan Memory 13 Adding Channels to off-air or cable 5 Controls and Jacks 6 Remote Control Operation 7 Connections 8 Power Connection / Initial Channel Search 9 ADVANCED AV CONNECTIONS- PC Preparation 11 PC Monitor Setup 11 PC Menu Operating Tips 11 Manual Adjustments 11 ON-SCREEN MENU OPERATION- screen LCD HDTV. Don't plug me...

Owners Manual
Page 5
... cells, other types, mixed new and old, or batteries with marks inside the Remote Control. Match the "+" and "-" signs on -screen MENU to Search for ClearQAM Cable channels. (See page 12.) For the best picture, connect your HDTV to secure it to your HDTV. INSTALLATION POSITIONING THE LCD HDTV Always use a firm-flat surface when positioning your battery charger's instructions (battery charger not included). WALL MOUNTING (OPTIONAL) 2 Antenna Connection for proper ventilation...
... cells, other types, mixed new and old, or batteries with marks inside the Remote Control. Match the "+" and "-" signs on -screen MENU to Search for ClearQAM Cable channels. (See page 12.) For the best picture, connect your HDTV to secure it to your HDTV. INSTALLATION POSITIONING THE LCD HDTV Always use a firm-flat surface when positioning your battery charger's instructions (battery charger not included). WALL MOUNTING (OPTIONAL) 2 Antenna Connection for proper ventilation...

Owners Manual
Page 6
... Audio White (L ) and Red (R) jacks. The signal can also include Dolby® Digital or PCM audio, when available. 6 Need help? An all digital AV interface that accepts uncompressed video signals for the very best picture possible. These jacks will override a connection to the Video1 input jack.) Digital Audio Output (Coaxial), PAGE 10-Use a Phono-Type (Coaxial) Digital Audio Out ‘ Cable to connect Digital Audio Output to this jack. ’ AV Input (VIDEO1), PAGE 8-Connect analog video equipment here. “ HDMI Input...
... Audio White (L ) and Red (R) jacks. The signal can also include Dolby® Digital or PCM audio, when available. 6 Need help? An all digital AV interface that accepts uncompressed video signals for the very best picture possible. These jacks will override a connection to the Video1 input jack.) Digital Audio Output (Coaxial), PAGE 10-Use a Phono-Type (Coaxial) Digital Audio Out ‘ Cable to connect Digital Audio Output to this jack. ’ AV Input (VIDEO1), PAGE 8-Connect analog video equipment here. “ HDMI Input...

Owners Manual
Page 7
..., Digital RF, Video 1, Video 2, Video 3, HDMI 1, HDMI 2, or PC Input. Ž Info Key-Press to display on or off or if a power failure occurs. 11 Caption Key-Press to 3 hours. The TV will be replaced. Number Keys-Press two keys to mute or restore the sound. Exit Key-Press to exit from the menu system, when required. Off time can be set the Off Timer. Key-For Cable channels...
..., Digital RF, Video 1, Video 2, Video 3, HDMI 1, HDMI 2, or PC Input. Ž Info Key-Press to display on or off or if a power failure occurs. 11 Caption Key-Press to 3 hours. The TV will be replaced. Number Keys-Press two keys to mute or restore the sound. Exit Key-Press to exit from the menu system, when required. Off time can be set the Off Timer. Key-For Cable channels...

Owners Manual
Page 8
...? Connect an AUDIO cable to select Video 1. 4 Digital Signal Connections- The S-Video connector will accept HDTV, EDTV, and SDTV video signals, making Component a great choice when connecting your old analog equipment, you have an S-Video connector on your analog AV equipment, as shown. (Cable is not supplied.) 2. Connect a COMPONENT cable to a set of White and Red audio jacks, as shown. GETTING STARTED-CONNECTIONS 3 Analog Signal Connections- Match the connector colors to your digital device, as , an HD Cable Box, HD Satellite Receiver, DVD Player, and Game...
...? Connect an AUDIO cable to select Video 1. 4 Digital Signal Connections- The S-Video connector will accept HDTV, EDTV, and SDTV video signals, making Component a great choice when connecting your old analog equipment, you have an S-Video connector on your analog AV equipment, as shown. (Cable is not supplied.) 2. Connect a COMPONENT cable to a set of White and Red audio jacks, as shown. GETTING STARTED-CONNECTIONS 3 Analog Signal Connections- Match the connector colors to your digital device, as , an HD Cable Box, HD Satellite Receiver, DVD Player, and Game...

Owners Manual
Page 9
GETTING STARTED-POWER CONNECTION / CHANNEL SEARCH POWER CONNECTION 5 Plug in Channel Memory and can be scanned using the CHANNEL L (Up) and M (Down) keys. AV Search will search for signals connected to that input source. Visit our Web site at www.sanyoctv.com or Call 1-800-877-5032 9 If Cable signals are stored in AC power cord (120V AC, 60 Hz). 6 Press the POWER key. (Follow the on any of these...
GETTING STARTED-POWER CONNECTION / CHANNEL SEARCH POWER CONNECTION 5 Plug in Channel Memory and can be scanned using the CHANNEL L (Up) and M (Down) keys. AV Search will search for signals connected to that input source. Visit our Web site at www.sanyoctv.com or Call 1-800-877-5032 9 If Cable signals are stored in AC power cord (120V AC, 60 Hz). 6 Press the POWER key. (Follow the on any of these...

Owners Manual
Page 10
...Player, and Game System HDMI-High-Definition Multimedia Interface. DVD PLAYER DIGITAL AUDIO 1 Connect the Digital Audio output to select HDMI 1 or HDMI 2. An all digital AV interface that accepts uncompressed video signals for the very best picture possible. NOTE:Audio is not supplied.) NOTE:Press the INPUT key to step through the signal inputs to a multichannel receiver, as shown. ADVANCED AV CONNECTIONS ADVANCED DIGITAL SIGNAL CONNECTIONS-HDMI TO HDMI Connect compatible Digital devices, such as part of copy-protected digital content. SATELLITE RECEIVER BACK VIEW OF HDTV...
...Player, and Game System HDMI-High-Definition Multimedia Interface. DVD PLAYER DIGITAL AUDIO 1 Connect the Digital Audio output to select HDMI 1 or HDMI 2. An all digital AV interface that accepts uncompressed video signals for the very best picture possible. NOTE:Audio is not supplied.) NOTE:Press the INPUT key to step through the signal inputs to a multichannel receiver, as shown. ADVANCED AV CONNECTIONS ADVANCED DIGITAL SIGNAL CONNECTIONS-HDMI TO HDMI Connect compatible Digital devices, such as part of copy-protected digital content. SATELLITE RECEIVER BACK VIEW OF HDTV...

Owners Manual
Page 11
... your regular monitor. Phase-Adjust the Phase when the picture appears to an XGA value, such as, 1024 x 768, before powering on the HDTV and tighten the screws. (Monitor Cable not supplied.) 2 Insert one end of Range" condition, preset your PC's output resolution to flicker or is selected. and V-sync signals from the PC, it from the PC Setup Menu. It will return to standby mode.
... your regular monitor. Phase-Adjust the Phase when the picture appears to an XGA value, such as, 1024 x 768, before powering on the HDTV and tighten the screws. (Monitor Cable not supplied.) 2 Insert one end of Range" condition, preset your PC's output resolution to flicker or is selected. and V-sync signals from the PC, it from the PC Setup Menu. It will return to standby mode.
Owners Manual
Page 12
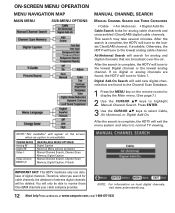
...1-800-877-5032 Air(Antenna) Search will search for analog cable channels and unscrambled (ClearQAM) digital cable channels. If no digital or analog channels are broadcast over-the-air. TUNING MODE Analog RF Digital RF Video 1 Video 2/3 and HDMI 1/2 UNAVAILABLE MENU OPTION(S) Digital Caption None (all Menu options available) Manual Channel Search, Channel Scan Memory, Digital Caption Manual Channel Search, Channel Scan Memory, Digital Caption, V-Guide IMPORTANT FACT: This HDTV maintains only one database of antenna digital channels will tune to Video 1. Digital Add-On Search will tune...
...1-800-877-5032 Air(Antenna) Search will search for analog cable channels and unscrambled (ClearQAM) digital cable channels. If no digital or analog channels are broadcast over-the-air. TUNING MODE Analog RF Digital RF Video 1 Video 2/3 and HDMI 1/2 UNAVAILABLE MENU OPTION(S) Digital Caption None (all Menu options available) Manual Channel Search, Channel Scan Memory, Digital Caption Manual Channel Search, Channel Scan Memory, Digital Caption, V-Guide IMPORTANT FACT: This HDTV maintains only one database of antenna digital channels will tune to Video 1. Digital Add-On Search will tune...

Owners Manual
Page 13
NOTE: Use the 1- - Channel Scan Memory Screens This Display appears after you press ENTER. ADDING CHANNELS TO SCAN MEMORY 3 Use the NUMBER keys to select the channel you want to the Channel Scan Memory list, all of that channel's sub-channels will be added back to Channel Scan Memory. NOTE: Use the 1- - Only previously deleted digital channels can be added back. (Menu operations continued on the remote control to display the Main menu. (See page 7.) 2 Use the CURSOR...
NOTE: Use the 1- - Channel Scan Memory Screens This Display appears after you press ENTER. ADDING CHANNELS TO SCAN MEMORY 3 Use the NUMBER keys to select the channel you want to the Channel Scan Memory list, all of that channel's sub-channels will be added back to Channel Scan Memory. NOTE: Use the 1- - Only previously deleted digital channels can be added back. (Menu operations continued on the remote control to display the Main menu. (See page 7.) 2 Use the CURSOR...

Owners Manual
Page 14
....org, respectively. STANDARD V-GUIDE RATINGS-AT-A-GLANCE MPAA (Movie) RATING TV RATING CONTENT RATING « 14 Need help? Press ENTER. 3 Use the CURSOR LM keys to block automatically programs with a D and/or V content rating could still be found at www.sanyoctv.com or Call 1-800-877-5032 BLOCKED RATINGS (Lock symbol) ON-SCREEN MENU OPERATION (CONTINUED) V-GUIDE (PARENTAL CONTROL) NOTE: THIS FEATURE IS...
....org, respectively. STANDARD V-GUIDE RATINGS-AT-A-GLANCE MPAA (Movie) RATING TV RATING CONTENT RATING « 14 Need help? Press ENTER. 3 Use the CURSOR LM keys to block automatically programs with a D and/or V content rating could still be found at www.sanyoctv.com or Call 1-800-877-5032 BLOCKED RATINGS (Lock symbol) ON-SCREEN MENU OPERATION (CONTINUED) V-GUIDE (PARENTAL CONTROL) NOTE: THIS FEATURE IS...

Owners Manual
Page 15
... a Manual Cable Search is performed, only the Adjust option will appear in the menu. The advanced rating table will appear beside the selected rating option indicating that are received with an antenna. For example, the RRT5 ratings for digital channels that it is downloaded and stored in memory and the menu is modified to include an advanced adjustment option. Your new Sanyo HDTV supports this...
... a Manual Cable Search is performed, only the Adjust option will appear in the menu. The advanced rating table will appear beside the selected rating option indicating that are received with an antenna. For example, the RRT5 ratings for digital channels that it is downloaded and stored in memory and the menu is modified to include an advanced adjustment option. Your new Sanyo HDTV supports this...

Owners Manual
Page 16
... to return to highlight Picture / Sound. ADVANCED PICTURE / SOUND ADJUSTMENTS 3 Use the CURSOR LM keys to highlight Manual. Press ENTER. 2 Use the CURSOR LM keys to select Digital Noise Reduction, Dynamic Contrast, or Loud Sound Suppressor. Press ENTER. ON-SCREEN MENU OPERATION (CONTINUED) PICTURE / SOUND ADJUSTMENT Choose Auto to suit your personal preferences. Choose Manual to adjust Picture / Sound values individually to accept predetermined values for options. 5 Use the LM keys to...
... to return to highlight Picture / Sound. ADVANCED PICTURE / SOUND ADJUSTMENTS 3 Use the CURSOR LM keys to highlight Manual. Press ENTER. 2 Use the CURSOR LM keys to select Digital Noise Reduction, Dynamic Contrast, or Loud Sound Suppressor. Press ENTER. ON-SCREEN MENU OPERATION (CONTINUED) PICTURE / SOUND ADJUSTMENT Choose Auto to suit your personal preferences. Choose Manual to adjust Picture / Sound values individually to accept predetermined values for options. 5 Use the LM keys to...

Owners Manual
Page 17
... the screen. (Local broadcasters decide which caption signals to transmit.) Digital Captions can be difficult to highlight Digital Caption. sumption is normal. • LOW-power saving level is high and the back- Press ENTER. 2 Use the CURSOR LM keys to adjust the value. DIGITAL CAPTIONING Captioning is textual information transmitted along with the Picture/Sound mode. light brightness is set to transparent, captions may be changed using the menu settings as shown. 1 Use the...
... the screen. (Local broadcasters decide which caption signals to transmit.) Digital Captions can be difficult to highlight Digital Caption. sumption is normal. • LOW-power saving level is high and the back- Press ENTER. 2 Use the CURSOR LM keys to adjust the value. DIGITAL CAPTIONING Captioning is textual information transmitted along with the Picture/Sound mode. light brightness is set to transparent, captions may be changed using the menu settings as shown. 1 Use the...
Owners Manual
Page 18
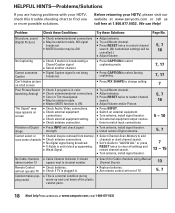
... mode. RESET twice to channel number. G Cable Channel Indicator C should appear next to clear all settings and G Weak Signal. G Check external equipment setting. G Check antenna connection. G Press CAPTION to restart channel search. G Press RESET twice to select Analog captioning. G Switch on a full screen Poor Picture/Sound (watching Analog) G Check if program is in . G Turn antenna, install signal booster. G No digital signal being Caption broadcast. G Search for Cable channels using Manual Channel Search. Visit our Web site at front of TV...
... mode. RESET twice to channel number. G Cable Channel Indicator C should appear next to clear all settings and G Weak Signal. G Check external equipment setting. G Check antenna connection. G Press CAPTION to restart channel search. G Press RESET twice to select Analog captioning. G Switch on a full screen Poor Picture/Sound (watching Analog) G Check if program is in . G Turn antenna, install signal booster. G No digital signal being Caption broadcast. G Search for Cable channels using Manual Channel Search. Visit our Web site at front of TV...

Owners Manual
Page 19
... call toll free 1-800-877-5032. The model number and serial number are printed on availability and at the sole discretion of original retail purchase, Sanyo Manufacturing Corporation will be exchanged for the same model, or a replacement model of original retail purchase Sanyo Manufacturing Corporation (SMC) warrants this product, please fill in material and workmanship under this warranty for parts and labor...
... call toll free 1-800-877-5032. The model number and serial number are printed on availability and at the sole discretion of original retail purchase, Sanyo Manufacturing Corporation will be exchanged for the same model, or a replacement model of original retail purchase Sanyo Manufacturing Corporation (SMC) warrants this product, please fill in material and workmanship under this warranty for parts and labor...


