
Owners Manual
Page 2
... setting position of the projector such as ceiling mounting or wall-hanging (see page 37). ◆ Two HDMI Terminals The projector has two HDMI (High Definition Multimedia Interface) terminals. Features and Design This Multimedia Projector is designed with 1280 x 720 resolution (16:9 aspect ratio) can project the image from component video signals such as DVD players and HDTV devices in full screen. ◆ Interlace-Progressive Conversion High-quality picture...
... setting position of the projector such as ceiling mounting or wall-hanging (see page 37). ◆ Two HDMI Terminals The projector has two HDMI (High Definition Multimedia Interface) terminals. Features and Design This Multimedia Projector is designed with 1280 x 720 resolution (16:9 aspect ratio) can project the image from component video signals such as DVD players and HDTV devices in full screen. ◆ Interlace-Progressive Conversion High-quality picture...
Owners Manual
Page 3
... 24 Image 27 Image Mode Selection 27 Image Adjustment 28 Image Mode Adjustment 28 Picture Adjustment 33 Picture Position and Screen Adjustment 33 Screen 34 Screen Size Adjustment 34 Setting 36 Setting 36 Information 41 Input Source Information Display 41 Maintenance and Cleaning 42 Warning Indicator 42 Cleaning the RGB panels 43 Cleaning the Air Filters 45 Cleaning the Projection Lens 46 Cleaning the Projector Cabinet 46 Lamp Replacement 47 Lamp Replacement Counter 48 Appendix 49 Troubleshooting 49 Indicators and Projector Condition 50 Menu Tree...
... 24 Image 27 Image Mode Selection 27 Image Adjustment 28 Image Mode Adjustment 28 Picture Adjustment 33 Picture Position and Screen Adjustment 33 Screen 34 Screen Size Adjustment 34 Setting 36 Setting 36 Information 41 Input Source Information Display 41 Maintenance and Cleaning 42 Warning Indicator 42 Cleaning the RGB panels 43 Cleaning the Air Filters 45 Cleaning the Projection Lens 46 Cleaning the Projector Cabinet 46 Lamp Replacement 47 Lamp Replacement Counter 48 Appendix 49 Troubleshooting 49 Indicators and Projector Condition 50 Menu Tree...
Owners Manual
Page 4
... minimum distances must be disposed of separately from the ceiling, clean the air intake vents, air filters, and the top of the projector periodically with high quality materials and components which can also be dangerous. This projector produces intense light from the power outlet. Otherwise it in good condition for a long time, the cooling fans can reduce the service life of Electronic Computer/Data Processing Equipment...
... minimum distances must be disposed of separately from the ceiling, clean the air intake vents, air filters, and the top of the projector periodically with high quality materials and components which can also be dangerous. This projector produces intense light from the power outlet. Otherwise it in good condition for a long time, the cooling fans can reduce the service life of Electronic Computer/Data Processing Equipment...

Owners Manual
Page 5
... the service technician has used replacement parts specified by the manufacturer as they may touch dangerous voltage points or short out parts that the projector is operated. When replacement parts are required, be covered with cloth or other materials, and the bottom opening or removing covers may expose you are covered by persons walking on it from the type of power source indicated on the projector. Unplug this projector...
... the service technician has used replacement parts specified by the manufacturer as they may touch dangerous voltage points or short out parts that the projector is operated. When replacement parts are required, be covered with cloth or other materials, and the bottom opening or removing covers may expose you are covered by persons walking on it from the type of power source indicated on the projector. Unplug this projector...

Owners Manual
Page 6
... projector is closed, retract the adjustable feet, and lock the lens with the Lens Shift Lock to prevent damage to the lens and cabinet. Do not put the projector on the projector. Safety Instructions Air Circulation Openings in the cabinet are provided to cool down to project an image. CAUTION Hot air is exhausted from side to protect it into a suitable case. When using or installing the projector...
... projector is closed, retract the adjustable feet, and lock the lens with the Lens Shift Lock to prevent damage to the lens and cabinet. Do not put the projector on the projector. Safety Instructions Air Circulation Openings in the cabinet are provided to cool down to project an image. CAUTION Hot air is exhausted from side to protect it into a suitable case. When using or installing the projector...
Owners Manual
Page 7
... frequency energy. If the plug supplied is indicated on a circuit different from the Parts Department indicated in the United States and Canada is not installed and used in your socket outlet, it . Connect the equipment into an outlet on the pin face of the plug. AC Power Cord for your User Instructions. The end of this projector meets the requirement for the...
... frequency energy. If the plug supplied is indicated on a circuit different from the Parts Department indicated in the United States and Canada is not installed and used in your socket outlet, it . Connect the equipment into an outlet on the pin face of the plug. AC Power Cord for your User Instructions. The end of this projector meets the requirement for the...

Owners Manual
Page 10
... the image in the Power management mode (p.39). - y OK button Execute the item selected or use them to access the submenu items (p.20). i INPUT button Select an input source (p.24). 10 t MENU button Open or close the On-Screen Menu (p.20). w POWER indicator - Blinks red when the internal temperature of life (pp.47, 50). Blinks green in the Normal through mode (p.35). Blinks red during operations. - Part Names and Functions Top Control rew q t y ui q POWER ON/STAND-BY button Turn the projector...
... the image in the Power management mode (p.39). - y OK button Execute the item selected or use them to access the submenu items (p.20). i INPUT button Select an input source (p.24). 10 t MENU button Open or close the On-Screen Menu (p.20). w POWER indicator - Blinks red when the internal temperature of life (pp.47, 50). Blinks green in the Normal through mode (p.35). Blinks red during operations. - Part Names and Functions Top Control rew q t y ui q POWER ON/STAND-BY button Turn the projector...

Owners Manual
Page 11
... !6 y u SCREEN IMAGE !5 IMAGE ADJ. !4 BRIGHTNESS CONTRAST i BRIGHT CONT. COLOR !3 LENS IRIS IMAGE o IRIS PRESET USER !2 COMPONENT HDMI VIDEO C1/C2 H1/H2 !0 INFO. r LAMP CONTROL button Select a lamp mode (pp.22, 29). u SCREEN button Select a screen size (pp.23, 34). button Display the Image adj. Menu items one at a time and directly adjust its image level (pp.23, 28). !6 OK button Execute the selected item or access the sub-menu items (p.20). !7 RESET button Reset to moisture or heat. - For cleaning, use...
... !6 y u SCREEN IMAGE !5 IMAGE ADJ. !4 BRIGHTNESS CONTRAST i BRIGHT CONT. COLOR !3 LENS IRIS IMAGE o IRIS PRESET USER !2 COMPONENT HDMI VIDEO C1/C2 H1/H2 !0 INFO. r LAMP CONTROL button Select a lamp mode (pp.22, 29). u SCREEN button Select a screen size (pp.23, 34). button Display the Image adj. Menu items one at a time and directly adjust its image level (pp.23, 28). !6 OK button Execute the selected item or access the sub-menu items (p.20). !7 RESET button Reset to moisture or heat. - For cleaning, use...

Owners Manual
Page 19
... 38.) The automatic slide shutter closes and the POWER indicator starts to "Off," the projector can turn the Main On/Off switch off the projector. Basic Operation "Power off ?" Turning Off the Projector 1 Press the POWER ON/STAND-BY button on the top control or on the screen. appears on the remote control. disappears after use may result in every 24 hours. • The running . 2 When the projector is set to blink red.
... 38.) The automatic slide shutter closes and the POWER indicator starts to "Off," the projector can turn the Main On/Off switch off the projector. Basic Operation "Power off ?" Turning Off the Projector 1 Press the POWER ON/STAND-BY button on the top control or on the screen. appears on the remote control. disappears after use may result in every 24 hours. • The running . 2 When the projector is set to blink red.
Owners Manual
Page 21
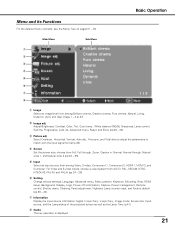
...., V-sync freq., Image mode, Screen size, Input source, and the Lamp status of the projected screen as well as the Lamp Time (p.41). w Image adj. r Screen Set the screen size; i Guide The key operation is displayed. 21 e Picture adj. y Setting Change various settings; Language, Advanced menu, Menu position, Keystone, Mounting, Rear, HDMI setup, Background, Display, Logo, Power off confirmation, Capture, Power management, Remote control, Shutter demo, Cleaning, Panel adjustment, Highland, Lamp counter reset, and Factory default (pp.36 - 40). Adjust Brightness, Contrast, Color, Tint...
...., V-sync freq., Image mode, Screen size, Input source, and the Lamp status of the projected screen as well as the Lamp Time (p.41). w Image adj. r Screen Set the screen size; i Guide The key operation is displayed. 21 e Picture adj. y Setting Change various settings; Language, Advanced menu, Menu position, Keystone, Mounting, Rear, HDMI setup, Background, Display, Logo, Power off confirmation, Capture, Power management, Remote control, Shutter demo, Cleaning, Panel adjustment, Highland, Lamp counter reset, and Factory default (pp.36 - 40). Adjust Brightness, Contrast, Color, Tint...

Owners Manual
Page 22
... used operations, using the remote control is automatically turned off when no buttons on the screen. Auto 1 . . . . . The lamp mode is automatically switched to zoom in and out. Remote Control LIGHT button LAMP CONTROL button ON/STAND-BY LIGHT LAMP CONTROL LAMP NO SHOW FREEZE MENU RESET FREEZE button OK SCREEN IMAGE IMAGE ADJ. ✔Note: • See the next page for the description of the buttons enables you to freeze the picture on the remote control are pressed for 10 seconds. Basic Operation Zoom and Focus Adjustment Rotate...
... used operations, using the remote control is automatically turned off when no buttons on the screen. Auto 1 . . . . . The lamp mode is automatically switched to zoom in and out. Remote Control LIGHT button LAMP CONTROL button ON/STAND-BY LIGHT LAMP CONTROL LAMP NO SHOW FREEZE MENU RESET FREEZE button OK SCREEN IMAGE IMAGE ADJ. ✔Note: • See the next page for the description of the buttons enables you to freeze the picture on the remote control are pressed for 10 seconds. Basic Operation Zoom and Focus Adjustment Rotate...

Owners Manual
Page 27
... operated without any control by the projector in a dark room. Menu Operation 1 Press the Point ed buttons to select the Image Menu and press the Point 8 or OK buttons to access the submenu items. 2 Use the Point ed buttons to select User image 1 - 4. Vivid For viewing contrasty images to select Brilliant cinema, Creative cinema, Pure cinema, Natural, Living, Dynamic, or Vivid; COLOR LENS IRIS IMAGE IRIS PRESET USER COMPONENT HDMI VIDEO...
... operated without any control by the projector in a dark room. Menu Operation 1 Press the Point ed buttons to select the Image Menu and press the Point 8 or OK buttons to access the submenu items. 2 Use the Point ed buttons to select User image 1 - 4. Vivid For viewing contrasty images to select Brilliant cinema, Creative cinema, Pure cinema, Natural, Living, Dynamic, or Vivid; COLOR LENS IRIS IMAGE IRIS PRESET USER COMPONENT HDMI VIDEO...

Owners Manual
Page 39
... POWER indicator changes to five (5) minutes. This is turned off . It starts the countdown until lamp off period. When the countdown time has elapsed, the lamp is used at the same time. Press the Point 8 or OK buttons to start Shutter demo. Remote control Two different remote control codes are replaced, the remote control code automatically returns to switch between Code 1 and Code 2. To change the code of the remote control are assigned to this projector: the factory-set to green blinking. Shutter...
... POWER indicator changes to five (5) minutes. This is turned off . It starts the countdown until lamp off period. When the countdown time has elapsed, the lamp is used at the same time. Press the Point 8 or OK buttons to start Shutter demo. Remote control Two different remote control codes are replaced, the remote control code automatically returns to switch between Code 1 and Code 2. To change the code of the remote control are assigned to this projector: the factory-set to green blinking. Shutter...

Owners Manual
Page 40
... R (red), G (green), and B (blue). When replacing the projection lamp, reset the lamp replacement counter with the Bright dialog box. 2. "Return to switch On/Off. See page 44. To close this function. See page 48 for the user's logo and the lamp counter to the next color. Adjust the bright parts with this screen and return to minimize vertical lines in the order of whether or not an input source is used...
... R (red), G (green), and B (blue). When replacing the projection lamp, reset the lamp replacement counter with the Bright dialog box. 2. "Return to switch On/Off. See page 44. To close this function. See page 48 for the user's logo and the lamp counter to the next color. Adjust the bright parts with this screen and return to minimize vertical lines in the order of whether or not an input source is used...
Owners Manual
Page 43
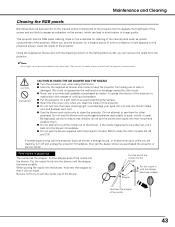
... happened to clean the other models: Z4, Z3, and Z1X. Put this projector (model: Z60) to be removed completely with these steps. CAUTION PROHIBITED CAUTION IN USING THE AIR BLOWER AND THE NOZZLE ● Turn the projector over when using the blower. ● Use only the supplied air blower and nozzle to prevent scratching the surface. ● Open the hole cover only when you clean the inside...
... happened to clean the other models: Z4, Z3, and Z1X. Put this projector (model: Z60) to be removed completely with these steps. CAUTION PROHIBITED CAUTION IN USING THE AIR BLOWER AND THE NOZZLE ● Turn the projector over when using the blower. ● Use only the supplied air blower and nozzle to prevent scratching the surface. ● Open the hole cover only when you clean the inside...
Owners Manual
Page 47
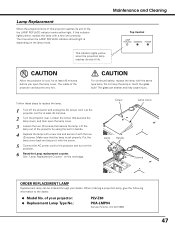
...; Replacement Lamp Type No.: PLV-Z60 POA-LMP94 (Service Parts No. 610 323 5998) 47 See "Lamp Replacement Counter" on the lamp mode. Maintenance and Cleaning Lamp Replacement When the projection lamp of this indicator lights yellow, replace the lamp with the two (2) screws. CAUTION Allow the projector to the projector and turn on the projector. 6 Reset the Lamp replacement counter. CAUTION For continued safety, replace the lamp with the screw. 5 Connect the AC power cord to cool, for at least 45 minutes before you open the lamp cover...
...; Replacement Lamp Type No.: PLV-Z60 POA-LMP94 (Service Parts No. 610 323 5998) 47 See "Lamp Replacement Counter" on the lamp mode. Maintenance and Cleaning Lamp Replacement When the projection lamp of this indicator lights yellow, replace the lamp with the two (2) screws. CAUTION Allow the projector to the projector and turn on the projector. 6 Reset the Lamp replacement counter. CAUTION For continued safety, replace the lamp with the screw. 5 Connect the AC power cord to cool, for at least 45 minutes before you open the lamp cover...
Owners Manual
Page 48
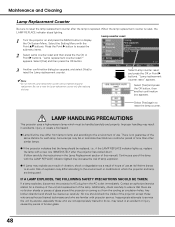
... use . Lamp counter reset 1 Turn the projector on and press the MENU button to reset the lamp counter. Be sure to ensure that the lamp should be replaced, i.e., if the LAMP REPLACE indicator lights up carefully. Select [Yes] and press the OK button, then another confirmation box appears. Select the Setting Menu with the Point ed buttons. "Lamp replacement counter reset" appears. Inappropriate attempts to service the unit by pieces of broken glass. 48 Maintenance and Cleaning Lamp Replacement Counter...
... use . Lamp counter reset 1 Turn the projector on and press the MENU button to reset the lamp counter. Be sure to ensure that the lamp should be replaced, i.e., if the LAMP REPLACE indicator lights up carefully. Select [Yes] and press the OK button, then another confirmation box appears. Select the Setting Menu with the Point ed buttons. "Lamp replacement counter reset" appears. Inappropriate attempts to service the unit by pieces of broken glass. 48 Maintenance and Cleaning Lamp Replacement Counter...
Owners Manual
Page 49
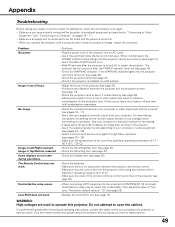
... focus. Check the Mounting/Rear item (see pages 24 - 26). - Check the batteries. - Make sure the code of the projector (see if it does not project an image, restart the computer. Make sure you purchased the projector or service center. If the WARNING indicator lights red, the projector cannot be changed when connecting to a projector. Make sure the temperature is corresponding to that of the projector (see page 42). - If problems...
... focus. Check the Mounting/Rear item (see pages 24 - 26). - Check the batteries. - Make sure the code of the projector (see if it does not project an image, restart the computer. Make sure you purchased the projector or service center. If the WARNING indicator lights red, the projector cannot be changed when connecting to a projector. Make sure the temperature is corresponding to that of the projector (see page 42). - If problems...

Owners Manual
Page 50
... a new one promptly. Reset the Lamp replacement counter after replacing the lamp. The projector has been cooled down . When the projector is cooled down enough and the ✽ temperature returns to be turned on because malfunction occurs or the lamp reaches its end of life, the LAMP REPLACE indicator lights yellow. The lamp does not turn on the projector, the WARNING indicator stops blinking. The temperature inside temperature ✽ returns to turn on . (The WARNING indicator keeps blinking.) Check and clean the air filters. The projector...
... a new one promptly. Reset the Lamp replacement counter after replacing the lamp. The projector has been cooled down . When the projector is cooled down enough and the ✽ temperature returns to be turned on because malfunction occurs or the lamp reaches its end of life, the LAMP REPLACE indicator lights yellow. The lamp does not turn on the projector, the WARNING indicator stops blinking. The temperature inside temperature ✽ returns to turn on . (The WARNING indicator keeps blinking.) Check and clean the air filters. The projector...

Owners Manual
Page 52
... +31 -100 to +8. Lamp Time Image Screen Input Lamp status PAL SECAM NTSC NTSC4.43 PAL-M PAL-N 480i 480p 575i 575p 720p 1080i D-VGA D-480i D-480p D-575i D-575p D-720p D-1080i D-1080p Resolution for PC input - - - Appendix Picture adj. V-sync freq. Screen Information Overscan Horizontal Vertical Auto adj. Unknown Language Advanced menu Menu Position Keystone Mounting Rear HDMI setup Background Display Logo Power off confirmation Capture Power management Remote control Shutter demo Cleaning Panel adjustment Highland Lamp counter reset Factory default English German French...
... +31 -100 to +8. Lamp Time Image Screen Input Lamp status PAL SECAM NTSC NTSC4.43 PAL-M PAL-N 480i 480p 575i 575p 720p 1080i D-VGA D-480i D-480p D-575i D-575p D-720p D-1080i D-1080p Resolution for PC input - - - Appendix Picture adj. V-sync freq. Screen Information Overscan Horizontal Vertical Auto adj. Unknown Language Advanced menu Menu Position Keystone Mounting Rear HDMI setup Background Display Logo Power off confirmation Capture Power management Remote control Shutter demo Cleaning Panel adjustment Highland Lamp counter reset Factory default English German French...


