
Owners Manual
Page 2
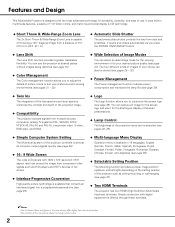
...for the starting-up display or between presentations. ◆ Lamp Control The brightness of the projection lamp can be stored (see pages 28 - 32). ◆ Power Management The Power management function reduces power consumption and maintains the lamp life (see page 39). ◆ Twin Iris The integration...pages 22, 29). ◆ Simple Computer System Setting The Multi-scan system of the projector conforms to almost all computer output signals quickly (see page 26). ◆ 16 : 9 Wide Screen The wide LCD panels with 1280 x 720 resolution (16:9 aspect ratio) can project the image from ...
...for the starting-up display or between presentations. ◆ Lamp Control The brightness of the projection lamp can be stored (see pages 28 - 32). ◆ Power Management The Power management function reduces power consumption and maintains the lamp life (see page 39). ◆ Twin Iris The integration...pages 22, 29). ◆ Simple Computer System Setting The Multi-scan system of the projector conforms to almost all computer output signals quickly (see page 26). ◆ 16 : 9 Wide Screen The wide LCD panels with 1280 x 720 resolution (16:9 aspect ratio) can project the image from ...
Owners Manual
Page 3
... Terminal 9 Top Control 10 Remote Control 11 Remote Control Operating Range 12 Remote Control Battery Installation 12 Installation 13 Positioning the Projector 13 Adjustable Feet 13 Connecting the AC Power Cord 14 Moving the Lens 15 Connecting to Video Equipment (Video, S-Video) ...43 Cleaning the Air Filters 45 Cleaning the Projection Lens 46 Cleaning the Projector Cabinet 46 Lamp Replacement 47 Lamp Replacement Counter 48 Appendix 49 Troubleshooting 49 Indicators and Projector Condition 50 Menu Tree 51 System Mode Chart 53 Technical Specifications 54 ...
... Terminal 9 Top Control 10 Remote Control 11 Remote Control Operating Range 12 Remote Control Battery Installation 12 Installation 13 Positioning the Projector 13 Adjustable Feet 13 Connecting the AC Power Cord 14 Moving the Lens 15 Connecting to Video Equipment (Video, S-Video) ...43 Cleaning the Air Filters 45 Cleaning the Projection Lens 46 Cleaning the Projector Cabinet 46 Lamp Replacement 47 Lamp Replacement Counter 48 Appendix 49 Troubleshooting 49 Indicators and Projector Condition 50 Menu Tree 51 System Mode Chart 53 Technical Specifications 54 ...
Owners Manual
Page 4
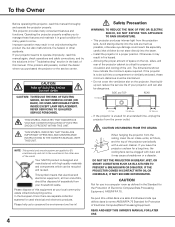
NO USER-SERVICEABLE PARTS INSIDE EXCEPT LAMP REPLACEMENT. THIS SYMBOL INDICATES THAT DANGEROUS ... être utilisé dans une salle d'ordinateurs telle que définie dans la norme ANSI/NFPA 75 Standard for an extended time, unplug the projector from your local community waste collection/recycling centre. SIDE and TOP REAR 1.5' (50 cm) ... USE. This projector provides many years to be built into the beam. - Your SANYO product is critical for used electrical and electronic products. Heat buildup can also be recycled and reused. Install the projector in ! ...
NO USER-SERVICEABLE PARTS INSIDE EXCEPT LAMP REPLACEMENT. THIS SYMBOL INDICATES THAT DANGEROUS ... être utilisé dans une salle d'ordinateurs telle que définie dans la norme ANSI/NFPA 75 Standard for an extended time, unplug the projector from your local community waste collection/recycling centre. SIDE and TOP REAR 1.5' (50 cm) ... USE. This projector provides many years to be built into the beam. - Your SANYO product is critical for used electrical and electronic products. Heat buildup can also be recycled and reused. Install the projector in ! ...

Owners Manual
Page 6
...the product and to strong forces, or put the projector on the cabinet will become hot while the projector is cooled enough. 6 The fan's running speed is changed according to the lens and cabinet. Improper installation may reduce the lamp life and cause fire hazard. 20˚ Do ...not tilt the projector more than 20 degrees from any other transport service, consult your dealer. - NO SIDEWARD Moving the Projector When moving the projector, make sure that the automatic slide shutter ...
...the product and to strong forces, or put the projector on the cabinet will become hot while the projector is cooled enough. 6 The fan's running speed is changed according to the lens and cabinet. Improper installation may reduce the lamp life and cause fire hazard. 20˚ Do ...not tilt the projector more than 20 degrees from any other transport service, consult your dealer. - NO SIDEWARD Moving the Projector When moving the projector, make sure that the automatic slide shutter ...

Owners Manual
Page 8
... !3 Main On/Off Switch !4 Air Intake Vents/Air Filters ✽ Kensington Security Slot This slot is for a Kensington lock used to deter theft of the projector. *Kensington is exhausted from the exhaust vent. Part Names and Functions Front q Air flow w e r t y u i o !0 Back !1 ✽ S-VIDEO COMPONENT 1 HDMI 1 HDMI... VIDEO Y Pb/Cb Pr/Cr SERVICEPORT !2 !3 !4 Bottom !5 q Exhaust Vent CAUTION Hot air is a registered trademark of ACCO Brands Corporation. !5 Adjustable Feet !6 Lamp Cover !7 RGB Panel Cleaning Hole Cover !6 !7 8 Do not put heat-sensitive objects near this side.
... !3 Main On/Off Switch !4 Air Intake Vents/Air Filters ✽ Kensington Security Slot This slot is for a Kensington lock used to deter theft of the projector. *Kensington is exhausted from the exhaust vent. Part Names and Functions Front q Air flow w e r t y u i o !0 Back !1 ✽ S-VIDEO COMPONENT 1 HDMI 1 HDMI... VIDEO Y Pb/Cb Pr/Cr SERVICEPORT !2 !3 !4 Bottom !5 q Exhaust Vent CAUTION Hot air is a registered trademark of ACCO Brands Corporation. !5 Adjustable Feet !6 Lamp Cover !7 RGB Panel Cleaning Hole Cover !6 !7 8 Do not put heat-sensitive objects near this side.

Owners Manual
Page 10
...or close the On-Screen Menu (p.20). Part Names and Functions Top Control rew q t y ui q POWER ON/STAND-BY button Turn the projector on or off period. - Blinks orange when the automatic slide shutter is in the OnScreen Menu, or use it to pan the image in the... Blinks red when the internal temperature of life (pp.47, 50). r LAMP REPLACE indicator Lights yellow light when the projection lamp reaches its end of the projector exceeds the operating range (pp.42, 50). Lights red while the projector is closed during operations (p.50). Blinks red during operations. - Blinks green...
...or close the On-Screen Menu (p.20). Part Names and Functions Top Control rew q t y ui q POWER ON/STAND-BY button Turn the projector on or off period. - Blinks orange when the automatic slide shutter is in the OnScreen Menu, or use it to pan the image in the... Blinks red when the internal temperature of life (pp.47, 50). r LAMP REPLACE indicator Lights yellow light when the projection lamp reaches its end of the projector exceeds the operating range (pp.42, 50). Lights red while the projector is closed during operations (p.50). Blinks red during operations. - Blinks green...

Owners Manual
Page 11
...Adjustment (pp.28 - 31), Picture Adjustment (p.33) and the Keystone function in the Normal through mode (p.35). Remote Control e w q ON/STAND-BY LIGHT LAMP CONTROL r LAMP NO SHOW FREEZE !8 t MENU RESET !7 OK !6 y u SCREEN IMAGE !5 IMAGE ADJ. !4 BRIGHTNESS CONTRAST i BRIGHT CONT. button Display the Image adj.... image on or off (pp.18, 19). S-VIDEO PC !1 INPUT CXVT Part Names and Functions q POWER ON/STAND-BY button Turn the projector on the screen (p.23). t MENU button Open or close the On-Screen Menu (p.20). o LENS IRIS button Adjust the lens iris (pp...
...Adjustment (pp.28 - 31), Picture Adjustment (p.33) and the Keystone function in the Normal through mode (p.35). Remote Control e w q ON/STAND-BY LIGHT LAMP CONTROL r LAMP NO SHOW FREEZE !8 t MENU RESET !7 OK !6 y u SCREEN IMAGE !5 IMAGE ADJ. !4 BRIGHTNESS CONTRAST i BRIGHT CONT. button Display the Image adj.... image on or off (pp.18, 19). S-VIDEO PC !1 INPUT CXVT Part Names and Functions q POWER ON/STAND-BY button Turn the projector on the screen (p.23). t MENU button Open or close the On-Screen Menu (p.20). o LENS IRIS button Adjust the lens iris (pp...

Owners Manual
Page 19
... the POWER ON/STAND-BY button on the top control or on . Continuous use . • While the POWER indicator is blinking, the lamp is set to "Off," the projector can turn off ?" "Power off and unplug the AC power cord. The blinking continues for about an hour in every 24 hours. •.../Off switch off ?" Wait until the POWER indicator becomes red to be turned on page 42. • Do not put the projector in shortening the lamp life. Turning Off the Projector 1 Press the POWER ON/STAND-BY button on the top control or on page 38.) The automatic slide shutter closes and the...
... the POWER ON/STAND-BY button on the top control or on . Continuous use . • While the POWER indicator is blinking, the lamp is set to "Off," the projector can turn off ?" "Power off and unplug the AC power cord. The blinking continues for about an hour in every 24 hours. •.../Off switch off ?" Wait until the POWER indicator becomes red to be turned on page 42. • Do not put the projector in shortening the lamp life. Turning Off the Projector 1 Press the POWER ON/STAND-BY button on the top control or on page 38.) The automatic slide shutter closes and the...
Owners Manual
Page 20
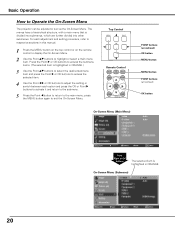
... Point ed buttons to highlight or select a main menu item. Press the Point 8 or OK buttons to the main menu; Top Control Remote Control LAMP NO SHOW FREEZE MENU RESET OK SCREEN IMAGE IMAGE ADJ. POINT buttons (arrowhead) OK button MENU button MENU button POINT buttons (arrowhead) OK button On...selected item is divided into submenus, which are further divided into other submenus. press the MENU button again to Operate the On-Screen Menu The projector can be adjusted or set via the On-Screen Menu. For each option and press the OK or Point 8 buttons to activate it and ...
... Point ed buttons to highlight or select a main menu item. Press the Point 8 or OK buttons to the main menu; Top Control Remote Control LAMP NO SHOW FREEZE MENU RESET OK SCREEN IMAGE IMAGE ADJ. POINT buttons (arrowhead) OK button MENU button MENU button POINT buttons (arrowhead) OK button On...selected item is divided into submenus, which are further divided into other submenus. press the MENU button again to Operate the On-Screen Menu The projector can be adjusted or set via the On-Screen Menu. For each option and press the OK or Point 8 buttons to activate it and ...

Owners Manual
Page 28
...Contrast ➜ Color ➜ Tint ➜ Color temp. ➜ Red ➜ Green ➜ Blue ➜ Sharpness ➜ Lamp control ➜ Gamma ➜ Progressive ➜ Lens iris ➜ Lamp iris ➜ Auto black stretch➜ Contrast enhancement ➜ Transient improvement ➜ Gain R/G/B ➜ Offset R/G/B ➜ Gamma ...ADJ. button on to +31). Press the MENU button after adjusting each input source and the adjustment is kept until the projector is turned off or the image mode is displayed. If you press the Point d button, the next item can be ...
...Contrast ➜ Color ➜ Tint ➜ Color temp. ➜ Red ➜ Green ➜ Blue ➜ Sharpness ➜ Lamp control ➜ Gamma ➜ Progressive ➜ Lens iris ➜ Lamp iris ➜ Auto black stretch➜ Contrast enhancement ➜ Transient improvement ➜ Gain R/G/B ➜ Offset R/G/B ➜ Gamma ...ADJ. button on to +31). Press the MENU button after adjusting each input source and the adjustment is kept until the projector is turned off or the image mode is displayed. If you press the Point d button, the next item can be ...

Owners Manual
Page 29
...) Press the Point 7 button to the next page.... 29 The brightness according to "Eco" under no signal input. Eco Lower brightness reduces the lamp power consumption. Film . . . . level changes to +7). press the Point 8 button to deepen blue tone (from -7 to "User." &#...format is automatically switched to the input signal. The lamp mode is 480p, 575p, or 720p. • The "Film" option in progressive. For moving pictures. Normal brightness. Auto 1 . . . . . Auto 2 . . . . . With this function, the projector reproduces pictures faithful to display the Advanced menu. ...
...) Press the Point 7 button to the next page.... 29 The brightness according to "Eco" under no signal input. Eco Lower brightness reduces the lamp power consumption. Film . . . . level changes to +7). press the Point 8 button to deepen blue tone (from -7 to "User." &#...format is automatically switched to the input signal. The lamp mode is 480p, 575p, or 720p. • The "Film" option in progressive. For moving pictures. Normal brightness. Auto 1 . . . . . Auto 2 . . . . . With this function, the projector reproduces pictures faithful to display the Advanced menu. ...

Owners Manual
Page 38
... Select [Yes] to switch On/Off. Press the Point 8 or OK buttons to project the image as early as possible even when the lamp is turned on the projector. Show the factory-set to "On," a confirmation dialog box with unsupported signals. • When starting to project images after the... lamp becomes bright enough. Press the Point 8 or OK buttons to stop capturing. Capture This function enables you to capture an image being ...
... Select [Yes] to switch On/Off. Press the Point 8 or OK buttons to project the image as early as possible even when the lamp is turned on the projector. Show the factory-set to "On," a confirmation dialog box with unsupported signals. • When starting to project images after the... lamp becomes bright enough. Press the Point 8 or OK buttons to stop capturing. Capture This function enables you to capture an image being ...

Owners Manual
Page 39
...button on the top control or remote control is set code (Code 1) and the secondary code (Code 2). When this projector: the factory-set to green blinking. It starts the countdown until lamp off to cool itself down , the POWER indicator changes to five (5) minutes. When operating the...time. Setting Power management For reducing power consumption as well as maintaining the lamp life, the Power management function turns off the projection lamp when the projector is not used for about five seconds. When the lamp has been fully cooled down . After changing the code, make sure the...
...button on the top control or remote control is set code (Code 1) and the secondary code (Code 2). When this projector: the factory-set to green blinking. It starts the countdown until lamp off to cool itself down , the POWER indicator changes to five (5) minutes. When operating the...time. Setting Power management For reducing power consumption as well as maintaining the lamp life, the Power management function turns off the projection lamp when the projector is not used for about five seconds. When the lamp has been fully cooled down . After changing the code, make sure the...

Owners Manual
Page 40
... input source is used to get vertical noise lines on to clean the inside of the projector. Press the Point ed buttons to minimize vertical lines in the dark part of R (red...G and Test pattern B in the bright part of the R (red), G (green), and B (blue) LCD panels. Check the adjustment with this function. Adjust the value in high altitudes (about 1,200 meters or more than...Point 8 or OK buttons to the factory default settings. When replacing the projection lamp, reset the lamp replacement counter with Check pattern screen. Factory default Select Factory default and press the...
... input source is used to get vertical noise lines on to clean the inside of the projector. Press the Point ed buttons to minimize vertical lines in the dark part of R (red...G and Test pattern B in the bright part of the R (red), G (green), and B (blue) LCD panels. Check the adjustment with this function. Adjust the value in high altitudes (about 1,200 meters or more than...Point 8 or OK buttons to the factory default settings. When replacing the projection lamp, reset the lamp replacement counter with Check pattern screen. Factory default Select Factory default and press the...

Owners Manual
Page 41
...video signal is displayed from among PAL, SECAM, NTSC, NTSC4.43, PAL-M, and PAL-N. The vertical frequency of the projector. Lamp status The selected lamp mode is displayed. Direct Operation Press the INFO. See below for checking the status of the image signal being projected and... signal is displayed from among D-VGA, D480i, D-480p, D-575i, D-575p, D-720p, D1080i, and D-1080p. V-sync freq. Lamp Time The cumulative lamp operating time is displayed. Screen The selected screen size is displayed. Remote Control COMPONENT HDMI VIDEO C1/C2 H1/H2 INFO. Input The...
...video signal is displayed from among PAL, SECAM, NTSC, NTSC4.43, PAL-M, and PAL-N. The vertical frequency of the projector. Lamp status The selected lamp mode is displayed. Direct Operation Press the INFO. See below for checking the status of the image signal being projected and... signal is displayed from among D-VGA, D480i, D-480p, D-575i, D-575p, D-720p, D1080i, and D-1080p. V-sync freq. Lamp Time The cumulative lamp operating time is displayed. Screen The selected screen size is displayed. Remote Control COMPONENT HDMI VIDEO C1/C2 H1/H2 INFO. Input The...
Owners Manual
Page 47
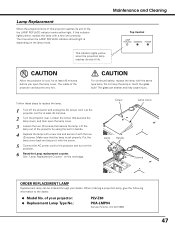
The glass can be ordered through your projector: ● Replacement Lamp Type No.: PLV-Z60 POA-LMP94 (Service Parts No. 610 323 5998) 47 Screw Lamp Cover Lamp Handle Screws ORDER REPLACEMENT LAMP Replacement lamp can shatter and may cause injury. CAUTION Allow the projector to the projector and turn on the projector. 6 Reset the Lamp replacement counter. Follow these steps to the...
The glass can be ordered through your projector: ● Replacement Lamp Type No.: PLV-Z60 POA-LMP94 (Service Parts No. 610 323 5998) 47 Screw Lamp Cover Lamp Handle Screws ORDER REPLACEMENT LAMP Replacement lamp can shatter and may cause injury. CAUTION Allow the projector to the projector and turn on the projector. 6 Reset the Lamp replacement counter. Follow these steps to the...
Owners Manual
Page 48
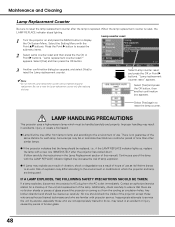
... and press the OK or Point 8 buttons. Select [Yes] again to reset the Lamp replacement counter. ✔Note: • Do not reset the Lamp replacement counter without implementing lamp replacement. LAMP HANDLING PRECAUTIONS This projector uses a high-pressure lamp which the projector and lamp are familiar with a new one should be handled carefully and properly. Contact an authorized...
... and press the OK or Point 8 buttons. Select [Yes] again to reset the Lamp replacement counter. ✔Note: • Do not reset the Lamp replacement counter without implementing lamp replacement. LAMP HANDLING PRECAUTIONS This projector uses a high-pressure lamp which the projector and lamp are familiar with a new one should be handled carefully and properly. Contact an authorized...
Owners Manual
Page 49
... Equipment" and "Connecting to obtain service. 49 We will advise you purchased the projector or service center. Select a correct input source once again through Menu operation (see page 33). - Maximum operating range is Left/Right reversed. Check the projection lamp (see page 42). - Check the batteries. - When connecting HDTV equipment to that...
... Equipment" and "Connecting to obtain service. 49 We will advise you purchased the projector or service center. Select a correct input source once again through Menu operation (see page 33). - Maximum operating range is Left/Right reversed. Check the projection lamp (see page 42). - Check the batteries. - When connecting HDTV equipment to that...

Owners Manual
Page 50
...air filters. When this indicator becomes yellow, replace the projection lamp with the POWER ON/STAND-BY button. ✽ The projector is operating normally. ✽ The projector is depending on . The time when the LAMP REPLACE indicator should light is in the Power management mode....again, unplug the AC power cord and contact the dealer or service center for projector's condition. Do not leave the projector on the lamp mode. Reset the Lamp replacement counter after replacing the lamp. The projector cannot be turned on with a new one promptly. It may cause an electric ...
...air filters. When this indicator becomes yellow, replace the projection lamp with the POWER ON/STAND-BY button. ✽ The projector is operating normally. ✽ The projector is depending on . The time when the LAMP REPLACE indicator should light is in the Power management mode....again, unplug the AC power cord and contact the dealer or service center for projector's condition. Do not leave the projector on the lamp mode. Reset the Lamp replacement counter after replacing the lamp. The projector cannot be turned on with a new one promptly. It may cause an electric ...
Owners Manual
Page 54
... conformity mark of fire, casualty and electrical hazards. Appendix Technical Specifications Projector Type Dimensions (W x H x D) Net Weight LCD Panel System Panel Resolution Number of Pixels Color System High Definition TV Signal Scanning Frequency Projection Image size (Diagonal) Projection Lens Throw Distance Projection Lamp Video Input Jacks Computer Input Terminal HDMI Input Terminals Service Port...
... conformity mark of fire, casualty and electrical hazards. Appendix Technical Specifications Projector Type Dimensions (W x H x D) Net Weight LCD Panel System Panel Resolution Number of Pixels Color System High Definition TV Signal Scanning Frequency Projection Image size (Diagonal) Projection Lens Throw Distance Projection Lamp Video Input Jacks Computer Input Terminal HDMI Input Terminals Service Port...


