
Operation Manual
Page 1
MODEL AR-FX9 OPERATION MANUAL (for facsimile) Page • INSTALLATION 11 • INITIAL SETTINGS 13 • CHOOSING SUITABLE MEDIA 49 • HOW TO USE THE FAX FUNCTION 51 • SPECIAL FUNCTIONS 66 • TROUBLESHOOTING 84 • APPENDIX 91
MODEL AR-FX9 OPERATION MANUAL (for facsimile) Page • INSTALLATION 11 • INITIAL SETTINGS 13 • CHOOSING SUITABLE MEDIA 49 • HOW TO USE THE FAX FUNCTION 51 • SPECIAL FUNCTIONS 66 • TROUBLESHOOTING 84 • APPENDIX 91

Operation Manual
Page 2
... is specifically designed for example, the misfeed indicator and add paper indicator), are described in the Operation Manual. http://www.sharp.de/doc/AR-FX9.pdf Note • This manual describes how to TS103 021. This equipment has been tested according to spill any of Conformity can be viewed at the network interface. • Use caution when installing or modifying telephone lines. • Avoid using...
... is specifically designed for example, the misfeed indicator and add paper indicator), are described in the Operation Manual. http://www.sharp.de/doc/AR-FX9.pdf Note • This manual describes how to TS103 021. This equipment has been tested according to spill any of Conformity can be viewed at the network interface. • Use caution when installing or modifying telephone lines. • Avoid using...
Operation Manual
Page 3
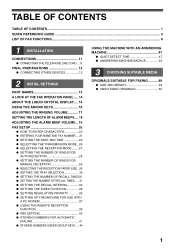
... CONTENTS...1 QUICK REFERENCE GUIDE ...3 LIST OF FAX FUNCTIONS...6 1 INSTALLATION CONNECTIONS 11 ● CONNECTING THE TELEPHONE LINE CORD ...11 FINAL PREPARATIONS 12 ● CONNECTING OTHER DEVICES 12 2 INITIAL SETTINGS PART NAMES 13 A LOOK AT THE FAX OPERATION PANEL ..... 14 ABOUT THE LIQUID CRYSTAL DISPLAY.... 16 USING THE ARROW KEYS 16 ADJUSTING THE RINGING VOLUME........... 17 SETTING THE LENGTH OF ALARM BEEPS .... 18 ADJUSTING THE ALARM BEEP VOLUME .. 19 FAX SETUP 20...
... CONTENTS...1 QUICK REFERENCE GUIDE ...3 LIST OF FAX FUNCTIONS...6 1 INSTALLATION CONNECTIONS 11 ● CONNECTING THE TELEPHONE LINE CORD ...11 FINAL PREPARATIONS 12 ● CONNECTING OTHER DEVICES 12 2 INITIAL SETTINGS PART NAMES 13 A LOOK AT THE FAX OPERATION PANEL ..... 14 ABOUT THE LIQUID CRYSTAL DISPLAY.... 16 USING THE ARROW KEYS 16 ADJUSTING THE RINGING VOLUME........... 17 SETTING THE LENGTH OF ALARM BEEPS .... 18 ADJUSTING THE ALARM BEEP VOLUME .. 19 FAX SETUP 20...
Operation Manual
Page 4
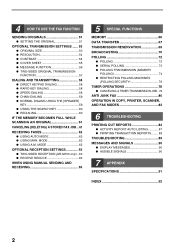
..... 79 ANTI JUNK FAX 80 OPERATION IN COPY, PRINTER, SCANNER, AND FAX MODES 83 6 TROUBLESHOOTING PRINTING OUT REPORTS 84 ● ACTIVITY REPORT AUTO LISTING 87 ● PRINTING TRANSACTION REPORTS........ 88 TROUBLESHOOTING 89 MESSAGES AND SIGNALS 90 ● DISPLAY MESSAGES 90 ● AUDIBLE SIGNALS 90 7 APPENDIX SPECIFICATIONS 91 INDEX 92 2 4 HOW TO USE THE FAX FUNCTION SENDING ORIGINALS 51 ● SETTING THE ORIGINAL 51...
..... 79 ANTI JUNK FAX 80 OPERATION IN COPY, PRINTER, SCANNER, AND FAX MODES 83 6 TROUBLESHOOTING PRINTING OUT REPORTS 84 ● ACTIVITY REPORT AUTO LISTING 87 ● PRINTING TRANSACTION REPORTS........ 88 TROUBLESHOOTING 89 MESSAGES AND SIGNALS 90 ● DISPLAY MESSAGES 90 ● AUDIBLE SIGNALS 90 7 APPENDIX SPECIFICATIONS 91 INDEX 92 2 4 HOW TO USE THE FAX FUNCTION SENDING ORIGINALS 51 ● SETTING THE ORIGINAL 51...

Operation Manual
Page 5
Selecting the transmission mode Memory transmission mode MEMORY The indicator lights up to change modes. Direct transmission mode MEMORY The indicator is off when direct transmission mode is selected. Place the original Using the SPF/RSPF Using the document glass Place the original face up (up when memory transmission mode is selected. Press the [MEMORY] key to 30 pages at once) Place the original face down 3 QUICK REFERENCE GUIDE The following quick reference guide provides brief explanations the operation of the machine.
Selecting the transmission mode Memory transmission mode MEMORY The indicator lights up to change modes. Direct transmission mode MEMORY The indicator is off when direct transmission mode is selected. Place the original Using the SPF/RSPF Using the document glass Place the original face up (up when memory transmission mode is selected. Press the [MEMORY] key to 30 pages at once) Place the original face down 3 QUICK REFERENCE GUIDE The following quick reference guide provides brief explanations the operation of the machine.

Operation Manual
Page 8
... 6 LIST OF FAX FUNCTIONS The FAX MAIN MENU is used . 5 : DAY LIGHT SAVING Enable automatic adjustment of the clock at a specified time. 2 : CLEAR Cancel a timer transmission job. 2 : ENTRY MODE 1 : FAX NUMBER Store (or delete) fax numbers in Rapid Keys, Speed Dial numbers, and Group Keys. 1 : RAPID KEY 2 : SPEED # 3 : GROUP KEY 2 : DATE&TIME SET Set the date and time in the machine. 3 : OWN PASSCODE SET Program the name and phone number of the user of daylight savings time. 3 : MEMORY STATUS Check and delete...
... 6 LIST OF FAX FUNCTIONS The FAX MAIN MENU is used . 5 : DAY LIGHT SAVING Enable automatic adjustment of the clock at a specified time. 2 : CLEAR Cancel a timer transmission job. 2 : ENTRY MODE 1 : FAX NUMBER Store (or delete) fax numbers in Rapid Keys, Speed Dial numbers, and Group Keys. 1 : RAPID KEY 2 : SPEED # 3 : GROUP KEY 2 : DATE&TIME SET Set the date and time in the machine. 3 : OWN PASSCODE SET Program the name and phone number of the user of daylight savings time. 3 : MEMORY STATUS Check and delete...

Operation Manual
Page 14
... OPERATION MANUAL contents CHANGING A TRAY'S PAPER SIZE SETTING MISFEED REMOVAL TONER CARTRIDGE REPLACEMENT CHECKING THE TOTAL COUNT CLEANING THE MACHINE OPTIONAL EQUIPMENT Page 19 79 85 87 88 90 Online Manual (on the rear of the message under 10 seconds. Operation Manual (for your computer. FINAL PREPARATIONS CONNECTING OTHER DEVICES If desired, an answering machine or external telephone can be used as a printer...
... OPERATION MANUAL contents CHANGING A TRAY'S PAPER SIZE SETTING MISFEED REMOVAL TONER CARTRIDGE REPLACEMENT CHECKING THE TOTAL COUNT CLEANING THE MACHINE OPTIONAL EQUIPMENT Page 19 79 85 87 88 90 Online Manual (on the rear of the message under 10 seconds. Operation Manual (for your computer. FINAL PREPARATIONS CONNECTING OTHER DEVICES If desired, an answering machine or external telephone can be used as a printer...
Operation Manual
Page 16
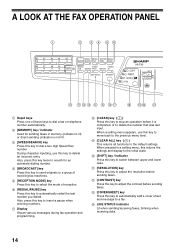
... programming. 8 [CLEAR] key ( ) Press this key to stop an operation before sending faxes. 13 [COVERSHEET] key Press this key to the default settings. When a setting menu appears, use this key to automatically add a cover sheet and message to automatically redial the last number you dialed. RECEPTION REDIAL/ MEMORY SEARCH CAST MODE PAUSE RESOLU- COVER 2-SIDED TION CONTRAST SHEET REPORT TX LINE STATUS SPEAKER AR-FX9 10 11 12...
... programming. 8 [CLEAR] key ( ) Press this key to stop an operation before sending faxes. 13 [COVERSHEET] key Press this key to the default settings. When a setting menu appears, use this key to automatically add a cover sheet and message to automatically redial the last number you dialed. RECEPTION REDIAL/ MEMORY SEARCH CAST MODE PAUSE RESOLU- COVER 2-SIDED TION CONTRAST SHEET REPORT TX LINE STATUS SPEAKER AR-FX9 10 11 12...

Operation Manual
Page 17
... tone dialing mode. 25 Numeric keys Press these keys to dial numbers, and enter numbers and letters during number/name storing procedures. 26 [#] key Press this key to select the mode. Press the " " key to change from the document glass. • Manually receiving a fax. • Entering and setting information. 28 Power save indicator This lights up when an original is not closed. 22 [MENU] key Press this key to enter...
... tone dialing mode. 25 Numeric keys Press these keys to dial numbers, and enter numbers and letters during number/name storing procedures. 26 [#] key Press this key to select the mode. Press the " " key to change from the document glass. • Manually receiving a fax. • Entering and setting information. 28 Power save indicator This lights up when an original is not closed. 22 [MENU] key Press this key to enter...

Operation Manual
Page 28
... is in each mode: SPEED/ BROAD- To change modes, press the [MEMORY] key. The machine memory is not used ), dialing and scanning begin at the same time. If there are no previously stored fax jobs and no job in progress (the telephone line is not being sent from the document glass by transmission reservation (p.69), broadcast transmission (p.70), broadcasting using a Group key (p.71), or...
... is in each mode: SPEED/ BROAD- To change modes, press the [MEMORY] key. The machine memory is not used ), dialing and scanning begin at the same time. If there are no previously stored fax jobs and no job in progress (the telephone line is not being sent from the document glass by transmission reservation (p.69), broadcast transmission (p.70), broadcasting using a Group key (p.71), or...

Operation Manual
Page 29
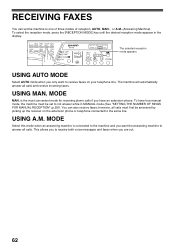
... telephone line. SPEED/ BROAD- COVER 2-SIDED TION CONTRAST SHEET REPORT TX LINE STATUS SPEAKER AR-FX9 NOV 05 WED 8:20 AM STAND-BY AUTO 100% The selected reception mode appears. 1,2,3, 1,2,3, ZOOM For more information on reception modes, refer to receive faxes on the extension phone. ● A.M. This allows you to answer all calls and receive incoming faxes. ● MAN. INITIAL SETTINGS SELECTING...
... telephone line. SPEED/ BROAD- COVER 2-SIDED TION CONTRAST SHEET REPORT TX LINE STATUS SPEAKER AR-FX9 NOV 05 WED 8:20 AM STAND-BY AUTO 100% The selected reception mode appears. 1,2,3, 1,2,3, ZOOM For more information on reception modes, refer to receive faxes on the extension phone. ● A.M. This allows you to answer all calls and receive incoming faxes. ● MAN. INITIAL SETTINGS SELECTING...
Operation Manual
Page 32
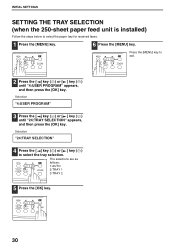
... SETTINGS SETTING THE TRAY SELECTION (when the 250-sheet paper feed unit is installed) Follow the steps below to select the tray selection. The selections are as follows: 1:AUTO 1,2,3, 1,2,3, 2:TRAY 1 3:TRAY 2 5 Press the [OK] key. 1,2,3, 1,2,3, 30 Press the [MENU] key to exit. 1,2,3, 1,2,3, 1,2,3, 1,2,3, 2 Press the [ ] key ( ) or [ ] key ( ) until "24:TRAY SELECTION" appears, and then press the [OK] key. Selection "4:USER...
... SETTINGS SETTING THE TRAY SELECTION (when the 250-sheet paper feed unit is installed) Follow the steps below to select the tray selection. The selections are as follows: 1:AUTO 1,2,3, 1,2,3, 2:TRAY 1 3:TRAY 2 5 Press the [OK] key. 1,2,3, 1,2,3, 30 Press the [MENU] key to exit. 1,2,3, 1,2,3, 1,2,3, 1,2,3, 2 Press the [ ] key ( ) or [ ] key ( ) until "24:TRAY SELECTION" appears, and then press the [OK] key. Selection "4:USER...

Operation Manual
Page 42
... when PBX setting is ON) R-key allows use the PBX settiing function : 1 Press the [MENU] key. 6 Press the [ ] key ( ) or [ ] key ( ) to indicate that the speaker will not be forwarded to public line outside PBX. PBX setting Use the following procedure to use to dial (or register) PBX internal numbers : to dial (or register) an internal number, press [SPEAKER] key prior to enter the ID CODE and...
... when PBX setting is ON) R-key allows use the PBX settiing function : 1 Press the [MENU] key. 6 Press the [ ] key ( ) or [ ] key ( ) to indicate that the speaker will not be forwarded to public line outside PBX. PBX setting Use the following procedure to use to dial (or register) PBX internal numbers : to dial (or register) an internal number, press [SPEAKER] key prior to enter the ID CODE and...

Operation Manual
Page 56
...'t, the next best available setting will produce a clearer image than Fine used alone. COVER 2-SIDED TION CONTRAST SHEET REPORT TX LINE STATUS SPEAKER CONTRAST The fax automatically controls the contrast, but you do not change the setting, the original will produce a clearer image than Super fine used alone. • S. This setting will automatically be used. This setting will be sent in STANDARD mode. 01...
...'t, the next best available setting will produce a clearer image than Fine used alone. COVER 2-SIDED TION CONTRAST SHEET REPORT TX LINE STATUS SPEAKER CONTRAST The fax automatically controls the contrast, but you do not change the setting, the original will produce a clearer image than Super fine used alone. • S. This setting will automatically be used. This setting will be sent in STANDARD mode. 01...
Operation Manual
Page 64
... in MANUAL mode (See "SETTING THE NUMBER OF RINGS FOR MANUAL RECEPTION" (p.29)). The machine will automatically answer all calls must be answered by picking up the receiver on your telephone line. however, all calls and receive incoming faxes. USING MAN. is connected to the machine and you are out. 62 COVER 2-SIDED TION CONTRAST SHEET REPORT TX LINE STATUS SPEAKER AR-FX9...
... in MANUAL mode (See "SETTING THE NUMBER OF RINGS FOR MANUAL RECEPTION" (p.29)). The machine will automatically answer all calls must be answered by picking up the receiver on your telephone line. however, all calls and receive incoming faxes. USING MAN. is connected to the machine and you are out. 62 COVER 2-SIDED TION CONTRAST SHEET REPORT TX LINE STATUS SPEAKER AR-FX9...

Operation Manual
Page 76
..."1:1.TIME" or "2:REPEAT" can select whether polling transmission will take place and press the [OK] key. Only one original can be set to machines whose fax numbers ...document glass and perform the following steps: 1 Press the [MENU] key. 1,2,3, 1,2,3, 3 Press the [ ] key ( ) or [ ] key ( ) to a fax machine that polls your machine ("RESTRICTING POLLING MACHINES (POLLING SECURITY)" on polling transmission standby. SPECIAL FUNCTIONS POLLING TRANSMISSION (MEMORY POLLING) This function is used to transmit an original that has been scanned into memory to select the number of times...
..."1:1.TIME" or "2:REPEAT" can select whether polling transmission will take place and press the [OK] key. Only one original can be set to machines whose fax numbers ...document glass and perform the following steps: 1 Press the [MENU] key. 1,2,3, 1,2,3, 3 Press the [ ] key ( ) or [ ] key ( ) to a fax machine that polls your machine ("RESTRICTING POLLING MACHINES (POLLING SECURITY)" on polling transmission standby. SPECIAL FUNCTIONS POLLING TRANSMISSION (MEMORY POLLING) This function is used to transmit an original that has been scanned into memory to select the number of times...

Operation Manual
Page 77
"1:1.TIME" or "2:REPEAT" can be selected as the number 1,2,3, 1,2,3, of times polling transmission will take place and press the [OK] key. SPECIAL FUNCTIONS Adding a original to polling memory: Use this procedure to add an original to select the number of polling operations allowed. 2 Press the [ ] key ( ) or [ ] key ( ) until "2:CLEAR" appears, and then press the [OK] key. Selection "1:SET" 4 Press the [ ] key ( ) or [ ] key ( ) to another...
"1:1.TIME" or "2:REPEAT" can be selected as the number 1,2,3, 1,2,3, of times polling transmission will take place and press the [OK] key. SPECIAL FUNCTIONS Adding a original to polling memory: Use this procedure to add an original to select the number of polling operations allowed. 2 Press the [ ] key ( ) or [ ] key ( ) until "2:CLEAR" appears, and then press the [OK] key. Selection "1:SET" 4 Press the [ ] key ( ) or [ ] key ( ) to another...

Operation Manual
Page 86
... timer or dual access operations that are described below. 1. 6 Chapter 6 TROUBLESHOOTING PRINTING OUT REPORTS The machine is capable of printing a range of reports on faxing activities as well as the sender or recipient and the time of the operation, etc. TIMER MODE FILE RESERVED 01 ...SPEED # : XXX FAX # : XXXXXXXXXXXXXXXXXXXXX SPEED # : XXX XXX FAX # : XXXXXXX : XXXXXXXX : XXXXXX 10-SEP-200X FRI 06:30 RECEIVER 84 P.01 ACTIVITY REPORT (SEND) # DATE START TIME XX 10-SEP XX:XX XX RECEIVER 10-SEP-200X FRI 06:30 COM.TIME PAGES TYPE/NOTE X:XX:XX XX XXXXXXX XXXXX FILE...
... timer or dual access operations that are described below. 1. 6 Chapter 6 TROUBLESHOOTING PRINTING OUT REPORTS The machine is capable of printing a range of reports on faxing activities as well as the sender or recipient and the time of the operation, etc. TIMER MODE FILE RESERVED 01 ...SPEED # : XXX FAX # : XXXXXXXXXXXXXXXXXXXXX SPEED # : XXX XXX FAX # : XXXXXXX : XXXXXXXX : XXXXXX 10-SEP-200X FRI 06:30 RECEIVER 84 P.01 ACTIVITY REPORT (SEND) # DATE START TIME XX 10-SEP XX:XX XX RECEIVER 10-SEP-200X FRI 06:30 COM.TIME PAGES TYPE/NOTE X:XX:XX XX XXXXXXX XXXXX FILE...
Operation Manual
Page 91
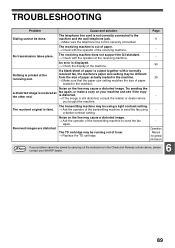
... not correctly connected to send the fax using a light contrast setting. The transmitting machine may be done. again. The receiving machine does not support the G3 standard. → Check with the operator of the receiving machine. - you bought the machine. Operation Manual (for general information) Note If your SHARP dealer. 6 89 TROUBLESHOOTING Problem Cause and solution Page The telephone line cord is...
... not correctly connected to send the fax using a light contrast setting. The transmitting machine may be done. again. The receiving machine does not support the G3 standard. → Check with the operator of the receiving machine. - you bought the machine. Operation Manual (for general information) Note If your SHARP dealer. 6 89 TROUBLESHOOTING Problem Cause and solution Page The telephone line cord is...

Operation Manual
Page 94
... devices 12 - Speed dialing 58 - Using the [SPEAKER] key 59 Display 14, 16 Document glass 13 E Entering your name and fax number 21 F Fax main menu 6 Fax setup - Date and time 22 - How to enter characters 20 - Number of fax functions 6 M Memory 66 Message function 56 Messages and signals 90 O Operation panel 13 Optional transmission settings - Size and weight 49 - Length of recall times 31 - Rapid key dialing 43 - Index function 35 - PBX Setting...
... devices 12 - Speed dialing 58 - Using the [SPEAKER] key 59 Display 14, 16 Document glass 13 E Entering your name and fax number 21 F Fax main menu 6 Fax setup - Date and time 22 - How to enter characters 20 - Number of fax functions 6 M Memory 66 Message function 56 Messages and signals 90 O Operation panel 13 Optional transmission settings - Size and weight 49 - Length of recall times 31 - Rapid key dialing 43 - Index function 35 - PBX Setting...