
Operation Manual
Page 1
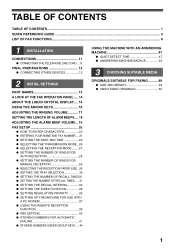
MODEL AR-FX9 OPERATION MANUAL (for facsimile) Page • INSTALLATION 11 • INITIAL SETTINGS 13 • CHOOSING SUITABLE MEDIA 49 • HOW TO USE THE FAX FUNCTION 51 • SPECIAL FUNCTIONS 66 • TROUBLESHOOTING 84 • APPENDIX 91
MODEL AR-FX9 OPERATION MANUAL (for facsimile) Page • INSTALLATION 11 • INITIAL SETTINGS 13 • CHOOSING SUITABLE MEDIA 49 • HOW TO USE THE FAX FUNCTION 51 • SPECIAL FUNCTIONS 66 • TROUBLESHOOTING 84 • APPENDIX 91

Operation Manual
Page 2
...you should immediately remove it from lightning. • Do not install or use the fax function of your telephone equipment is specifically designed for example, the misfeed indicator and add...machine near the equipment and shall be a remote risk of Conformity can be viewed at the network interface. • Use caution when installing or modifying telephone lines. • Avoid using a telephone (... accessible. • Never install telephone wiring during an electrical storm. http://www.sharp.de/doc/AR-FX9.pdf Note • This manual describes how to the pan-European TS103 021 ...
...you should immediately remove it from lightning. • Do not install or use the fax function of your telephone equipment is specifically designed for example, the misfeed indicator and add...machine near the equipment and shall be a remote risk of Conformity can be viewed at the network interface. • Use caution when installing or modifying telephone lines. • Avoid using a telephone (... accessible. • Never install telephone wiring during an electrical storm. http://www.sharp.de/doc/AR-FX9.pdf Note • This manual describes how to the pan-European TS103 021 ...
Operation Manual
Page 3
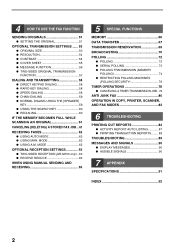
...CONNECTING THE TELEPHONE LINE CORD ...11 FINAL PREPARATIONS 12 ● CONNECTING OTHER DEVICES 12 2 INITIAL SETTINGS PART NAMES 13 A LOOK AT THE FAX OPERATION PANEL ..... 14 ABOUT THE LIQUID CRYSTAL DISPLAY.... 16 USING THE ARROW KEYS 16 ADJUSTING THE RINGING VOLUME........... 17 SETTING THE LENGTH OF... ALARM BEEPS .... 18 ADJUSTING THE ALARM BEEP VOLUME .. 19 FAX SETUP 20 ● HOW TO ENTER CHARACTERS 20 ● ENTERING YOUR NAME AND FAX NUMBER.....21 ● SETTING THE DATE AND TIME 22 ● SELECTING THE TRANSMISSION MODE ..26 &#...
...CONNECTING THE TELEPHONE LINE CORD ...11 FINAL PREPARATIONS 12 ● CONNECTING OTHER DEVICES 12 2 INITIAL SETTINGS PART NAMES 13 A LOOK AT THE FAX OPERATION PANEL ..... 14 ABOUT THE LIQUID CRYSTAL DISPLAY.... 16 USING THE ARROW KEYS 16 ADJUSTING THE RINGING VOLUME........... 17 SETTING THE LENGTH OF... ALARM BEEPS .... 18 ADJUSTING THE ALARM BEEP VOLUME .. 19 FAX SETUP 20 ● HOW TO ENTER CHARACTERS 20 ● ENTERING YOUR NAME AND FAX NUMBER.....21 ● SETTING THE DATE AND TIME 22 ● SELECTING THE TRANSMISSION MODE ..26 &#...
Operation Manual
Page 4
...9679; USING THE SEARCH KEY 60 ● REDIALING 60 IF THE MEMORY BECOMES FULL WHILE SCANNING AN ORIGINAL 61 CANCELING (DELETING) A STORED FAX JOB...61 RECEIVING FAXES 62 ● USING AUTO MODE 62 ● USING MAN. MODE 62 ● USING A.M. MODE 62 OPTIONAL RECEPTION SETTINGS 63 ●... TWO-SIDED RECEPTION (AR-M155 only) ..63 ● RECEIVE REDUCE 64 WHEN USING MANUAL SENDING AND RECEIVING 65 5 SPECIAL FUNCTIONS MEMORY 66 ...
...9679; USING THE SEARCH KEY 60 ● REDIALING 60 IF THE MEMORY BECOMES FULL WHILE SCANNING AN ORIGINAL 61 CANCELING (DELETING) A STORED FAX JOB...61 RECEIVING FAXES 62 ● USING AUTO MODE 62 ● USING MAN. MODE 62 ● USING A.M. MODE 62 OPTIONAL RECEPTION SETTINGS 63 ●... TWO-SIDED RECEPTION (AR-M155 only) ..63 ● RECEIVE REDUCE 64 WHEN USING MANUAL SENDING AND RECEIVING 65 5 SPECIAL FUNCTIONS MEMORY 66 ...

Operation Manual
Page 6
...the destination. Dial. Enter the first letter of the number (a Group Key cannot be used). Adjust the resolution and contrast. Dial. If you are faxing a multi-page original, change pages and press the [START] key ( ). SPEED/ SEARCH 01 09 10 18 Speed Dial number or Rapid Key ...Place the original. REDIAL/ PAUSE Dial with the numeric keys and then press the [REDIAL/PAUSE] key. Place the original. 4 RESOLU- Sending a fax Dialing methods Direct Dialing Press the numeric keys to press the [START] key 18 after pressing a Rapid Key. Speed Dialing Rapid Key Dialing Chain Dialing...
...the destination. Dial. Enter the first letter of the number (a Group Key cannot be used). Adjust the resolution and contrast. Dial. If you are faxing a multi-page original, change pages and press the [START] key ( ). SPEED/ SEARCH 01 09 10 18 Speed Dial number or Rapid Key ...Place the original. REDIAL/ PAUSE Dial with the numeric keys and then press the [REDIAL/PAUSE] key. Place the original. 4 RESOLU- Sending a fax Dialing methods Direct Dialing Press the numeric keys to press the [START] key 18 after pressing a Rapid Key. Speed Dialing Rapid Key Dialing Chain Dialing...

Operation Manual
Page 7
...the resolution and contrast. Automatically sending a fax at a specified time (timer transmission) To set to take place, the reception mode of your machine. Faxes will be transmitted after previous jobs are automatically received. Receiving a fax Selecting the reception mode RECEPTION MODE Press ...until the desired reception mode appears in progress Place the original. BROADCAST RESOLU- To receive a fax, answer the call your fax machine and request automatic transmission of an original placed in your machine must be received automatically. "A.M." : ...
...the resolution and contrast. Automatically sending a fax at a specified time (timer transmission) To set to take place, the reception mode of your machine. Faxes will be transmitted after previous jobs are automatically received. Receiving a fax Selecting the reception mode RECEPTION MODE Press ...until the desired reception mode appears in progress Place the original. BROADCAST RESOLU- To receive a fax, answer the call your fax machine and request automatic transmission of an original placed in your machine must be received automatically. "A.M." : ...

Operation Manual
Page 8
...Settings (factory default setting appears in bold) 0 : RX DATA TRANSFER * (See page 9) 1 : DATA TRANSFER Enable transfer of received faxes to another fax machine when printing is used to take place automatically at the beginning and end of the machine to which the machine answers calls in... on which the machine answers calls in automatic reception mode. 0 - 9 (2) 5 : # OF RINGS (MANUAL) Set the number of rings on which received faxes will be transferred. 1 : TIMER MODE 1 : SET Set up a transmission or polling job to configure settings for configuring settings is used . 5 : DAY ...
...Settings (factory default setting appears in bold) 0 : RX DATA TRANSFER * (See page 9) 1 : DATA TRANSFER Enable transfer of received faxes to another fax machine when printing is used to take place automatically at the beginning and end of the machine to which the machine answers calls in... on which the machine answers calls in automatic reception mode. 0 - 9 (2) 5 : # OF RINGS (MANUAL) Set the number of rings on which received faxes will be transferred. 1 : TIMER MODE 1 : SET Set up a transmission or polling job to configure settings for configuring settings is used . 5 : DAY ...

Operation Manual
Page 9
... can be selected. 00 - 15 min. (01 min.) 12 : SECURITY SELECT Enable the polling security function. 1 : ON 2 : OFF 13 : FAX REMOTE NUMBER Set the 1-digit number used to 15 minutes can be selected. 01 - 15 min. (03 min.) 11 : RECALL INT. Menu item Settings...that are made when the line is busy. 1 to activate remote fax reception. 0 - 9 (5) 14 : REMOTE RECEPTION Enable the remote reception function. 1 : ON 2 : OFF 15 : FAX SIGNAL RCV Enable automatic fax reception when a fax tone is heard after answering a call on received faxes. 1 : ALWAYS PRINTS 2 : ERROR ONLY 3 : NEVER PRINTS...
... can be selected. 00 - 15 min. (01 min.) 12 : SECURITY SELECT Enable the polling security function. 1 : ON 2 : OFF 13 : FAX REMOTE NUMBER Set the 1-digit number used to 15 minutes can be selected. 01 - 15 min. (03 min.) 11 : RECALL INT. Menu item Settings...that are made when the line is busy. 1 to activate remote fax reception. 0 - 9 (5) 14 : REMOTE RECEPTION Enable the remote reception function. 1 : ON 2 : OFF 15 : FAX SIGNAL RCV Enable automatic fax reception when a fax tone is heard after answering a call on received faxes. 1 : ALWAYS PRINTS 2 : ERROR ONLY 3 : NEVER PRINTS...

Operation Manual
Page 10
... that sounds when a key is pressed. 1 : OFF 2 : LOW 3 : MIDDLE 4 : HIGH 20 : INDEX PRINT Enable printing of a black mark (index) at the top of each received fax page. 1 : ON 2 : OFF 21 : DATE&TIME FORMAT 1 : TIME FORMAT Select 12-hour or 24-hour format for the time set in the machine. 1 : 12 HOUR... 3 : YYYYMMDD 22 : PBX SETTING ** Set this function for pbx setting. 1 : ON 2 : OFF 23 : 2-SIDED RX Print on both sides of the paper when a multi-page fax is received. 1 : ON 2 : OFF 24 : TRAY SELECTION (when the 250-sheet paper feed unit is installed) Set the tray for printing received...
... that sounds when a key is pressed. 1 : OFF 2 : LOW 3 : MIDDLE 4 : HIGH 20 : INDEX PRINT Enable printing of a black mark (index) at the top of each received fax page. 1 : ON 2 : OFF 21 : DATE&TIME FORMAT 1 : TIME FORMAT Select 12-hour or 24-hour format for the time set in the machine. 1 : 12 HOUR... 3 : YYYYMMDD 22 : PBX SETTING ** Set this function for pbx setting. 1 : ON 2 : OFF 23 : 2-SIDED RX Print on both sides of the paper when a multi-page fax is received. 1 : ON 2 : OFF 24 : TRAY SELECTION (when the 250-sheet paper feed unit is installed) Set the tray for printing received...

Operation Manual
Page 11
... * Please note that the PBX setting is full and cannot receive messages or otherwise fails. 1 : ON 2 : OFF Perform polling transmission once. Sequentially poll multiple fax machines. For the other countries, the parameter "22. MODE 1: QUIET DETECT TIME 2 : AUTO RECEIVE 7 : MEMORY POLL MODE 1 : 1 TIME 2 : ... appears in bold) Enable the anti junk function to block fax reception from specified fax numbers. 1 : ON 2 : OFF Program (or delete) fax numbers from which fax reception is to be blocked. 1 : SET 2 : CLEAR Activate fax reception when a period of silence longer than the set time...
... * Please note that the PBX setting is full and cannot receive messages or otherwise fails. 1 : ON 2 : OFF Perform polling transmission once. Sequentially poll multiple fax machines. For the other countries, the parameter "22. MODE 1: QUIET DETECT TIME 2 : AUTO RECEIVE 7 : MEMORY POLL MODE 1 : 1 TIME 2 : ... appears in bold) Enable the anti junk function to block fax reception from specified fax numbers. 1 : ON 2 : OFF Program (or delete) fax numbers from which fax reception is to be blocked. 1 : SET 2 : CLEAR Activate fax reception when a period of silence longer than the set time...

Operation Manual
Page 12
...setting or information is selected. When the numeric key is pressed, the item is selected or entered. 1 Press the [MODE SELECT] key to indicate that fax R mode is selected. 2 Press the [MENU] key. Press the [MENU] key to configure the settings explained on pages 6 through 9. SELECTING SETTINGS ...) key to enter characters or numbers. Note An item can also be selected after pressing the [MENU] key by pressing the numeric key for the fax function is selected. 1,2,3, To enter information: Press the numeric keys to select a menu item and press the [OK] key. Note • If...
...setting or information is selected. When the numeric key is pressed, the item is selected or entered. 1 Press the [MODE SELECT] key to indicate that fax R mode is selected. 2 Press the [MENU] key. Press the [MENU] key to configure the settings explained on pages 6 through 9. SELECTING SETTINGS ...) key to enter characters or numbers. Note An item can also be selected after pressing the [MENU] key by pressing the numeric key for the fax function is selected. 1,2,3, To enter information: Press the numeric keys to select a menu item and press the [OK] key. Note • If...

Operation Manual
Page 13
...that you hear a "click". Surge protectors can be purchased from your nearest Sharp service center. Adapter TEL LINE socket LINE ABOUT THE OPERATION MANUALS The operation manuals for the machine are as a fax machine. 1 Chapter 1 INSTALLATION CONNECTIONS CONNECTING THE TELEPHONE LINE CORD Use only ...the adapter is used to attach an extension telephone or answering machine to the wall telephone socket. This manual only explains the fax functions of paper misfeeds, and peripheral equipment, see the operation manual for Nordic countries. As shown in the illustration, insert...
...that you hear a "click". Surge protectors can be purchased from your nearest Sharp service center. Adapter TEL LINE socket LINE ABOUT THE OPERATION MANUALS The operation manuals for the machine are as a fax machine. 1 Chapter 1 INSTALLATION CONNECTIONS CONNECTING THE TELEPHONE LINE CORD Use only ...the adapter is used to attach an extension telephone or answering machine to the wall telephone socket. This manual only explains the fax functions of paper misfeeds, and peripheral equipment, see the operation manual for Nordic countries. As shown in the illustration, insert...

Operation Manual
Page 14
... over the line. It is too long, you may have a PC modem on the same line, you pick up the extension phone and hear a fax tone, the machine will automatically cut in the operation manual for the machine : OPERATION MANUAL contents CAUTIONS PART NAMES POWER ON AND OFF LOADING THE... to keep the length of the machine. ● Connecting an answering machine to the machine allows you to receive both voice and fax messages when you also have difficulty receiving faxes sent by pressing their [START] key ( ) after leaving their voice message. ● You can be used as a printer and ...
... over the line. It is too long, you may have a PC modem on the same line, you pick up the extension phone and hear a fax tone, the machine will automatically cut in the operation manual for the machine : OPERATION MANUAL contents CAUTIONS PART NAMES POWER ON AND OFF LOADING THE... to keep the length of the machine. ● Connecting an answering machine to the machine allows you to receive both voice and fax messages when you also have difficulty receiving faxes sent by pressing their [START] key ( ) after leaving their voice message. ● You can be used as a printer and ...
Operation Manual
Page 16
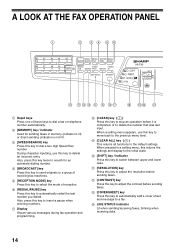
... dialed. When a setting menu appears, use this key to dial a two digit Speed Dial number. COVER 2-SIDED TION CONTRAST SHEET REPORT TX LINE STATUS SPEAKER AR-FX9 10 11 12 13 14 15 16 17 18 19 20 21 1 Rapid keys Press one of reception. 6 [REDIAL/PAUSE] key Press this key to... a fax. 14 LINE STATUS indicator Lit when sending/receiving faxes, blinking when receiving data. 14 Also, press this key to insert a pause when entering numbers. 7 Display Shows various messages during...
... dialed. When a setting menu appears, use this key to dial a two digit Speed Dial number. COVER 2-SIDED TION CONTRAST SHEET REPORT TX LINE STATUS SPEAKER AR-FX9 10 11 12 13 14 15 16 17 18 19 20 21 1 Rapid keys Press one of reception. 6 [REDIAL/PAUSE] key Press this key to... a fax. 14 LINE STATUS indicator Lit when sending/receiving faxes, blinking when receiving data. 14 Also, press this key to insert a pause when entering numbers. 7 Display Shows various messages during...

Operation Manual
Page 17
...(To close the line, press the [SPEAKER] key again.) Please refer to "PBX function" for the following: • To begin sending a fax. • Reading an original into memory from pulse dialing to tone dialing mode. 25 Numeric keys Press these keys to dial numbers, and enter ... to select the mode. When dialing, press this key after you are finished scanning originals into memory from the document glass. • Manually receiving a fax. • Entering and setting information. 28 Power save function is activated. 15 Press the " " key to change from the document glass. 27 [START...
...(To close the line, press the [SPEAKER] key again.) Please refer to "PBX function" for the following: • To begin sending a fax. • Reading an original into memory from pulse dialing to tone dialing mode. 25 Numeric keys Press these keys to dial numbers, and enter ... to select the mode. When dialing, press this key after you are finished scanning originals into memory from the document glass. • Manually receiving a fax. • Entering and setting information. 28 Power save function is activated. 15 Press the " " key to change from the document glass. 27 [START...

Operation Manual
Page 22
... not complete and varies according to the destination and language. ● To enter two characters in the order marked above each of characters is deleted. 3. FAX SETUP HOW TO ENTER CHARACTERS You can be entered 1 1 Space 2 ABC2 a b c 3 DEF 3 d e f 4 GH I 4 g h i 5 JKL5 j k l 6 MNO 6mn o 7 PQRS 7 p q r s 8 TUV8 t u v 9 WX Y Z 9 w x y z 00 ● Please note that this...
... not complete and varies according to the destination and language. ● To enter two characters in the order marked above each of characters is deleted. 3. FAX SETUP HOW TO ENTER CHARACTERS You can be entered 1 1 Space 2 ABC2 a b c 3 DEF 3 d e f 4 GH I 4 g h i 5 JKL5 j k l 6 MNO 6mn o 7 PQRS 7 p q r s 8 TUV8 t u v 9 WX Y Z 9 w x y z 00 ● Please note that this...

Operation Manual
Page 23
... ] key ( ) or [ ] key ( ) to move the cursor to the character immediately following procedure to enter your name and fax number: 1 Press the [MENU] key. 1,2,3, 1,2,3, 2 Enter your own fax number (maximum 20 digits) by pressing the Numeric keys. Press the [CLEAR] key ( ).The character in the menu display by pressing ...the operation panel keys as shown on the left. Enter your name and fax number printed at the top of the items in front of 40 characters). Press each key repeatedly until the desired letter appears in the ...
... ] key ( ) or [ ] key ( ) to move the cursor to the character immediately following procedure to enter your name and fax number: 1 Press the [MENU] key. 1,2,3, 1,2,3, 2 Enter your own fax number (maximum 20 digits) by pressing the Numeric keys. Press the [CLEAR] key ( ).The character in the menu display by pressing ...the operation panel keys as shown on the left. Enter your name and fax number printed at the top of the items in front of 40 characters). Press each key repeatedly until the desired letter appears in the ...

Operation Manual
Page 28
...REDIAL/ MEMORY SEARCH CAST MODE PAUSE RESOLU- Direct transmission (the MEMORY indicator is off when direct transmission is selected. Note • A fax job cannot be stored while a direct transmission is in each mode: SPEED/ BROAD- MEMORY indicator 01 02 10 11 06 07 15 16...scanned. Each page is transmitted after the destination is dialed and the connection established. The machine memory is not used for sending faxes: memory transmission and direct transmission. INITIAL SETTINGS SELECTING THE TRANSMISSION MODE The machine has two modes for direct transmission, and thus ...
...REDIAL/ MEMORY SEARCH CAST MODE PAUSE RESOLU- Direct transmission (the MEMORY indicator is off when direct transmission is selected. Note • A fax job cannot be stored while a direct transmission is in each mode: SPEED/ BROAD- MEMORY indicator 01 02 10 11 06 07 15 16...scanned. Each page is transmitted after the destination is dialed and the connection established. The machine memory is not used for sending faxes: memory transmission and direct transmission. INITIAL SETTINGS SELECTING THE TRANSMISSION MODE The machine has two modes for direct transmission, and thus ...

Operation Manual
Page 29
... the most convenient mode for receiving incoming calls and faxes: ● AUTO mode: Select this mode when you only want the answering machine to answer all calls. COVER 2-SIDED TION CONTRAST SHEET REPORT TX LINE STATUS SPEAKER AR-FX9 NOV 05 WED 8:20 AM STAND-BY AUTO 100...% The selected reception mode appears. 1,2,3, 1,2,3, ZOOM For more information on reception modes, refer to receive faxes on the extension phone. ● A.M. mode: This is connected ...
... the most convenient mode for receiving incoming calls and faxes: ● AUTO mode: Select this mode when you only want the answering machine to answer all calls. COVER 2-SIDED TION CONTRAST SHEET REPORT TX LINE STATUS SPEAKER AR-FX9 NOV 05 WED 8:20 AM STAND-BY AUTO 100...% The selected reception mode appears. 1,2,3, 1,2,3, ZOOM For more information on reception modes, refer to receive faxes on the extension phone. ● A.M. mode: This is connected ...

Operation Manual
Page 31
... 9). 2 Press the [ ] key ( ) or [ ] key ( ) until "5:# OF RINGS (MANUAL)" appears, and then press the [OK] key. If you would like to use (0 to print received faxes. INITIAL SETTINGS SETTING THE NUMBER OF RINGS FOR MANUAL RECEPTION The number of rings before the machine answers in the Operation Manual (for general information...
... 9). 2 Press the [ ] key ( ) or [ ] key ( ) until "5:# OF RINGS (MANUAL)" appears, and then press the [OK] key. If you would like to use (0 to print received faxes. INITIAL SETTINGS SETTING THE NUMBER OF RINGS FOR MANUAL RECEPTION The number of rings before the machine answers in the Operation Manual (for general information...