
Operation Manual
Page 1
MODEL AR-FX9 OPERATION MANUAL (for facsimile) Page • INSTALLATION 11 • INITIAL SETTINGS 13 • CHOOSING SUITABLE MEDIA 49 • HOW TO USE THE FAX FUNCTION 51 • SPECIAL FUNCTIONS 66 • TROUBLESHOOTING 84 • APPENDIX 91
MODEL AR-FX9 OPERATION MANUAL (for facsimile) Page • INSTALLATION 11 • INITIAL SETTINGS 13 • CHOOSING SUITABLE MEDIA 49 • HOW TO USE THE FAX FUNCTION 51 • SPECIAL FUNCTIONS 66 • TROUBLESHOOTING 84 • APPENDIX 91

Operation Manual
Page 2
...the network interface. • Use caution when installing or modifying telephone lines. • Avoid using a telephone (other than a cordless type) during a lightning storms. • Never install telephone jacks in the Operation Manual. Take care not to spill any of the machine. http://www.sharp.de/doc/AR-FX9.pdf ... w et locations unless the jack is not operating properly, you should immediately remove it from lightning. • Do not install or use the fax function of your telephone line, as the "SPF" and to the pan-European TS103 021 regulation. Part names and functions...
...the network interface. • Use caution when installing or modifying telephone lines. • Avoid using a telephone (other than a cordless type) during a lightning storms. • Never install telephone jacks in the Operation Manual. Take care not to spill any of the machine. http://www.sharp.de/doc/AR-FX9.pdf ... w et locations unless the jack is not operating properly, you should immediately remove it from lightning. • Do not install or use the fax function of your telephone line, as the "SPF" and to the pan-European TS103 021 regulation. Part names and functions...
Operation Manual
Page 3
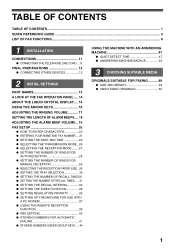
...TABLE OF CONTENTS...1 QUICK REFERENCE GUIDE ...3 LIST OF FAX FUNCTIONS...6 1 INSTALLATION CONNECTIONS 11 ● CONNECTING THE TELEPHONE LINE CORD ...11 FINAL PREPARATIONS 12 ● CONNECTING OTHER DEVICES 12 2 INITIAL SETTINGS PART NAMES 13 A LOOK AT THE FAX OPERATION PANEL ..... 14 ABOUT THE LIQUID CRYSTAL DISPLAY.............. 17 SETTING THE LENGTH OF ALARM BEEPS .... 18 ADJUSTING THE ALARM BEEP VOLUME .. 19 FAX SETUP 20 ● HOW TO ENTER CHARACTERS 20 ● ENTERING YOUR NAME AND FAX NUMBER.....21 ● SETTING THE DATE AND TIME 22 ● SELECTING THE TRANSMISSION MODE .....
...TABLE OF CONTENTS...1 QUICK REFERENCE GUIDE ...3 LIST OF FAX FUNCTIONS...6 1 INSTALLATION CONNECTIONS 11 ● CONNECTING THE TELEPHONE LINE CORD ...11 FINAL PREPARATIONS 12 ● CONNECTING OTHER DEVICES 12 2 INITIAL SETTINGS PART NAMES 13 A LOOK AT THE FAX OPERATION PANEL ..... 14 ABOUT THE LIQUID CRYSTAL DISPLAY.............. 17 SETTING THE LENGTH OF ALARM BEEPS .... 18 ADJUSTING THE ALARM BEEP VOLUME .. 19 FAX SETUP 20 ● HOW TO ENTER CHARACTERS 20 ● ENTERING YOUR NAME AND FAX NUMBER.....21 ● SETTING THE DATE AND TIME 22 ● SELECTING THE TRANSMISSION MODE .....

Operation Manual
Page 10
... that sounds when a key is pressed. 1 : OFF 2 : LOW 3 : MIDDLE 4 : HIGH 20 : INDEX PRINT Enable printing of a black mark (index) at the top of each received fax page. 1 : ON 2 : OFF 21 : DATE&TIME FORMAT 1 : TIME FORMAT Select 12-hour or 24-hour format for the time set in the machine. 1 : 12 HOUR.... 1 : ON 2 : OFF 23 : 2-SIDED RX Print on both sides of the paper when a multi-page fax is received. 1 : ON 2 : OFF 24 : TRAY SELECTION (when the 250-sheet paper feed unit is installed) Set the tray for printing received faxes. 1 : AUTO 2 : TRAY 1 3 : TRAY 2 Page 64 18 17 19 35 23 24 40 63 30...
... that sounds when a key is pressed. 1 : OFF 2 : LOW 3 : MIDDLE 4 : HIGH 20 : INDEX PRINT Enable printing of a black mark (index) at the top of each received fax page. 1 : ON 2 : OFF 21 : DATE&TIME FORMAT 1 : TIME FORMAT Select 12-hour or 24-hour format for the time set in the machine. 1 : 12 HOUR.... 1 : ON 2 : OFF 23 : 2-SIDED RX Print on both sides of the paper when a multi-page fax is received. 1 : ON 2 : OFF 24 : TRAY SELECTION (when the 250-sheet paper feed unit is installed) Set the tray for printing received faxes. 1 : AUTO 2 : TRAY 1 3 : TRAY 2 Page 64 18 17 19 35 23 24 40 63 30...

Operation Manual
Page 13
...install surge protectors for using the machine, including safety information, installation, paper loading, removal of the cord with the core into the wall telephone socket. This manual only explains the fax... functions of lightning or power surges, we recommend that the adapter is not necessary for the machine. 11 For general information on the side of the machine as shown in the illustration, insert the end of paper misfeeds, and peripheral equipment, see the operation manual for Nordic countries. 1 Chapter 1 INSTALLATION...for the machine are as a fax machine. As shown in the ...
...install surge protectors for using the machine, including safety information, installation, paper loading, removal of the cord with the core into the wall telephone socket. This manual only explains the fax... functions of lightning or power surges, we recommend that the adapter is not necessary for the machine. 11 For general information on the side of the machine as shown in the illustration, insert the end of paper misfeeds, and peripheral equipment, see the operation manual for Nordic countries. 1 Chapter 1 INSTALLATION...for the machine are as a fax machine. As shown in the ...

Operation Manual
Page 14
...of the machine to be connected to the machine through the telephone jack, labeled "TEL," on the Remote Reception function, and deactivate the Fax Signal Receive function. Your callers can be used as a printer and scanner for your computer. FINAL PREPARATIONS CONNECTING OTHER DEVICES If desired, ... calls like any other extension phone on your answering machine, and then set to receive both voice and fax messages when you to "ON". 12 Also explains how to install the software that this feature, first change the outgoing message of the machine. ● Connecting an answering...
...of the machine to be connected to the machine through the telephone jack, labeled "TEL," on the Remote Reception function, and deactivate the Fax Signal Receive function. Your callers can be used as a printer and scanner for your computer. FINAL PREPARATIONS CONNECTING OTHER DEVICES If desired, ... calls like any other extension phone on your answering machine, and then set to receive both voice and fax messages when you to "ON". 12 Also explains how to install the software that this feature, first change the outgoing message of the machine. ● Connecting an answering...
Operation Manual
Page 32
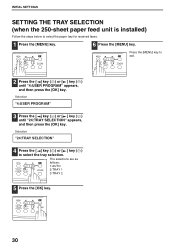
... are as follows: 1:AUTO 1,2,3, 1,2,3, 2:TRAY 1 3:TRAY 2 5 Press the [OK] key. 1,2,3, 1,2,3, 30 INITIAL SETTINGS SETTING THE TRAY SELECTION (when the 250-sheet paper feed unit is installed) Follow the steps below to select the paper tray for received faxes. 1 Press the [MENU] key. 6 Press the [MENU] key.
... are as follows: 1:AUTO 1,2,3, 1,2,3, 2:TRAY 1 3:TRAY 2 5 Press the [OK] key. 1,2,3, 1,2,3, 30 INITIAL SETTINGS SETTING THE TRAY SELECTION (when the 250-sheet paper feed unit is installed) Follow the steps below to select the paper tray for received faxes. 1 Press the [MENU] key. 6 Press the [MENU] key.