
BD-HP50U Operation Manual
Page 4
...would you like to do with this Player 3 DEAR SHARP CUSTOMER 4 IMPORTANT SAFETY INSTRUCTIONS... 4 - 6 About Discs 7 - 8 About Disc Contents 9 Important Information 10 Getting ...SHARP TV Using the Remote Control... 21 Turning the Power On 22 Language Setting 22 Turning Off the LCD Backlight and Indications ....... 23 Using AQUOS LINK 23 BD/DVD/CD Playback 24 - 27 Opening the front panel door 24 Loading a Disc 24 BD/DVD Video Playback 24 BD...POWER OFF 36 AQUOS LINK 36 PLAYBACK SETTING 36 FRONT DISPLAY/LED 37 VERSION 37 SYSTEM RESET 37 USB MEMORY MANAGEMENT 38 SOFTWARE UPDATE 39 - ...
...would you like to do with this Player 3 DEAR SHARP CUSTOMER 4 IMPORTANT SAFETY INSTRUCTIONS... 4 - 6 About Discs 7 - 8 About Disc Contents 9 Important Information 10 Getting ...SHARP TV Using the Remote Control... 21 Turning the Power On 22 Language Setting 22 Turning Off the LCD Backlight and Indications ....... 23 Using AQUOS LINK 23 BD/DVD/CD Playback 24 - 27 Opening the front panel door 24 Loading a Disc 24 BD/DVD Video Playback 24 BD...POWER OFF 36 AQUOS LINK 36 PLAYBACK SETTING 36 FRONT DISPLAY/LED 37 VERSION 37 SYSTEM RESET 37 USB MEMORY MANAGEMENT 38 SOFTWARE UPDATE 39 - ...

BD-HP50U Operation Manual
Page 25
Using AQUOS LINK Controlling the Blu-ray disc player using an HDMI cable, you can turn the LCD backlight on the screen, even if you are too bright when watching movies, you can interactively operate this player with your SHARP AQUOS TV. Playback function turns on automatically. Automatic input select function ...MANAGEMENT SOFTWARE UPDATE SYSTEM RESET 4 Press c/d to select "ON" or "OFF", then press ENTER. 5 Press SETUP or EXIT to the LCD TV compatible with AQUOS LINK When you connect this player to exit. NOTE • In order to make AQUOS LINK available, set up AQUOS LINK on...
Using AQUOS LINK Controlling the Blu-ray disc player using an HDMI cable, you can turn the LCD backlight on the screen, even if you are too bright when watching movies, you can interactively operate this player with your SHARP AQUOS TV. Playback function turns on automatically. Automatic input select function ...MANAGEMENT SOFTWARE UPDATE SYSTEM RESET 4 Press c/d to select "ON" or "OFF", then press ENTER. 5 Press SETUP or EXIT to the LCD TV compatible with AQUOS LINK When you connect this player to exit. NOTE • In order to make AQUOS LINK available, set up AQUOS LINK on...
BD-HP50U Operation Manual
Page 36
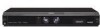
...Basic Operation for this player. Example: Setting "...the basic operations of the "MENU". The following is the explanation for DVD video, BD-ROM, and then select the country code. DISPLAYS THE TITLE LIST SETTINGS ON SCREEN...to exit. AUDIO VIDEO SETTINGS QUICK START AUTO POWER OFF AQUOS LINK PLAYBACK SETTING FRONT DISPLAY/LED VERSION USB MEMORY MANAGEMENT SOFTWARE UPDATE SYSTEM RESET ON OFF Press n RETURN to return to...Select the next item Press c/d to exit. 34 PARENTAL CONTROL DISC LANGUAGE ANGLE MARK DISPLAY PASSWORD SETTING LEVEL 3 0 USA 7 Press SETUP or EXIT to select the ...
...Basic Operation for this player. Example: Setting "...the basic operations of the "MENU". The following is the explanation for DVD video, BD-ROM, and then select the country code. DISPLAYS THE TITLE LIST SETTINGS ON SCREEN...to exit. AUDIO VIDEO SETTINGS QUICK START AUTO POWER OFF AQUOS LINK PLAYBACK SETTING FRONT DISPLAY/LED VERSION USB MEMORY MANAGEMENT SOFTWARE UPDATE SYSTEM RESET ON OFF Press n RETURN to return to...Select the next item Press c/d to exit. 34 PARENTAL CONTROL DISC LANGUAGE ANGLE MARK DISPLAY PASSWORD SETTING LEVEL 3 0 USA 7 Press SETUP or EXIT to select the ...
BD-HP50U Operation Manual
Page 40
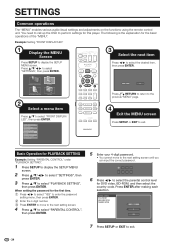
... ENTER. • "NO USB MEMORY!" appears when no USB memory is being performed. 1 Insert the USB memory device into the BD STORAGE/SERVICE terminal on rear of this player. 2 Press SETUP to display the SETUP MENU screen. 3 Press a/b/c/d to select "SETTINGS", then press ENTER. 4 Press a/b to... data such as the Virtual Package data copied to the player's internal memory (game score, etc.) will display. AUDIO VIDEO SETTINGS QUICK START AUTO POWER OFF AQUOS LINK PLAYBACK SETTING FRONT DISPLAY/LED VERSION USB MEMORY MANAGEMENT SOFTWARE UPDATE SYSTEM RESET 6 Press c/d, select "YES", and press ...
... ENTER. • "NO USB MEMORY!" appears when no USB memory is being performed. 1 Insert the USB memory device into the BD STORAGE/SERVICE terminal on rear of this player. 2 Press SETUP to display the SETUP MENU screen. 3 Press a/b/c/d to select "SETTINGS", then press ENTER. 4 Press a/b to... data such as the Virtual Package data copied to the player's internal memory (game score, etc.) will display. AUDIO VIDEO SETTINGS QUICK START AUTO POWER OFF AQUOS LINK PLAYBACK SETTING FRONT DISPLAY/LED VERSION USB MEMORY MANAGEMENT SOFTWARE UPDATE SYSTEM RESET 6 Press c/d, select "YES", and press ...
BD-HP50U Operation Manual
Page 41
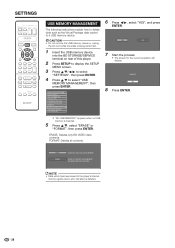
...AQUOS LINK PLAYBACK SETTING FRONT DISPLAY/LED VERSION USB MEMORY MANAGEMENT SOFTWARE UPDATE SYSTEM RESET 7 During the data checking, "Checking" blinks. To update this player. SOFTWARE UPDATE...UPDATE FILE. OK q Settings 39 SETTINGS SOFTWARE UPDATE This function allows software updates by inserting a USB memory device with the update file into the BD STORAGE/SERVICE terminal on rear of this unit software and the version of this player...OK 6 Press ENTER to obtain the software update file, please call 1-800-BE-SHARP. START UPDATE? ENTER 4-DIGIT PASSWORD THERE IS MORE THAN ...
...AQUOS LINK PLAYBACK SETTING FRONT DISPLAY/LED VERSION USB MEMORY MANAGEMENT SOFTWARE UPDATE SYSTEM RESET 7 During the data checking, "Checking" blinks. To update this player. SOFTWARE UPDATE...UPDATE FILE. OK q Settings 39 SETTINGS SOFTWARE UPDATE This function allows software updates by inserting a USB memory device with the update file into the BD STORAGE/SERVICE terminal on rear of this unit software and the version of this player...OK 6 Press ENTER to obtain the software update file, please call 1-800-BE-SHARP. START UPDATE? ENTER 4-DIGIT PASSWORD THERE IS MORE THAN ...
BD-HP50U Operation Manual
Page 42
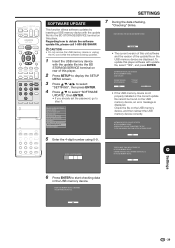
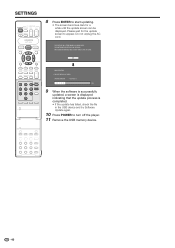
SETTINGS 8 Press ENTER to start updating. • The screen becomes dark for the update screen to turn off the player. 11 Remove the USB memory device. 40 Please wait for a while until the update screen can be displayed. THE PICTURE WILL TEMPORARILY GO DARK UNTIL THE SOFTWARE UPDATE DISPLAY APPEARS. WAIT SEVERAL MINUTES AND DO NOT...
SETTINGS 8 Press ENTER to start updating. • The screen becomes dark for the update screen to turn off the player. 11 Remove the USB memory device. 40 Please wait for a while until the update screen can be displayed. THE PICTURE WILL TEMPORARILY GO DARK UNTIL THE SOFTWARE UPDATE DISPLAY APPEARS. WAIT SEVERAL MINUTES AND DO NOT...
BD-HP50U Operation Manual
Page 48
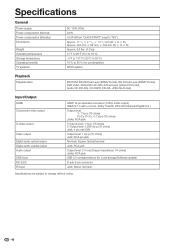
...;F (5°C to 35°C) -4°F to 131°F (-20°C to 55°C) 10 % to 80 % (no condensation) NTSC system Playback Playable discs BD-ROM, BD-RE Dual Layer (BDMV format), BD-R Dual Layer (BDMV format), DVD Video, DVD+RW/+R/-RW/-R Dual Layer (Video/VR format), Audio CD (CD-DA), CD-RW/R (CD-DA...-pin jack Terminal: Square Optical terminal Jack: RCA jack Output level: 2 V rms (Output impedance: 1K ohms) Jacks: RCA jack USB 2.0 correspondence (for Local storage/Software update) D-sub 9-pin connector Jack: Stereo mini jack Specifications are subject to change without notice. 46
...;F (5°C to 35°C) -4°F to 131°F (-20°C to 55°C) 10 % to 80 % (no condensation) NTSC system Playback Playable discs BD-ROM, BD-RE Dual Layer (BDMV format), BD-R Dual Layer (BDMV format), DVD Video, DVD+RW/+R/-RW/-R Dual Layer (Video/VR format), Audio CD (CD-DA), CD-RW/R (CD-DA...-pin jack Terminal: Square Optical terminal Jack: RCA jack Output level: 2 V rms (Output impedance: 1K ohms) Jacks: RCA jack USB 2.0 correspondence (for Local storage/Software update) D-sub 9-pin connector Jack: Stereo mini jack Specifications are subject to change without notice. 46


