
Operation Manual
Page 3
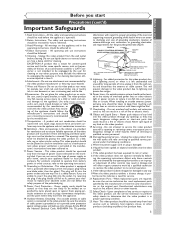
... checks to determine that they exit from the type of any way. Never push objects of power source indicated on the video product. 19. Power supply cords should be fatal. 17. All warnings on or pinched by following conditions: a.When the power-supply cord or plug is a safety feature. Grounding or Polarization - e. Power Sources - Before you start Connections Getting started Recording Precautions (cont'd) Important Safeguards Playing discs...
... checks to determine that they exit from the type of any way. Never push objects of power source indicated on the video product. 19. Power supply cords should be fatal. 17. All warnings on or pinched by following conditions: a.When the power-supply cord or plug is a safety feature. Grounding or Polarization - e. Power Sources - Before you start Connections Getting started Recording Precautions (cont'd) Important Safeguards Playing discs...

Operation Manual
Page 4
... progressive scan picture problems, it may not operate properly. Copy Protection This Unit supports Macrovision copy protection. If moisture forms inside the cabinet, call a qualified dealer or service centre approved by Macrovision Corporation and other limited viewing uses only unless otherwise authorized by Macrovision Corporation, and is not a malfunction. • Keep the DVD recorder away from the household AC outlet. • Do not place the DVD recorder in direct...
... progressive scan picture problems, it may not operate properly. Copy Protection This Unit supports Macrovision copy protection. If moisture forms inside the cabinet, call a qualified dealer or service centre approved by Macrovision Corporation and other limited viewing uses only unless otherwise authorized by Macrovision Corporation, and is not a malfunction. • Keep the DVD recorder away from the household AC outlet. • Do not place the DVD recorder in direct...

Operation Manual
Page 6
... Setup 49 Search 50 Title/Chapter search 50 Track search 51 Time search 51 Repeat/Random/Program playback 52 Repeat play 52 Random playback 52 Program play 53 Selecting the format of audio and video . . . . . .54 Switching audio soundtrack 54 Switching subtitles 55 Switching camera angles 56 Reducing block noise 56 Editing 57 Information on disc editing 57 Guide to a title list 57 Editing discs with Video mode 57 Editing discs with VR mode 58 Editing DVD-RW discs in Video mode 59 Deleting titles 59 Putting names on titles 60 Setting or clearing chapter...
... Setup 49 Search 50 Title/Chapter search 50 Track search 51 Time search 51 Repeat/Random/Program playback 52 Repeat play 52 Random playback 52 Program play 53 Selecting the format of audio and video . . . . . .54 Switching audio soundtrack 54 Switching subtitles 55 Switching camera angles 56 Reducing block noise 56 Editing 57 Information on disc editing 57 Guide to a title list 57 Editing discs with Video mode 57 Editing discs with VR mode 58 Editing DVD-RW discs in Video mode 59 Deleting titles 59 Putting names on titles 60 Setting or clearing chapter...

Operation Manual
Page 7
... DVD-Video playback*.You will be increased by title, chapter, or time. Putting names on titles Setting pictures for thumbnails Setting/clearing chapter markers Deleting parts of this operation manual Many functions of titles etc Available to Audio CDs Available to play DVD-RW/R discs recorded in advance. Symbol in the original list. Daily or weekly program recordings are depending on recordings as you prefer. Symbol Description DVD-V Available to DVD Video discs Video DVD-RW Avaialble to DVD-RW in Video mode VR DVD...
... DVD-Video playback*.You will be increased by title, chapter, or time. Putting names on titles Setting pictures for thumbnails Setting/clearing chapter markers Deleting parts of this operation manual Many functions of titles etc Available to Audio CDs Available to play DVD-RW/R discs recorded in advance. Symbol in the original list. Daily or weekly program recordings are depending on recordings as you prefer. Symbol Description DVD-V Available to DVD Video discs Video DVD-RW Avaialble to DVD-RW in Video mode VR DVD...

Operation Manual
Page 8
... S-Video input of external equipment with a standard video cable. 15. E (REV) button During playback, press to skip to stop play . 7. AC Power Cord 7. COAXIAL DIGITAL AUDIO OUTPUT jack Use to connect a TV monitor with component video Use to connect external equipment with standard receiver or other Use to your remote control so that you start a recording. Disc tray Place a disc when open or close the disc tray. Press repeatedly to start a one-touch timer recording. 12. Before you can also be turned on the rear panel. B (PLAY) button...
... S-Video input of external equipment with a standard video cable. 15. E (REV) button During playback, press to skip to stop play . 7. AC Power Cord 7. COAXIAL DIGITAL AUDIO OUTPUT jack Use to connect a TV monitor with component video Use to connect external equipment with standard receiver or other Use to your remote control so that you start a recording. Disc tray Place a disc when open or close the disc tray. Press repeatedly to start a one-touch timer recording. 12. Before you can also be turned on the rear panel. B (PLAY) button...

Operation Manual
Page 9
..., press to select a title/chapter/track on the TV screen. (VR mode only) 23. K / L / { / B buttons Press to the previously displayed menu screen. 9 Editing Changing the SETUP menu Others Español RETURN button Press to return to select items or settings. 25. REC MODE button Press to display the timer program setting menu. 18. TIMER PROG. button Press to switch the recording speed. 6. SKIP H button During playback, press to skip to display the setup menu. SETUP button Press to the previous chapter or track. REPEAT button Press to confirm or select menu items...
..., press to select a title/chapter/track on the TV screen. (VR mode only) 23. K / L / { / B buttons Press to the previously displayed menu screen. 9 Editing Changing the SETUP menu Others Español RETURN button Press to return to select items or settings. 25. REC MODE button Press to display the timer program setting menu. 18. TIMER PROG. button Press to switch the recording speed. 6. SKIP H button During playback, press to skip to display the setup menu. SETUP button Press to the previous chapter or track. REPEAT button Press to confirm or select menu items...

Operation Manual
Page 13
...a VCR, pictures may be distorted due to the copy protection system. • When Progressive Scan mode is not compatible with Progressive Scan (480p) and you start Connections Getting started Recording Connections Connection to the TV. Make one of the following connections, depending on the capabilities of your TV is selected, no "P.SCAN" is compatible with Progressive Scan; Basic Audio TV R L Method 1 Better picture S-VIDEO IN Method 2 Best picture COMPONENT VIDEO IN Y PB/CB Playing discs PR/CR Editing Changing the SETUP menu Audio cable (supplied) DVD Recorder 1 OUTPUT...
...a VCR, pictures may be distorted due to the copy protection system. • When Progressive Scan mode is not compatible with Progressive Scan (480p) and you start Connections Getting started Recording Connections Connection to the TV. Make one of the following connections, depending on the capabilities of your TV is selected, no "P.SCAN" is compatible with Progressive Scan; Basic Audio TV R L Method 1 Better picture S-VIDEO IN Method 2 Best picture COMPONENT VIDEO IN Y PB/CB Playing discs PR/CR Editing Changing the SETUP menu Audio cable (supplied) DVD Recorder 1 OUTPUT...

Operation Manual
Page 14
... IN 5 Connect Audio cable (supplied) 4 Connect Video cable (supplied) Round 3 Connect Coaxial cable Round Coaxial cable (supplied) 2 Connect Round Coaxial R DIGITAL AUDIO OUTPUT PCM / BITSTREAM 1 AUDIO 2 OUTPUT VIDEO L S-VIDEO TV ANTENNA Y PB/CB cable 1 COAXIAL INPUT R AUDIO L (L1) VIDEO S-VIDEO PR/CR COMPONENT VIDEO OUTPUT Connect (Back of DVD recorder) (Cable box or Satellite box) OUT IN Cable Signal 1 Connect Round Coaxial cable Note to the Cable TV System Installer : This reminder is turned on this page. If many or all the channels you are using this setup. Be...
... IN 5 Connect Audio cable (supplied) 4 Connect Video cable (supplied) Round 3 Connect Coaxial cable Round Coaxial cable (supplied) 2 Connect Round Coaxial R DIGITAL AUDIO OUTPUT PCM / BITSTREAM 1 AUDIO 2 OUTPUT VIDEO L S-VIDEO TV ANTENNA Y PB/CB cable 1 COAXIAL INPUT R AUDIO L (L1) VIDEO S-VIDEO PR/CR COMPONENT VIDEO OUTPUT Connect (Back of DVD recorder) (Cable box or Satellite box) OUT IN Cable Signal 1 Connect Round Coaxial cable Note to the Cable TV System Installer : This reminder is turned on this page. If many or all the channels you are using this setup. Be...

Operation Manual
Page 16
... be used . When you like (manual) Can record 16:9 size pictures Can record Copy-Once programs Editing Can perform basic edit functions Can perform advanced edit functions (Playlist edit) *1 DVD-RW (VR mode) can record on DISPLAY .@/: 1 GHI OPEN/CLOSE TIMER PROG. Step 2: Insert a blank disc Remote Control POWER 1 CH To turn on the following discs. • DVD-RW Ver 1.2 / 2-4x CPRM compatible • DVD-R General Ver 2.0 / 8x For example, when you have connected this page for distribution Play...
... be used . When you like (manual) Can record 16:9 size pictures Can record Copy-Once programs Editing Can perform basic edit functions Can perform advanced edit functions (Playlist edit) *1 DVD-RW (VR mode) can record on DISPLAY .@/: 1 GHI OPEN/CLOSE TIMER PROG. Step 2: Insert a blank disc Remote Control POWER 1 CH To turn on the following discs. • DVD-RW Ver 1.2 / 2-4x CPRM compatible • DVD-R General Ver 2.0 / 8x For example, when you have connected this page for distribution Play...

Operation Manual
Page 17
... POWER DISPLAY OPEN/CLOSE TIMER PROG. start Connections Getting started Recording Getting started Easy DVD recording (Cont'd) Step 3: Select the recording speed Step 4: Select the desired channel Step 5: Record to the edited version of DVD disc are generally divided into chapters. The contents of the disc; Original and Playlist (VR mode) You can edit the following from a title list. • Putting names on titles • Setting pictures for ? Finalizing a Disc • This will find editing discs is to Disc 58% This operation may be played back on a chapter...
... POWER DISPLAY OPEN/CLOSE TIMER PROG. start Connections Getting started Recording Getting started Easy DVD recording (Cont'd) Step 3: Select the recording speed Step 4: Select the desired channel Step 5: Record to the edited version of DVD disc are generally divided into chapters. The contents of the disc; Original and Playlist (VR mode) You can edit the following from a title list. • Putting names on titles • Setting pictures for ? Finalizing a Disc • This will find editing discs is to Disc 58% This operation may be played back on a chapter...
Operation Manual
Page 19
... Delete POWER DISPLAY OPEN/CLOSE TIMER PROG. Screen: B PLAY REV FWD h g STOP C 1 SETUP TOP MENU MENU/LIST K REPEAT ENTER 5 7 { ZOOM B RETURN L Select the channel number to 2 3 add or delete. 4 Setup Menu Press { button to move to a lower channel number. 5 Press B button to move to a 2 higher channel number. 6 Select "SETUP" using K / L / { / B buttons, then press ENTER button. Before you can be added or deleted from a channel memory.Then the next channel number will appear so that you start Connections Getting started Recording Getting started Channel...
... Delete POWER DISPLAY OPEN/CLOSE TIMER PROG. Screen: B PLAY REV FWD h g STOP C 1 SETUP TOP MENU MENU/LIST K REPEAT ENTER 5 7 { ZOOM B RETURN L Select the channel number to 2 3 add or delete. 4 Setup Menu Press { button to move to a lower channel number. 5 Press B button to move to a 2 higher channel number. 6 Select "SETUP" using K / L / { / B buttons, then press ENTER button. Before you can be added or deleted from a channel memory.Then the next channel number will appear so that you start Connections Getting started Recording Getting started Channel...
Operation Manual
Page 22
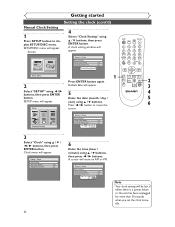
... a power failure or this unit has been unplugged for more than 30 seconds when you set the clock manually. A .@/: 1 CH REC MONITOR GHI 4 PQRS 7 REC MODE CLEAR REC PAUSE F ABC 2 JKL 5 TUV 8 SPACE 0 DEF 3 MNO 6 WXYZ 9 CM SKIP SKIP H G B PLAY REV FWD h g STOP C SETUP TOP MENU MENU/LIST K REPEAT ENTER { B ZOOM RETURN L 2 3 4 5 6 Playback Setting Setup > Clock Clock Setting Auto Clock Setting Daylight Saving Time JAN / 12 / 2004 (MON) 12 : 00AM Auto ON 3 Select "Clock" using { / B buttons, then press ENTER button. Setup > Clock Clock Setting Auto Clock...
... a power failure or this unit has been unplugged for more than 30 seconds when you set the clock manually. A .@/: 1 CH REC MONITOR GHI 4 PQRS 7 REC MODE CLEAR REC PAUSE F ABC 2 JKL 5 TUV 8 SPACE 0 DEF 3 MNO 6 WXYZ 9 CM SKIP SKIP H G B PLAY REV FWD h g STOP C SETUP TOP MENU MENU/LIST K REPEAT ENTER { B ZOOM RETURN L 2 3 4 5 6 Playback Setting Setup > Clock Clock Setting Auto Clock Setting Daylight Saving Time JAN / 12 / 2004 (MON) 12 : 00AM Auto ON 3 Select "Clock" using { / B buttons, then press ENTER button. Setup > Clock Clock Setting Auto Clock...
Operation Manual
Page 28
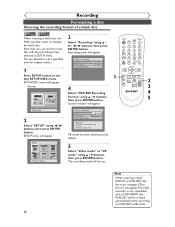
... using K / L buttons, then press ENTER button. Setup Playback Setting Setup > Recording DVD-RW Recording Format VVidRemo omdoede Auto Chapter V1R0 mmionduetes Timer Programming Video mode DVD Player Compatibility mode. Note • When inserting a blank DVD+R or DVD+RW disc, the error message ("Disc Error") will appear.This DVD recorder is not compatible with the recording format selected in VR mode. 28 Recording Formatting a disc Choosing the recording format of a blank disc Video DVD-RW VR DVD-RW When inserting a blank disc, the DVD recorder starts to display SETUP/DISC menu...
... using K / L buttons, then press ENTER button. Setup Playback Setting Setup > Recording DVD-RW Recording Format VVidRemo omdoede Auto Chapter V1R0 mmionduetes Timer Programming Video mode DVD Player Compatibility mode. Note • When inserting a blank DVD+R or DVD+RW disc, the error message ("Disc Error") will appear.This DVD recorder is not compatible with the recording format selected in VR mode. 28 Recording Formatting a disc Choosing the recording format of a blank disc Video DVD-RW VR DVD-RW When inserting a blank disc, the DVD recorder starts to display SETUP/DISC menu...

Operation Manual
Page 35
...time you cannot select any other program. 35 Editing Changing the SETUP menu Others Español Setup > Recording > Timer Programming Date Start 1. Next, correct the timer programming by using press K/L/{/B buttons. A .@/: 1 CH REC MONITOR GHI 4 PQRS 7 REC MODE CLEAR REC PAUSE F ABC 2 JKL 5 TUV 8 SPACE 0 DEF 3 MNO 6 WXYZ 9 CM SKIP SKIP H G B PLAY REV h STOP C SETUP TOP MENU K FWD g MENU/LIST REPEAT ENTER { B ZOOM RETURN L 2 5 4 Note • Press TIMER PROG. Your program setting will be highlighted with red. POWER DISPLAY OPEN/CLOSE TIMER PROG. Timer...
...time you cannot select any other program. 35 Editing Changing the SETUP menu Others Español Setup > Recording > Timer Programming Date Start 1. Next, correct the timer programming by using press K/L/{/B buttons. A .@/: 1 CH REC MONITOR GHI 4 PQRS 7 REC MODE CLEAR REC PAUSE F ABC 2 JKL 5 TUV 8 SPACE 0 DEF 3 MNO 6 WXYZ 9 CM SKIP SKIP H G B PLAY REV h STOP C SETUP TOP MENU K FWD g MENU/LIST REPEAT ENTER { B ZOOM RETURN L 2 5 4 Note • Press TIMER PROG. Your program setting will be highlighted with red. POWER DISPLAY OPEN/CLOSE TIMER PROG. Timer...

Operation Manual
Page 38
... to select the input of this unit, select "L1" position by pressing [0], [0], [1] on the remote control or the CH L / K buttons. • To use the input jacks on the back of this unit, select "L2" position by pressing [0], [0], [2] on the front of the TV to start recording. 7. Select the input of the DVD recorder which the DVD recorder is connected. Press REC button on page 26. B PLAY REV FWD h g STOP C SETUP TOP MENU MENU/LIST K REPEAT ENTER { B ZOOM RETURN L 8 5. Select a recording speed using REC MODE button. Press STOP...
... to select the input of this unit, select "L1" position by pressing [0], [0], [1] on the remote control or the CH L / K buttons. • To use the input jacks on the back of this unit, select "L2" position by pressing [0], [0], [2] on the front of the TV to start recording. 7. Select the input of the DVD recorder which the DVD recorder is connected. Press REC button on page 26. B PLAY REV FWD h g STOP C SETUP TOP MENU MENU/LIST K REPEAT ENTER { B ZOOM RETURN L 8 5. Select a recording speed using REC MODE button. Press STOP...

Operation Manual
Page 52
..., you stop playback. • You cannot select "Group" during random play , press REPEAT button. Random Play Screen: Program Play Setup Menu 52 3 Select "Random Play" using { / B but - Note • To cancel random play, press STOP C button twice during the random playback of playing in the current title (for DVDs), or current track (for Audio CDs). • To cancel the repeat playback, select OFF at step 2.The repeat setting will also be set with in Select "CD" using K / L buttons, then press ENTER button. The selected repeat play a F H G B PLAY disc randomly...
..., you stop playback. • You cannot select "Group" during random play , press REPEAT button. Random Play Screen: Program Play Setup Menu 52 3 Select "Random Play" using { / B but - Note • To cancel random play, press STOP C button twice during the random playback of playing in the current title (for DVDs), or current track (for Audio CDs). • To cancel the repeat playback, select OFF at step 2.The repeat setting will also be set with in Select "CD" using K / L buttons, then press ENTER button. The selected repeat play a F H G B PLAY disc randomly...

Operation Manual
Page 68
... be deleted. : Disc > Edit > Original 1 Chapter 1/1 Title Delete Scene Delete Edit Title Name ChapterAMdadrk Index PiDcteulreete Protect OFF ON Yes No JAN/ 1 1:00AM CH12 XP Writing to Disc This operation may take a while to each title. 7 Select "Yes" using { / B buttons, then press ENTER button. When you have decided. Screen: 1 Press SETUP button. A .@/: 1 CH REC MONITOR GHI 4 PQRS 7 REC MODE CLEAR REC PAUSE F ABC 2 JKL 5 TUV 8 SPACE 0 DEF 3 MNO 6 WXYZ 9 CM SKIP SKIP H G B PLAY REV h STOP C SETUP TOP MENU K FWD g MENU/LIST REPEAT...
... be deleted. : Disc > Edit > Original 1 Chapter 1/1 Title Delete Scene Delete Edit Title Name ChapterAMdadrk Index PiDcteulreete Protect OFF ON Yes No JAN/ 1 1:00AM CH12 XP Writing to Disc This operation may take a while to each title. 7 Select "Yes" using { / B buttons, then press ENTER button. When you have decided. Screen: 1 Press SETUP button. A .@/: 1 CH REC MONITOR GHI 4 PQRS 7 REC MODE CLEAR REC PAUSE F ABC 2 JKL 5 TUV 8 SPACE 0 DEF 3 MNO 6 WXYZ 9 CM SKIP SKIP H G B PLAY REV h STOP C SETUP TOP MENU K FWD g MENU/LIST REPEAT...

Operation Manual
Page 88
... STOP button if you are recorded in the Dolby Digital format. Playback Setting Setup > Playback TV Aspect Parental Lock Disc Menu Language Audio Language Subtitle Language Digital Out Dynamic Range Control Fast Forward with Audio 4:3 Letter Box All English Original OFF PCM DolbOy NDigital DTSOFF • Select a setting using K / L / { / B buttons, then press ENTER button. Proceed to display SETUP/DISC menu. SETUP/DISC menu will appear. Setup Menu Setup 1 5 POWER DISPLAY OPEN/CLOSE TIMER PROG. Changing the SETUP menu Audio setting Choose the appropriate Audio settings...
... STOP button if you are recorded in the Dolby Digital format. Playback Setting Setup > Playback TV Aspect Parental Lock Disc Menu Language Audio Language Subtitle Language Digital Out Dynamic Range Control Fast Forward with Audio 4:3 Letter Box All English Original OFF PCM DolbOy NDigital DTSOFF • Select a setting using K / L / { / B buttons, then press ENTER button. Proceed to display SETUP/DISC menu. SETUP/DISC menu will appear. Setup Menu Setup 1 5 POWER DISPLAY OPEN/CLOSE TIMER PROG. Changing the SETUP menu Audio setting Choose the appropriate Audio settings...

Operation Manual
Page 92
... of power failure) Check the braker. • Re-connect the connecting cord securely. • The connecting cords are no batteries in SETUP menu (page 18). • Select a channel of any TV program using the CH o / p buttons. • Adjust TV antenna. • Adjust the picture (see the TV's instruction manual). • Place the DVD recorder and TV farther apart. • Place the TV and any bunched antenna cables farther apart. • Switch the input to...
... of power failure) Check the braker. • Re-connect the connecting cord securely. • The connecting cords are no batteries in SETUP menu (page 18). • Select a channel of any TV program using the CH o / p buttons. • Adjust TV antenna. • Adjust the picture (see the TV's instruction manual). • Place the DVD recorder and TV farther apart. • Place the TV and any bunched antenna cables farther apart. • Switch the input to...

Operation Manual
Page 93
... DVD recorder's internal clock stopped due to automatically format a DVD-RW. • There was inserted. Editing Changing the SETUP menu Others Español 93 ROM) (page 41). • The region code on the DVD VIDEO, DVD-R or DVD-RW being played. • You are recording. Remove the disc and leave the DVD recorder turned on for the DVD recorder to a power failure that was recorded on another setting that lasted for the sound track cannot be changed or turned off. Timer recording is...
... DVD recorder's internal clock stopped due to automatically format a DVD-RW. • There was inserted. Editing Changing the SETUP menu Others Español 93 ROM) (page 41). • The region code on the DVD VIDEO, DVD-R or DVD-RW being played. • You are recording. Remove the disc and leave the DVD recorder turned on for the DVD recorder to a power failure that was recorded on another setting that lasted for the sound track cannot be changed or turned off. Timer recording is...