

LC20B2UA Operation Manual
Page 3
... or theft, please record the TV's model and serial numbers in case of these materials may be connected to the grounding system of the building, as close to the point of mercury. IMPORTANT INFORMATION WARNING: FCC Regulations state that the cable ground shall be regulated due to operate this equipment. The numbers are located at the rear of the TV.
... or theft, please record the TV's model and serial numbers in case of these materials may be connected to the grounding system of the building, as close to the point of mercury. IMPORTANT INFORMATION WARNING: FCC Regulations state that the cable ground shall be regulated due to operate this equipment. The numbers are located at the rear of the TV.

LC20B2UA Operation Manual
Page 4
... or local power company. I Wall or ceiling mounting-When mounting the product on safety. I Servicing-Do not attempt to perform many years of trouble-free operation of the Sharp LCD Color TV product. I Overloading-Do not overload AC outlets or extension cords. Removing covers can result in your home, consult your dealer. d.When the product does not operate properly as the original parts. Use of the...
... or local power company. I Wall or ceiling mounting-When mounting the product on safety. I Servicing-Do not attempt to perform many years of trouble-free operation of the Sharp LCD Color TV product. I Overloading-Do not overload AC outlets or extension cords. Removing covers can result in your home, consult your dealer. d.When the product does not operate properly as the original parts. Use of the...

LC20B2UA Operation Manual
Page 5
... The LCD panel is provided or the manufacturer's instructions are designed for built-in installation; When mounting the product on a wall, be injured by the manufacturer. Therefore, it must be moved with impact. Be careful not to be sure to the product. I Cleaning-Unplug the power cord from... pool and in case the LCD panel breaks. Use only a cart, stand, tripod, bracket or table recommended by the manufacturer or sold with 921,600 thin film transistors, giving you fine picture details. Occasionally, a few non-active pixels may appear on the screen as a bookcase or rack,...
... The LCD panel is provided or the manufacturer's instructions are designed for built-in installation; When mounting the product on a wall, be injured by the manufacturer. Therefore, it must be moved with impact. Be careful not to be sure to the product. I Cleaning-Unplug the power cord from... pool and in case the LCD panel breaks. Use only a cart, stand, tripod, bracket or table recommended by the manufacturer or sold with 921,600 thin film transistors, giving you fine picture details. Occasionally, a few non-active pixels may appear on the screen as a bookcase or rack,...

LC20B2UA Operation Manual
Page 6
...of time, unplug it from touching such power lines or circuits as contact with respect to proper grounding of the mast and supporting structure, grounding of the lead-in the vicinity of overhead power lines or other electric light or power ...power lines or circuits. This will prevent damage to the equipment due to keep from the wall outlet and disconnect the antenna. Section 810 of the National Electrical Code provides information with them might be fatal. 5 IMPORTANT SAFETY PRECAUTIONS (Continued) I If an outside antenna is connected to the television equipment, be sure the antenna...
...of time, unplug it from touching such power lines or circuits as contact with respect to proper grounding of the mast and supporting structure, grounding of the lead-in the vicinity of overhead power lines or other electric light or power ...power lines or circuits. This will prevent damage to the equipment due to keep from the wall outlet and disconnect the antenna. Section 810 of the National Electrical Code provides information with them might be fatal. 5 IMPORTANT SAFETY PRECAUTIONS (Continued) I If an outside antenna is connected to the television equipment, be sure the antenna...

LC20B2UA Operation Manual
Page 7
...SHARP CUSTOMER ...3 IMPORTANT SAFETY PRECAUTIONS 3-5 SUPPLIED ACCESSORIES ...7 PREPARATION ...8-10 Using the Remote Control ...8 Batteries for the Remote Control 8 Power Connection ...9 Antenna Connection ...9, 10 FRONT AND REAR CONTROL OPTIONS 11-13 Removing the Back Cover ...13 Listening with Headphones ...13 REMOTE CONTROL ...14 BASIC OPERATION ...14-17 Turning on POWER ...15 Switching TV/VIDEO [AV1/AV2/COMPONENT/TV] Modes 15 Sound Volume ...16 ON/OFF Standby ...16 Changing the Channels ...17 SELECTING MENU ITEMS ...18 ADJUSTMENT ...19-34 Adjusting the SLEEP TIMER Settings 19 Adjusting...
...SHARP CUSTOMER ...3 IMPORTANT SAFETY PRECAUTIONS 3-5 SUPPLIED ACCESSORIES ...7 PREPARATION ...8-10 Using the Remote Control ...8 Batteries for the Remote Control 8 Power Connection ...9 Antenna Connection ...9, 10 FRONT AND REAR CONTROL OPTIONS 11-13 Removing the Back Cover ...13 Listening with Headphones ...13 REMOTE CONTROL ...14 BASIC OPERATION ...14-17 Turning on POWER ...15 Switching TV/VIDEO [AV1/AV2/COMPONENT/TV] Modes 15 Sound Volume ...16 ON/OFF Standby ...16 Changing the Channels ...17 SELECTING MENU ITEMS ...18 ADJUSTMENT ...19-34 Adjusting the SLEEP TIMER Settings 19 Adjusting...

LC20B2UA Operation Manual
Page 10
... SHARP Dealer or Service Center for easy hookup. MENU TV/VIDEO MAIN POWER CH VOL Plug into the set to the ANT. RF switch (not supplied) OUT Two-set , screw the 75-ohm cable to off when connecting the AC adapter. I Always turn the main POWER switch of utilizing the converter/descrambler provided by using the converter's channel keys. One possible method of the LCD TV set for the type of the wall...
... SHARP Dealer or Service Center for easy hookup. MENU TV/VIDEO MAIN POWER CH VOL Plug into the set to the ANT. RF switch (not supplied) OUT Two-set , screw the 75-ohm cable to off when connecting the AC adapter. I Always turn the main POWER switch of utilizing the converter/descrambler provided by using the converter's channel keys. One possible method of the LCD TV set for the type of the wall...

LC20B2UA Operation Manual
Page 15
... and Uruguay, set to remove flickering and color bleeding. 14 Country TV broadcasting Factory setting of color system system TV Video User setting TV/Video U.S.A. REMOTE CONTROL POWER DISPLAY*1 SLEEP MUTE VOL(+)/(-) CH ( )/( ) MTS*3 POWER SLEEP DISPLAY BRIGHT MENU MUTE VOL CH TV/VIDEO FLASHBACK BRIGHT MENU/ ]/[/ (Cursor control) TV/VIDEO FLASHBACK*2 1 2 3 4 5 6 7 8 9 MTS 0 100 Channel Select *1 Displays the receiving channel for 10 seconds. *2 Returns to the country before using this product by following the table below. BASIC OPERATION This product...
... and Uruguay, set to remove flickering and color bleeding. 14 Country TV broadcasting Factory setting of color system system TV Video User setting TV/Video U.S.A. REMOTE CONTROL POWER DISPLAY*1 SLEEP MUTE VOL(+)/(-) CH ( )/( ) MTS*3 POWER SLEEP DISPLAY BRIGHT MENU MUTE VOL CH TV/VIDEO FLASHBACK BRIGHT MENU/ ]/[/ (Cursor control) TV/VIDEO FLASHBACK*2 1 2 3 4 5 6 7 8 9 MTS 0 100 Channel Select *1 Displays the receiving channel for 10 seconds. *2 Returns to the country before using this product by following the table below. BASIC OPERATION This product...
LC20B2UA Operation Manual
Page 16
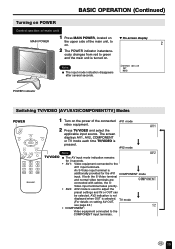
BASIC OPERATION (Continued) Turning on POWER Control section of main unit 1 Press MAIN POWER, located on M On-screen display MAIN POWER the upper side of the main unit, to green and the main unit is turned on . 2 2 The POWER indicator instantane- Notes: STEREO Note: I The input mode indication disappears after several seconds. ously changes from red to on .
BASIC OPERATION (Continued) Turning on POWER Control section of main unit 1 Press MAIN POWER, located on M On-screen display MAIN POWER the upper side of the main unit, to green and the main unit is turned on . 2 2 The POWER indicator instantane- Notes: STEREO Note: I The input mode indication disappears after several seconds. ously changes from red to on .

LC20B2UA Operation Manual
Page 17
... indicator decreases. BASIC OPERATION (Continued) Sound Volume POWER SLEEP DISPLAY BRIGHT MENU MUTE VOL CH TV/VIDEO FLASHBACK MUTE 1 2 3 4 5 6 7 8 9 MTS 0 100 VOL (+)/(-) MTS 1 Press VOL (+) to select the MTS settings. [STEREO]: stereo audio [SAP]: second audio program [MONO]: monophonic audio Note: I The screen displays VOLUME 50 VOLUME 10 VOLUME 30 To select MTS (Multi ch TV Sound) 1 Press MTS to display the MTS screen. 2 2 Press MTS to increase the sound volume. The segment...
... indicator decreases. BASIC OPERATION (Continued) Sound Volume POWER SLEEP DISPLAY BRIGHT MENU MUTE VOL CH TV/VIDEO FLASHBACK MUTE 1 2 3 4 5 6 7 8 9 MTS 0 100 VOL (+)/(-) MTS 1 Press VOL (+) to select the MTS settings. [STEREO]: stereo audio [SAP]: second audio program [MONO]: monophonic audio Note: I The screen displays VOLUME 50 VOLUME 10 VOLUME 30 To select MTS (Multi ch TV Sound) 1 Press MTS to display the MTS screen. 2 2 Press MTS to increase the sound volume. The segment...
LC20B2UA Operation Manual
Page 18
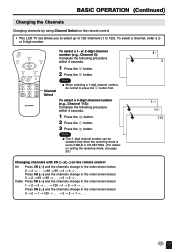
... MENU MUTE VOL CH TV/VIDEO FLASHBACK 1 2 3 4 5 6 7 8 9 MTS 0 100 1 Press the button. 2 Press the 5 button. POWER SLEEP DISPLAY BRIGHT To select a 1- Note: I When selecting a 1-digit channel number, do not fail to press the button first. BASIC OPERATION (Continued) Changing the Channels Changing channels by using Channel Select on the remote control • This LCD TV set to CABLE in CH-SETTING. (For details on setting the receiving mode, see page 25.) 0- 5 1-- 11- 115 Changing channels with CH ( )/( ) on the remote control...
... MENU MUTE VOL CH TV/VIDEO FLASHBACK 1 2 3 4 5 6 7 8 9 MTS 0 100 1 Press the button. 2 Press the 5 button. POWER SLEEP DISPLAY BRIGHT To select a 1- Note: I When selecting a 1-digit channel number, do not fail to press the button first. BASIC OPERATION (Continued) Changing the Channels Changing channels by using Channel Select on the remote control • This LCD TV set to CABLE in CH-SETTING. (For details on setting the receiving mode, see page 25.) 0- 5 1-- 11- 115 Changing channels with CH ( )/( ) on the remote control...

LC20B2UA Operation Manual
Page 19
... [ 0] COLOR [ 0] BLACK LEVEL [ 0 ] SHARPNESS [ 0 ] COLOR SYSTEM [ N358 ] RESET EX I T : MENU SELECT : ENTER : EX I T : MENU (Pages 20, 24) PRESET RE TURN BR I GHTNESS [ BR I GHT ] AUTO POWER OFF [ OFF ] UPS I DE [ NORMAL ] R I GHT / LEF T [ NORMAL ] AV2 I N / OUT [ IN ] SELECT : ADJUST : (Page 28) CLOSED CAPT I ON RE TURN MODE [ OFF ] DATA [ CH 1 ] EX I T : MENU SELECT : ADJUST : (Pages 31-34) EX I T : MENU I NPUT SECRET NO . - - - - (Pages 21, 25-27) SET UP...
... [ 0] COLOR [ 0] BLACK LEVEL [ 0 ] SHARPNESS [ 0 ] COLOR SYSTEM [ N358 ] RESET EX I T : MENU SELECT : ENTER : EX I T : MENU (Pages 20, 24) PRESET RE TURN BR I GHTNESS [ BR I GHT ] AUTO POWER OFF [ OFF ] UPS I DE [ NORMAL ] R I GHT / LEF T [ NORMAL ] AV2 I N / OUT [ IN ] SELECT : ADJUST : (Page 28) CLOSED CAPT I ON RE TURN MODE [ OFF ] DATA [ CH 1 ] EX I T : MENU SELECT : ADJUST : (Pages 31-34) EX I T : MENU I NPUT SECRET NO . - - - - (Pages 21, 25-27) SET UP...

LC20B2UA Operation Manual
Page 20
... and the SLEEP indicator goes out. I N POWER SLEEP DISPLAY BRIGHT MENU MUTE VOL CH TV/VIDEO FLASHBACK 1 2 3 4 5 6 7 8 9 MTS 0 100 MENU/ ]/[/ Setting the SLEEP TIMER on the MENU screen 1 Press MENU to display the MENU screen. 2 Press ]/[ to move the cursor to SLEEP TIMER. 3 Press to display the SLEEP TIMER screen. 4 Press to set or press the POWER button on the remote control, the SLEEP TIMER setting is displayed on the TV set the sleep timer (in minutes). The SLEEP TIMER is turned off when --- I The SLEEP TIMER screen automatically disappears...
... and the SLEEP indicator goes out. I N POWER SLEEP DISPLAY BRIGHT MENU MUTE VOL CH TV/VIDEO FLASHBACK 1 2 3 4 5 6 7 8 9 MTS 0 100 MENU/ ]/[/ Setting the SLEEP TIMER on the MENU screen 1 Press MENU to display the MENU screen. 2 Press ]/[ to move the cursor to SLEEP TIMER. 3 Press to display the SLEEP TIMER screen. 4 Press to set or press the POWER button on the remote control, the SLEEP TIMER setting is displayed on the TV set the sleep timer (in minutes). The SLEEP TIMER is turned off when --- I The SLEEP TIMER screen automatically disappears...

LC20B2UA Operation Manual
Page 23
... I DEO ADJUST ( TV) RE TURN P I CTURE [ 30] T I NT [ 0] COLOR [ 0] BLACK LEVEL [ 0 ] SHARPNESS [ 0 ] COLOR SYSTEM [ N358 ] RESET EX I See page 23 for the settings. 7 Press MENU to return to enter. ADJUSTMENT (Continued) Adjusting the VIDEO ADJUST Settings POWER SLEEP DISPLAY BRIGHT 1 Press MENU to enter. SELECT : ADJUST : EX I T : MENU + EX I CTURE 30 - SELECT : ENTER : RE TURN P I T : MENU 22 MENU SLEEP T IMER V I DEO ADJUST PRESET CLOSED CAPT I ON V-CH I T : MENU 4 Press ]/[ to move the cursor to VIDEO ADJUST. 3 Press to display the MENU screen.
... I DEO ADJUST ( TV) RE TURN P I CTURE [ 30] T I NT [ 0] COLOR [ 0] BLACK LEVEL [ 0 ] SHARPNESS [ 0 ] COLOR SYSTEM [ N358 ] RESET EX I See page 23 for the settings. 7 Press MENU to return to enter. ADJUSTMENT (Continued) Adjusting the VIDEO ADJUST Settings POWER SLEEP DISPLAY BRIGHT 1 Press MENU to enter. SELECT : ADJUST : EX I T : MENU + EX I CTURE 30 - SELECT : ENTER : RE TURN P I T : MENU 22 MENU SLEEP T IMER V I DEO ADJUST PRESET CLOSED CAPT I ON V-CH I T : MENU 4 Press ]/[ to move the cursor to VIDEO ADJUST. 3 Press to display the MENU screen.
LC20B2UA Operation Manual
Page 25
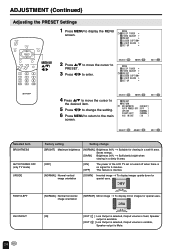
..., Output volume is fixed, Speaker output is available. ] Line Output is selected, Output volume is variable, Speaker output is no signal for viewing in a well-lit area. RIGHT/LEFT [NORMAL] Normal horizontal image orientation [MIRROR] Mirror image → To display mirror images for special uses. SELECT : ENTER : MENU SLEEP T IMER V I DEO ADJUST PRESET CLOSED CAPT I ON V-CH I P BLOCK SET UP EX I T : MENU Selected item BRIGHTNESS AUTO POWER OFF (only TV mode) UPSIDE Factory setting Setting change the setting...
..., Output volume is fixed, Speaker output is available. ] Line Output is selected, Output volume is variable, Speaker output is no signal for viewing in a well-lit area. RIGHT/LEFT [NORMAL] Normal horizontal image orientation [MIRROR] Mirror image → To display mirror images for special uses. SELECT : ENTER : MENU SLEEP T IMER V I DEO ADJUST PRESET CLOSED CAPT I ON V-CH I P BLOCK SET UP EX I T : MENU Selected item BRIGHTNESS AUTO POWER OFF (only TV mode) UPSIDE Factory setting Setting change the setting...
LC20B2UA Operation Manual
Page 26
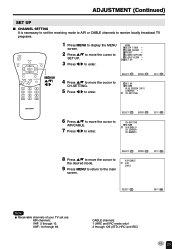
.../ CABLE AIR CABLE EX I T : MENU SELECT : EX I T : MENU Note: I T : MENU 8 Press ]/[ to move the cursor to SET UP. 3 Press to enter. SELECT : ENTER : CH-SETT I NG RE TURN AI R/CABLE CH SEARCH CH MEMORY EX I Receivable channels of your TV set the receiving mode to AIR or CABLE channels to receive locally broadcast TV programs. POWER SLEEP DISPLAY BRIGHT MENU MUTE VOL CH TV/VIDEO FLASHBACK 1 2 3 4 5 6 7 8 9 MTS 0 100 MENU/ ]/[/ 1 Press MENU to display the MENU screen. 2 Press...
.../ CABLE AIR CABLE EX I T : MENU SELECT : EX I T : MENU Note: I T : MENU 8 Press ]/[ to move the cursor to SET UP. 3 Press to enter. SELECT : ENTER : CH-SETT I NG RE TURN AI R/CABLE CH SEARCH CH MEMORY EX I Receivable channels of your TV set the receiving mode to AIR or CABLE channels to receive locally broadcast TV programs. POWER SLEEP DISPLAY BRIGHT MENU MUTE VOL CH TV/VIDEO FLASHBACK 1 2 3 4 5 6 7 8 9 MTS 0 100 MENU/ ]/[/ 1 Press MENU to display the MENU screen. 2 Press...

LC20B2UA Operation Manual
Page 29
I If any button is pressed to the main screen. For each mode, two channels are problems at the broadcast source. The [CAPTION] mode shows subscripts of dialogs and commentaries of TV dramas and news programs while allowing a clear view of the TV programs. POWER SLEEP DISPLAY BRIGHT MENU MUTE VOL CH TV/VIDEO FLASHBACK 1 2 3 4 5 6 7 8 9 MTS 0 100 MENU/ ]/[/ 1 Press MENU to display the MENU screen. 2 Press ]/[ to move the cursor to CLOSED CAPTION. 3 Press to...
I If any button is pressed to the main screen. For each mode, two channels are problems at the broadcast source. The [CAPTION] mode shows subscripts of dialogs and commentaries of TV dramas and news programs while allowing a clear view of the TV programs. POWER SLEEP DISPLAY BRIGHT MENU MUTE VOL CH TV/VIDEO FLASHBACK 1 2 3 4 5 6 7 8 9 MTS 0 100 MENU/ ]/[/ 1 Press MENU to display the MENU screen. 2 Press ]/[ to move the cursor to CLOSED CAPTION. 3 Press to...

LC20B2UA Operation Manual
Page 38
.../VIDEO MAIN POWER CH VOL VIDEO AV-IN2/OUT L AUDIO R COMPONENT Y PB PR L AUDIO R Connect a VCR, Audio amplifier, etc. I AV2 has 2 OUT modes (see page 24). Cable clamps MENU TV/VIDEO MAIN POWER CH VOL 37 Notes: I When using the S-Video input for AV-IN1, no video output will be made to the AV output terminal, but audio output will be made for connection to external audio systems. Note: How to fix the cables • Fix cables and cords...
.../VIDEO MAIN POWER CH VOL VIDEO AV-IN2/OUT L AUDIO R COMPONENT Y PB PR L AUDIO R Connect a VCR, Audio amplifier, etc. I AV2 has 2 OUT modes (see page 24). Cable clamps MENU TV/VIDEO MAIN POWER CH VOL 37 Notes: I When using the S-Video input for AV-IN1, no video output will be made to the AV output terminal, but audio output will be made for connection to external audio systems. Note: How to fix the cables • Fix cables and cords...

LC20B2UA Operation Manual
Page 39
... input mode is set to TV. 15 • Make sure the main power switch of the main unit is 15 on. • Make sure the BLACK LEVEL is properly adjusted. • Fluorescent lamp may have reached the end of service life. • Make sure the S-Video terminal is free of the remote controller. 8 Remote control does not work. • Make sure the remote sensor window is no picture...
... input mode is set to TV. 15 • Make sure the main power switch of the main unit is 15 on. • Make sure the BLACK LEVEL is properly adjusted. • Fluorescent lamp may have reached the end of service life. • Make sure the S-Video terminal is free of the remote controller. 8 Remote control does not work. • Make sure the remote sensor window is no picture...

LC20B2UA Operation Manual
Page 43
... of the nearest Sharp Authorized Service, or to have Proof of the nearest Sharp Authorized Servicer, call 1-800-BE-SHARP. Some states do to Obtain Service: LC-20B2UA LCD Color Television (Be sure to obtain product literature, accessories, supplies, or customer assistance, please call Sharp toll free at no event shall Sharp be liable, or in any way responsible, for the period(s) set forth herein are...
... of the nearest Sharp Authorized Service, or to have Proof of the nearest Sharp Authorized Servicer, call 1-800-BE-SHARP. Some states do to Obtain Service: LC-20B2UA LCD Color Television (Be sure to obtain product literature, accessories, supplies, or customer assistance, please call Sharp toll free at no event shall Sharp be liable, or in any way responsible, for the period(s) set forth herein are...

LC20B2UA Operation Manual
Page 44
... this LIMITED WARRANTY statement to transmission line/power line voltage or liquid spillage. (g) Any product received without appropriate model, serial number and CSA/cUL markings. (h) Any products used for any removal, reinstallation, transportation and insurance costs incurred. This warranty constitutes the entire express warranty granted by Sharp and no other than Sharp, Sharp's Authorized Service Centres or Sharp's Authorized Servicing Dealers. (c) Damage caused or repairs required as...
... this LIMITED WARRANTY statement to transmission line/power line voltage or liquid spillage. (g) Any product received without appropriate model, serial number and CSA/cUL markings. (h) Any products used for any removal, reinstallation, transportation and insurance costs incurred. This warranty constitutes the entire express warranty granted by Sharp and no other than Sharp, Sharp's Authorized Service Centres or Sharp's Authorized Servicing Dealers. (c) Damage caused or repairs required as...


