

LC20B2UA Operation Manual
Page 6
... GROUNDING AS PER NATIONAL ELECTRICAL CODE GROUND CLAMP ELECTRIC SERVICE EQUIPMENT NEC-NATIONAL ELECTRICAL CODE ANTENNA LEAD IN WIRE ANTENNA DISCHARGE UNIT (NEC SECTION 810-20) GROUNDING CONDUCTORS (NEC SECTION 810-21) GROUND CLAMPS POWER SERVICE GROUNDING ELECTRODE SYSTEM (NEC ART 250, PART H) I An outside antenna system, extreme care should not...
... GROUNDING AS PER NATIONAL ELECTRICAL CODE GROUND CLAMP ELECTRIC SERVICE EQUIPMENT NEC-NATIONAL ELECTRICAL CODE ANTENNA LEAD IN WIRE ANTENNA DISCHARGE UNIT (NEC SECTION 810-20) GROUNDING CONDUCTORS (NEC SECTION 810-21) GROUND CLAMPS POWER SERVICE GROUNDING ELECTRODE SYSTEM (NEC ART 250, PART H) I An outside antenna system, extreme care should not...

LC20B2UA Operation Manual
Page 7
CONTENTS Page DEAR SHARP CUSTOMER ...3 IMPORTANT SAFETY PRECAUTIONS 3-5 SUPPLIED ACCESSORIES ...7 PREPARATION ...8-10 Using the Remote Control ...8 Batteries for the Remote Control 8 Power Connection ...9 Antenna Connection ...9, 10 FRONT AND REAR ... ON/OFF Standby ...16 Changing the Channels ...17 SELECTING MENU ITEMS ...18 ADJUSTMENT ...19-34 Adjusting the SLEEP TIMER Settings 19 Adjusting the BRIGHTNESS Settings 20 Adjusting the LANGUAGE Settings 21 Adjusting the VIDEO ADJUST Settings 22, 23 Adjusting the PRESET Settings 24 SET UP ...25, 26 Adjusting the BLUE SCREEN...
CONTENTS Page DEAR SHARP CUSTOMER ...3 IMPORTANT SAFETY PRECAUTIONS 3-5 SUPPLIED ACCESSORIES ...7 PREPARATION ...8-10 Using the Remote Control ...8 Batteries for the Remote Control 8 Power Connection ...9 Antenna Connection ...9, 10 FRONT AND REAR ... ON/OFF Standby ...16 Changing the Channels ...17 SELECTING MENU ITEMS ...18 ADJUSTMENT ...19-34 Adjusting the SLEEP TIMER Settings 19 Adjusting the BRIGHTNESS Settings 20 Adjusting the LANGUAGE Settings 21 Adjusting the VIDEO ADJUST Settings 22, 23 Adjusting the PRESET Settings 24 SET UP ...25, 26 Adjusting the BLUE SCREEN...

LC20B2UA Operation Manual
Page 19
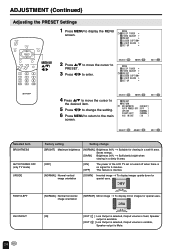
...SELECT : ADJUST : (Pages 22, 23) V I DEO ADJUST ( TV ) RE TURN P I CTURE [ 30] T I NT [ 0] COLOR [ 0] BLACK LEVEL [ 0 ] SHARPNESS [ 0 ] COLOR SYSTEM [ N358 ] RESET EX I T : MENU SELECT : ENTER : EX I T : MENU (Pages 20, 24) PRESET RE TURN BR I GHTNESS [ BR I GHT ] AUTO POWER OFF [ OFF ] UPS I DE [ NORMAL ] R I GHT / LEF T [ NORMAL ] AV2 I... menu screen. I This product is set to comply with the special buttons: SLEEP and BRIGHT (see page 19 and page 20). (Page 19) SLEEP T IMER RE TURN SLEEP T IMER [ --- I Items in the United States (NTSC-N358). I ...
...SELECT : ADJUST : (Pages 22, 23) V I DEO ADJUST ( TV ) RE TURN P I CTURE [ 30] T I NT [ 0] COLOR [ 0] BLACK LEVEL [ 0 ] SHARPNESS [ 0 ] COLOR SYSTEM [ N358 ] RESET EX I T : MENU SELECT : ENTER : EX I T : MENU (Pages 20, 24) PRESET RE TURN BR I GHTNESS [ BR I GHT ] AUTO POWER OFF [ OFF ] UPS I DE [ NORMAL ] R I GHT / LEF T [ NORMAL ] AV2 I... menu screen. I This product is set to comply with the special buttons: SLEEP and BRIGHT (see page 19 and page 20). (Page 19) SLEEP T IMER RE TURN SLEEP T IMER [ --- I Items in the United States (NTSC-N358). I ...

LC20B2UA Operation Manual
Page 21
...NORMAL DARK Notes: BR I GHTNESS [ BR I GHT ] I [BRIGHT]: maximum brightness [NORMAL]: 60% brightness (suitable for viewing in a well-lit area and saves energy) [DARK]: 20% brightness (sufficiently bright when viewing in 3 seconds. SELECT : ENTER : EX I T : MENU PRESET RE TURN BR I GHTNESS [ BR I GHT ] AUTO POWER OFF [ OFF .... 5 Press to set the brightness of the screen. MENU SLEEP T IMER V I DEO ADJUST PRESET CLOSED CAPT I ON V-CH I T : MENU 20 ADJUSTMENT (Continued) Adjusting the BRIGHTNESS Settings You can set the brightness. 6 Press MENU to return to change the setting.
...NORMAL DARK Notes: BR I GHTNESS [ BR I GHT ] I [BRIGHT]: maximum brightness [NORMAL]: 60% brightness (suitable for viewing in a well-lit area and saves energy) [DARK]: 20% brightness (sufficiently bright when viewing in 3 seconds. SELECT : ENTER : EX I T : MENU PRESET RE TURN BR I GHTNESS [ BR I GHT ] AUTO POWER OFF [ OFF .... 5 Press to set the brightness of the screen. MENU SLEEP T IMER V I DEO ADJUST PRESET CLOSED CAPT I ON V-CH I T : MENU 20 ADJUSTMENT (Continued) Adjusting the BRIGHTNESS Settings You can set the brightness. 6 Press MENU to return to change the setting.
LC20B2UA Operation Manual
Page 25
..., Speaker output is inactive. [NORMAL] Normal vertical image orientation [DOWN] Inverted image → To display images upside down for special uses. Saves energy. [DARK] Brightness 20% → Sufficiently bright when viewing in a well-lit area. RIGHT/LEFT [NORMAL] Normal horizontal image orientation [MIRROR] Mirror image → To display mirror images for...
..., Speaker output is inactive. [NORMAL] Normal vertical image orientation [DOWN] Inverted image → To display images upside down for special uses. Saves energy. [DARK] Brightness 20% → Sufficiently bright when viewing in a well-lit area. RIGHT/LEFT [NORMAL] Normal horizontal image orientation [MIRROR] Mirror image → To display mirror images for...

LC20B2UA Operation Manual
Page 40
...interference. This is used in a low temperature rooms (location), the picture may cause the cabinet to deform and the LCD panel to malfunction. (Storage temperature: -20°C to +60°C) 39 The picture is doubled or tripled. • Make sure the antenna is spotted. • There may be interference from ... • The reception may be bad. • Make sure the antenna is facing the right direction. • Make sure the outside antenna is not sharp. Try positioning them further apart. TROUBLESHOOTING (Continued) Antenna Problem The picture is not disconnected.
...interference. This is used in a low temperature rooms (location), the picture may cause the cabinet to deform and the LCD panel to malfunction. (Storage temperature: -20°C to +60°C) 39 The picture is doubled or tripled. • Make sure the antenna is spotted. • There may be interference from ... • The reception may be bad. • Make sure the antenna is facing the right direction. • Make sure the outside antenna is not sharp. Try positioning them further apart. TROUBLESHOOTING (Continued) Antenna Problem The picture is not disconnected.


