
Service Manual
Page 2
... PARTS AND WIRES IN THE ORIGINAL POSITION AFTER ASSEMBLING OR WIRING There are indicated with the printed board. Remove the antenna terminal on TV and turn on the cabinet, chassis and parts. Insulation resistance between the antenna terminal or external metal and the AC cord plug blades. and DESCRIPTION You can... . 5. Before applying new silicon grease, remove all the old silicon grease. (Old grease may cause damage to the panel while servicing. BE CAREFUL WITH THE LCD PANEL Avoid a shock to the IC and Transistor).
... PARTS AND WIRES IN THE ORIGINAL POSITION AFTER ASSEMBLING OR WIRING There are indicated with the printed board. Remove the antenna terminal on TV and turn on the cabinet, chassis and parts. Insulation resistance between the antenna terminal or external metal and the AC cord plug blades. and DESCRIPTION You can... . 5. Before applying new silicon grease, remove all the old silicon grease. (Old grease may cause damage to the panel while servicing. BE CAREFUL WITH THE LCD PANEL Avoid a shock to the IC and Transistor).

Service Manual
Page 14
... is used . After the Up-Date, the screen will start automatically. SERVICING FIXTURES AND TOOLS JG176 2007 USA DTV LCD ROM DISC Ref. APJG176121 Parts Name 2007 USA DTV LCD ROM DISC Remarks Up-Date of the set for the new DIGITAL SOFT FIRMWARE. Copy the "update.dat" in CD...to USB connector. (Refer to the topside of shipping. 9. Insert the AC CORD of the Firmware RE-WRITE FOR DIGITAL SOFT FIRMWARE 1. Turn off the power. 7. Turn on the set and turn on the screen. 5. The unit will appear on the power. Unplug the AC CORD, and remove the USB Flash Memory. 8. C-2...
... is used . After the Up-Date, the screen will start automatically. SERVICING FIXTURES AND TOOLS JG176 2007 USA DTV LCD ROM DISC Ref. APJG176121 Parts Name 2007 USA DTV LCD ROM DISC Remarks Up-Date of the set for the new DIGITAL SOFT FIRMWARE. Copy the "update.dat" in CD...to USB connector. (Refer to the topside of shipping. 9. Insert the AC CORD of the Firmware RE-WRITE FOR DIGITAL SOFT FIRMWARE 1. Turn off the power. 7. Turn on the set and turn on the screen. 5. The unit will appear on the power. Unplug the AC CORD, and remove the USB Flash Memory. 8. C-2...
Service Manual
Page 15
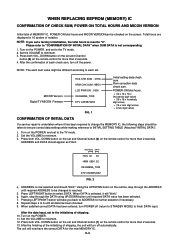
... steps should appear as FIG 2. Please refer to the TV mode. 2. MICON Version Digital TV MICON Fimware HCS CHK SUM : 07EA HRM CHK SUM : 9BD4 LCD PWR ON : 0000 OEC6088A_T039 DTV CA03B72232 FIG. 1 Initial setting data check sum. POWER ON total hours. = (16 x 16 x 16 x thousands digit value) + (...16 x 16 x hundreds digit value) + (16 x tens digit value) + (ones digit value) CONFIRMATION OF INITIAL DATA If a service repair is not corresponding. 1. Turn on the remote control for the new MEMORY IC. DOWN button on the set and Channel button (8) on the POWER, and set to the initializing...
... steps should appear as FIG 2. Please refer to the TV mode. 2. MICON Version Digital TV MICON Fimware HCS CHK SUM : 07EA HRM CHK SUM : 9BD4 LCD PWR ON : 0000 OEC6088A_T039 DTV CA03B72232 FIG. 1 Initial setting data check sum. POWER ON total hours. = (16 x 16 x 16 x thousands digit value) + (...16 x 16 x hundreds digit value) + (16 x tens digit value) + (ones digit value) CONFIRMATION OF INITIAL DATA If a service repair is not corresponding. 1. Turn on the remote control for the new MEMORY IC. DOWN button on the set and Channel button (8) on the POWER, and set to the initializing...


